


Xcitium Ticketing Setup - Admin Guide
Who this is for: An Administrator setting up ticketing on the Xcitium MSP Platform for the first time.
Portals: use the one for your region.
- US region: https://msp.platform.xcitium.com
- EU region: https://msp-eu.platform.xcitium.com
By the end you will have: staff and customers added, ticket routing and SLAs in place, the AI Agent connected and tested, and a first ticket created and tracked.
1. How the module fits together
The Tickets menu on the left of the portal is your ticketing module. It has two halves:
| Half | What it does | Where you find it |
| Service Desk (human workflow) | Tickets, staff, departments, customers, SLAs, help topics | Tickets → Dashboard / Create Ticket / My Tickets / Unassigned / All Tickets / SLA Dashboard; Admin → Settings → Ticketing Settings |
| AI layer (Service Desk IT AI Agent) | Answers users, runs automated actions, escalates to technicians | Tickets → AI Queue, AI Integrations, AI Playbooks, AI Assignee Management; Managed AI → Service Desk IT AI Agent |
The AI Agent does not replace the Service Desk. It sits on top of it. Tickets the AI can't resolve go into the normal queue for your technicians.
Key idea: connecting an integration and enabling a tool are separate steps. Connect Office 365 first, then switch on the Office 365 actions inside a Playbook.
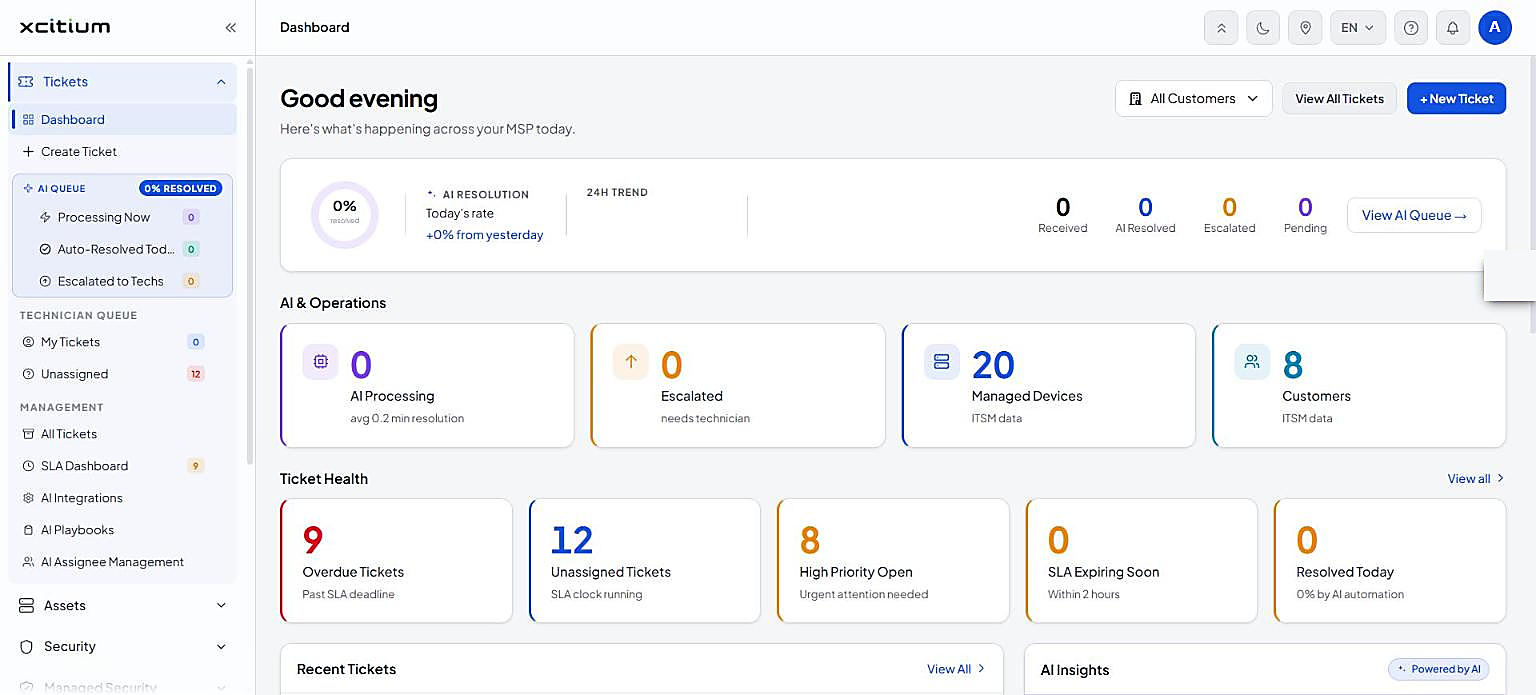
Figure 1. Tickets → Dashboard. The left menu lists every part of the ticketing module. The AI Queue box shows today's AI resolution rate.
Left-menu map (Tickets)
| Menu item | Purpose |
| Dashboard | Overview of ticket activity and AI resolution rate |
| Create Ticket | Log a ticket manually |
| AI Queue → Processing Now | Tickets the AI is working on right now |
| AI Queue → Auto-Resolved Today | Tickets the AI closed without a human |
| AI Queue → Escalated to Techs | Tickets the AI handed to a person |
| Technician Queue → My Tickets | Tickets assigned to you |
| Technician Queue → Unassigned | Tickets nobody owns yet (check daily) |
| All Tickets | Every ticket, searchable |
| SLA Dashboard | Breached, at-risk and compliance figures |
| AI Integrations | Connections the AI uses |
| AI Playbooks | Rules for what the AI does and when |
| AI Assignee Management | Who receives tickets the AI can't resolve |
2. Before you start
- You can sign in to your regional portal: https://msp.platform.xcitium.com (US) or https://msp-eu.platform.xcitium.com (EU)
- You are an Account Administrator or Administrator (only the account administrator can add staff with Admin privileges)
- You have a list of your technicians (name, email, role)
- You have a list of your customers and their end users
- You know your support categories (for example Billing, Technical Support, Password Reset, Hardware)
- You know your response and resolution targets (for example Critical = 4 hours, Standard = 24 hours)
- If the AI will automate Microsoft 365 or Google Workspace tasks: you have admin access to that tenant
3. Setup, step by step
Follow the steps in order. Steps marked optional can be skipped on day one.
Step 1: Sign in and open Tickets
- Go to the portal for your region and sign in: https://msp.platform.xcitium.com (US) or https://msp-eu.platform.xcitium.com (EU).
- The Dashboard opens. In the left menu, click Tickets to expand the ticketing module (see Figure 1).
- Recommended: enable two-factor authentication. Admin → Staff has a Reset 2FA button for staff who lose their device.
Step 2: Create roles (optional)
Roles control what each staff member can see and do. The defaults are Account Administrator, Administrator and Technician. A new technician can simply be given Technician.
To create a custom role:
- Open Admin → Settings → Ticketing Settings (this opens the Admin Panel, Figure 2).
- Go to Staff → Roles → Add New Role.
- Name the role, tick the Admin Panel and Staff Panel permissions, and choose which departments the role can access.
- Add admin notes if you like, then click Create Role.
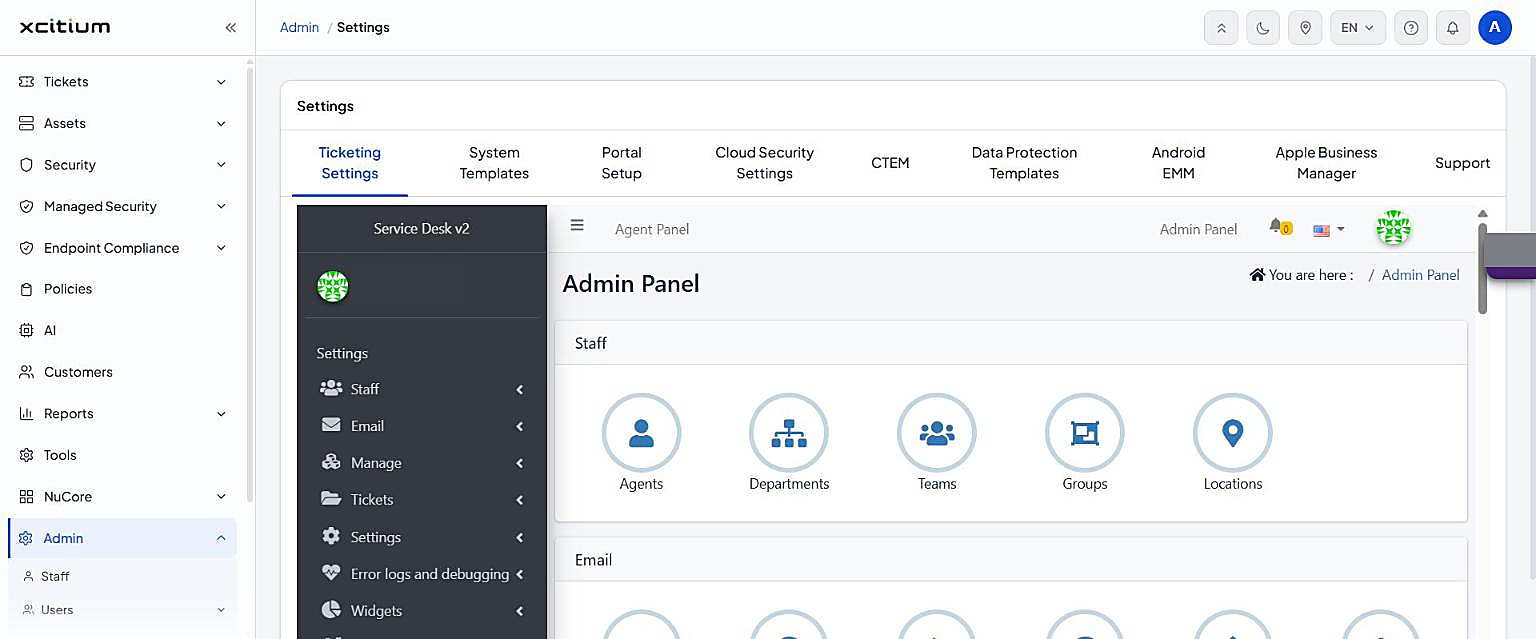
Figure 2. Admin → Settings → Ticketing Settings. The Admin Panel's Staff group has Agents, Departments, Teams, Groups and Locations.
Step 3: Create departments (optional)
Departments group technicians by skill. Defaults are Maintenance, Support (the default) and Sales. New staff and un-routed tickets go to the default department.
- Admin → Settings → Ticketing Settings → Staff → Departments → Add New Department.
- Enter a name, for example Computer Maintenance.
- Choose Public (users can submit tickets and see it in the client portal) or Private (staff only).
- Save. You can refine the other settings later.
Step 4: Add your support staff
- Go to Admin → Staff (Figure 3).
- Click + New Staff.
- Enter Name, Email and Role, then Save.
- The person gets a verification email. They click the link, verify, then create their password.
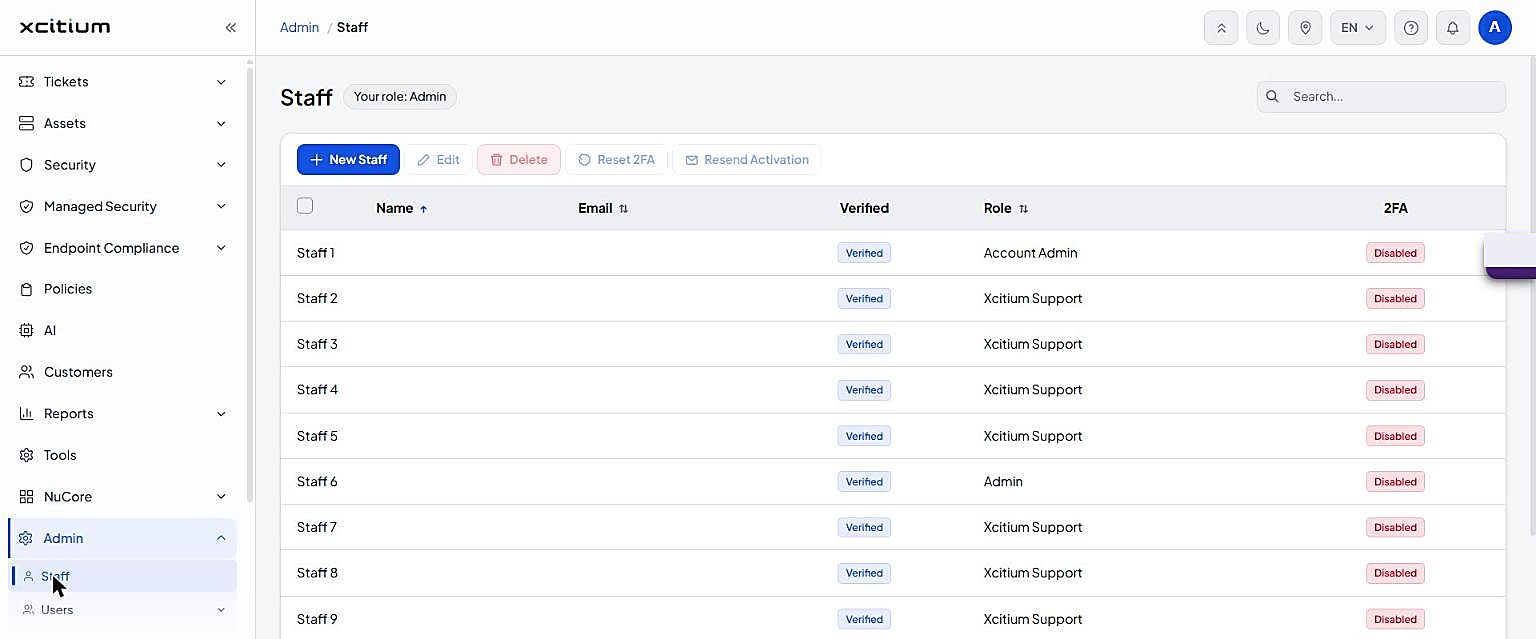
Figure 3. Admin → Staff. The toolbar has + New Staff, Edit, Delete, Reset 2FA and Resend Activation.
| Button | Use |
| Edit | Change name, role or details |
| Delete | Remove a staff member |
| Reset 2FA | Let someone re-enrol two-factor |
| Resend Activation | Send the verification email again |
Agents, Departments, Teams, Groups and Locations can also be organised under Admin → Settings → Ticketing Settings → Staff.
Step 5: Add ticket categories (help topics)
Categories are the topics a user picks when asking for help. They can route tickets to a department, trigger a custom form and select an auto-response.
- Admin → Settings → Ticketing Settings → Manage → Ticket Categories → Add New Category. The ticket form calls this field Help Topic.
- Enter a unique Category name, for example Billing Inquiries, Technical Support, Printer Issue.
- Set Status to Active. Tickets can only be created in active categories.
- Optionally set the department or staff member to route to, a custom form and a custom auto-response.
- Save.
Step 6: Add customers
A customer is a company you support.
- Click Customers in the left menu (Figure 4).
- Click + New Customer.
- Enter the company details (name, contact email, address, postal code) and save.
- Use Edit or Delete on the same screen to maintain them later.
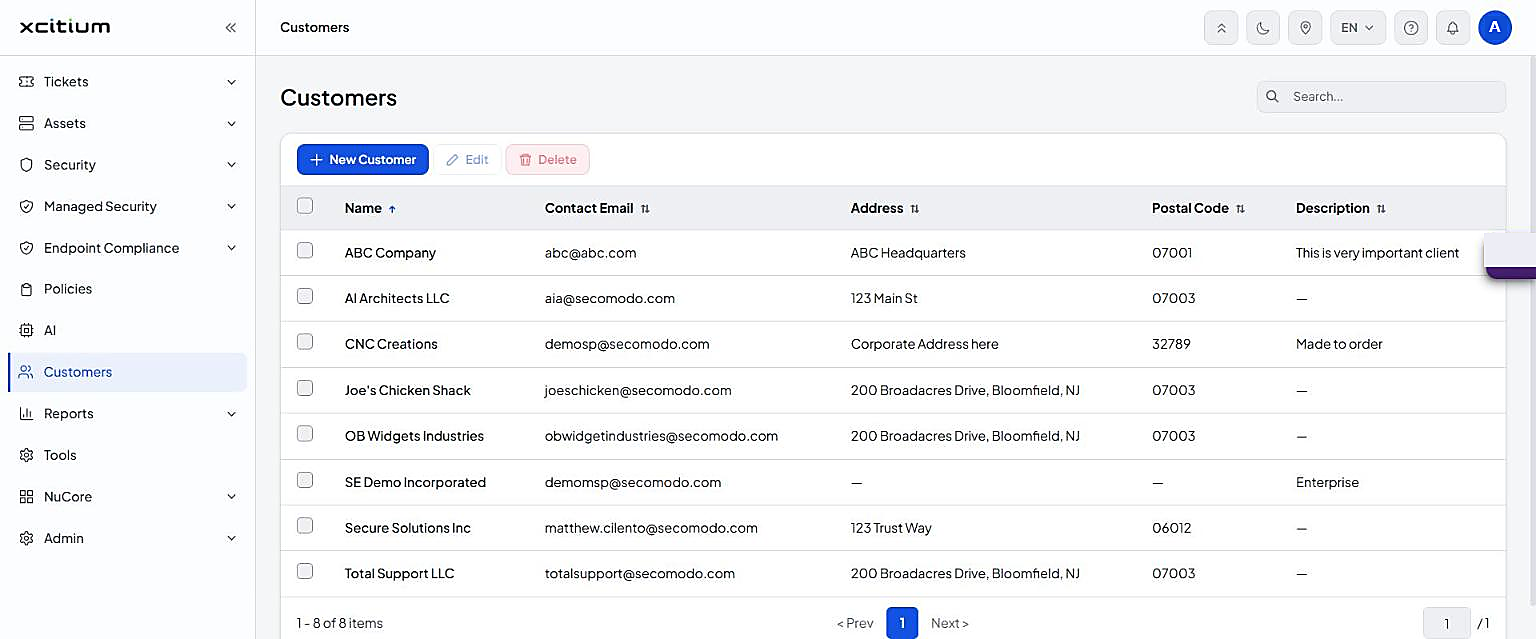
Figure 4. Customers. Name, contact email, address and postal code are listed for each company. Details are hidden in this example.
Step 7: Enrol end users and link them to customers
End users raise tickets through the portal, by email, or from a managed device.
- Add users one at a time, or import many from a .csv file (Staff Panel → Users → User Directory → Add New User or Import).
- Users can also self-enrol and will receive an activation email.
- Assign each user to their customer company so tickets are tied to the right client.
Users must be registered before they can sign in to create and track tickets.
Step 8: Set up SLA plans and service contracts
- Define your SLA plans. The SLA Dashboard shows policies such as Priority (6h) and Standard (24h).
- Attach the right plan to each customer or contract.
- On a ticket, pick the plan in the SLA Plan field.
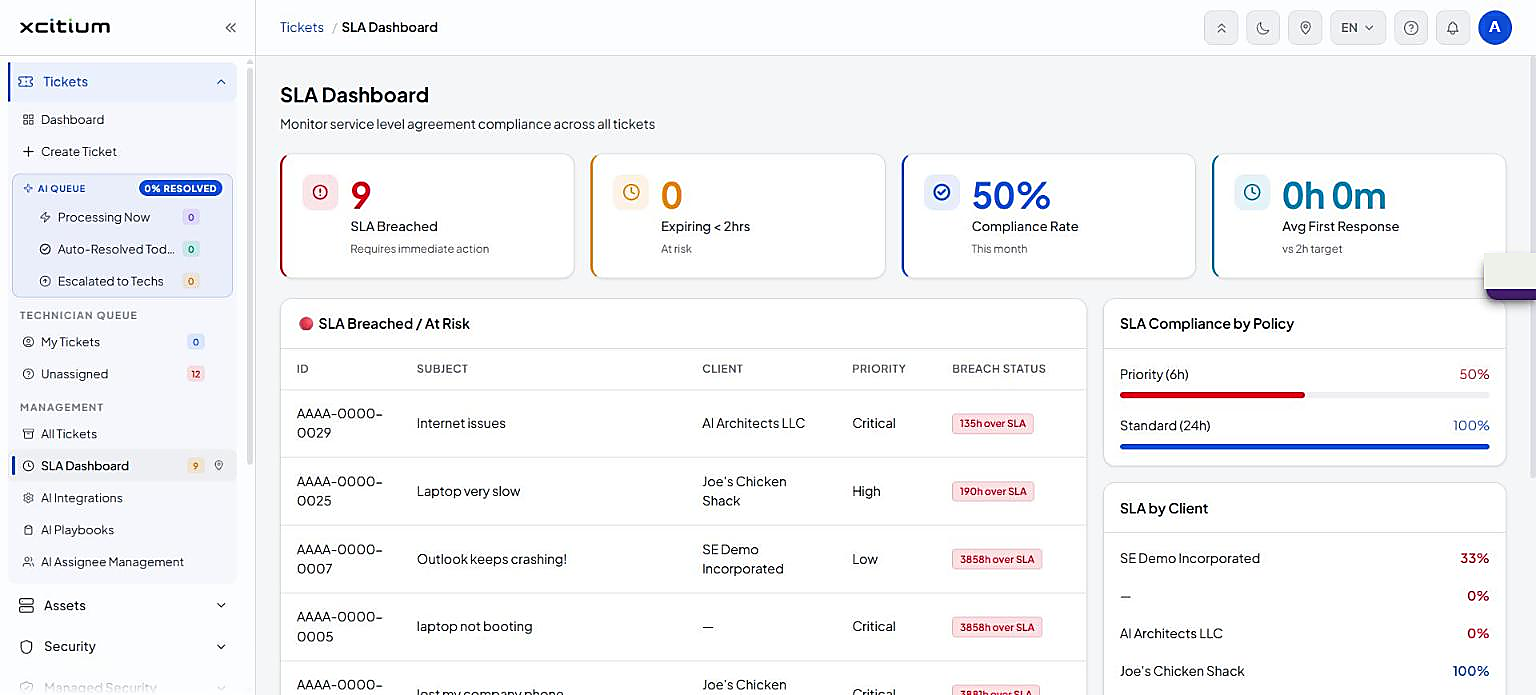
Figure 5. Tickets → SLA Dashboard. Tiles show breached tickets, tickets expiring soon, compliance rate and average first response.
| Tile | Meaning |
| SLA Breached | Tickets past their target. Fix these first |
| Expiring < 2 hrs | Tickets about to breach |
| Compliance Rate | Share of tickets within SLA this month |
| Avg First Response | Average time to first reply, against target |
Step 9: Create your first ticket
- Click Tickets → Create Ticket (Figure 6).
- User Details: select the user, or enter Email (required), first and last name, phone and mobile. Select the Customer.
- Fill in the Ticket Option fields in the table below.
- The AI Suggestions panel on the right proposes help based on the subject and details you type.
- Click Create Ticket.
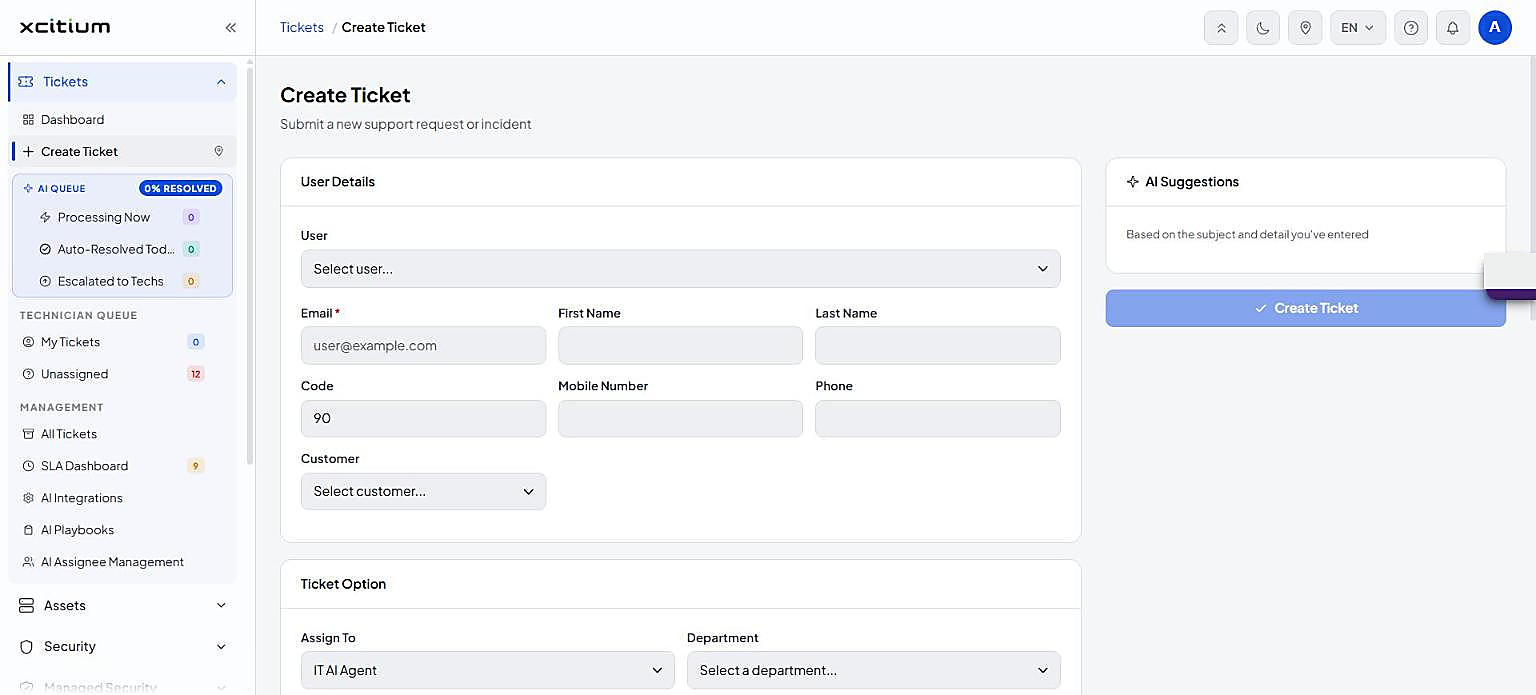
Figure 6. Tickets → Create Ticket. User Details on the left, AI Suggestions and the Create Ticket button on the right. Ticket Option sits below User Details.
| Field | What to choose |
| Assign To | A technician, or IT AI Agent (the default) to let the AI try first |
| Department | Where the ticket belongs |
| SLA Plan | Priority or Standard |
| Due Date | Optional deadline |
| Help Topic | Your category from Step 5 |
| Ticket Type | Incident, request and so on |
| Ticket Component | The affected component |
| Tags | For example Urgent Issues |
Step 10: Work the queues
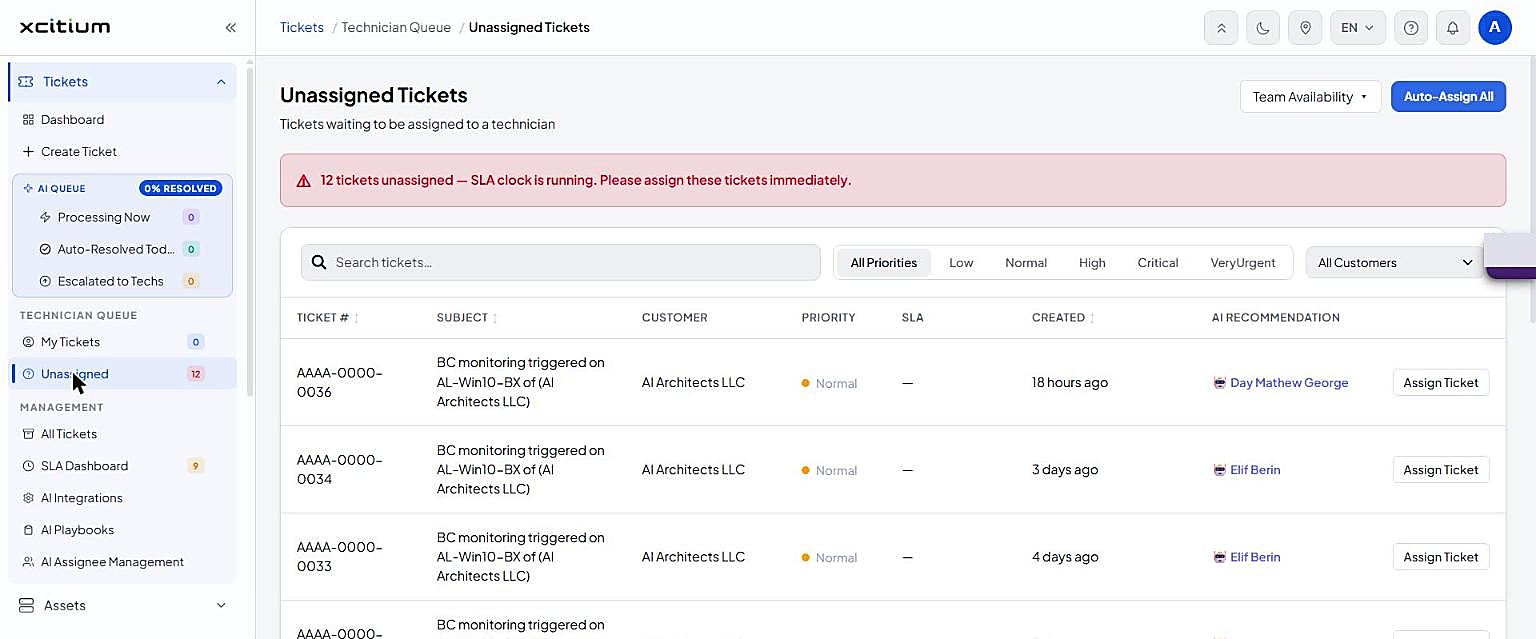
Figure 7. Technician Queue → Unassigned. A red banner counts unassigned tickets. Filter by priority or customer, then assign each one.
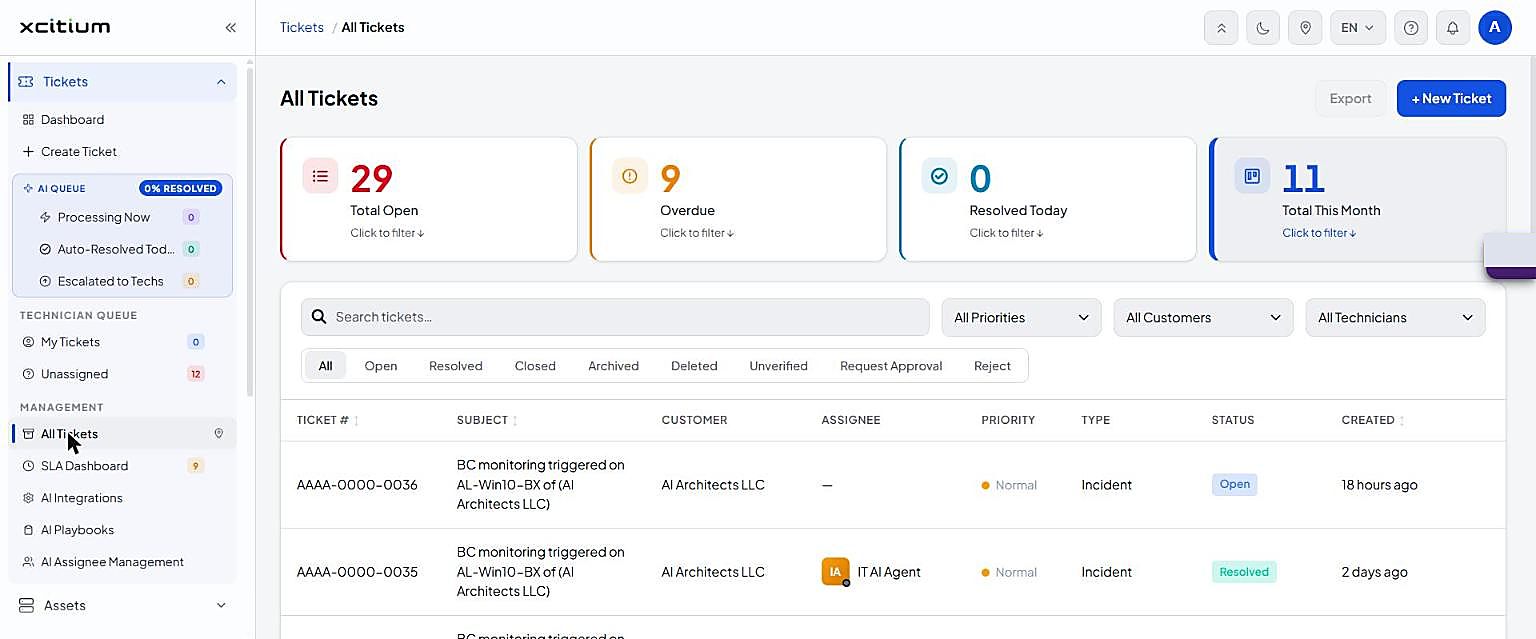
Figure 8. Management → All Tickets. Tiles show open, overdue, resolved today and this month's total. Filter by status, priority, customer or technician.
| Queue | Daily habit |
| Unassigned | Assign every ticket to an owner |
| My Tickets | Work your own tickets, most urgent first |
| Escalated to Techs | Pick up what the AI couldn't solve |
| SLA Dashboard | Check for breached and expiring tickets |
| Auto-Resolved Today | Spot-check that AI closures were correct |
Step 11: Turn on the AI layer
Do these in order.
- Open the agent. Sign in to the portal → Managed AI → under My AI Agents, find Service Desk IT AI Agent → Manage Your AI Agent.
- Confirm the ticketing integration. Under Integrations → Ticket Management, check that Service Desk V2 is connected. Only one ticket-management integration can be active at a time. To switch to Odoo Helpdesk, disconnect Service Desk V2 first.
- Connect automations (if wanted). Integrations → Automations → Connect for Office 365 or Google Workspace, then complete the provider sign-in and permission screen. On this platform, Admin → Integrations has tabs for Office 365 (Client ID, Tenant ID, Secret Key), AWS, SentinelOne, Windows Defender, Microsoft Entra, Google Workspace, CrowdStrike and Azure Active Directory (Figure 9).
- Review playbooks. Open Tickets → AI Playbooks (Figure 10). Ready-made examples include Employee Offboarding, Microsoft Teams Troubleshooting, Employee Hardware Request, Device Performance Troubleshooting, Shared Drive / Network Folder, New Computer Setup, Email Troubleshooting, Printer Troubleshooting, Software Installation Request and Google Workspace User Audit.
- To make your own, click Add New Playbook and give it a Name, Definition and Trigger.
- Turn on Require Approver only for actions that need human sign-off, such as deleting a user.
- A greyed-out tool means the matching integration isn't connected yet. The Tools panel then shows Connect Office 365.
- The built-in IT Escalation Fallback playbook runs when nothing else matches and the AI can't solve the issue.
- To make your own, click Add New Playbook and give it a Name, Definition and Trigger.
- Set fallback assignees. Open Tickets → AI Assignee Management → Add Assignee (Figure 11). Add each person and describe the kinds of IT tickets they should handle. When the AI can't resolve a case, the ticket goes to the best-matching person based on these descriptions.
- Add knowledge. In Repository / AI Training, add your IT policies, VPN guides, onboarding and offboarding procedures, password policy and FAQs. Use current documents with clear titles, and remove outdated or duplicate versions.
- Choose channels. Under Channels, enable where users can talk to the AI: Web (copy the embed snippet), Email, Microsoft Outlook, Microsoft Teams, Slack, RingCentral, Discord.
- Test before going live. Use Try Agent and the channel Open Preview button.
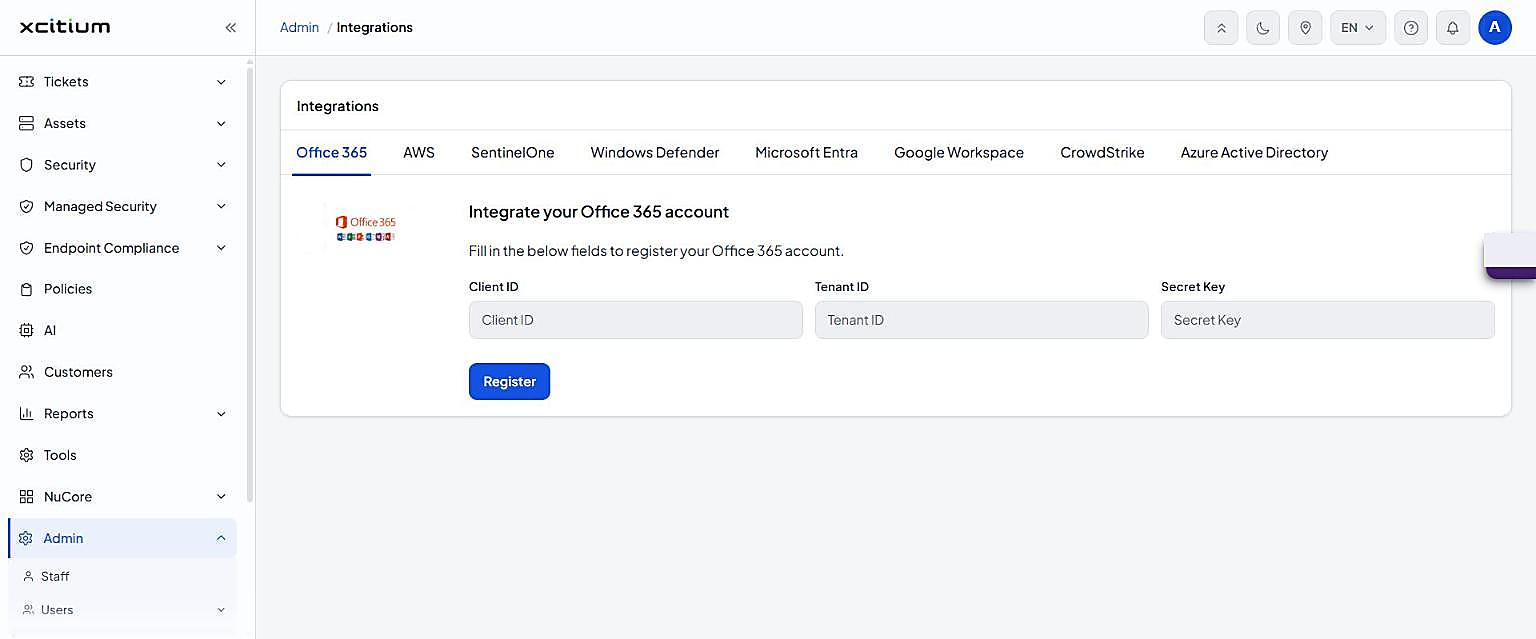
Figure 9. Admin → Integrations, Office 365 tab. Enter Client ID, Tenant ID and Secret Key, then click Register. Other tabs cover AWS, SentinelOne, Windows Defender, Microsoft Entra, Google Workspace and more.

Figure 10. Tickets → AI Playbooks. The list is on the left. Selecting a playbook opens its settings, and the Tools panel on the right. Tools are greyed out until Office 365 is connected.
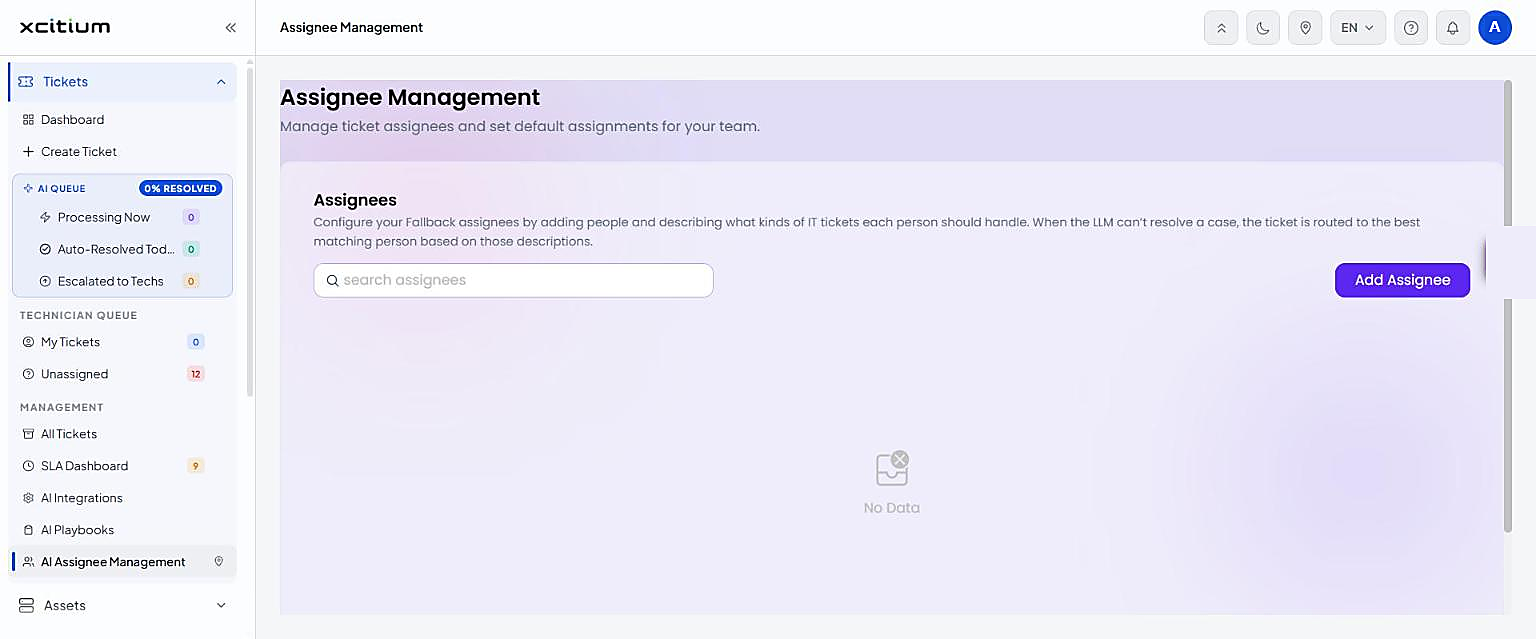
Figure 11. Tickets → AI Assignee Management. Click Add Assignee to name who handles which kinds of tickets when the AI can't resolve them.
Step 12: Test end to end
Run these six tests in Try Agent:
- A question answered only from your training documents.
- A Microsoft 365 request that uses a connected tool.
- A Google Workspace request that uses a connected tool.
- A request that should match a specific playbook.
- A request that needs approval.
- A request the AI can't solve, to prove the escalation and ticket path works.
Then confirm the escalated ticket appears in AI Agent → Ticket Management and in Tickets → All Tickets (its source shows as API). Finally review Dashboard and Chat History.
Step 13: Review performance
- Tickets → Dashboard: AI resolution rate, plus Processing Now, Auto-Resolved Today and Escalated to Techs.
- Tickets → SLA Dashboard: breaches, compliance by policy and by client.
- Reports (left menu): scheduled and ad-hoc reports.
- AI Agent → Ticket Management: counters for Total, Open, In Progress, Resolved, Auto-Resolved and Rejected.
4. Quick-start checklist
- Signed in, Tickets menu visible
- Custom roles created (optional)
- Departments created (optional)
- Technicians added and activated
- Ticket categories added and Active
- Customers added
- End users added or imported and linked to customers
- SLA plans defined and assigned
- First ticket created and assigned
- Service Desk V2 connected in the AI Agent
- Office 365 / Google Workspace connected (if needed)
- Playbooks reviewed, approvals set where needed
- Fallback assignees added
- Training documents added
- Channels enabled
- Six Try Agent tests passed
- Dashboards reviewed
5. Troubleshooting and FAQ
- Is "Service Desk IT AI Agent" the default ITSM AI agent?
Yes. - Why are Office 365 tools greyed out in a playbook?
Office 365 isn't connected yet. Connect it under Integrations → Automations, then return to the playbook. - Does connecting Office 365 turn on every action?
No. Connecting gives access, and you choose actions per playbook. Examples: Change Password, Delete User, List Users, Update User, Create User, List Groups. - Where do tickets from AI conversations go?
To the AI Agent's Ticket Management page and to Service Desk V2 / All Tickets, with the same ID and subject in both. - Does the AI replace the Service Desk?
No. It adds conversation and automation on top. - A new technician never got an email.
Admin → Staff, select them, click Resend Activation. - Can I use two ticketing integrations at once?
No. Only one of Service Desk V2 or Odoo Helpdesk can be active. - Where should I test changes?
Try Agent for behaviour, and each channel's preview, before users see it. - A technician lost their phone.
Admin → Staff → select → Reset 2FA.
6. Glossary
| Term | Meaning |
| Agent / Staff | A person on your team who handles tickets |
| Customer | A company you support |
| User | An individual who raises tickets |
| Department | A group of staff with a shared skill |
| Help topic / Category | The subject the user picks, which drives routing |
| SLA | Agreed response and resolution times |
| Playbook | A rule telling the AI when and how to act |
| Tool | An action a playbook can use, such as List Users |
| Integration | A connection to an outside system |
| Approver | A person who must authorise an AI action before it runs |
| Channel | Where users talk to the AI |
| Fallback assignee | Who gets a ticket the AI couldn't resolve |