


Playbooks
- Click 'AI' > 'AI Agent' > 'Manage Your AI Agent' > 'Playbooks' to open this interface.
A playbook tells the agent what to do when a particular kind of request arrives. The 'Playbooks' tab is split into three panels: the list of playbooks on the left, the editor in the middle and the tool library on the right.
You can search playbooks, add one, edit the text of an existing one, require an approver, and add automated actions from the connected integrations.
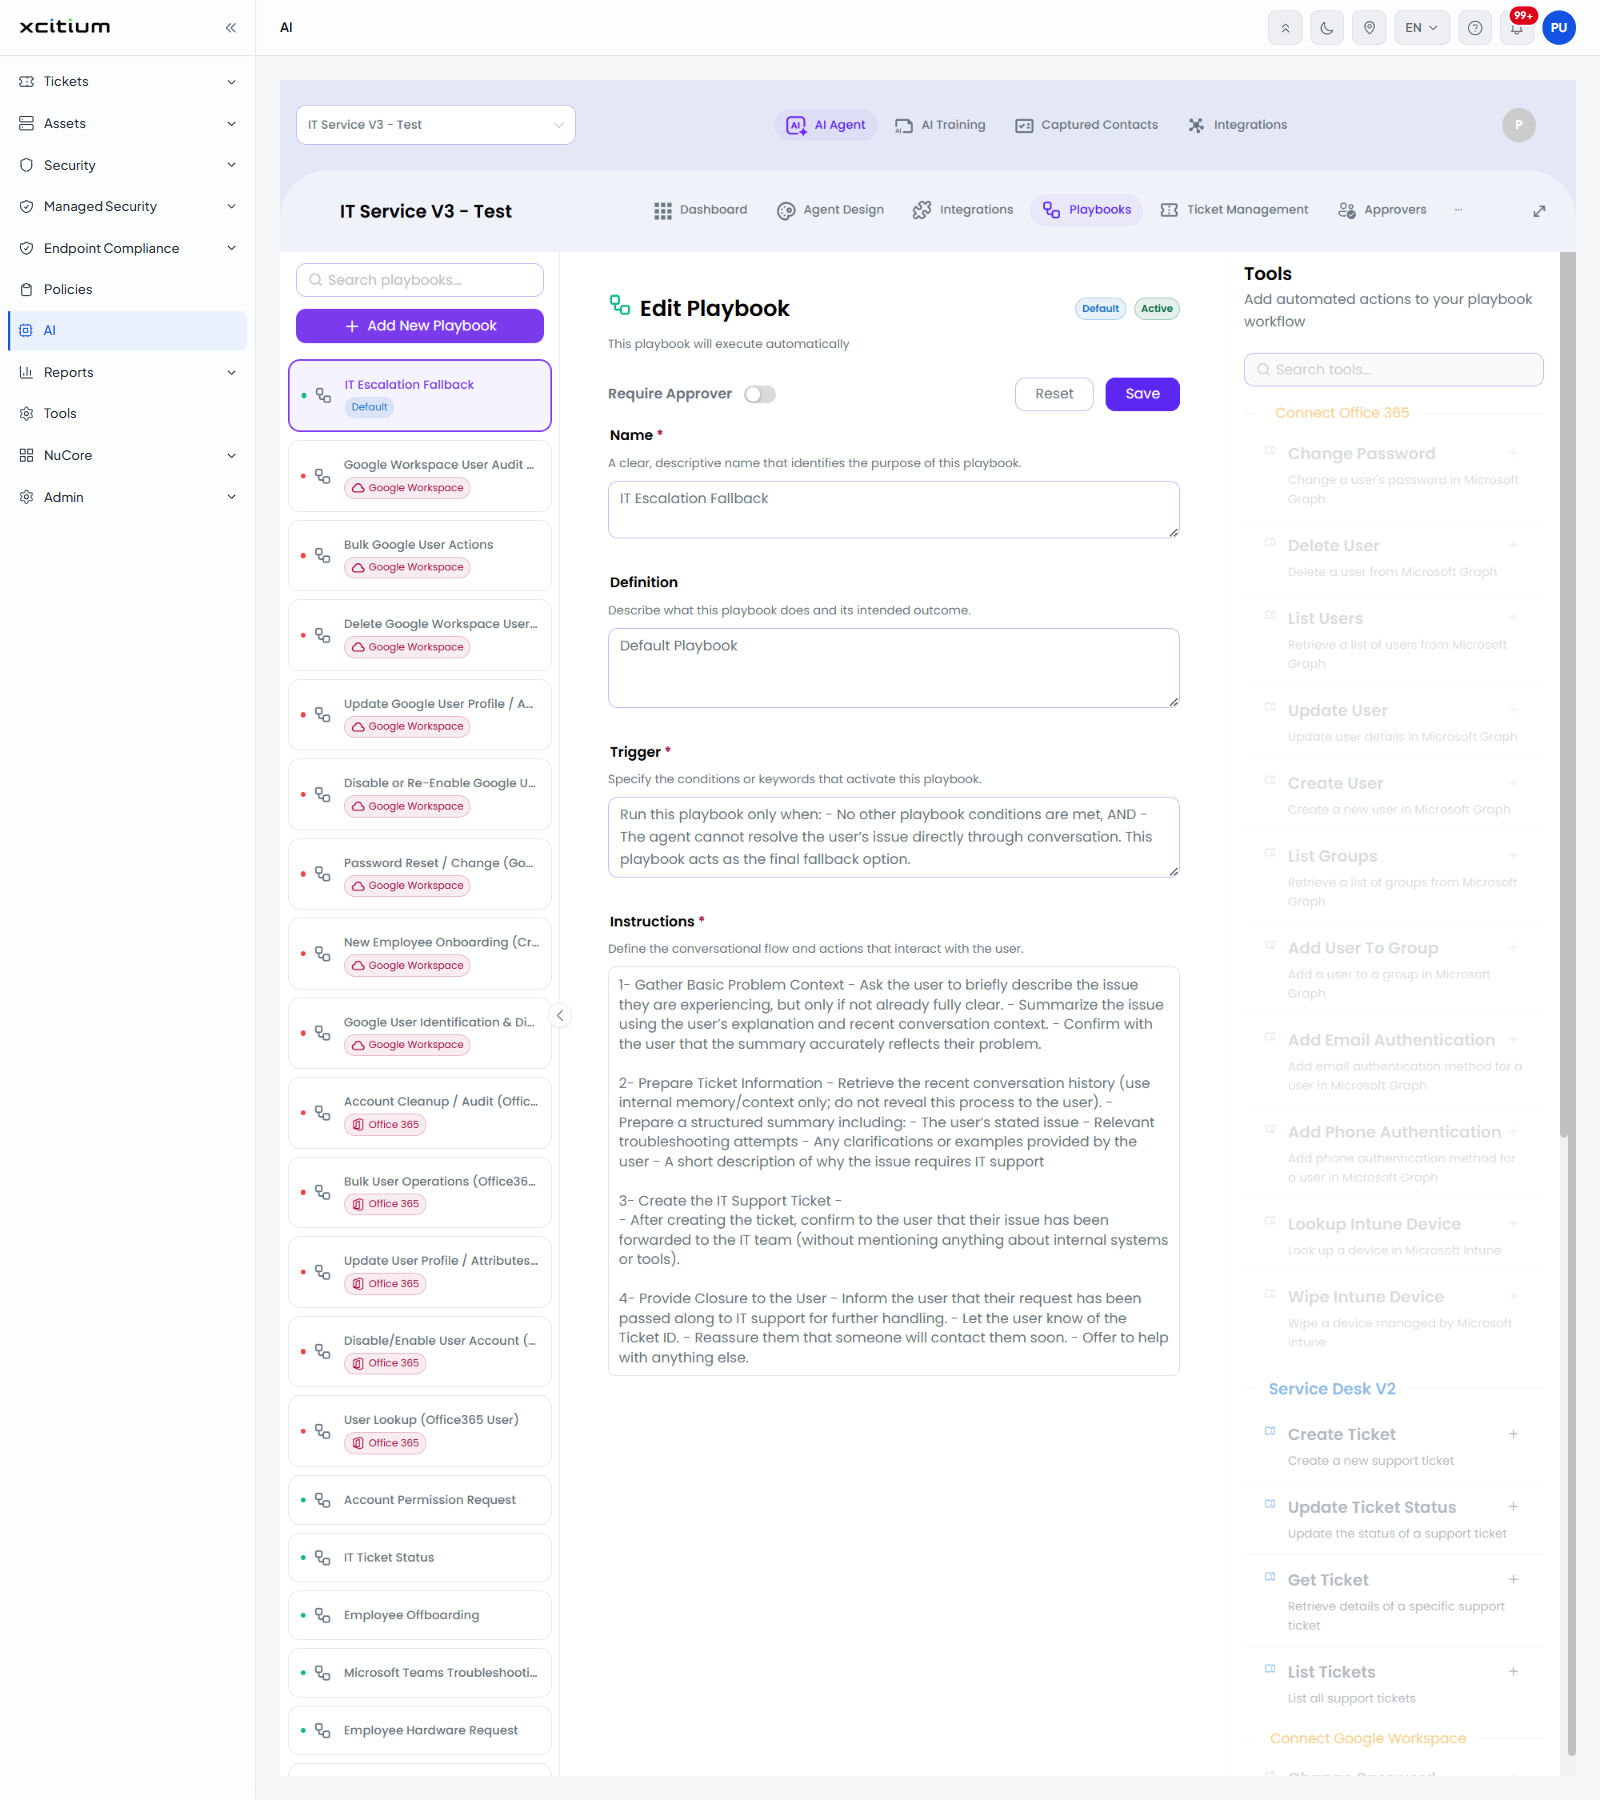
The playbook list
| Control | Description |
| Search playbooks... | Narrows the list by name. |
| Add New Playbook | Opens the 'Create New Playbook' form. |
| Playbook row | A coloured dot for the playbook state, the name, and a badge for the integration it uses, for example 'Google Workspace' or 'Office 365'. The agent's fallback playbook also carries a 'Default' badge. |
The editor
The middle panel is headed 'Edit Playbook' with badges showing 'Default' and 'Active', and the line 'This playbook will execute automatically'. Above the fields are a 'Require Approver' toggle and the buttons 'Reset' and 'Save'.
| Field | Control | Description |
| Require Approver | Toggle | Makes the playbook wait for an approver before it acts. |
| Name | Text box, required | 'A clear, descriptive name that identifies the purpose of this playbook.' |
| Definition | Multi-line text box | 'Describe what this playbook does and its intended outcome.' |
| Trigger | Multi-line text box, required | 'Specify the conditions or keywords that activate this playbook.' |
| Instructions | Multi-line text box, required | 'Define the conversational flow and actions that interact with the user.' |
The tool library
The right panel is headed 'Tools' with the line 'Add automated actions to your playbook workflow' and a 'Search tools...' box. Tools are grouped by the integration that provides them, and each is added with the '+' button beside it. Tools from an integration that is not connected are greyed out.
| Group | Tool | Description |
| Connect Office 365 | Change Password | Change a user's password in Microsoft Graph |
| Connect Office 365 | Delete User | Delete a user from Microsoft Graph |
| Connect Office 365 | List Users | Retrieve a list of users from Microsoft Graph |
| Connect Office 365 | Update User | Update user details in Microsoft Graph |
| Connect Office 365 | Create User | Create a new user in Microsoft Graph |
| Connect Office 365 | List Groups | Retrieve a list of groups from Microsoft Graph |
| Connect Office 365 | Add User To Group | Add a user to a group in Microsoft Graph |
| Connect Office 365 | Add Email Authentication | Add email authentication method for a user in Microsoft Graph |
| Connect Office 365 | Add Phone Authentication | Add phone authentication method for a user in Microsoft Graph |
| Connect Office 365 | Lookup Intune Device | Look up a device in Microsoft Intune |
| Connect Office 365 | Wipe Intune Device | Wipe a device managed by Microsoft Intune |
| Service Desk V2 | Create Ticket | Create a new support ticket |
| Service Desk V2 | Update Ticket Status | Update the status of a support ticket |
| Service Desk V2 | Get Ticket | Retrieve details of a specific support ticket |
| Service Desk V2 | List Tickets | List all support tickets |
| Connect Google Workspace | Change Password | Update the password of an existing Google Workspace user |
| Connect Google Workspace | Delete User | Remove a user from Google Workspace |
| Connect Google Workspace | List Users | Retrieve and list users from Google Workspace |
| Connect Google Workspace | Update User | Modify details of an existing Google Workspace user |
| Connect Google Workspace | Create User | Create a new user in Google Workspace |
| Customer DB | Create Contact | Create new contact in database |
| Customer DB | Update Contact | Update existing contact information |
| Customer DB | Delete Contact | Delete contact from database |
| Customer DB | Search Contact | Search for contacts in database |
| Connect Odoo HelpDesk | Create Ticket | Create a new support ticket |
| Connect Odoo HelpDesk | Update Ticket Status | Update the status of a support ticket |
| Connect Odoo HelpDesk | Get Ticket | Retrieve details of a specific support ticket |
| Connect Odoo HelpDesk | List Tickets | List all support tickets |
Create a playbook
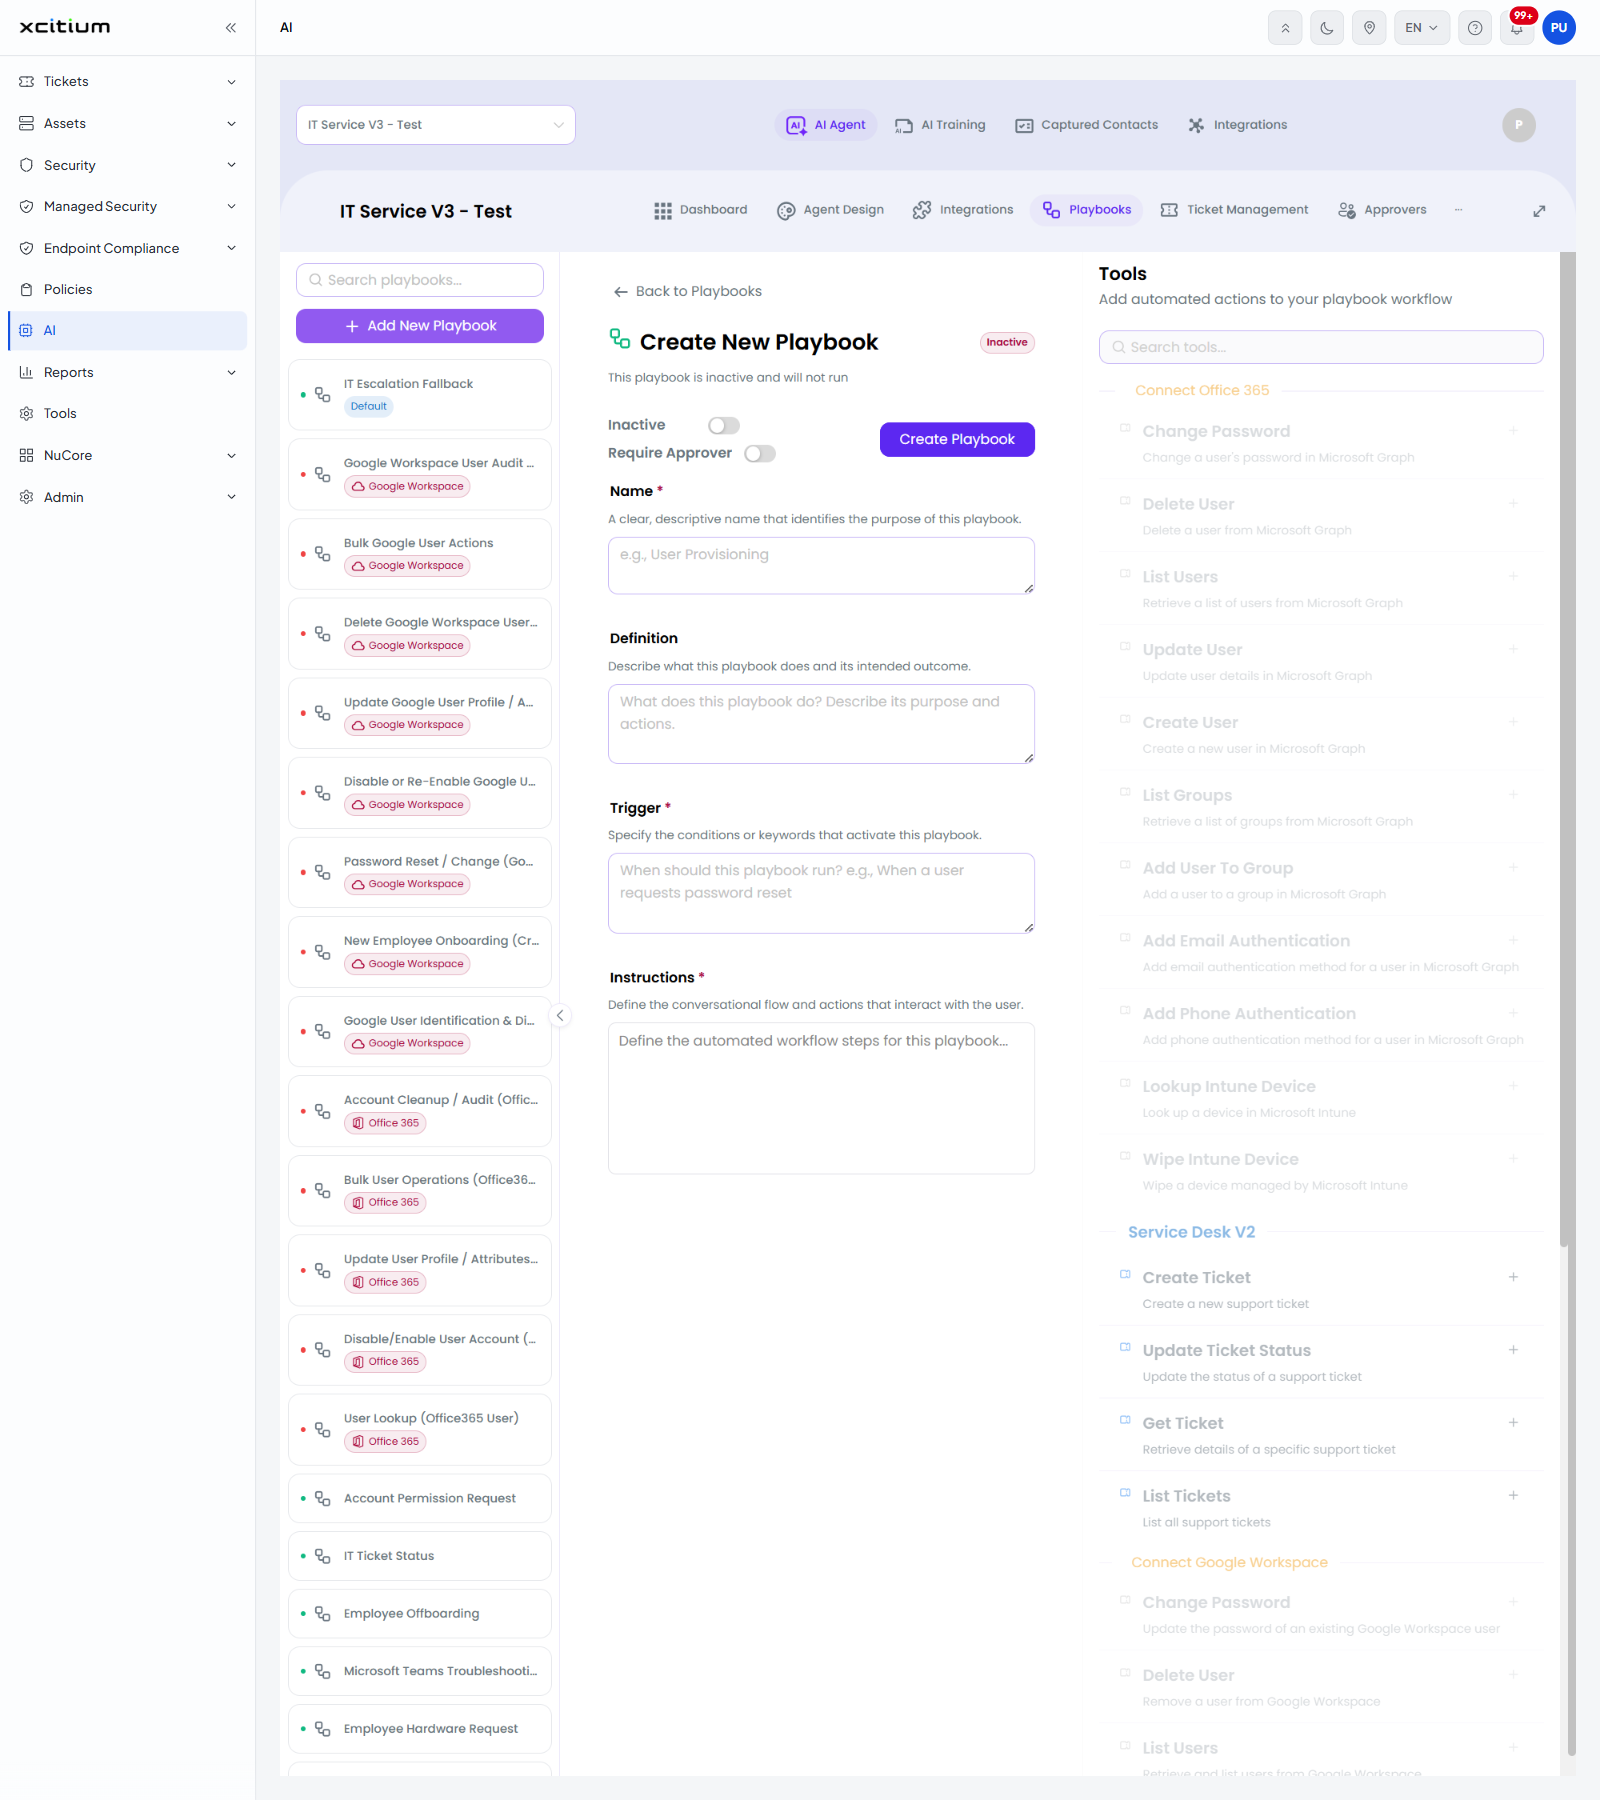
Clicking 'Add New Playbook' opens 'Create New Playbook'. A 'Back to Playbooks' link returns to the editor, and a badge shows 'Inactive' with the line 'This playbook is inactive and will not run'.
| Field | Control | Description |
| Inactive | Toggle | Off by default. Turn it on to let the playbook run once it is created. |
| Require Approver | Toggle | Off by default. |
| Name | Text box, required | Placeholder 'e.g., User Provisioning'. |
| Definition | Multi-line text box | Placeholder 'What does this playbook do? Describe its purpose and actions.' |
| Trigger | Multi-line text box, required | Placeholder 'When should this playbook run? e.g., When a user requests password reset'. |
| Instructions | Multi-line text box, required | Placeholder 'Define the automated workflow steps for this playbook...'. |
- Click 'AI' > 'AI Agent' > 'Manage Your AI Agent' > 'Playbooks'.
- Click 'Add New Playbook'.
- Type a 'Name', a 'Definition', a 'Trigger' and the 'Instructions'.
- Add the actions the playbook needs from the 'Tools' panel with the '+' button next to each one.
- Turn on 'Require Approver' if the actions must be approved first.
- Click 'Create Playbook'.
Note: 'Reset' in the editor discards the changes you have made to an existing playbook and puts the saved text back.