


Manage Incidents
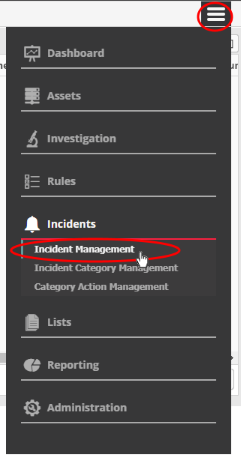
- Click the 'Menu' button > 'Incidents' > 'Incident Management'.
- This area lists recent incidents along with details such as customer network, the object affected, the user to whom it is assigned and more.
- The actions menu lets you close/re-open incidents, assign them to different users and change incident status.
The 'Incident Management' screen:
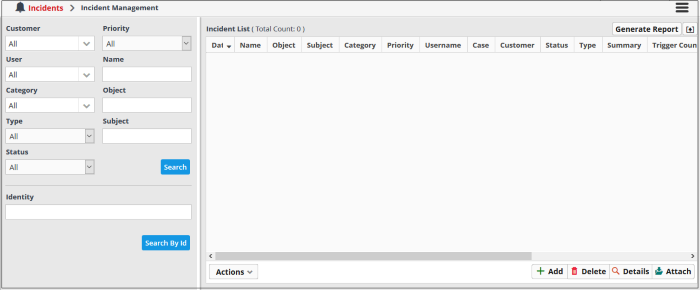
- Use the drop-down menus on the left to filter incidents. Click 'Search' to execute the query. You can combine filters to run more granular searches.
- You can also click the notification icon on the title bar to open this screen:

|
Column Header |
Description |
|---|---|
|
Date |
Time the incident was detected or added. |
|
Name |
|
|
Object |
The resource on which the incident occurred. For example, an endpoint. |
|
Subject |
The source of the incident. For example, a user or process that accessed the resource. |
|
Category |
The type of the incident. |
|
Priority |
|
|
Username |
The name of the admin to whom the incident is assigned. |
| Customer | The name of the customer on whose network the incident was detected. |
|
Status |
The current standing of the incident. The possible values are:
|
|
Type |
Whether the incident was added manually or by a correlation rule. The possible values are:
|
|
Summary |
For incidents added by correlation rules - The 'Summary' column displays a short description of the it as defined in the rule based on which the it was detected. For manually added events - The 'Summary' field displays the short description of it as entered during its creation. |
|
Trigger Count |
Number of times the incident occurred. |
|
Last Trigger Date |
Date and time the incident last occurred. |
|
Identity |
The incident identification number that was auto-generated by cWatch. |
|
Report |
Indicates whether a report has been generated for the incident. The possible values are:
|
| TheHive | TheHive is a security incident response platform. Contact your Comodo account manager to access this. |
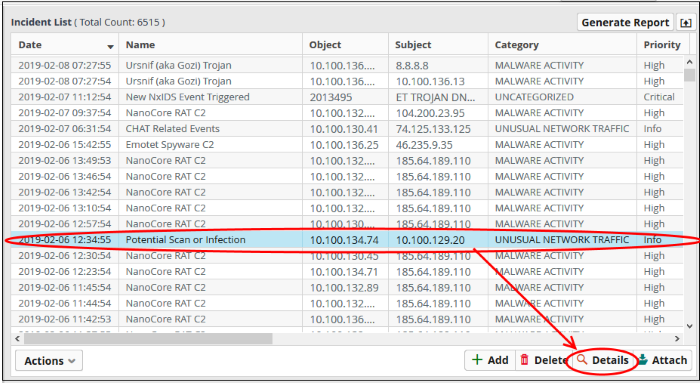
- Click any column header to sort the table in order of the items in the column.
Following sections explain on:
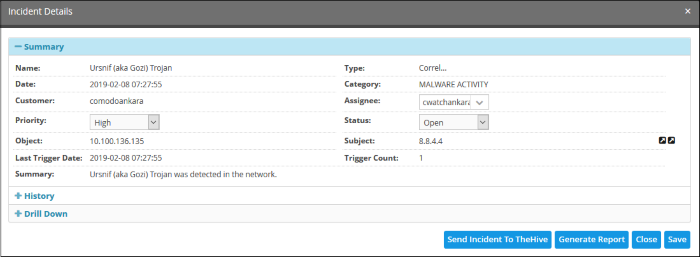
- Select an incident and click the 'Details' button at the bottom.
- The details pane contains comprehensive information about the incident. This includes the name of the rule that triggered the alert, category of the incident, name of the customer, type of rule and more.
- The pane also lets you view other events detected by the same rule on other endpoints in the network.
The pane opens at the 'Summary' page.
- History – You can view the stages of the incident management, for example, closed with reason as False-Positive, in-progress and so on.
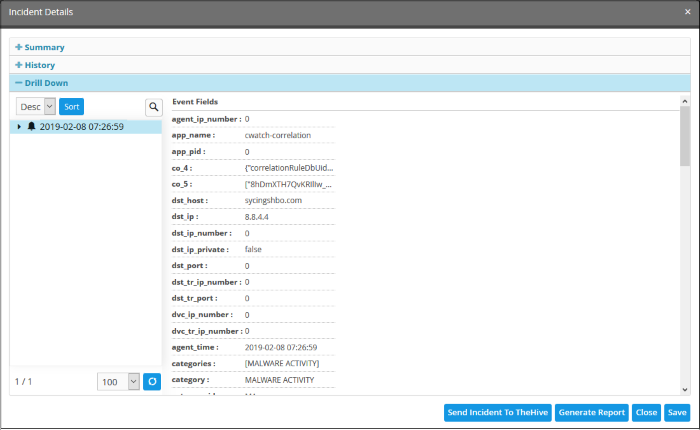
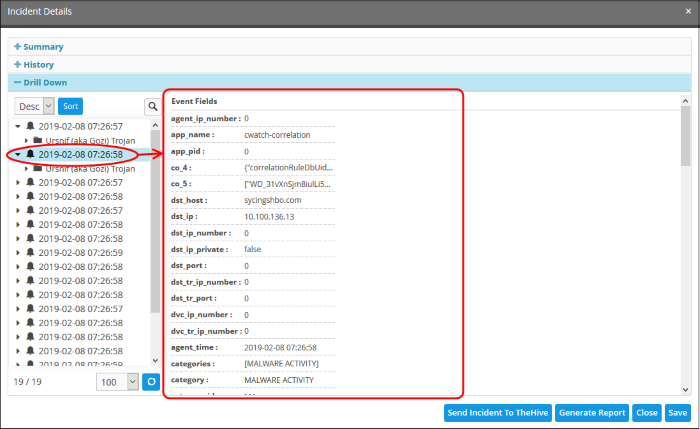
- Use the 'Drill Down' report to view all devices affected by the incident:
- Place your mouse cursor over an item to view full details as a tool tip.
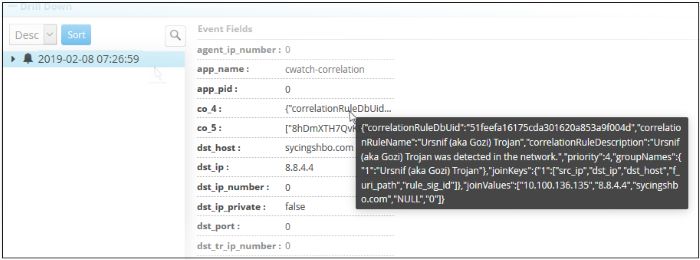
The 'Event Fields' pane on the right shows all event fields in the incident.
See 'Output Mappings' under 'Configuring a Correlation Rule' in Managing Rules for more details.
The 'Drill Down' pane lets you view other incidents identified by the same rule.
-
To view the events, expand the folder structure under drill-down and select the time point.
The field values of the respective event detected at the time point will be displayed at the right.
- Send Incidents to TheHive – TheHive is a security incident response platform. Contact your Comodo account manager to access this.
- Generate Report – Click to generate an incident report. Click View Report' to view the output.
- Close – Click this to close the ticket. Enter details for closing the ticket and click 'Save'. The incident details will be archived.
- The 'Actions' drop down lists various activities you can perform on the incident:
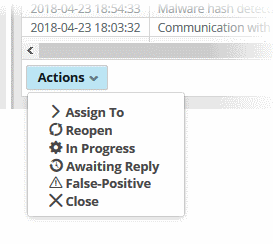
Actions:
- Assign To - The incident is assigned to one of the administrators

- Reopen - The status of the closed ticket will change to re open
- In Progress - Change the status of the incident to 'In Progress'. Enter a comment to explain the status change in the field provided.
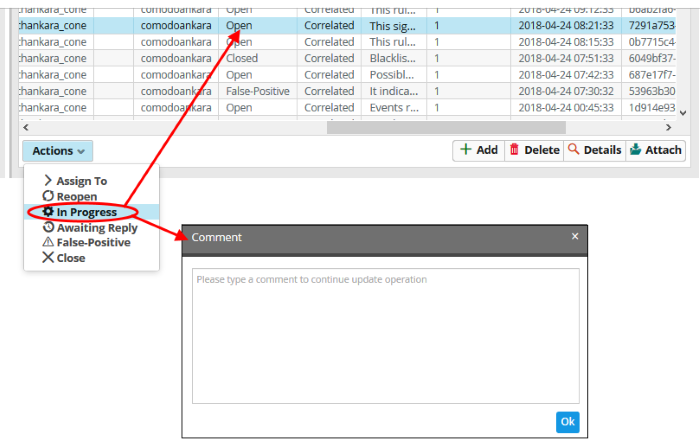
- Awaiting Reply – Select an open incident that requires response from the user and click 'Awaiting Reply'. Enter a comment about the incident and click 'Ok'
- False-Positive – Select the malware free incidents and select the 'False Positive' from the 'Action' drop down
- Close
– Select 'Close' after the incident is resolved
In addition to the incidents reported by correlation rules, admins can manually add incidents and assign them to specific users.
To add and assign an incident
- Click the 'Add' button at the bottom of the screen.
The 'Add Incident' dialog will open.
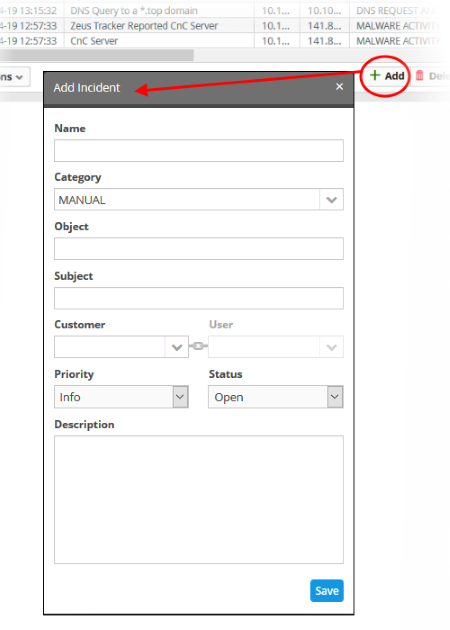
Name - Enter a name for the incident.
- Category - Select the classification of the incident from drop down
- Object - Enter the value you want to assign. For example: Source IP address
- Subject - Enter the value you want to assign. For example: if you have assigned source IP address to the object, you can enter the destination IP address to check for the events occurring between the two end points specified
- Customer - Choose the customer from the drop-down for whom you want to add the incident.
- Assignee - Select the user to whom the incident should be assigned
- Priority - Select the severity level of the incident from the drop-down. The options available are 'Info', 'Low', 'Medium', 'High' and 'Critical'.
- Status - Select the status of the incident from the drop-down. The options available are – Open, In Progress, False-Positive and Closed.
- Description - Enter an appropriate description for the incident
- Click
the 'Save' button
- Admins can identify incidents based on the name, object and subject of the incident.
- If the values above match an existing incident, then the incident will add to the count of the existing incident. If the values are new, then a new incident is created.
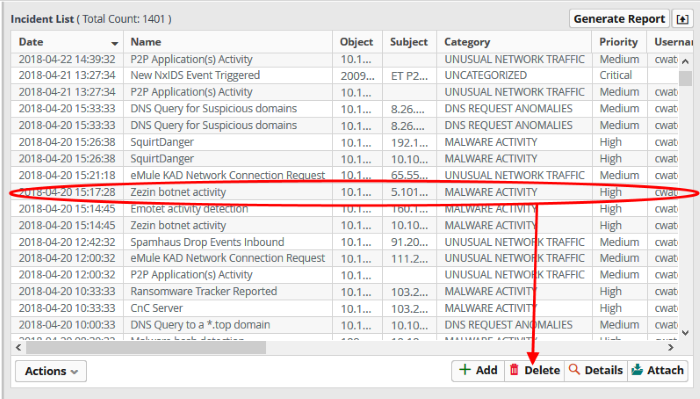
Administrator can delete incidents
that are no longer required from the list.
To delete incidents
- Select the incident(s) from the list and click the 'Delete' button at the bottom
A
confirmation dialog will be displayed before you want to delete the
incident.
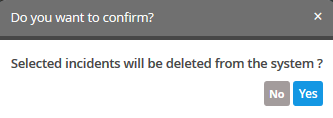
- Click
'Yes' to confirm removal of the incident from the list.