Antivirus Settings
CCAV's real-time scanner constantly monitors all files and processes on your computer for potential threats. If you launch a program or file which poses a threat, then the scanner blocks it and alerts you immediately. The antivirus settings interface lets you configure various settings related to the real-time scanner and other items.
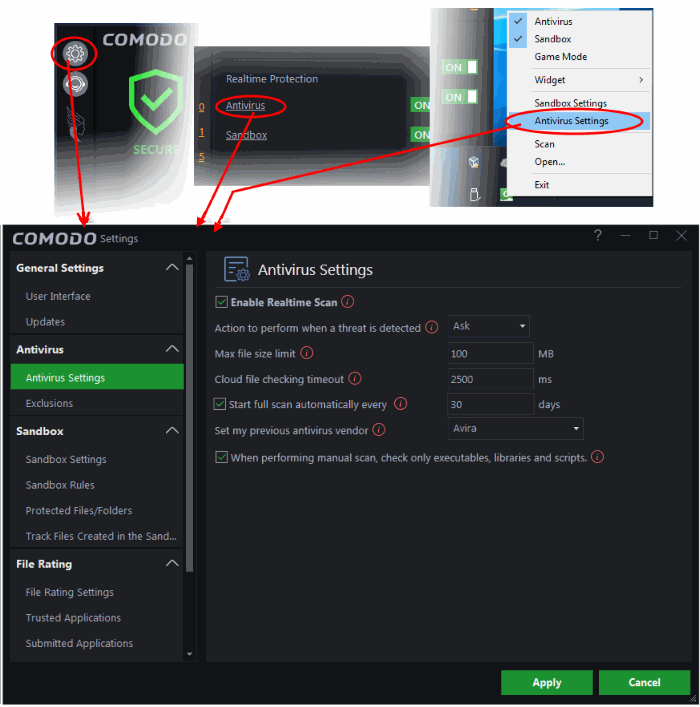
Open the 'Antivirus Settings' area
This can be done in three ways:
- Click the 'Settings' icon on the left then 'Antivirus' > 'Antivirus Settings'
OR
- Click the 'Antivirus' link under 'Realtime Protection'
OR
- Right-click the CCAV system tray icon (or the widget) and choose 'Antivirus Settings' from the options.

- Enable Realtime Scan – Enable or disable Real-time virus monitoring. It is strongly recommended that you leave this option selected. (Default = Enabled)
|
Background Note: The real-time scanner (aka 'On-Access Scan') is always ON and checks files in real time when they are created, opened or copied (as soon as you interact with a file, Comodo Cloud Antivirus checks it). This instant detection of viruses assures you, the user, that your system is perpetually monitored for malware and enjoys the highest level of protection. The real-time scanner also scans system memory on start. If you launch a program or file which creates destructive anomalies, then the scanner blocks it and alerts you immediately. Should you wish, you can specify that CCAV does not show you alerts if viruses are found but automatically deals with them (choice of auto-quarantine or auto-block). |
- Action to perform when a threat is detected – Configure how CCAV should react when malware is detected by the real-time protection engine. (Default = Alert) The available options are:
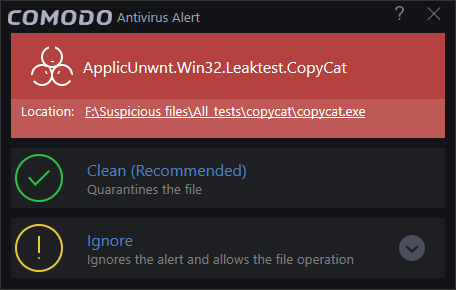
- Ask - An alert will be displayed whenever a malware is identified from a realtime scan. An example of Antivirus alert is shown below:

You can choose to clean, ignore, submit the file as false alert or add the file to trusted files list. If you need more details about these options, see Antivirus Alert in Understand CCAV Alerts. Choosing not show antivirus alerts in favor of automatically quarantining or blocking will minimize disturbances but at some loss of user awareness.
- Quarantine – The detected threat(s) will be moved to quarantine for your later assessment and action. See View and Manage Quarantined Items for more details
- Block - Stops the application or file from execution
- Max file size limit - Allows you to set a maximum size (in MB) for the individual files to be scanned during on-access scanning. Files larger than the size specified here will not be scanned. (Default = 100 MB)
- Cloud file checking timeout – Allows you to configure the maximum time for which CCAV can run an antivirus scan on a single file over the cloud. If CCAV has not completed scanning a particular file by the end of this time period then the file will be skipped. (Default = 2500 Ms)
- Start full scan automatically every – Schedule a complete scan of your computer to take place at regular intervals. You can set the interval in the field provided. Disable this feature if you do not want a regular, scheduled scan. (Default = 30 days)
- Set my previous antivirus vendor - Allows you to specify your previous antivirus software vendor for the 'Lucky You' statistics page. Once set, the 'Lucky You' page will show you how many threats have been blocked by CCAV that would have been allowed by your previous vendor. See 'Lucky You' Statistics for more details.
- When performing manual scan, check only executables, libraries and scripts – Allows you to limit the file types to be scanned during an on-demand/manual scan. By default, CCAV scans only executable files, library files (e.g. .dll files) and scripts in the target location. This helps save time because, statistically, those file types are far more likely to contain malware. If you want to scan every file in a location then clear this check-box . For more derails on on-demand/manual scans, see Scan
and Clean your Computer. (Default = Enabled)


