Step 6 - Create
Configuration Profiles
- A configuration profile is a collection of settings which are applied to iOS, Android, Windows, Linux and Mac devices.
- Each profile lets you specify a device's network access rights, security settings, antivirus scan schedule, and other details.
- There are two main types of profile – 'Custom' and 'Default'. You can create custom profiles for users and user groups.
- Default profiles are those that are applied if no custom profile exists. Default profiles are applied on a per-operating system basis. There are default profiles for all supported operating systems (Windows, Mac, iOS, Android and Linux).
- This ensures all devices have a working profile installed. If you remove a custom profile then the default profile is automatically installed to take its place.
- You can designate any profile you want as a 'default' profile. You can have multiple default profiles per operating system.
- Profiles are applied at the time a device connects to the network. Profiles remain in effect unless the communication client is uninstalled from the device, or the profile itself is removed/disabled.
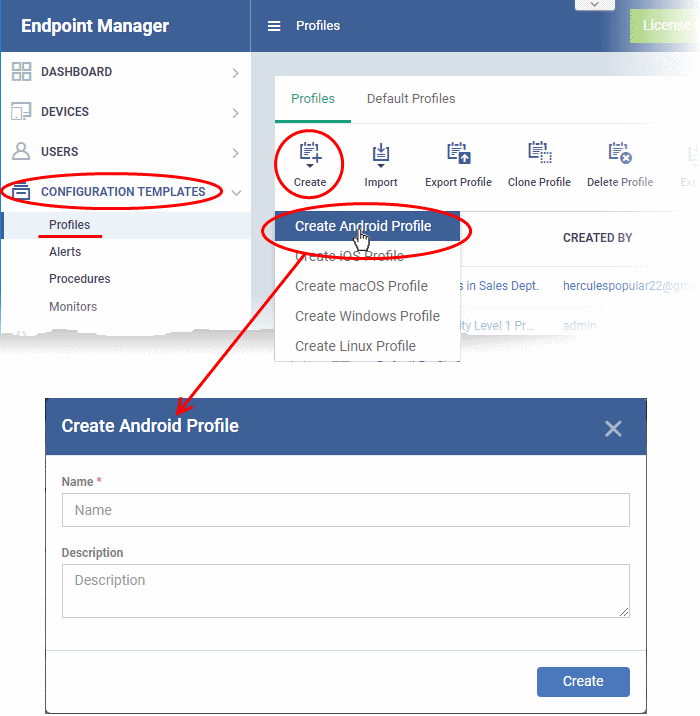
- Click 'Configuration Templates' > 'Profiles'
- Click 'Create' > 'Create Android Profile'
-
Enter a name and description for the profile and click 'Create'.
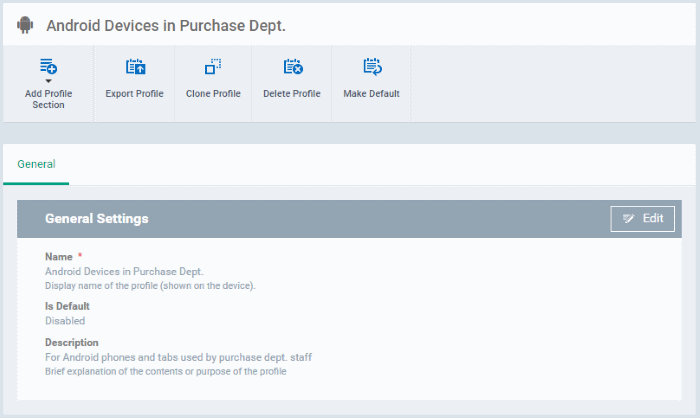
- Click the 'Make Default' button if you want to apply this profile to all devices with the target operating system.
- Alternatively, click the 'Edit' button and enable the 'Is Default' check box.
- Click 'Save'.
- Click the 'Add Profile Section' button and select a component that you want to add to the profile.
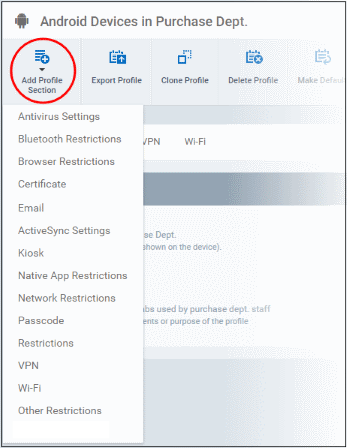
- The settings screen for the selected component will open. After saving, the new section will be available as a link when you open the profile.
- You can add as many sections as you require. Example sections include antivirus settings, feature restrictions and Wi-Fi settings.
- Click 'Save' in each configuration screen for the parameters and options selected in that screen to be added to the profile.
See Profiles for Android Devices in the main guide for more details on this area. In brief:
- General - Profile name, description and whether or not this is a default profile. These were configured in the previous step. The 'Default' profiles are applied to every device which matches their operating system.
- Antivirus Settings - Schedule and configure antivirus scans on the device.
- Bluetooth Restrictions - Specify Bluetooth restrictions such as to allow device discovery via Bluetooth, allow outgoing calls and more. This profile is supported for SAFE devices only.
- Browser Restrictions - Configure browser restrictions such as to allow pop-ups, javascript and cookies. This profile is supported for SAFE devices only.
- Certificate - Upload certificates to Endpoint Manager. You can then choose these certificates when configuring specific features in Endpoint Manager. Examples include Wi-Fi, Exchange Active Sync and VPN.
- E-mail - Configure email account, connection and security details for users accessing incoming and outgoing mails from their devices. This profile is supported for SAFE devices only.
- Active Sync Settings - Specify account name, host, domain and other settings to facilitate connections from devices under this profile to Microsoft Exchange Active Sync servers. This profile is supported for SAFE devices only.
- Native App Restrictions - Configure which native applications should be accessible to users. Native applications are those that ship with the device OS and include apps like Gmail, YouTube, the default Email client and the Gallery. This feature is supported for Android 4.0+ and Samsung for Enterprise (SAFE) devices such as Galaxy smartphones, Galaxy Note devices and Galaxy tablets.
- Network Restrictions - Specify network permissions such as minimum level of Wi-Fi security required to access that Wi-Fi network, allow user to add more Wi-Fi networks in their devices, type of text and multimedia messages to be allowed and configure whitelist/blacklisted Wi-Fi networks. This profile is supported for SAFE devices only.
- Passcode - Specify passcode complexity, minimum length, timeout-before-lock, failed logins before wipe (0=unlimited/never wipe), failed logins before capturing the photo of the possessor and location to recover lost or mislaid device, maximum lifetime of passcode in days and number of previous passcodes from which the new passcode should be unique.
- Restrictions - Configure default device settings for Wi-Fi connection and cellular network connection, whether users should be able to disable app verification, background traffic, bluetooth on/off, whether camera use is allowed, whether the user is allowed to encrypt data stored on the device and whether or not they are allowed to install applications from unknown sources.
- VPN - Configure directory user-name, VPN host, connection type and method of authentication for users wishing to connect to your internal network from an external location, whether to forcibly maintain VPN connection and more. This profile is supported for SAFE devices only.
- Wi-Fi - Specify the name (SSID), security configuration type and password (if required) of your wireless network to which the devices are to be connected. You can add other wireless networks by clicking 'Add new Wi-Fi section'.
- Other Restrictions - Configure a host of other permissions such as use of microphone, SD card, allow screen capture and more. This profile is supported for SAFE devices only.
- Click 'Configuration Templates' > 'Profiles'
-
Click 'Create' > 'Create iOS Profile'
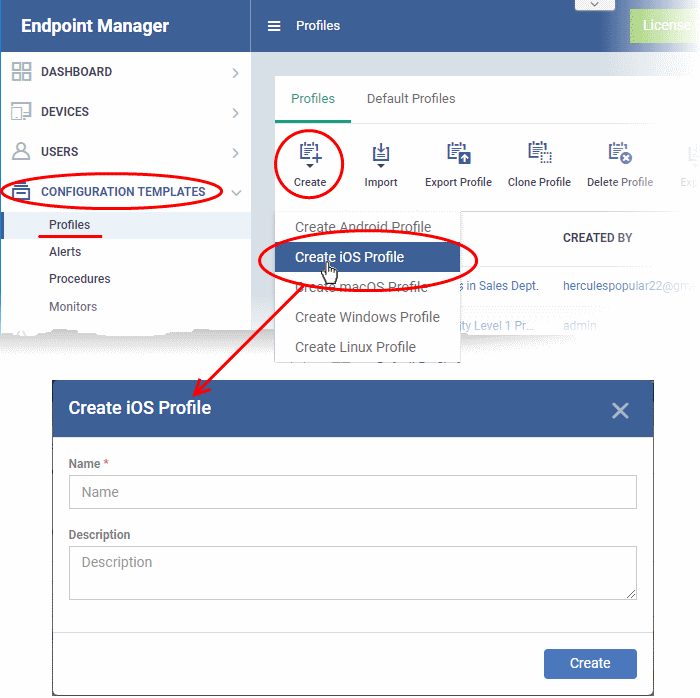
- Enter a name and description for the profile and click 'Create'.
- The profile is created and the 'General Settings' for the profile is displayed.
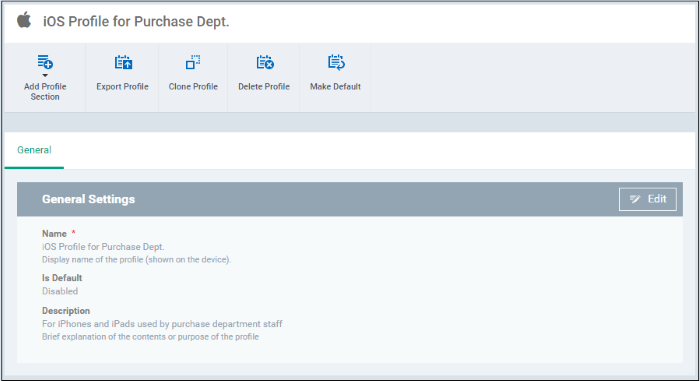
- If
you want this profile to be a default policy, click the 'Make
default' button at the top. Alternatively, click the 'Edit' button
 on the right of the 'General' settings screen and enable the 'Is
Default' check box.
- Click 'Save'.
The next step is to add profile sections.
- Each profile section contains a range of settings for a specific management feature.
- For example, there are profile sections for 'Email', 'Single Sign-On', 'LDAP', 'Cellular Networks' and so on.
- You can add as many different sections as you want when building your device profile.
- To get started:
- Click 'Add Profile Section'
- Select the component that you want to add to the profile:
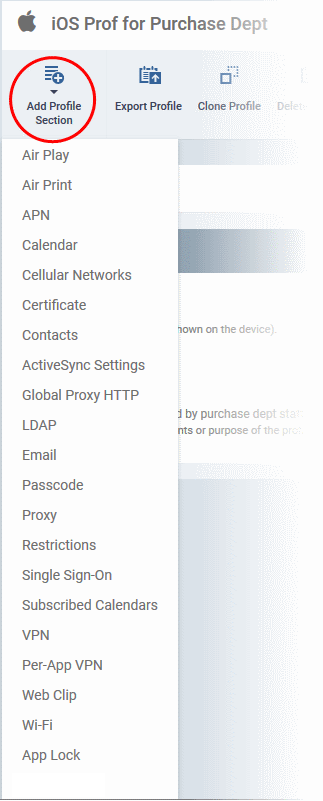
- General - Profile name, description and whether or not this is a default profile. These were configured in the previous step. Default profiles are automatically applied upon device enrollment.
- Airplay - Allows you to whitelist devices so they can take advantage of Apple Airplay functionality (iOS 7 +)
- Airprint - Specify the location of Airprint printers so they can be reached by devices under this profile (iOS 7 +)
- APN - Specify an Access Point Name for devices on this profile. APN settings define the network path for all cellular data. This area allows you to configure a new APN name (GPRS access point), username/password and the address/port of the proxy host server. The APN setting is replaced by the 'Cellulars' setting in iOS7 and over.
- Calendar - Configure CalDAV server and connection settings which will allow device integration with corporate scheduling and calendar services.
- Cellular Networks - Configure cellular network settings. The 'cellulars' setting performs fulfills a similar role to the APN setting and actually replaces it in iOS 7 and above.
- Certificate - Upload certificates to Endpoint Manager. You can then choose these certificates when configuring specific features in Endpoint Manager. Examples include Wi-Fi, Exchange Active Sync and VPN.
- Contacts - Configure CardDAV account, host and user-settings to enable contact synchronization between different address book providers (for example, to synchronize iOS contacts and Google contacts).
- Active Sync Settings - Specify account name, host, domain and other settings to facilitate connections from devices under this profile to Microsoft Exchange Active Sync servers.
- Global HTTP Proxy - Global HTTP proxies are used to ensure that all traffic going to and coming from an iOS device is routed through a specific proxy server. This, for example, allows the traffic to be packet-filtered regardless of the network that the user is connected through.
- LDAP - Configure LDAP account settings for devices under this profile so users can connect to company address books and contact lists.
- E-mail- Configure general mail server settings including incoming and outgoing servers, connection protocol (IMAP/POP), user-name/password and SMIME/SSL preferences.
- Passcode - Specify passcode complexity, minimum length, timeout-before-lock, failed logins before wipe (0=unlimited/never wipe), failed logins before capturing the photo of the possessor and location to recover lost or mislaid device, maximum lifetime of passcode in days and number of previous passcodes from which the new passcode should be unique.
- Proxy - Allows you to specify the proxy server, and their credentials, to be used by the device for network connections.
- Restrictions - Configure default device settings for Wi-Fi connection and cellular network connection, whether users should be able to disable app verification, background traffic, bluetooth on/off, whether camera use is allowed, whether the user is allowed to encrypt data stored on the device and whether or not they are allowed to install applications from unknown sources.
- Single Sign-On - iOS 7 +. Configure user credentials that can be used to authenticate user permissions for multiple enterprise resources. This removes the need for a user to re-enter passwords. In this area, you will configure Kerberos principal name, realm and the URLs and apps that are permitted to use Kerberos credentials for authentication.
- Subscribed Calendars - Specify one or more calendar services which you wish to push notifications to devices under this profile.
- VPN - Configure directory user-name, VPN host, connection type and method of authentication for users wishing to connect to your internal network from an external location. This profile is supported for iOS 7 and above.
- VPN Per App – Configure VPN as above but on a per-application basis. This profile is supported for iOS 7 and above.
- Web Clip - Allows you to push a shortcut to a website onto the home-screen of target devices. This section allows you to choose an icon, label and target URL for the web-clip.
- Wi-Fi - Specify the name (SSID), security configuration type and password (if required) of your wireless network to which the devices are to be connected.
- App Lock – Configure restrictions on usage of device resources for selected applications.
See Profiles for iOS Devices in the main guide for more details on this area. In brief, iOS device profiles are more detailed than Android profiles.
- Click 'Configuration Templates' > 'Profiles'
- Click 'Create' > 'Create Mac OS Profile'
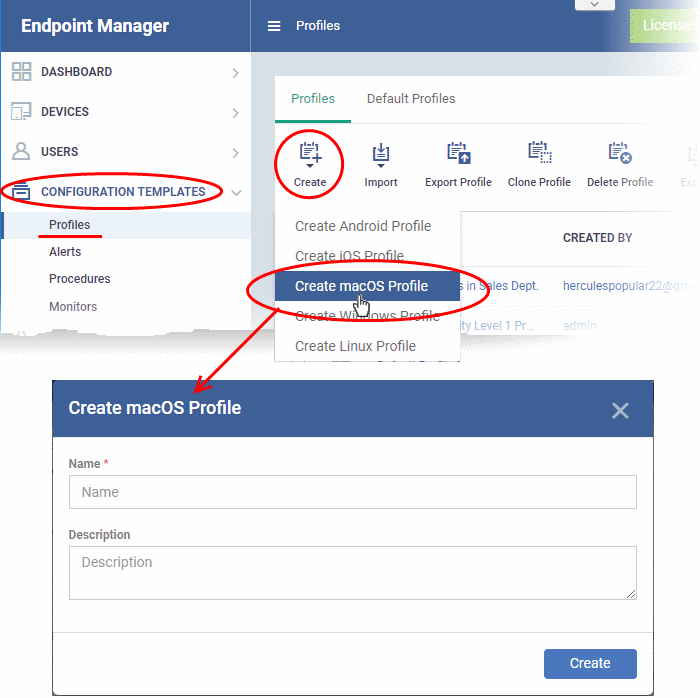
- Name - Enter a label for the profile
- Description - Enter appropriate short notes for the profile
- Click the 'Create' button
The new profile will open at the general settings page:
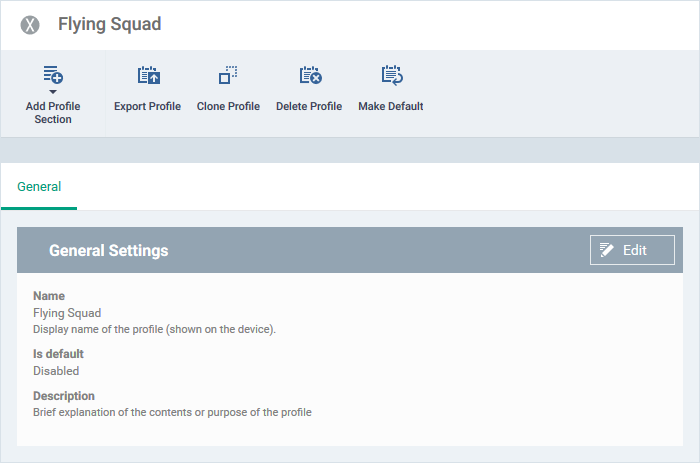
- 'Make Default' -A 'default' profile is one that is applied automatically to any newly added device which matches its operating system. Click this button if you want all MAC OS devices to receive this profile.
- Click 'Save'.
The next step is to add sections to the profile. Each section lets you define settings for a particular security or management feature.
- Click 'Add Profile Section' then select the section you want to add from the list:
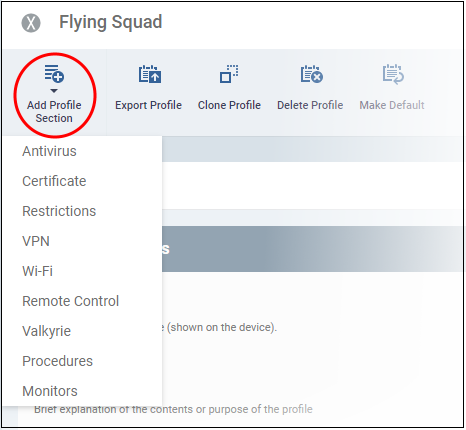
The new section will appear as a tab under the profile name. You can add as many sections as required to a profile.
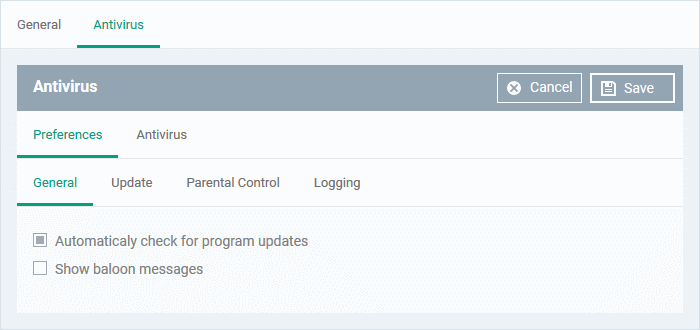
-
Configure the settings and click 'Save'.
The new section will become available as a tab. You can configure antivirus settings, certificate settings, device restrictions, VPN connection parameters, Wi-Fi connection parameters and more. If a component is not configured, the device will continue to use existing settings, or settings that have been applied by another EM profile.
-
Click 'Save' in each configuration screen for the parameters and options selected in that screen to be added to the profile.
See Profiles for Mac OS Devices in the main guide for more details on this area. In brief:
- Antivirus - Enable on-access scanning of files, configure scan and alert options, set alert time out period, maximum size for files to be scanned, files to be excluded and more.
- Certificates - Upload certificates to Endpoint Manager. You can then choose these certificates when configuring specific features in Endpoint Manager. Examples include Wi-Fi, Exchange Active Sync and VPN.
- Restrictions - Configure restrictions on device functionality and features, iCloud access and so on.
- VPN - Configure directory user-name, VPN host, connection type and method of authentication for users wishing to connect to your internal network from an external location and more.
- Wi-Fi - Specify the name (SSID),
security configuration type and password (if required) of your
wireless network to which the devices are to be connected.
- Remote Control - Allows you to configure settings for remote takeover and notifications which are shown to end-users before and during a remote control session.
- Valkyrie Settings - Valkyrie is a cloud-based file verdict service that subjects unknown files to a range of tests in order to identify those that are malicious. Configure settings for Valkyrie cloud look up service.
- Procedures - A procedure is a script designed to accomplish a specific task on target devices. For example, you can run procedures to change the permissions on specific folders on multiple devices, or lock a device after a certain period of time.
- Monitors - Configure performance and availability conditions for various events. An alert is triggered if the conditions are breached. For example, you can monitor free disk space, CPU/RAM usage, device online status and more.
- Click 'Configuration Templates' > 'Profiles List' > 'Create' > 'Create Windows Profile':
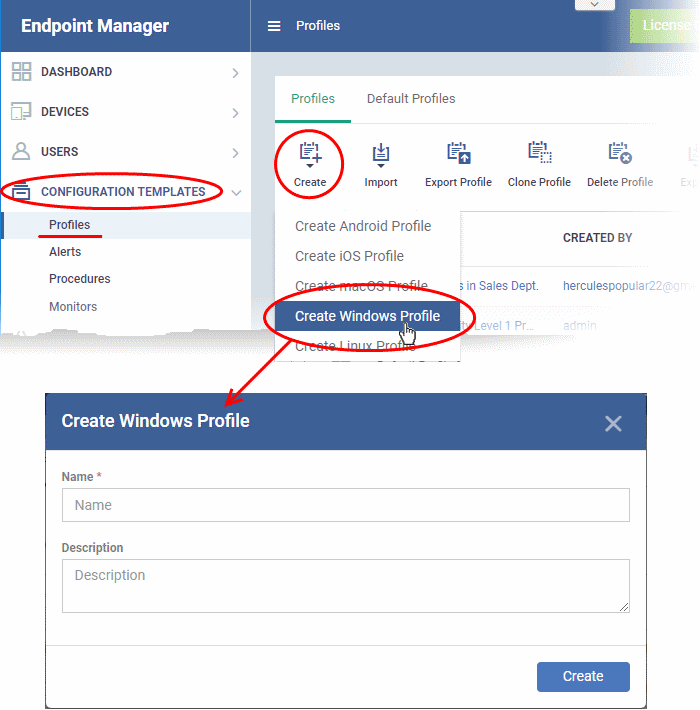
- Enter a name and description for the profile
- Click the 'Create' button
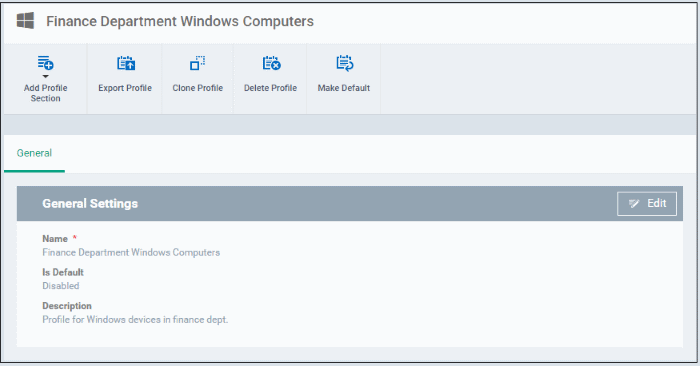
Your profile will open at its configuration page:
-
Click 'Edit' if you wish to modify basic profile settings:
- 'Is Default?' - A 'default' profile is one that is applied automatically to any device which matches its operating system. You can have multiple 'default' profiles per operating system.
-
Click 'Save'.
The next step is to add profile sections.
- Each profile section contains a range of settings for a specific security or management feature.
- For example, there are profile sections for 'Antivirus', 'External Device Control', 'Firewall', 'Procedures' and so on.
- You can add as many different sections as you want when building your profile.
To get started:
- Click 'Add Profile Section'
- Select the component that you want to add to the profile:
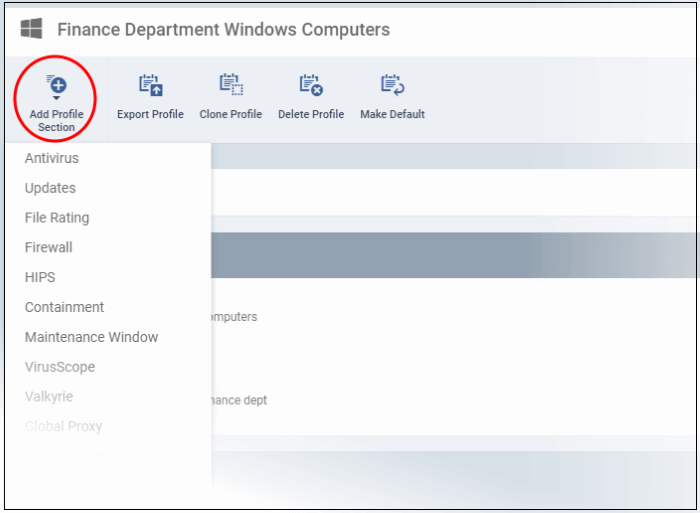
- Configure the settings and parameters and click 'Save'
The new profile section will become available as a tab in this interface.
If a component is not configured, the device will continue to use existing, user-defined settings or settings that have been applied by another EM profile.
-
Click 'Save' in each configuration screen for the parameters and options selected in that screen to be added to the profile.
See Profiles for Windows Devices in the full guide for more information on these settings. In brief:
- Antivirus - Enable on-access scanning of files, configure scan and alert options, set alert time out period, maximum size for files to be scanned, files to be excluded and more.
- Update - Set the conditions for Comodo Client Security (CCS) to automatically download and install program and virus database updates.
- File Rating - Enable cloud lookup for checking reputation of files accessed in real-time, configure options for files to be trusted and detecting potentially unwanted applications. For more details on File Rating in CCS, refer to the help page explaining File rating Settings in CCS online help guide.
- Firewall - Enable/Disable the Firewall component, configure Firewall
behavior, add and manage Application and Global Firewall rules and
more. See help
page explaining Firewall Settings in CCS
online help guide, for more details on Firewall in CCS.
- HIPS - Enable Host Intrusion Prevention System (HIPS) and its behavior, configure HIPS rules and define Protected Objects at the endpoints. See help page explaining HIPS Settings in CCS online help guide, for more details on HIPS in CCS.
- Containment - Enable auto-containment of unknown files, add exclusions, configure containment behavior, view and manage auto-containment rules and configure the Virtual Desktop. See help page explaining Containment in CCS
online help guide, for more details on Containment in CCS.
- Maintenance Window - A maintenance window (MW) is a scheduled time-slot when admins can run important tasks on target devices. Admins can enable a warning if somebody attempts to run a task outside of a maintenance window.
- VirusScope - Enable VirusScope that monitors the activities of processes
running at the endpoints and generates alerts if they take actions
that could potentially threaten your privacy and/or security and
configure options for alert generation. See help
page explaining
VirusScope, for more details on
VirusScope in CCS online help guide.
-
Valkyrie - Valkyrie is a cloud based file analysis system. look-up system. It uses a range of static and dynamic detectors including heuristics, file look-up, real-time behavior analysis and human expert to analyze the submitted files and determine if the file is good or bad (malicious). You can enable Valkyrie and its components and set a schedule for submitting unknown files identified from the endpoints.
- Global Proxy - Specify a proxy server through which endpoints should connect to external networks like the internet.
- Clients Proxy - Specify proxy servers through which Comodo endpoint clients should connect to Endpoint Manager and other Comodo services. Clients which will use this proxy are Comodo Client Security (CCS) and Comodo Communication Client (CC).
- Agent Discovery Settings - Specify whether or not communication client should send logs to EM about antivirus and containment events.
- UI Settings - Configure the appearance of the communication client (CC) and Comodo Client Security (CCS). You can re-brand CC and CCS with your own company name, logo, product name and product logo and select which components of CCS should be visible to end-users.
- Logging Settings - Enable event logs, configure max. log file size and other settings.
- Client Access Control - Password-protect Comodo Client Security (CCS) and communication client (CC) on managed endpoints.
- External Device Control - Block or permit specific types of device from connecting to managed endpoints. Example devices you may want to control are USB storage devices and Bluetooth devices.
- Monitors Settings - Configure performance and availability conditions for various events and services. An alert will be triggered if the conditions are breached. For example, you can monitor free disk space, service and web page availability, CPU/RAM usage, device online status and more.
- Procedures - Allows you to add, view, delete and prioritize procedures which have been added to a profile.
- Remote Control - Configure remote access settings.
- Remote Tools - Enable/disable remote access to endpoint files and processes. You can also configure how notifications are shown during a remote session.
- Miscellaneous - Monitor the registry for changes to auto-run items, services, and scheduled tasks by unrecognized files.
- Script Analysis Settings - Enable / disable Heuristic command line analysis and embedded Code Detection and select programs to be monitored.
- Data Loss Prevention settings - Data loss prevention scans identify files containing sensitive information on managed Windows devices. For example, the scans find credit card numbers, social security numbers, bank account numbers, etc. You can then take actions to secure that data where required.
- Patch Management - Enable / disable patch operations on endpoints. The settings affect on-demand patch operations, scheduled patch operations and patch installations via procedures.
-
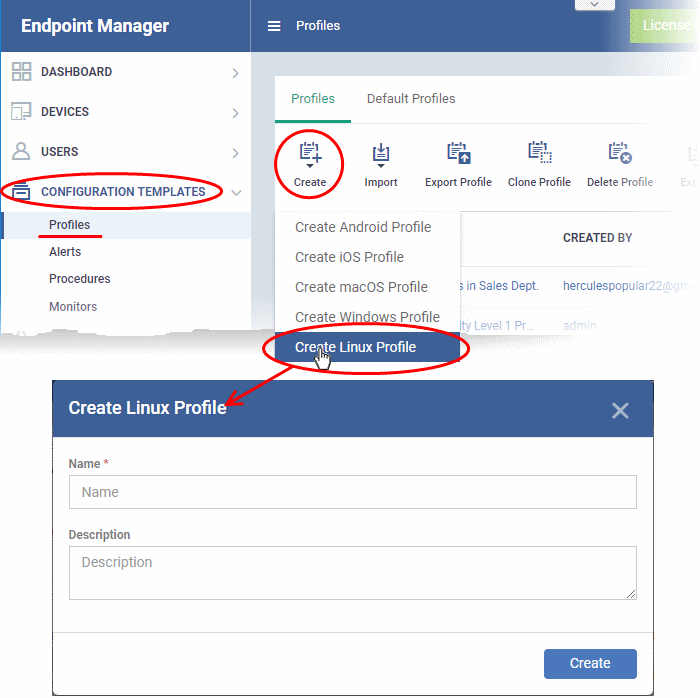
Click 'Configuration Templates' > 'Profiles'
-
Click 'Create' > 'Create Linux Profile'
-
Enter a name and description for the profile
-
Click the 'Create' button
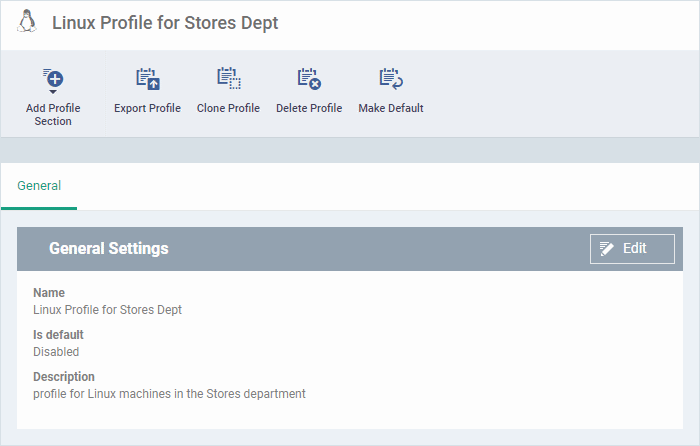
The Linux profile will be created and the 'General Settings' section will be displayed. The new profile is not a 'Default Profile' by default.
-
If you want this profile to be a default policy, click the 'Make Default' button at the top. Alternatively, click the 'Edit' button on the right of the 'General' settings screen and enable the 'Is Default' check box.
-
Click 'Save'.
The next step is to add the components for the profile.
-
Click the 'Add Profile Section' drop-down button and select the component from the list that you want to include for the profile.
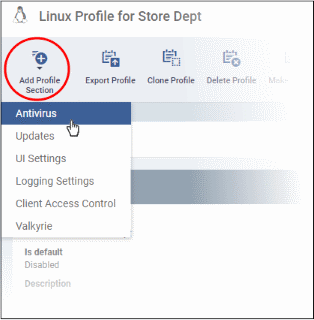
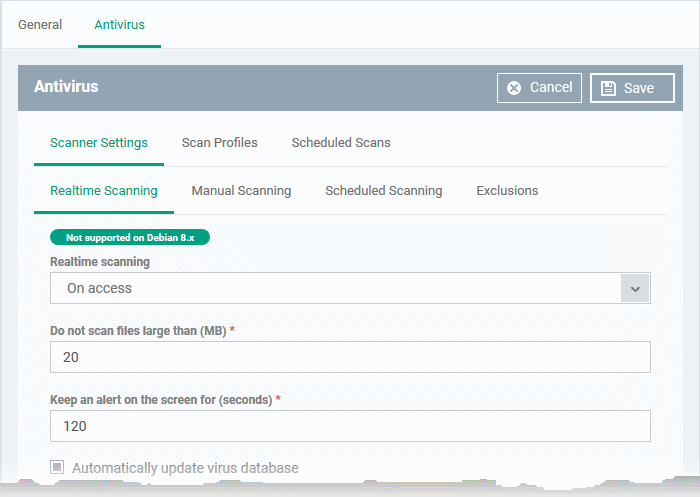
The settings screen for the selected component will be displayed. An example is shown below:
-
Configure the settings and click 'Save'.
The new section will become available as a tab. You can configure antivirus settings, interface language settings, logging settings, password protection to the CCS application on the endpoint and more. If a component is not configured, the device will continue to use existing, user-defined settings or settings that have been applied by another EM profile.
-
Click 'Save' in each configuration screen for the parameters and options selected in that screen to be added to the profile.
See Profiles for Linux Devices in the main guide for more details on this area. In brief:
-
Antivirus - Enable on-access scanning of files, configure scan profiles, timetable scheduled scans, set maximum size for files to be scanned, files to be excluded and more.
-
Updates - Enable/disable program and virus signature database updates, configure the server from which the updates are to be downloaded and more.
-
UI Settings - Select the interface language for CCS on the endpoint.
-
Logging Settings - Enable event logs, configure max. log file size and other settings.
-
Client Access Control – Password protect access to the CCS application on the endpoint.
- Valkyrie Settings - Valkyrie is a cloud-based file verdict service that subjects unknown files to a range of tests in order to identify those that are malicious. Configure settings for Valkyrie cloud look up service.


