


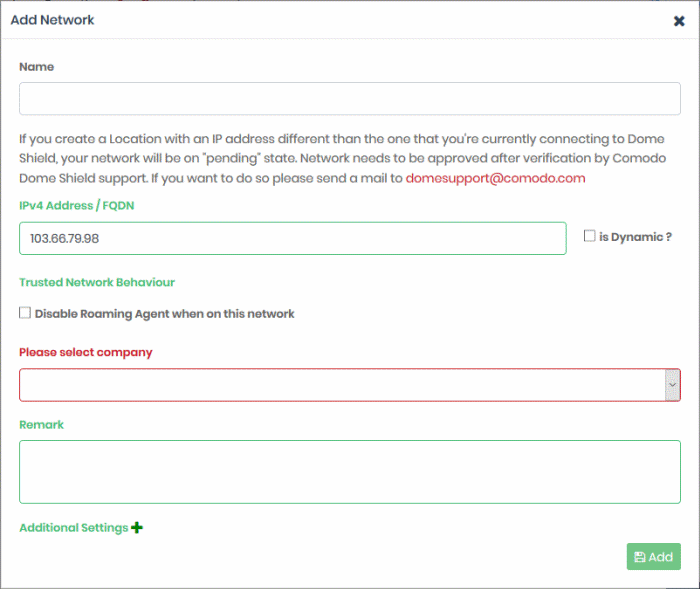
Add Networks
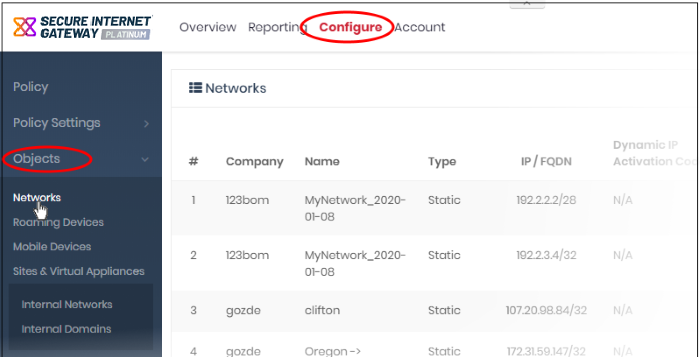
- Click 'Configure' > 'Objects' > 'Networks' to add, edit and manage protected networks.
- The IP of the network from which you are connecting was automatically added at enrollment. This network is already active.
- Any additional IPs you add will have a status of 'Pending' until they are approved by Xcitium. Please contact your Xcitium account manager or domesupport@Xcitium.com if you have questions on pending networks.
- You can add IP addresses in CIDR notation with network prefixes from /32 to /24. You can add any combination of CIDR ranges and/or individual IP addresses.
- Dynamic IP addresses. We provide an agent which auto-updates your Secure Internet Gateway policies with any address changes in your network. The agent should be installed on an endpoint in your target network. After you add a network which uses dynamic IPs, Secure Internet Gateway will create an activation code for the agent (click 'Configure' > 'Objects' > 'Networks' to view the code). Enter the code in the agent to enroll the network.
- Please also make sure endpoints in protected networks are configured to use XSIG DNS (Preferred DNS server - 8.26.56.10. Alternate DNS server - 8.20.247.10).
|
Networks - Table of Column Descriptions |
|
|---|---|
|
Column Header |
Description |
|
Company |
Applies to MSPs only. Name of the organization to which the network belongs. |
|
Name |
The name of the network. |
| Type |
Indicates whether the network uses static or dynamic IP addresses. |
|
IP / FQDN |
The public IP address or Fully Qualified Domain Name (FQDN) of the network. |
|
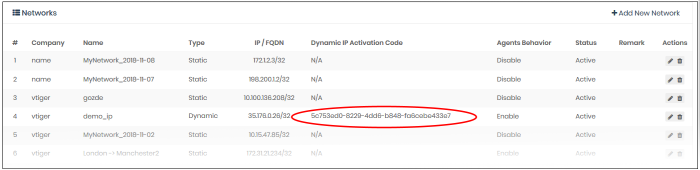
Dynamic IP Activation Code |
(Only networks with dynamic IP addresses). The activation code used to connect the network to Secure Internet Gateway. See Add Networks with Dynamic IP addresses for more details. |
| Agents Behavior | Shows whether the roaming agent is active or not when the device is inside the network. |
|
Status |
Can be 'Active' or 'Pending'. Active networks are available for Dome protection. 'Pending' means the IP address/FQDN is awaiting approval by Xcitium. |
| Remark | Description of the network. |
| Actions | Update or delete a network. |
The interface allow you to:
|
Add Networks – Form Parameters |
|
|---|---|
|
Field |
Description |
|
Name |
Enter an appropriate label for the network. |
|
IP Address / FQDN |
The IP address or Fully qualified domain name of your network.
Note: By default, this field shows the IP of the network from which you are connecting to Secure Internet Gateway. This will automatically become active after enrollment. Any new IP address that you add here will remain in pending status until approved by Xcitium. Dynamic - Select if you are enrolling a network with dynamic IP addresses. See Add Networks with Dynamic IP addresses for more details |
| Trusted Network Behavior |
Disable Roaming Agent when on this network – Select whether policies applied to roaming agents should be active when they connect to this network.
|
|
Please select company |
MSPs only.
|
|
Remark |
Enter comments, if any, for the network in the 'Remark' field. |
|
Additional Settings - These settings apply only to roaming devices which have the XSIG agent installed.
|
|
|
Host File Configuration |
Enter the name and IP address of your host in the respective fields. Click the '+' button to add more host entries. To remove an entry, click the corresponding trash can icon. |
- Click 'Add' when done.
The network is added and
shown in the list.
The next step is to configure your network's DNS to forward queries
to XSIG DNS. This will ensure all the endpoints in the networks are
protected. Alternatively, you can set XSIG DNS on the required endpoints
(there are various ways to do this, including DHCP setting, Windows GPO
and AD configuration). See https://www.Xcitium.com/secure-dns/switch/computer.html for more details.
- Change your DNS addresses to following Secure Internet Gateway addresses:
- Preferred DNS server – 8.26.56.10
- Alternate DNS server – 8.20.247.10
Note - no rules are applied to the new networks by default. You have to apply a policy to the network according to your requirements. See 'Apply Policies to Networks, Roaming / Mobile Devices' for advice on how to deploy web protection rules to networks.
|
Note: Any external IPs you add which are different to the one detected by Xcitium Secure Internet Gateway will need to be approved by Xcitium. To activate these networks, please contact our support at domesupport@Xcitium.com |
|
Important Note:
|
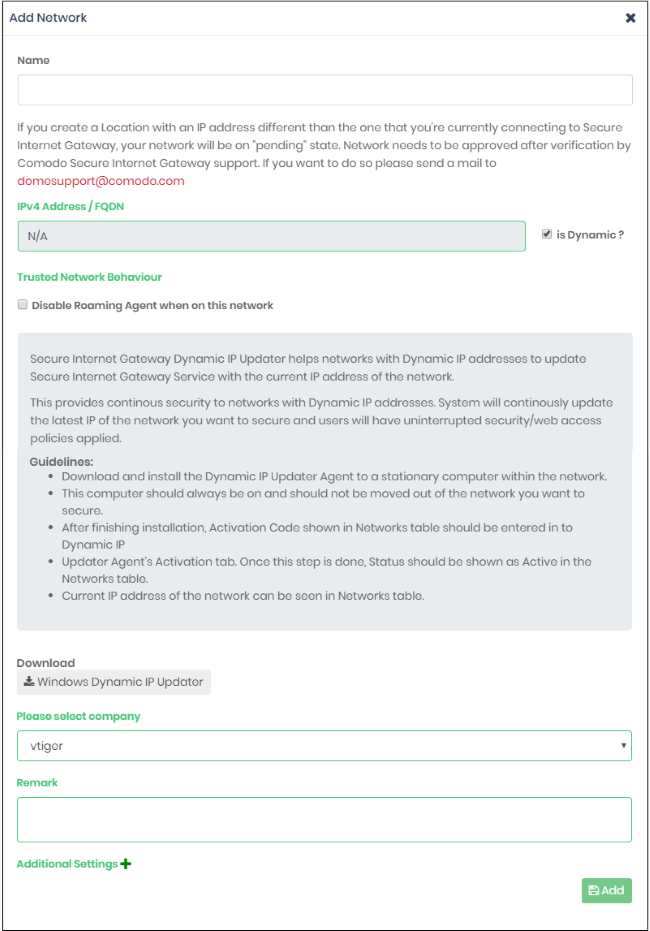
Add Networks with Dynamic IP Addresses
Step 1 - Install the IP Update agent on an endpoint in the network
- Click 'Configure' > 'Objects' > 'Networks'
- Click 'Add New Network':
|
Add Networks - Form Parameters |
|
|---|---|
|
Field |
Description |
|
Name |
Enter an appropriate label for the network. |
|
IP Address / FQDN / Dynamic |
Select the 'Dynamic' checkbox to enroll a network with dynamic IP addresses. A message box will appear with help to enroll the network.
|
|
Trusted Network Behavior |
Disable Roaming Agent when on this network – Select whether policies applied to roaming agents should be active when they connect to this network.
|
|
Please select company |
MSPs only
|
|
Remark |
Enter a description for the network. |
|
Additional Settings - These settings apply only to roaming devices which have the XSIG agent installed.
|
|
|
Host File Configuration |
Enter the name and IP address of your host in the respective fields. Click the '+' button to add more host entries. To remove an entry, click the corresponding trash can icon. |
- Click 'Add' in the 'Add Network' dialog.
The network is added with the status 'Pending'. Also, an 'Activation code' is generated and displayed in the row of the network.

- Transfer the agent setup files to an endpoint in the target network
|
Note: Choose an endpoint which is always powered up
and always connected to the network. This will let the agent monitor IP
address changes and send updates to Secure Internet Gateway. |
- Double-click on the setup file on the endpoint, or right click and select 'Install' from the context sensitive menu.
After installing the agent, the activation dialog is displayed:
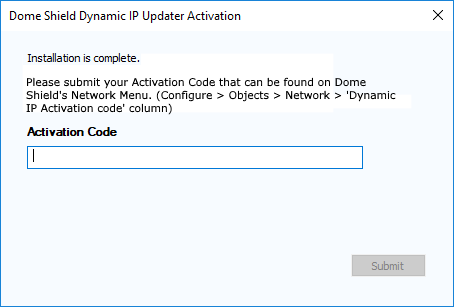
- Click 'Configure' > 'Objects' > 'Networks' in the Secure Internet Gateway interface to view the activation code:
- Enter code in the IP updater activation dialog.
- Click 'Submit'
- To update details of a network, click the edit button beside the network.
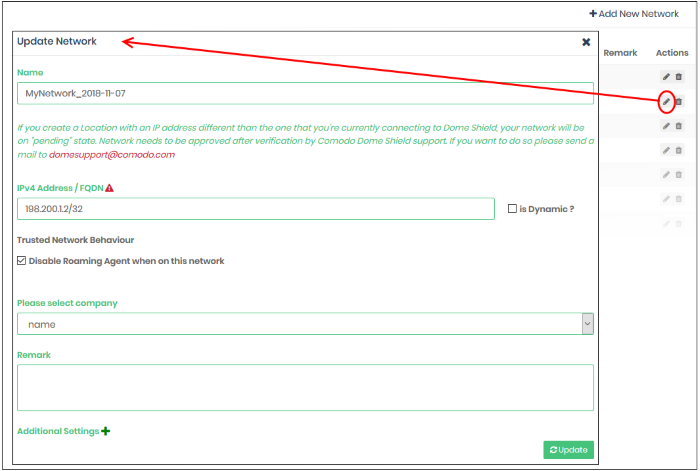
The 'Update Network' dialog will be displayed. Modify the details per your requirements. The process is similar to adding a new network explained above.
- Click the 'Update' button
Please note that when you delete a network, web protection policies will no longer be applied to network endpoints.
- Click the trash can icon beside a network to delete it.
A confirmation dialog is displayed.
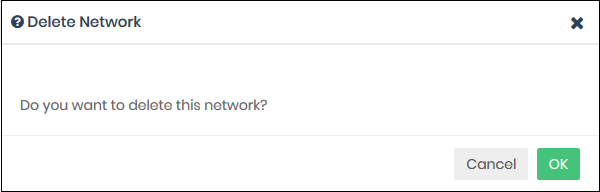
- Click 'OK' to confirm removal of the network from the list.