Step 2 - Add Your Network
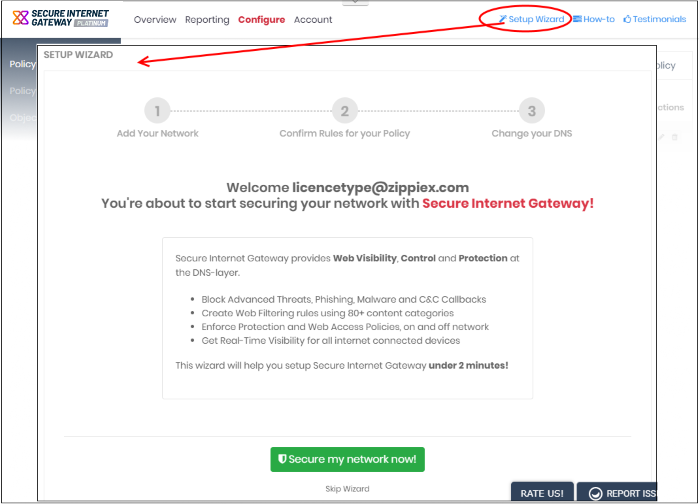
- The setup wizard lets you quickly enroll your networks to Secure Internet Gateway
- If you haven’t yet added a network, then the wizard will start automatically after logging in
- You can also start the wizard at any time by clicking 'Setup Wizard' at top-right:

- Click 'Secure my network now!'
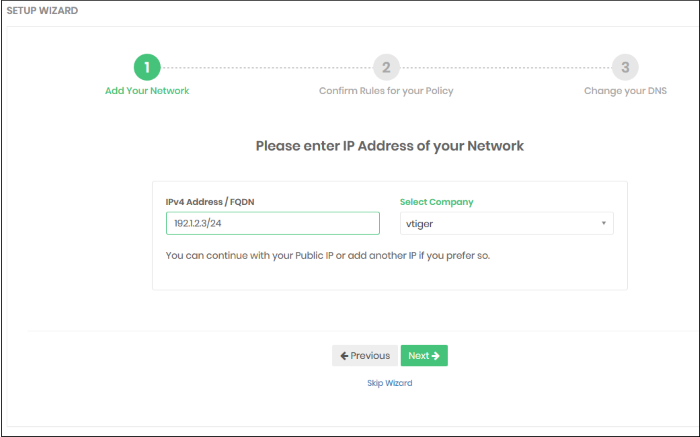
Step 1 - Add Networks

IP
Address / FQDN
By default, this shows the public IP of the network from which you are connecting. This network is automatically activated after initial enrollment.
- If required, you can change this to the IP of a different network you want to protect. Enter the fully qualified domain name or the network IP address in CIDR format. Secure Internet Gateway accepts prefixes from /24 to /32.
- Any IP you add here is automatically activated for protection. You need to change the network's DNS settings to Secure Internet Gateway, as explained in 'Change your DNS Settings'
- XSIG also supports dynamic IP addresses. You need to download the 'Windows Dynamic IP Updater' agent and install it on a network endpoint. See 'Add Networks' for more information.
Select Company- MSPs only. Choose the customer organization for which you want to enroll the network.
Click 'Next' to configure rules for the policy.
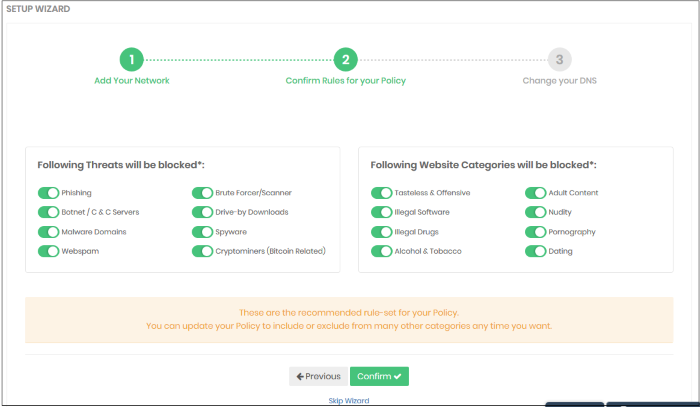
Step 2 - Configure Rules for your Policy
This step explains how to set up security and website category rules for your policy. These rules will be applied to your network on enrollment.

- All rules are enabled by default. You can enable / disable rules as required.
- If you are unsure, then a good rule of thumb is to just leave everything enabled. This gives you maximum protection, and you can always modify the rule later if there are issues.
- You can modify the policy later by clicking 'Policy Settings' in the left menu. See 'Manage Security Rules' and 'Manage Category Rules' if you need help with these areas.
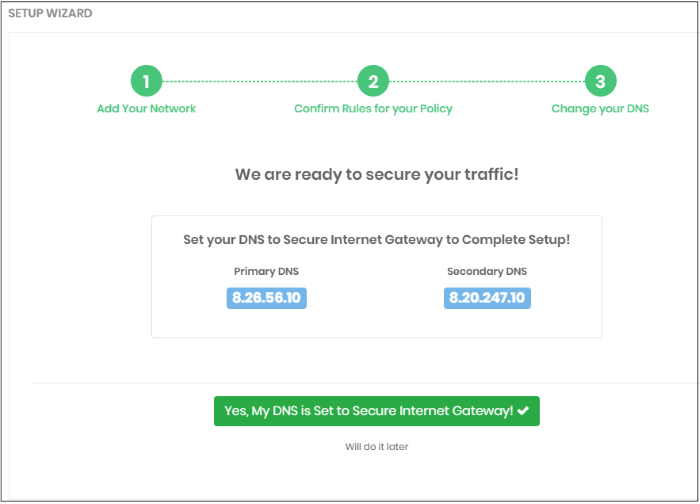
Step 3 - Change your DNS Settings
You need to point the network’s DNS settings to the following XSIG servers:
- Preferred DNS server - 8.26.56.10
- Alternate DNS server - 8.20.247.10
Click 'Yes, My DNS is set to XSIG' once you have done this:

That's it. You have now added a
network to Secure Internet Gateway.
- Networks added via the wizard above are labeled 'My Network', with the date appended to the label.
- Click 'Configure' > 'Objects' > 'Networks' to see all networks that you have added.
- You can also skip the setup wizard and add networks, roaming and mobile devices manually later on. See Step 3.
- To support dynamic IP addresses, you need to download the 'Windows Dynamic IP Updater' agent and install it on a network endpoint.
- See 'Add Networks' for more information.


