Admin Groups & Permissions
- Click 'Account management' > 'Admin groups & permissions'
- The 'Admin Groups & Permissions' area lets you create and set the privileges of admin user groups. Any users you place in an admin group will inherit the privileges of the group.
- There are two sets of permissions:
- Customer permissions are high-level admin privileges which cover all domains on the account. For example, add domains, configure user permissions, modify email templates, view customer info, manage admins, generate reports, etc.
- Domain permissions are technical privileges to configure and manage antispam on specific domains. For example, setup recipients, configure the delivery queue, configure whitelists and blacklists, etc.
- You can create multiple admin groups, each with different permission levels. Admin groups save time by avoiding the need to set permissions for every new administrator.
- There are two types of group you can add:
- Add Group - Creates a ‘blank’ group with no permissions set. You add all permissions that you require.
- Add Domain group - Creates a group with sufficient permissions enabled to manage a domain. This is just a time-saving feature which avoids the need to select permissions from scratch.
- The ‘Customer Permissions’ tree on the right shows all privileges which are enabled by default
- You can enable or disable these permissions as required in your custom domain group
- Open the ‘All Domain Permissions’ tree to choose the domains over which group members have control. You can set permissions on a per-domain basis in here
- The items available in the console will vary according to the permissions of the admin. See 'Manage Permissions for Administrators' for help to add admins to predefined groups.
- Click 'Account management' > 'Admin groups & permissions'
The admin groups & permissions interface is displayed.
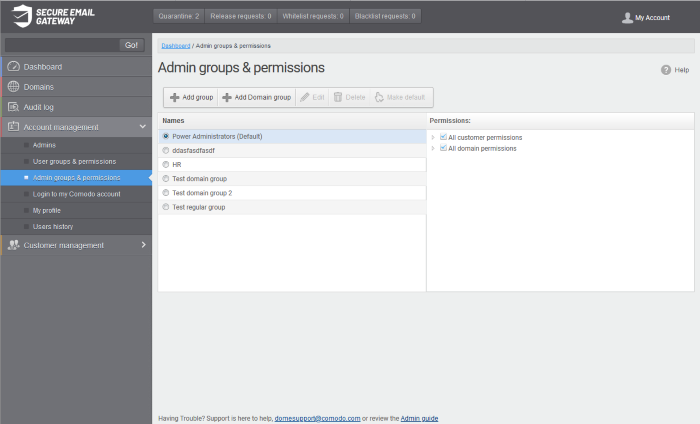
By default, power administrators group is available. Power administrators have all customer and domain permissions enabled. You cannot edit or delete this default group.
- Tick a group from the right side to view the permission levels assigned for it.
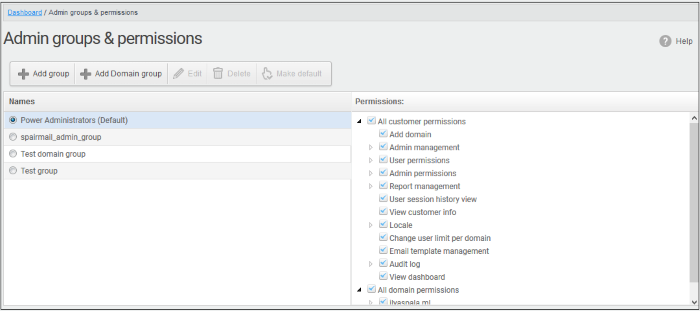
- Click on the arrow beside a permission to display the tree structure of second level of permissions, if available.
For administrators in the ‘Power Administrators’ group, all permission levels will be enabled. The Permission level is divided into two categories, 'All customer permissions' and 'All domain permissions'.
Customer permissions and domain permissions are two different settings. Customer permissions deals with configuring general privilege levels for the admin group. Domain permissions relates to what the admin can do in the domain(s).
- Customer permissions – Determines general privileges for the administrator. For example the admin can add domains, configure admin and user permissions and so on.
- Domain permissions – This pertains to domain level privileges. Determines what domains the admins can manage, for example, remove the domain, manage incoming and outgoing user for the domain and so on.
- See the full list of privilege levels below.
- 'Add Domain group' allows you to create groups for domain management with predefined customer permissions. Though you can create domain management groups using 'Add group' also, this feature is useful if you want to create a large number of domain groups.
Permission Levels
- All customer permissions - View and manage all customer related tasks.
- Add domain - Add new domain(s)
- Admin management - View and manage administrators for the account.
- View - Only view the list of administrators.
- Unlock - Unlock previously blocked administrators.
- Manage - Manage administrators for the account.
- User permissions - View and manage 'User Groups & Permissions'
- View - Only view 'User Groups & Permissions'.
- Manage - Manage 'User Groups & Permissions'
- Admin permissions - View and manage 'Admin Groups & Permissions'
- View - Only view 'Admin Groups & Permissions'
- Manage - Manage 'Admin Groups & Permissions'
- Report management - View and manage report subscriptions
- View - Only view report subscriptions
- Change - View and manage report subscriptions
- User session history view - View user sessions history for all domains in the account.
- View customer info - View information about the customer.
- Locale - View and manage message language sent to a user.
- View – Only view messages language.
- Change – View and manage messages language.
- Change user limit per domain - Configure the number of users for each domain in the account.
- Email template management - Edit the email template for user's notification emails.
- Audit log - Configure and view log for the permitted domain.
- Log - View and export the log for the permitted domain.
- View dashboard – Show main customer dashboard.
- All domain permissions - Assign domain(s) management.
- Assigned Domain(s) – Manage domains, incoming and outgoing users, emails, audit log and reports.
- View – Only view the assigned domains.
- Change – Edit the assigned domain(s)
- Remove – Remove the assigned domain(s).
- User Management – View and manage incoming users, outgoing users, whitelist recipients and blacklist recipients.
- Incoming user – View, manage and unlock incoming users.
- View – Only view list of incoming users.
- Manage – View and manage incoming users.
- Unlock – Unlock users immediately without waiting for the timeout period to end.
- Change forward settings – Change forward email settings for incoming users.
- Outgoing user – View, manage, lock/unlock and import from incoming users.
- View – Only view list of outgoing users.
- Manage – View and manage outgoing users.
- Outgoing settings – Configure a list of outgoing users.
- Lock/Unlock – Lock or unlock outgoing users from sending out mails.
- Import from incoming – Import outgoing users from the list of incoming users.
- Whitelist recipients – View and manage whitelist recipients.
- View – Only view list of whitelisted recipients.
- Manage – View and manage whitelist recipients.
- Blacklist recipients – View and manage whitelist recipients.
- View – Only view list of blacklisted recipients.
- Manage – View and manage blacklist recipients.
- Users auto-import - Automatically import all new incoming users bases on incoming email flow
- View – Only view list of users auto-import recipients.
- Manage – View and manage users auto-import recipients.
- Domain geolookup restrictions – View and manage CSEG web interface access control policies
- View – Only view the access control polices
- Manage – View and manage access control policies
- Domain management – View and manage all domain related tasks.
- Local recipients – View and manage local recipients.
- View – Only view list of local recipients.
- Manage – View and manage local recipients.
- Domain alias – View and manage domain aliases
- View – Only view the list of domain aliases.
- Manage – View and manage domain aliases.
- Email filter settings – View and configure incoming spam detection settings.
- View – Only view incoming spam detection settings.
- Change - View and configure "Spam threshold" and "Probable spam threshold" fields.
- Threshold – Configure changes for "Spam threshold" and "Probable spam threshold" fields in the Incoming Spam detection settings
- Domain settings - View and change domain settings.
- View – Only view the list of domain settings.
- Change - View and configure domain settings.
- Email for license notification – View and configure license expiry reminders
- Domain disk space limitation – View and configure archive storage disk space.
- View – Only view archive storage space.
- Change – View and configure archive storage space.
- LDAP – View and configure LDAP settings for importing users.
- View – Only view LDAP settings and list of imported users.
- Change – View and configure LDAP settings for importing users.
- Quarantine – View and manage quarantined mails.
- View – Only view the list of quarantined mails.
- Delete – Deleted quarantined mails from the list.
- Release – Release quarantined mails to the recipients.
- View mail content - Only view quarantined mails from the list.
- Archive - View and mange copy of incoming mails in archive.
- View – Only view archived mails.
- Resend – Resend archived mails to recipients.
- Retain – Retains archived mails from being purged automatically.
- Delete – Delete archived mails.
- View mail content - View mail content of archived mails.
- Incoming delivery queue – View and mange queued mails.
- View – Only view queued mails.
- Retry – Retry to send queued mails to recipients.
- Alerts - Queue email notification.
- Incoming Log Search – Search incoming mails log.
- Outgoing Log Search – Search sent mails log.
- Clear incoming cache – Clear incoming callout cache.
- Clear outgoing cache – Clear outgoing callout cache.
- User session history view - View user sessions history for the assigned domain(s).
- Office 365 Activation settings – View and configure Office 365 activation settings.
- SPF Control settings – View and manage sender policy framework (SPF) settings
- View – Only view SPF settings.
- Manage – View and configure SPF settings.
- Email Management – View and configure all Email management related settings and tasks.
- Email size – View and configure email size settings.
- View – Only view email size settings.
- Change – View and configure email size settings.
- Blocked extensions – View and manage blocked extensions.
- View – Only view the list of blocked extensions.
- Change – View and manage blocked extensions.
- Whitelist senders – View and manage sender whitelist.
- View – Only view sender whitelist.
- Manage – View and manage sender whitelist.
- Blacklist senders – View and manage sender blacklist.
- View – Only view sender blacklist.
- Manage - View and manage sender blacklist.
- Release requests – View and manage requests from users for release of quarantined mails.
- View – Only view the list of requests from users for release of quarantined mails.
- Manage – View and manage requests from users for release of quarantined mails.
- Whitelist requests – View and manage requests from users to whitelist senders.
- View – Only view the list of requests from users for adding senders to whitelist.
- Manage – View and manage requests from users to whitelist senders.
- Blacklist requests – View and manage requests from users to blacklist senders.
- View – Only view the list of requests from users for adding senders to blacklist.
- Manage – View and manage requests from users to blacklist senders.
- Report spam – Upload mails to CSEG for reporting them as spam.
- Create rule – Create and manage administrators rules.
- View – Only view administrators rules.
- Manage – View and manage administrators rules.
- Whitelist sender rule – View and manage rules for adding senders to whitelist
- View – Only view the whitelist sender rules
- Manage – View and manage whitelist sender rules
- Blacklist sender rule – View and manage rules for adding senders to blacklist
- View – Only view the blacklist sender rules
- Manage – View and manage blacklist sender rules
- Whitelist senders per user – View and manage whitelisted senders per user.
- View – Only view list of whitelisted senders per user.
- Manage – View and manage whitelisted senders per user.
- Blacklist senders per user – View and manage blacklisted senders per user.
- View – Only view list of blacklisted senders per user.
- Manage – View and manage blacklisted senders per user.
- Domain relay restrictions - View and configure email relay restriction rules
- View – Only view relay restriction rule
- Manage – View and manage relay restriction rules
- Audit log – Configure and view log for the permitted domain.
- Configuration – Configure the log settings for the permitted domain.
- Log - View and export the log for the permitted domain.
- Report management - View and configure settings for periodical domain and quarantine summary reports for the permitted domain.
- View - Only view the configured settings for periodical domain and quarantine summary reports for the permitted domain.
- Change - View and configure settings for periodical domain and quarantine summary reports for the permitted domain.
- Add group – No permissions are enabled. You can enable permissions as per your requirement.
- Add domain group – Permissions required for domain management are enabled. You have to select the domain(s) for adding to the domain group. The following customer permissions are enabled by default:
Click the following links for more details:
- All customer permissions
- User permissions – View and manage
- Report management – View and change
- User session history view
- Locale – View and change
- Email template management
- Audit log
- Click the 'Add group' button
- A new admin group creating field appears
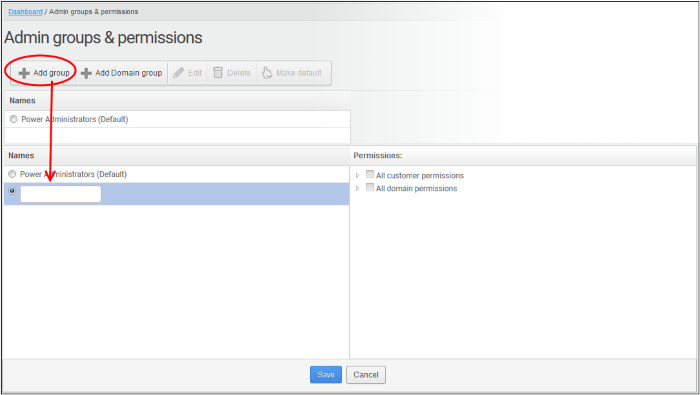
 Enter
the name of the group in the text field under the 'Name' column.
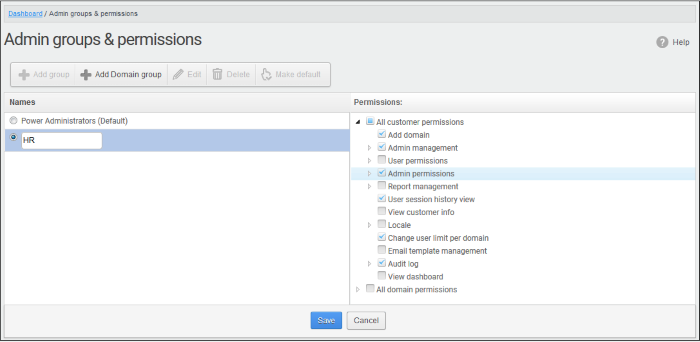
- Select the permissions for the admin group on the right.
- Click 'Save' button.
The newly created group is added.
Now, administrators belonging to the account can be assigned to this newly created group. See 'Manage Permissions for Administrators' in 'Administrators' on how to add users to predefined groups.
- Click the 'Add domain group' button
- A new domain admin group creating field appears
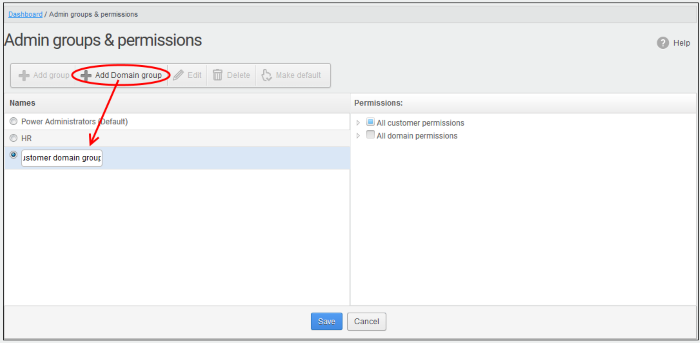

- Enter the domain admin group name
- Permissions:
- All customer permissions - This group comes with predefined customer permissions that is adequate for domain management. Update if required, but not recommended. See default permission levels explained above.
- All domain permissions - Select the domain(s) and domain permissions for the group.
- Click 'Save'
Now,
administrators belonging to the account can be assigned to this newly
created group. See 'Manage Permissions for Administrators' in 'Administrators'
on how to add users to predefined groups.
Edit an admin group / domain group
You can edit the name of an existing group and / or change the permission levels.
-
Select the group from the list and click the 'Edit' button.
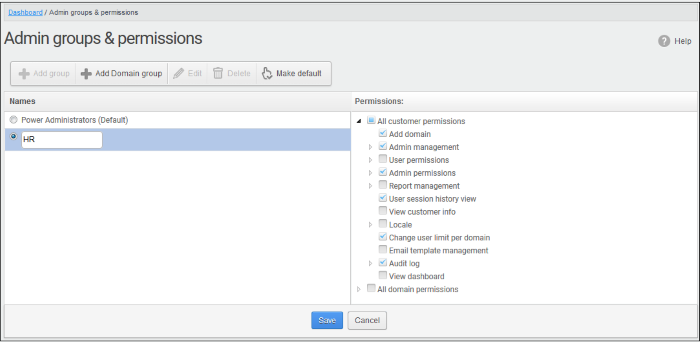

- Change the permission levels and / or the name of the group.
- Click the 'Save' button for the changes to take effect.
The admins in the group that is edited will be automatically reassigned to the edited group.
Delete an admin group / domain
group
- Select the group from the list and click the 'Delete' button.
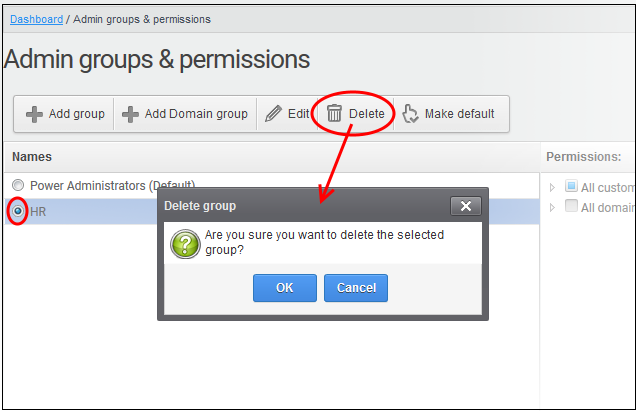

- Click 'OK' in the confirmation dialog.
The selected group will be deleted from the list.
|
Note 1: If you delete a group, admins assigned to that group will be automatically moved to default group. You have to reassign the administrators if required. Note 2: If you delete an admin group created by the administrator and marked as default, then the power administrator group that was shipped with the product will be set as default. All the admins from the deleted group will be automatically migrated to the power administrator group. |
Make a admin/ domain group as default
CSEG allows administrators to make an existing group as a default group. Newly added administrators and administrators belonging to an existing group whose name was deleted will be automatically moved to this default group.
-
Select a group from the list and click the 'Make default' button.
- A success dialog will be displayed.
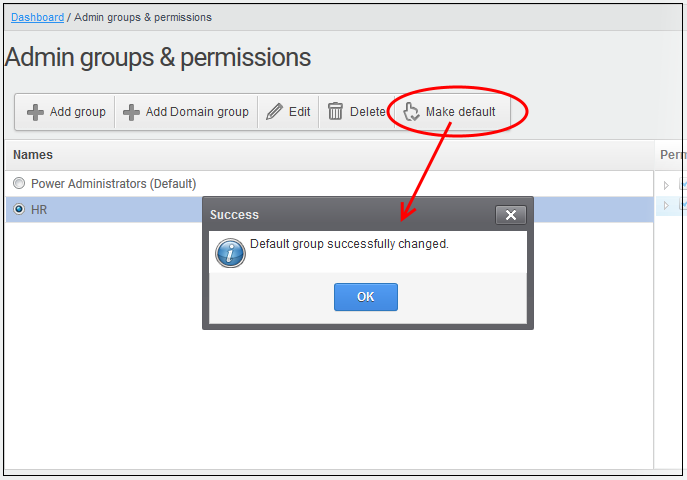

- Click 'OK'.
The selected group will be displayed as default group.
|
Note: If you delete an admin group created by the administrator and marked as default, then the power administrator group that was shipped with the product will be set as default. All the admins from the deleted group will be automatically migrated to the power administrator group. |


