Step 6 - Create Firewall Policy
Central
manager allows you to configure firewall policies for all devices in
an organization and for individual devices. You can also
create rules for source network address translation (SNAT), virtual
IPs, system access and more.
- Note - Existing FW policies are not imported with the device. We recommend you remove these from the device before importing then configure them again in central manager.
Each Dome firewall has a policy which manages traffic flowing in and out of the network. A policy is constructed from a series of firewall rules that are imposed on different types of traffic.
- Incoming traffic - Traffic from external network zones to hosts in the internal network zone
- Outgoing traffic - Traffic from hosts to the external network zone
- Inter-zone traffic - Traffic between network zones connected to the firewall device
- VPN traffic - Traffic from users connected to internal zones via virtual private network (VPN).
Each Firewall rule contains three components:
- General Settings - Specify source and destination addresses and the service/protocol of packets to be intercepted by the rule. You can select firewall address objects/groups as 'source' and 'destination' addresses. See Create Firewall Address Objects for help to create firewall address objects.
- Web Protection - Enable or disable URL filtering, Advanced Threat Protection (ATP) and SSL Interception. You can also choose pre-configured profiles for them. See Manage ATP Profile and Create URL Filter Profiles for help to create these profiles.
- Content Flow Check - Enable or disable Intrusion Prevention and Application Detection settings for the rule.
You can create different rules for different configurations for each of these components. The rules will be applied to the inbound and outbound packets in order.
- Before creating a firewall policy, you must first create firewall address objects, an advanced threat protection (ATP) profile, URL filters, and an intrusion prevention profile.
- Once done, these objects and profiles can be used in firewall, source network address translation (SNAT) and system access rules.
Create
Firewall Address Objects
- An address object is reference to a set of IP addresses in a specific organization / device. These objects can be used in firewall rules
- Click 'Firewall' > 'Firewall Addresses' in the left-hand menu
- Select an organization or individual device from the drop-down above the list (next to the word 'Firewall')
- Select an organization object to manage addresses for all devices in the organization
- Select an individual object under an organization to manage addresses for a single device
- Click the 'Add an address' button
- The 'Add Object' dialog will open:
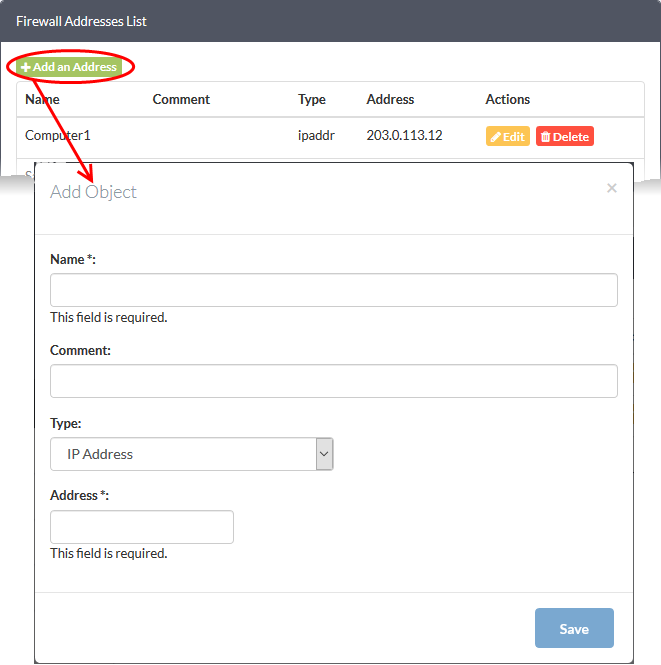
- Enter parameters for the new object:
- Name - Specify a label for the object (15 characters max). Ideally this should help identify the host(s) included in the object.
- Comment - Enter a short description of the object.
- Type - The type of address object you wish to create. The options are:
- Subnet - The object will describe an entire sub-network of computers. Enter the subnet address in the 'Address' field.
- IP address - Select this if a single host will be covered by the object. Enter the IP address in the 'Address' field.
- IP range - The object will refer to hosts on an entire range of IP addresses. Enter the IP range in the 'Address' field.
- Click 'Save'. The new address object will be added to the list.
Create
Firewall Address Object Groups (Optional)
- Firewall object groups consist of one or more IP address objects. Object groups can be created for organizations or devices
- Click 'Firewall' > 'Firewall Groups' in the left-hand menu
- Select an organization or individual device from the drop-down above the list (next to the word 'Firewall')
- Select an organization object to manage groups for all devices in the organization
- Select an individual object under an organization to manage groups for a single device
- Click 'Add a Group' at the top-left. The 'Add Group' dialog will open:
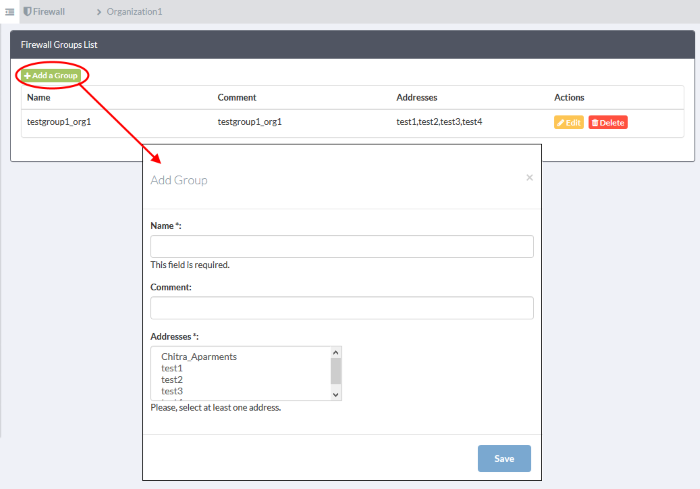
- Enter the parameters for the new object:
- Name - Specify a label for the group (15 characters max)
- Comment - Enter a short description of the group.
- Address - Select the address objects that should be included in the group.
- Click 'Save'. The new group will be added to the list.
- Advanced Threat Protection (ATP) safeguards networks against malware, hack attempts, data breaches and more.
- ATP intercepts files downloaded from websites or email attachments and uses a combination of antivirus scans, behavior analysis and blacklist checks to quickly block threats.
- Default ATP Profiles can be created for organizations and individual devices.
- The settings you save in the default profile will be applied to all rules in your firewall policy that have 'Advanced Threat Protection' enabled.
To configure an ATP profile for an organization or device
- Click 'Advanced Threat Protection' on the left.
- Select an organization or device from the drop-down above the list (next to the words 'Advanced Threat Protection')
- Select an organization to manage the ATP profile for all devices in the organization
- Select an individual device to manage the ATP profile for that single device
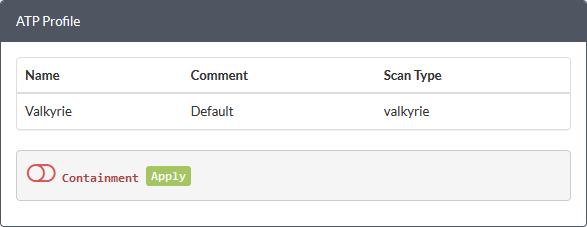
- Use the switch beside 'Containment' to enable or disable the auto-containment of unknown files at the endpoints.
- Click 'Apply'.
The default profile for the selected organization/device will be saved.
A URL filter profile lets you control which sites can be accessed by users on your network. There are two types of filters:
- Content categories - Web pages with content which falls into a chosen category will be automatically blocked
- URL Whitelist/Blacklist – Users can access whitelisted addresses. Blacklisted addresses will be blocked. These lists are often used to create exceptions for sites blocked (or allowed) by content categories
A profile can feature a combination of categories and white/blacklists. Profiles can be added to firewall rules created for an organization or device.
To create a URL filtering profile
- Click 'URL Filter' on the left
- Select an organization or device from the drop-down above the list (next to the words 'URL Filter')
- Select an organization to add a filter profile for all devices belonging to an organization
- Select an individual device to add a filter profile for a single device
- Click the 'Add a New URL Filter Profile' button:
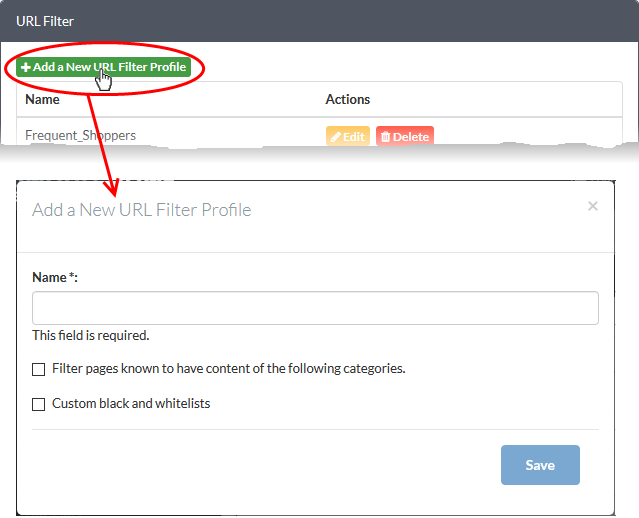
- Create a name for the profile. Ideally this should identify the network to which the profile will apply.
- Filter pages known to have content of the following categories - Specify content types which should be blocked by the profile.
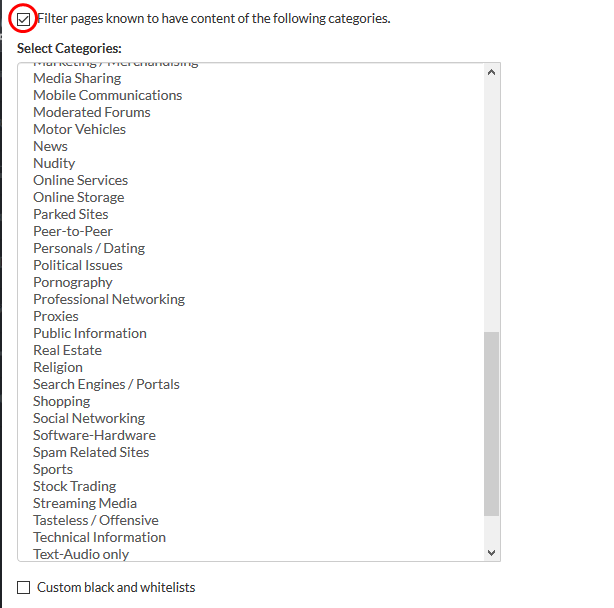
- Click on each category you wish to
block.
|
Tip: Hold down the 'CTRL' key while clicking to select multiple items. |
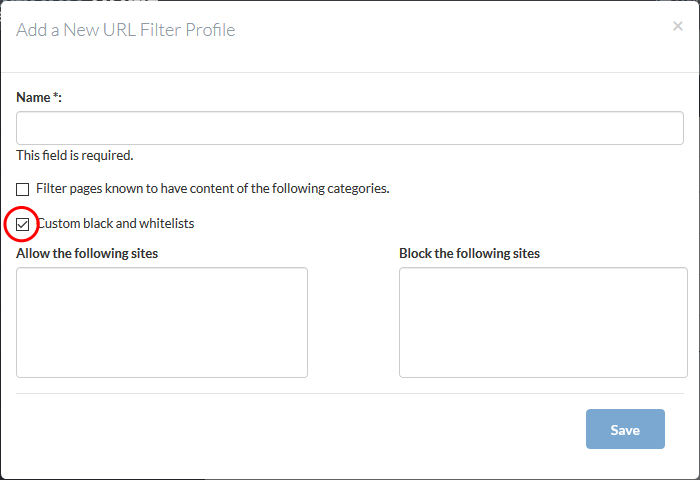
- Custom black and whitelists - Type the URLs of specific websites you wish to block or allow in the boxes provided:
|
Note:
|
- Click 'Save' to add the profile to the list.
- Repeat the process to add more URL filter profiles.
Manage Intrusion Prevention Profile
- Comodo Dome Firewall uses 'Snort', a state-of-the-art network intrusion prevention and detection system (IDS/IPS) directly built-in to its IP tables.
- Snort employs signature, protocol, and anomaly-based inspection of incoming traffic to detect and block intrusion attempts.
- Snort uses IPS 'rulesets'. Each ruleset contains a number of ips and application rules to identify applications that generate traffic on your network.
- Application identification rulesets intercept traffic from web based applications and allow or block data packets from them.
- All rule sets are constantly updated to confront emerging network intrusion techniques.
- The
settings you save in the default profile will be applied to all
rules in your firewall policy that have the 'default' intrusion
prevention profile enabled.
There are three components of an intrusion prevention profile:
Configure Rules Update Schedule
- Click 'Intrusion Prevention' on the left and choose 'IPS Settings'
- Select an organization or device from the drop-down above the list (next to the words 'Intrusion Prevention')
- Select an organization to manage the IPS ruleset update schedule for all devices in the organization
- Select an individual device to manage the IPS ruleset update schedule for that single device.
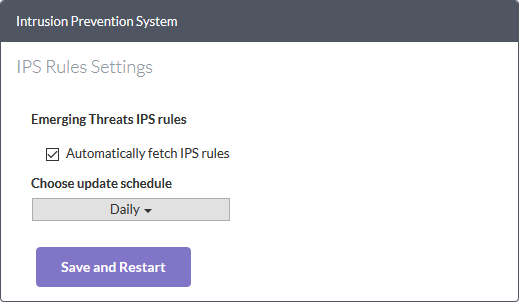
- Automatically fetch IPS rules - If enabled, Dome Firewall will download and install ruleset updates at the schedule you choose.
- Choose update schedule - Select the interval for automatic updates. The available options are:
- Hourly
- Daily (Default)
- Weekly
- Monthly
- Click 'Save and Restart'
Your settings will be saved. The devices in which the profile is already in effect will be restarted for the changes to take effect.
You can enable/disable IPS rulesets
and configure them to allow or block data packets as required.
To configure IPS Rulesets
- Click 'Intrusion Prevention' on the left and choose 'IPS Settings'
- Select an organization or device from the drop-down above the list (next to the words 'Intrusion Prevention')
- Select an organization to manage the IPS rulesets for all devices in the organization
- Select an individual device to manage the IPS rulesets for that single device.
Rulesets can be enabled or disabled individually or collectively:
- Enable a single ruleset - Click the
 icon in the 'Actions' column
- Disable
a single ruleset - Click the
 icon in the 'Actions' column
- Multiple rulesets - Select rulesets using the check-boxes on the left. Click the 'Enable' or 'Disable' button as required.
- Any changes will be saved to the default profile and immediately applied to devices on which the profile is active.
Rule actions are the responses you want the firewall to take if the conditions of a rule are met. There are two options:
- Alert - Will allow the packet to pass
and will generate an alert. An alert policy is indicated by a yellow
triangle in the 'Actions' column -

- Drop - Will block the data packet without generating an alert. A drop
policy is indicated by a shield icon in the 'Actions' column -

Any changes will be saved to the default profile and immediately applied to devices on which the profile is active.
Configure
Application Identification Rulesets
- Application identification rules intercept traffic from web apps and allow or block packets according to your preference.
To configure Application Identification Rulesets
- Click 'Intrusion Prevention' >'Application Identification'
- Select an organization or device from the drop-down above the list (next to the words 'Intrusion Prevention')
- Select an organization to manage the application identification rulesets for all devices in the organization
- Select an individual device to manage the application identification rulesets for that single device.
Rulesets can be enabled or disabled individually or collectively:
- Enable a single ruleset - Click the
 icon in the 'Actions' column
- Disable
a single ruleset - Click the
 icon in the 'Actions' column
- Multiple rulesets - Select rulesets using the check-boxes on the left. Click the 'Enable' or 'Disable' button as required
- Any changes will be saved to the default profile and immediately applied to devices on which the profile is active.
Rule actions
Rule actions are the responses you want the firewall to take if the conditions of a rule are met. There are two options:
-
Alert – Will allow the packet to pass and will generate an alert. An alert policy is indicated by a yellow triangle in the 'Actions' column -

- Drop – Will block the data packet without generating an alert. A drop
policy is indicated by a shield icon in the 'Actions' column -

Any changes will be saved to the default profile and immediately applied to devices on which the profile is active.
Each organization or device should have a firewall policy applied to it. A policy consists of a series of firewall rules that are imposed on different types of traffic.
- Click 'Firewall' on the left and choose 'Firewall Policy'
- Select an organization or device from the drop-down in the title bar (next to the word 'Firewall')
The 'Current Rules' pane shows all rules in the policy. You can edit these rules and create/remove rules.
- Select an organization to manage the firewall policy/rules for all devices belonging to the organization
- Select an individual device to manage the firewall policy/rules for a specific device

To add a rule to a policy
- Click 'Add New Firewall Rule' at the top-left of the 'Current Rules' interface
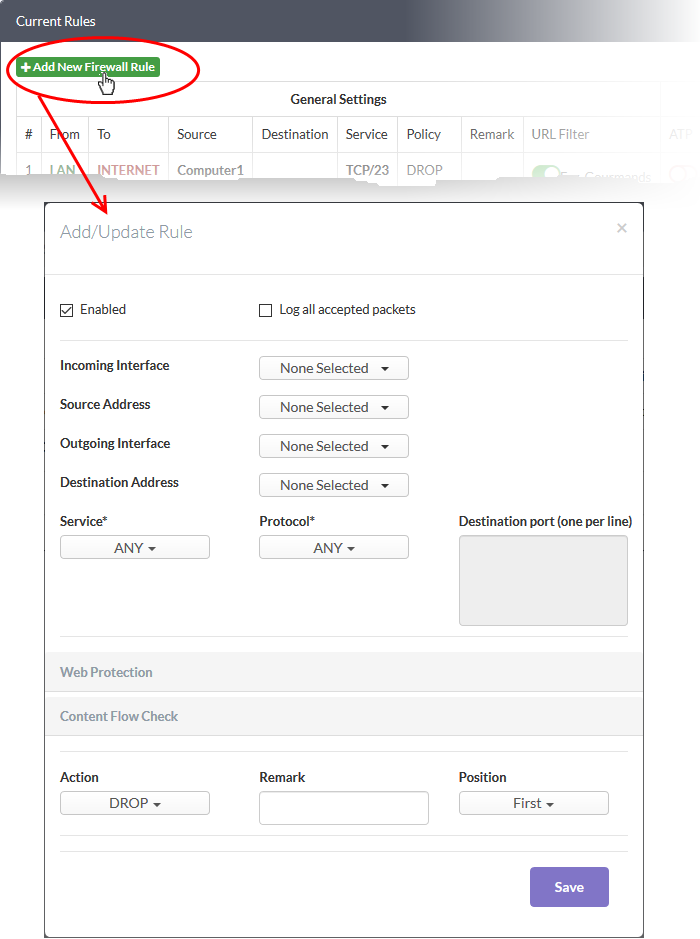
- Enabled - Enable or disable the firewall rule. You can also enable/disable the rule from the 'Current Rules' interface.
- Log all accepted packets - Enable to create a record of all packets allowed by the rule. You can view the logs from the respective firewall admin console. See https://help.comodo.com/topic-451-1-936-12765-View-Logs.html for more details.
- Incoming Interface - Choose the interface through which traffic is received. The drop-down shows the common and custom interfaces created for the selected organization or device.
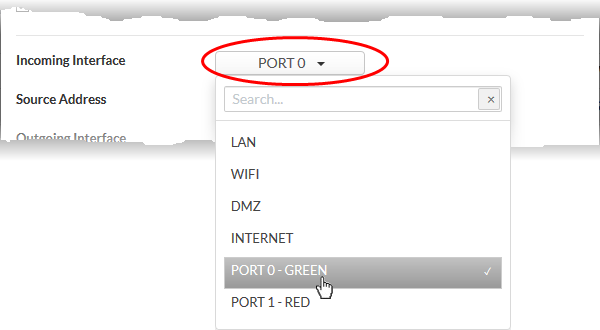
- You can select more than one interface for the rule.
- Use the 'Search' box to search for a specific interface.
- Source Address - Choose the firewall address object or group from which traffic originates. Please note that only the firewall address objects and object groups created for the selected organization/device will be available in the drop-down. See Create Firewall Address Objects for guidance on creating firewall address objects.
- Outgoing Interface - Choose the interface through which the traffic is sent. The drop-down shows the common interfaces and the custom interfaces created for the selected organization or the device.
- Destination Address - Choose the firewall address object or group to which traffic is sent. Please note that only the firewall address objects and object groups created for the selected organization/device will be available in the drop-down.
- Service - Choose the type of service hosted by the source from the drop-down
- Protocol - Choose the protocol used by the service
- Destination port - Specify the destination port number(s) used by the service, one by one.
- Click 'Web Protection' to open the security features for web protection:
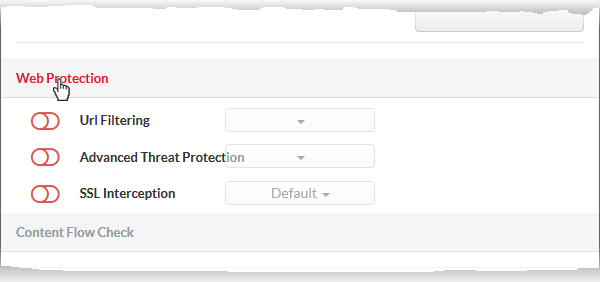
- URL Filtering - Enable or disable URL filtering profiles on traffic intercepted by the rule.
- Move the switch to ON to enable URL filtering
- Select the profile which specifies the sites you wish to block or allow from the drop-down:
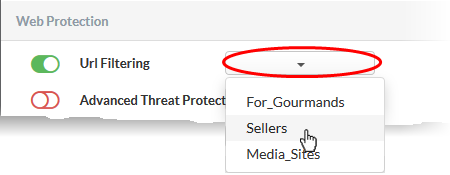
- URL filtering profiles can be created for organizations/device in the 'URL Filter' interface (click 'URL filter' on the left). See Create URL Filter Profiles for more details.
- Profiles defined for an organization can only be applied to devices which belong to the organization. If you apply it to the organization itself, the profile will apply to every device in the organization.
- Profiles defined for an individual device will be available only for that device.
- Advanced Threat Protection - Enable or disable advanced threat protection (ATP) settings on traffic intercepted by the rule. You can choose the ATP profile you want to apply from the drop-down menu.
- Move the switch to ON to enable ATP.
- Select the ATP profile from the drop-down.
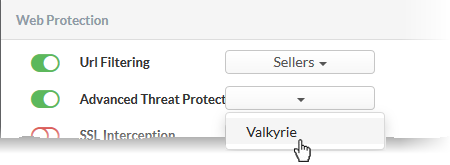
- The ATP default profile can be managed for the organization/device from the 'Advanced Threat Protection' interface. See Manage ATP Profile for guidance on this.
- SSL Interception - Enable or disable analysis of encrypted traffic which is intercepted by the rule.
- Move the switch to ON to enable SSL interception.
- Select the default profile from the drop-down.
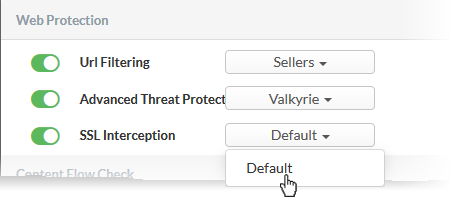
Selecting 'Default' will apply the HTTPS exception settings as configured on the firewall device itself. See https://help.comodo.com/topic-451-1-936-12835-HTTPS-Proxy.html for help with this.
- Click 'Content Flow Check' to configure these settings:

- Intrusion Prevention - Enable/disable Snort intrusion detection technology on traffic intercepted by the rule. See 'Intrusion Prevention' for more details.
- Move the switch to ON to enable intrusion prevention.
- Select the default profile from the drop-down.

Selecting 'Default' will apply the rule settings configured in the 'Intrusion Prevention' interface. See 'Manage Intrusion Prevention Profile' for more details.
- Application Detection - Enable or disable application identification rules on traffic intercepted by the rule. Application ID rules allow you to track the activities of applications on your network, allowing you to attribute IPS events to applications.
- Move the switch to ON to enable application detection.
- Select the default profile from the drop-down.
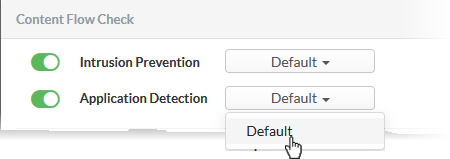
Selecting 'Default' will apply the settings configured for the organization/device in the 'Intrusion Prevention > 'Application Identification' interface. See 'Configure Application Identification Rulesets' for more details.
Actions
- Action - Specify whether packets matching the rule should be allowed or denied. The available options are:
- Accept - The data packets will be allowed without filtering
- Drop - The packets will be denied.
- Reject - The packets will be rejected, and error packets will be sent in response
- Remark - Enter a short description of the rule. The description will appear in the 'Remark' column of the 'Rules' table.
- Position - Set the priority of the rule in the list of rules. The rules will be applied on the inbound and outbound traffic in the order they appear on the list.
- Click 'Save' to add the rule to central manager.
The rule will be applied to all target devices. You can view the view the application status and re-apply the rule if required from the 'Dashboard' > 'Tasks' interface. See the online help page at https://help.comodo.com/topic-451-1-939-12877-View-Management-Tasks.html for guidance on this.
- Repeat the process to add more firewall rules to the policy.


