Step 2 – Configure the Network Interfaces
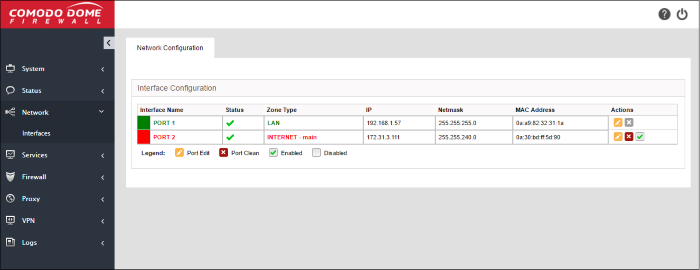
The network interfaces (LAN and Internet) used to connect endpoints to internal and external networks are pre-configured by Comodo.
To configure the network interfaces
- Click
'Network' on the left then 'Interfaces':

You may update the configuration of these interfaces if required. See the following links for more details:
Updating WAN network zone to connect to the internet
The setup for external networks involves configuring network parameters and preferences for the internet zone.
To configure the external network zone
- Click
on the edit icon
 in the row of the port to which the interface
device for connecting to external network/internet.
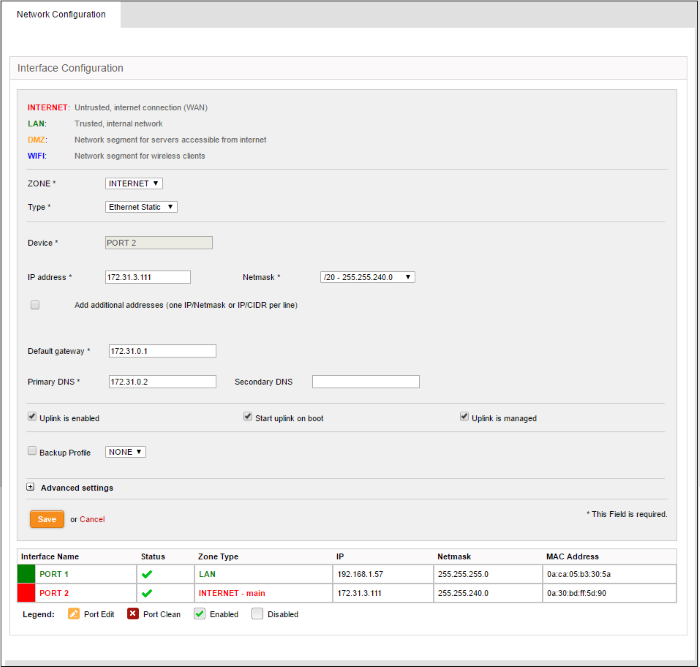
- The pane for configuring the network interface device will open.

- Zone - This is pre-configured as 'INTERNET' and cannot be changed.
- Type - This is pre-configured as 'Ethernet Static' and cannot be changed.
Device Settings
- Device - The port to which the interface device is connected. The port is pre-selected
- IP Address - Enter the IP address of the interface device
- Netmask - Choose the network mask containing the possible masks from the drop-down (e.g. /24 - 255.255.255.0)
- Add additional addresses - If additional IP address(es)/netmask(s) are to be added to the interface, select the 'Add additional addresses' checkbox and enter the additional IP address(es)/netmask(s) of different subnets one by one per line
- Default gateway - Enter the IP address of the default gateway through which DcF connects to internet in the 'Default Gateway' text box
- DNS Settings - Enter the IP addresses/hostnames of the primary and secondary DNS servers to be used in the respective fields
Uplink Settings
- Uplink is Enabled - The uplink will be activated by default. Deselect this checkbox if you don't want to enable the uplink device at this time. You can enable the uplink at a later time in two ways:
- Select the checkbox in the 'Actions' column of the 'Interface Configuration' interface
- Select the 'Active' checkbox beside the uplink in the Uplinks box from the Dashboard
- Start uplink on boot - The uplink will start automatically on every restart of DCF. Deselect this checkbox if you want to manually start the uplink only when required
- Uplink is managed - The uplink will be managed by DCF and its details will be displayed in the Dashboard. Deselect this option if you do not want the uplink details to be displayed in the Dashboard. You can switch the uplink to managed state at any time by selecting the 'Managed' checkbox beside the uplink in the Dashboard
- Backup Profile - Select this checkbox if you want to specify an alternative uplink connection to be activated in the event this uplink fails and choose the alternative uplink device from the drop-down
- Additional Link check hosts - The uplink reconnects automatically after a time period set by your ISP, in the event of a connection failure. If you want the appliance to check whether the uplink has connected successfully, you can try to ping known hosts in an external network. Enabling this option will reveal a text field where you should enter a list of one or more perpetually reachable IP addresses or hostnames. One of the hosts could be your ISP's DNS server or gateway
Advanced Settings:
The Advanced Settings pane allows you to specify the MAC address and the Maximum Transmission Unit (MTU) of the data packets for the interface device. These settings are optional. If you need to specify custom values for these fields, click on the '+' sign beside 'Advanced Settings' to expand the 'Advanced Settings' pane.
- Use custom MAC address - DCF has the capability to automatically detect the MAC address of the device connected to the port specified and populates the same in the MAC address column. If you need to specify a different MAC address to override and replace the default MAC address of the external interface, select the ' Use custom MAC address' checkbox and enter the MAC address in the text box that appears below the checkbox.
- Reconnection timeout - Specify the maximum time period (in seconds) that the uplink should attempt to reconnect in the event of a connection failure. The reconnection timeout period depends on the ISP configuration. If you are unsure, leave this field blank.
- MTU - Enter the Maximum Transmission Unit (MTU) of the data packets that can be sent over the network.
- Click 'Save'.
A confirmation dialog will be displayed.

- Click 'OK'.
DCF will restart for your settings to take effect.
- Network configuration activities like date, time, type of event, subject id, component name and the event outcome are logged.
|
Tip:
You can edit the network configuration e.g. for changing selected
parameters like hostname or the network range of a zone, at any
time depending on changes in your network. Click 'Network' > 'Interface', click the 'Edit icon' |
The setup for internal networks involves configuring network parameters and preferences for the LAN zone.
To configure the internal network zone
- Click
on the edit icon
 in the row of the port to which the interface
device for connecting to the LAN zone is plugged-in.

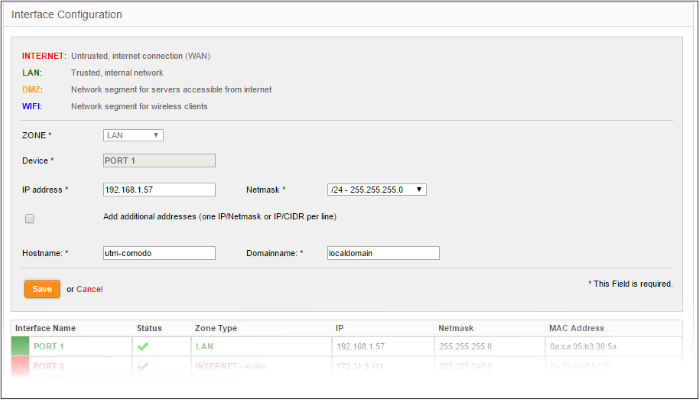
- Zone - Displays 'LAN' by default. This cannot be edited.
- Device - The port to which the interface device is connected. The port is pre-selected.
- IP Address - Enter the IP address of the interface device, as pre-configured in the network
- Netmask - Choose the network mask containing the possible masks from the drop-down (e.g. /24 - 255.255.255.0)
- Add additional addresses - If additional IP address(es)/netmask(s) are to be added to the interface, select the 'Add additional addresses' checkbox and enter the additional IP address(es)/netmask(s) of different subnets one by one.
- Hostname and Domainname - Enter the host name of your network server and the domain name of your network in the respective text fields
- Click 'Save'.
A confirmation dialog will be displayed.

- Click 'OK'.
- Network configuration activities like date, time, type of event, subject id, component name and the event outcome are logged.
|
Tip:
You can edit the network configuration e.g. for changing selected
parameters like hostname or the network range of a zone, at any
time depending on changes in your network. Click Network >
Interface, click the 'Edit icon' |


