Configure Firewall Policy Rules
Each Comodo Dome Firewall has a policy which manages traffic flowing in and out of the network. The policy is constructed from a series of firewall rules that are created and imposed for different types of data traffic.
- Incoming traffic - Traffic from external network zones to specified hosts in the internal network zone
- Outgoing traffic - Traffic from hosts to the external network zone
- Inter-zone traffic - Traffic between network
zones connected to the firewall device
- VPN traffic - Traffic from users connected to internal zones via virtual private network (VPN).
The 'Firewall Policy' interface
lets you create and manage rules for policies which are applied to
organizations and individual firewall devices. An organization policy
will apply to all firewall devices belonging to that organization.
- Note - Existing FW policies will not be imported with the device.
To configure firewall policy
- Click 'Firewall' on the left and choose 'Firewall Policy'
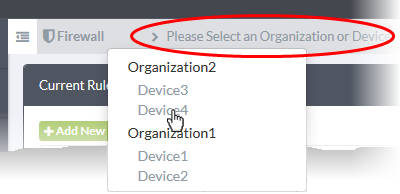
- Select the organization/device from the drop-down in the title bar
- Select an organization to manage policy/rules for all devices in that organization
- Select an individual device under an organization to manage policy/rules for a single device.

The 'Current
Rules' pane shows all rules which constitute the policy. You can edit
these rules and create/remove rules.
|
Policy Firewall Rules Table - Column Descriptions |
||
|---|---|---|
|
Category |
Column |
Description |
|
General Settings |
# |
Serial number of the rule. |
|
From |
The interface or network zone from which the traffic originates. |
|
|
To |
The interface or network zone to which the traffic is directed. |
|
|
Source |
The firewall object or object group which contains the addresses of the host(s) from which traffic originates. |
|
|
Destination |
The firewall object or object group which contains the addresses of the host(s) to which traffic is sent. |
|
|
Service |
Protocol and port that will be used by traffic affected by this rule. |
|
|
Policy |
Indicates the action taken on the data packets intercepted by the rule |
|
|
Remark |
A short description of the rule. |
|
|
Web Protection |
URL Filter |
Whether or not the 'Web Filter' security profile is enabled for the rule. If enabled you will see the name of the profile. |
|
Advanced Threat Protection |
Whether or not the 'Advanced Threat Protection' component is enabled for the rule. |
|
|
SSL Intercept |
Whether or not the 'HTTPS Intercept Web Filter security profile' is enabled for the rule. If enabled you will see the name of the profile. |
|
|
Intrusion Prevention |
IPS |
Whether or not the 'Intrusion Protection System (IPS)' security profile is enabled for the rule. |
|
AppID |
Whether or not the the 'Application Filter' rule is enabled for the policy. |
|
|
|
Rule ID |
Identity number of the rule. This is determined by the order in which the rules were created for the device/organization. Traffic is allowed or denied based on the first matching rule in ascending order of ID numbers. This is regardless of the order of the rules as shown in the table. |
|
Actions |
Controls for managing the rule.
|
|
Firewall rules contain three components:
- General Settings - Specify source and destination addresses and the service/protocol of packets to be intercepted by the rule. You can specify the firewall address objects and object groups as source and destination addresses. See Manage Firewall Address Objects for more details on adding firewall address objects.
-
Web Protection - Enable or disable URL filtering, Advanced Threat Protection (ATP) and SSL Interception. You can also choose pre-configured profiles for them. See Manage Advanced Threat Protection Profiles and Manage URL and Content Filtering Profiles for guidance on creating these profiles.
-
Content Flow Check - Enable or disable Intrusion Prevention and Application Detection settings for the rule. See Intrusion Prevention for more details on managing these settings.
You can create different rules for different configurations for each of these components. The rules will be applied to the inbound and outbound packets in order.
To add a rule to an existing organization a device policy
- Click 'Firewall' on the left and choose 'Firewall Policy'
- Select the organization/device from the drop-down in the title bar
- Select an organization if you wish to manage policy rules for all devices in the organization
- Select an individual device to manage policy rules for a particular device

- Click 'Add New Firewall Rule' at the top-left of the 'Current Rules' interface

General
Settings:
- Enabled – Enable or disable the firewall rule. You can also enable/disable the rule from the 'Current Rules' interface.
- Log all accepted packets – Enable to create a record of all packets allowed by the rule. You can view the logs from the respective firewall administrative console. See https://help.comodo.com/topic-451-1-936-12765-View-Logs.html for more details
for more details.
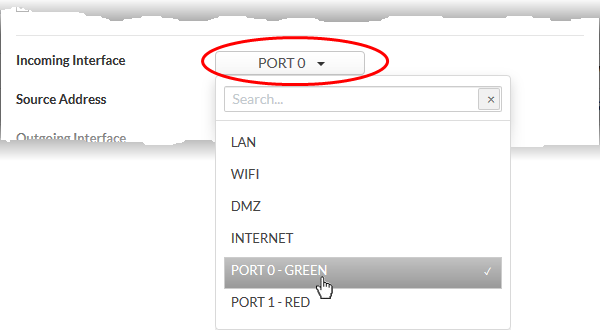
- Incoming Interface - Choose the interface through which traffic is received from the drop-down. The drop-down shows the common and custom interfaces created for the selected organization or device.

- You can select more than one interface for the rule
- Use the 'Search' box to search for a specific interface
- Source Address - Choose the firewall address object or the object group from which traffic originates. Please note that only the firewall address objects and object groups created for the selected organization/device will be available in the drop-down. See Manage Firewall Address Objects for guidance on creating firewall address objects.
- Outgoing Interface - Choose the interface through which the traffic is sent. The drop-down shows the common interfaces and the custom interfaces created for the selected organization or the device.
- Destination Address - Choose the firewall address object or group to which traffic is sent. Please note that only the firewall address objects and object groups created for the selected organization/device will be available in the drop-down.
- Service - Choose the type of service hosted by the source from the drop-down
- Protocol - Choose the protocol used by the service
- Destination port - Specify the destination port number(s) used by the service, one by one.
- Click 'Web Protection' to open the security features for web protection:

- URL Filtering – Enable or disable URL filtering profiles on traffic intercepted by the rule.
- Move the switch to ON position to enable URL filtering
- Select the profile which specifies the sites you wish to block or allow from the drop-down:

- URL filtering profiles can be added for organizations/devices from the 'URL Filter' interface. See Manage URL and Content Filtering Profiles for more details.
- Profiles defined for an organization can only be applied to devices which belong to the organization. If you apply it to the organization itself, the profile will pertain to every device in the organization.
- Profiles defined for an individual device will be available only for that device.
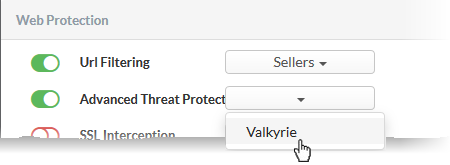
- Advanced Threat Protection - Enable or disable advanced threat protection (ATP) settings on traffic intercepted by the rule. You can choose the ATP profile you want to apply from the drop-down menu.
- Move the switch to ON to enable ATP.
- Select the ATP profile from the drop-down.

- The ATP default profile can be managed for the organization/device from the 'Advanced Threat Protection' > 'Profiles' interface. See Manage Advanced Threat Protection Profile for guidance on this.
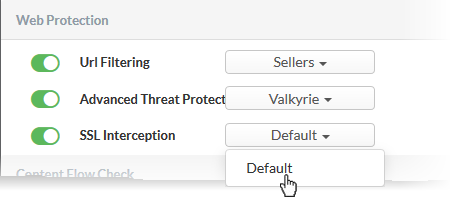
- SSL Interception - Enable or disable analysis of encrypted traffic which is intercepted by the rule.
- Move the switch to ON to enable SSL interception.
- Select the default profile from the drop-down.

Selecting 'Default' will apply the HTTPS exceptions settings as configured in the firewall device. See the online help page https://help.comodo.com/topic-451-1-936-12835-HTTPS-Proxy.html for more details.
- Click 'Content Flow Check' to configure these settings:

- Intrusion Prevention - Enable/disable Snort intrusion detection technology on traffic intercepted by the rule. See 'Intrusion Prevention' for more details.
Move the switch to ON to enable intrusion prevention.
- Move the toggle switch to ON position to enable intrusion prevention.
- Select the default profile from the drop-down.

Selecting 'Default' will apply the rule settings configured in the 'Intrusion Prevention' interface. See 'Intrusion Prevention' for more details.
- Application Detection - Enable or disable application identification rules on traffic intercepted by the rule. Application ID rules allow you to track the activities of applications on your network, allowing you to attribute IPS events to applications.
- Move the switch to ON to enable application detection.
- Select the default profile from the drop-down.

Selecting 'Default' will apply the settings configured for the organization/device in the 'Intrusion Prevention > 'Application Identification' interface. See 'Manage Application Identification Rulesets' for more details.
Actions
- Action - Specify whether packets matching the rule should be allowed or denied. The available options are:
- Accept - The data packets will be allowed without filtering
- Drop - The packets will be denied.
- Reject - The packets will be rejected, and error packets will be sent in response
- Remark - Enter a short description of the rule. The description will appear in the 'Remark' column of the 'Rules' table
- Position - Set the priority of the rule in the list of rules. The rules will be applied on the inbound and outbound traffic in the order they appear on the list
- Click 'Save' to add the rule to central manager.
The rule will be applied to all target devices. You can view the view the application status and re-apply the rule if required from the 'Dashboard' > 'Tasks' interface. See View Management Tasks for more details.


