Get Started
The first step is to configure your network clients to work with the Dome Cloud Firewall service. There are two ways to connect to Dome Cloud Firewall:
In this method, all users/clients
must be configured individually in order to route traffic via Dome Cloud Firewall. The advantage in this method is the clients will always be
routed via Dome Cloud Firewall irrespective of their location.
To configure a client to connect to Dome Cloud Firewall
- Click 'VPN' on the left then 'SSLVPN Server'
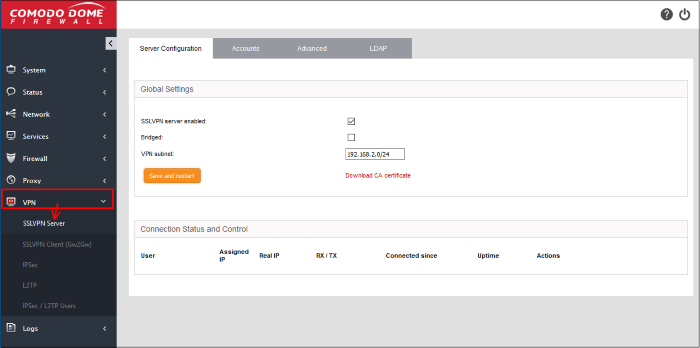
In the Server Configuration screen, configure the following:
- SSLVPN server enabled - Select the checkbox to enable the SSLVPN server
- Bridged - Select the checkbox if you wish to run the server in bridged mode
- Bridge to - Choose the local network zone to which the server is to be bridged. This option will appear only if you chose to run the server in bridged mode in the previous option
- Dynamic IP pool start address and Dynamic IP pool end address - Enter the first and last address of the IP address pool from which the IP addresses are to be dynamically assigned to the clients that are connecting to the server. All the traffic from these IP addresses will pass through the VPN firewall, if enabled
- Click 'Save and Restart'. The SSL VPN server service will be restarted for your settings to take effect
- To download the server certificate for deployment to the clients, click 'Download CA certificate'. The certificate can also be downloaded from the 'Accounts' interface
Next, click the 'Accounts' tab:

To add a new user account
- Click the 'Add account' button. The 'Add new user' pane for adding a new domain will open
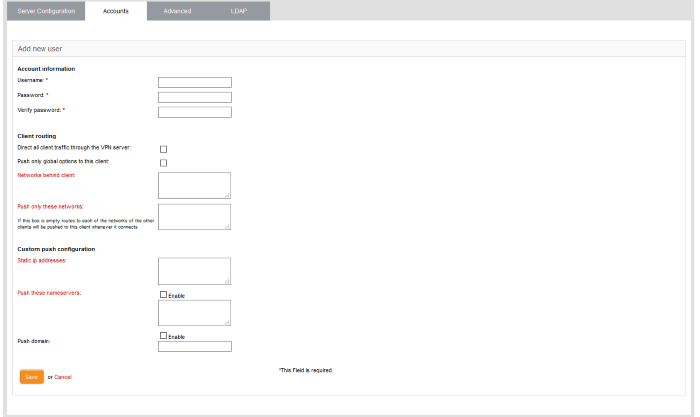
Account information
Specify the username and password for the user account. These credentials are to be entered to the SSL VPN client for authenticating itself to the server.
- Username - Enter a username for the account
- Password - Enter a password for the account
- Verify
password - Re-enter the password for confirmation
Client routing
Configure the routing traffic for the client
- Direct all client traffic through the VPN server - Select this option for all the incoming and outgoing traffic pertaining to the client to pass through the VPN server
- Push only global options to this client - Instructs the server to push only the network routes, name servers and domains specified under the Global Push Options under the 'Advanced' settings tab.
- Networks behind client - Enter the network subnet address of the VPN gateway server for the client to connect to VPN.
- Push only these networks - If you wish to push the routes of only selected networks to the client, then enter the network/subnet addresses of the networks. If you wish to push the routes of networks of all the other clients, leave this field blank.
Custom push configuration
- Static ip addresses - If you wish to assign static IP addresses for the clients using this account, enter the IP addresses in CIDR format. To avoid IP address clashes, it is recommended to specify the static IP addresses outside the Dynamic IP address pool specified under the 'Server Configuration' tab.
- Push these nameservers - If you wish the clients to use specific name servers for DNS resolution, select the 'Enable' checkbox and enter the IP addresses of the name servers in the text box.
- Push domain - If you wish to specify a specific search domain for the clients using this account, to identify the servers and network resources in the VPN network, select the 'Enable' checkbox and enter the domain name in the text box.
- Click 'Save'. The account will be added to the list of accounts. The account will be activated enabling the clients to connect to the server only after the next restart of the SSL VPN server.
- Click 'Restart SSL VPN server' to instantly restart the server.
Download the server certificate and the SSL VPN client configuration file from the 'Accounts' interface. The server certificate type for authentication can be configured under 'Advanced' tab > Authentication Settings.
- Click the 'Download CA certificate' link to download the server certificate.
- Click the 'Download Client Configuration' link to download the SSL VPN client configuration file in .ovpn format.
Next, transfer the certificate and the configuration file to the client. In order to connect for the client to connect to Dome Cloud Firewall, download and install openvpn client. You can download the client from https://openvpn.net/index.php/open-source/downloads.html
- After installing the OpenVPN GUI client, you need to paste the downloaded CA certificate and configuration file into the OPVN config file. The configuration file will be available in Program Files > OpenVPN > config.
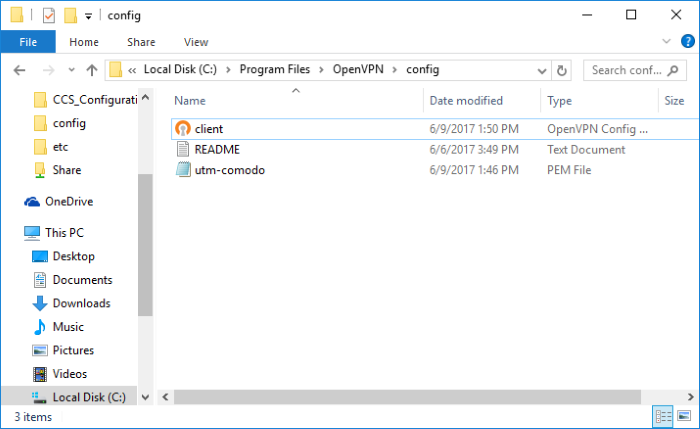
- Open the configuration file and make sure the parameters are as shown below:
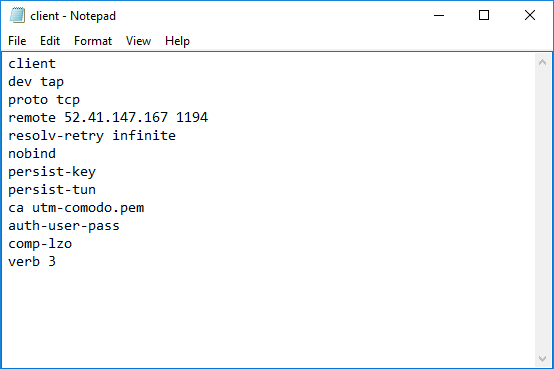
- In the third line, the protocol beside 'proto' depends on the protocol defined in 'Advanced' section.
- In the fourth line, the IP beside 'remote' should be the IP of your DCF account and the port as configured in 'Advanced' section. For example, if the Firewall URL is 52.41.147.187, then add '52.41.147.187' in the place of 'remote_ip'.
- To connect the client to DCF, right-click the OpenVPN GUI icon in the task bar then 'Connect'.
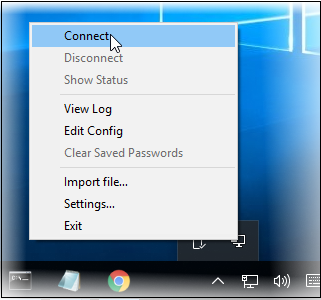
The connection process will start and the user authentication should be provided.
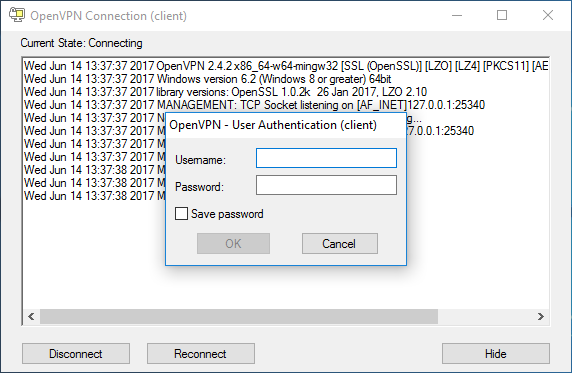
- Enter the credentials in the 'Username' and 'Password' fields and click 'OK'.
- That's it, the client will be connected to Dome Cloud Firewall and can be viewed in SSLVPN Server > Server Configuration tab under 'Connection Status and Control' pane.
See 'SSL VPN Server' and 'Configure Clients to Connect to Dome Cloud Firewall' for more details.
In this method, a network is configured to connect to Dome Cloud Firewall. Once done, all the clients behind the network will be routed via Dome Cloud Firewall but one disadvantage here is any client (roaming device) leaving the office network will not be routed via Dome Cloud Firewall. These roaming agents if required to connect to internet via Dome Cloud Firewall then they have to be routed via the office network.
You can use a router that supports
VPN or a local firewall to create a virtual private network between
that and Dome CF.
To configure a network to
connect to Dome Cloud Firewall
Enable VPN tunnel at Dome Cloud Firewall
- Click 'VPN' on the left then 'IPSec'
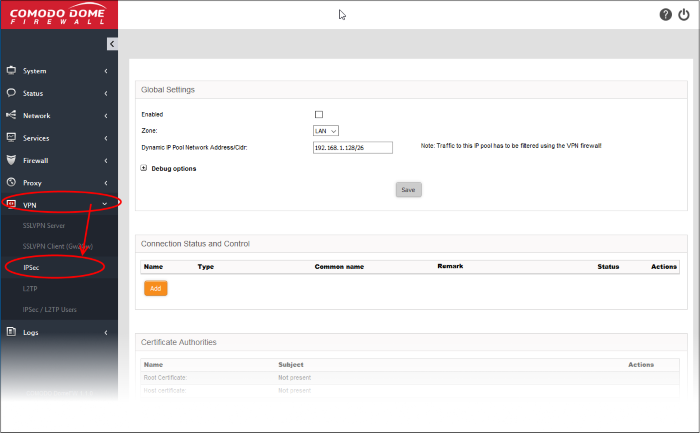
In the 'Global Settings' area:
- Enabled - Select the checkbox to enable the IPsec VPN service
- Zone - Choose the network zone to allow networks to access Dome CF through the IPsec VPN
- Dynamic IP pool network address/cidr - Specify the IP addresses for dynamic assignment to the clients in CIDR notation
- Click 'Save' for your settings to take effect
In the 'Certificate Authorities' area:
- Click 'Generate root/host certificate' to generate a new certificate or upload an existing certificate. The certificate is used for authentication purpose between Dome CF and your router/firewall at your premises. You can also use a pre-shared key for authentication if you do not want certificate authentication option. The pre-shared key option is available in the 'Connection Configuration' screen.
In the 'Connection Status and Control' area:
- Click 'Add' to create a new tunnel
- Select 'Net-to-Net Virtual Private Network' in the next screen 'Connection Type'
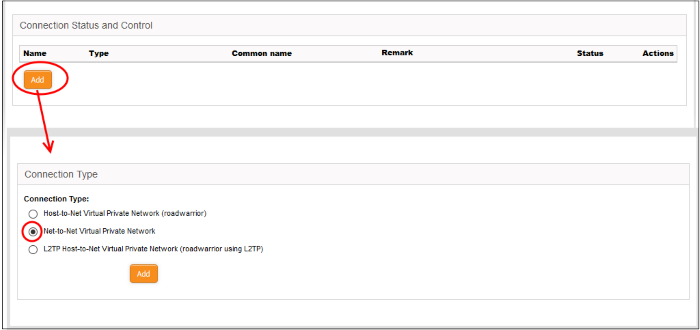
- Click 'Add'
The 'Connection Configuration' interface will be displayed:
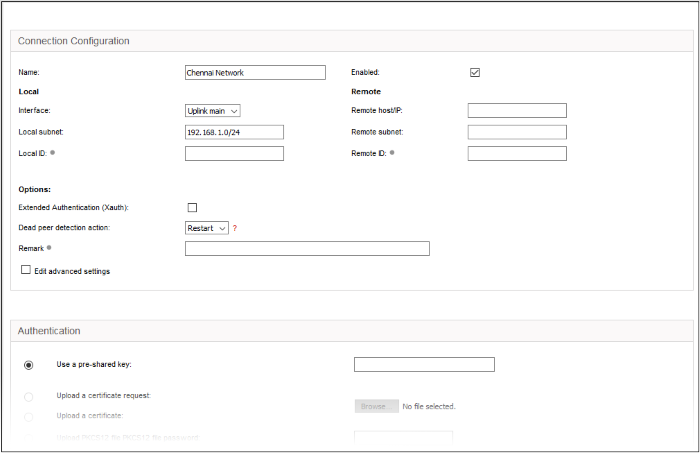
- Name - Enter a name to identify the connection tunnel
- Enabled - Select this checkbox for the tunnel to be enabled upon creation.
Local
- Interface - Choose the internet interface for this connection
- Local Subnet – Edit the local subnet if necessary
- Local ID - Enter an identification string for the local network
Remote
- Remote host/IP - Enter the IP address or hostname of the external host or network that is to be connected to Dome CF
- Remote subnet - Specify the sub network of the external network that can connect through the tunnel
- Remote ID - Enter an identification string for the local network
Authentication
- Select the authentication method. For example here we are using the pre-shared key
- Click
'Save' to complete the tunnel setup in Dome CF
Enable
VPN tunnel at your site
In order for the connection to be
established between your network and Dome CF, the same IPSec VPN
configuration has to be done at the network router, firewall or
gateway.
The settings in the device may vary but the main configuration should be the same at both ends. Important settings to be configured is given below:
- Select IPSec under VPN
- Provide the public or hostname of the Dome Cloud Firewall in the 'Remote host / IP field'
- Edit the local subnet field, if necessary
- In the 'Remote Subnet' field, enter the parameters of 'Local Subnet' that you provided in Dome CF
- Configure the authentication method that you selected in Dome CF. If you have chosen pre-shared key, provide the same key here.
- Click 'Save' to complete the tunnel setup in your network router, firewall or gateway.
Next, test the VPN connectivity between your network and Dome Cloud Firewall. If you need more help with this, please write to c1-support@comodo.com
See 'IPsec
Configuration' section for more details.


