


Generate a New Quote
Administrators can generate a price quote for any billable item.
|
Prerequisites:
|
A quote can be generated in two ways:
- From the QM interface - Based on customer requests, administrators can generate a new quote from scratch or from a template. See Create a New Quote for more details
- From
Service Desk - Service Desk staff
may work on tickets which involve billable items. Staff
can initiate quotes for these items from within the ticket. Such
quotes are added to Quote Manager as a drafts with the prefix
'Service Desk'. See Generate
a Quote from Service Desk for more
details.
QM also allows you to customize the design of quotes in 'Settings' > 'Quote Appearance'. All styles you create will be available for selection when you generate a new quote. See Quote Appearance Settings.
Create a New Quote
New quotes can be created in both the 'Home' and 'Quotes' interfaces.
To generate a new quote
- First, choose a quote template from the drop-down on the right of the 'New Quote' button.
- Select 'New Quote, no template' to use the default style.

- See Manage Quote Templates if you want to learn more about templates.
- Next, click the 'NEW QUOTE' button
- Go through four steps to generate the quote form:
The Quote setup stage contains two areas:
- Quote setup
- Private note
|
Quote Setup – Description Form Fields |
|
|---|---|
|
*To |
Select a recipient that you added in Step 2 - Add Customers. Enter a contact or company name in part or full. Matching contacts will be displayed for you to select. |
|
*Subject |
Subject line of the quote email which will be sent to your contact. |
|
Expires on |
The date up to which the quote is valid.
|
|
Style |
Select the appearance of the quote.

|
|
Private notes - Add comments for your reference and internal communication. These notes will not be shown in the quote sent to the customer. |
|
|
Note heading |
Title of your internal note. |
|
Note text |
Internal information. To add additional notes for the quote, click the 'ADD ONE MORE NOTE' button:
|

Fields marked as * are mandatory.
- Click 'Next' to proceed into the next step
Step 2 - Add items
The 'Add items' stage allows you to fill out fields available in the customer quote page.

- Specify the currency which you want to use in quote. All items added to the quote are charged in the selected currency. You can specify the billed items parity directly affect a cost and whether the currency symbol or the currency name will be shown in the quote. See Quote Currencies Settings and Quote Parity Settings for more details.
- To add products to the quote, choose the category into which your item fits then start searching the item in the text box as follow in search item explanation in the Create a New Quote Template section.
- If you wish to add a brand new item instead (one that does not exist in Quote manager), click the 'ADD NEW ITEM' button and follow the guidance in Step 3 - Add Items.
- Repeat the process to add more items
- To remove an item click 'X' at the right of the Item name
- To re-order the items in the list use the 'Up' and 'Down' arrows at the right end of the item details
- Enter the discount that can be applied to the item price in the 'Quote discount' field.
- After creating the item, QM will return you to the 'Add items' interface with the new item added.
Once the item has been added, basic details will be auto-completed from database records:
- Code, name and description will auto-complete with the defaults on record for the item.
- You can modify 'Price', 'Quantity', 'Unit Of Measurement', 'Tax' and 'Quote discount' on the quote.
- Set a client discount (optional) Encourage further purchases by setting a % discount on the total price.
- Click '+ Add New Item' to add more products and services to the quote.
- The total value for all items, including tax, is displayed on the lower-right of the form.
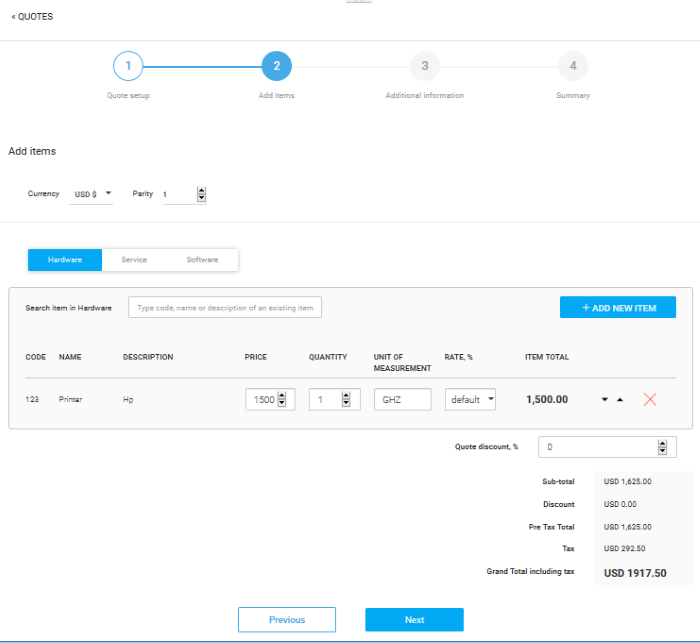
- Click 'Next'.
Step 3 - Additional Information
The 'Additional Information' step allows you to define whether your image signature and contact details such as phone, email, website and heading and / or footer will be displayed in the quote page.
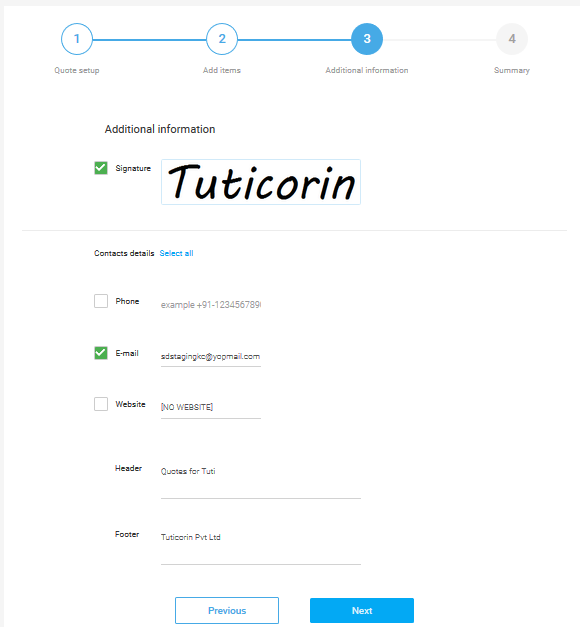
- Click 'Next'.
The 'Summary' stage displays the Quote overview page and summarized data and signature provided during the quote page creation.
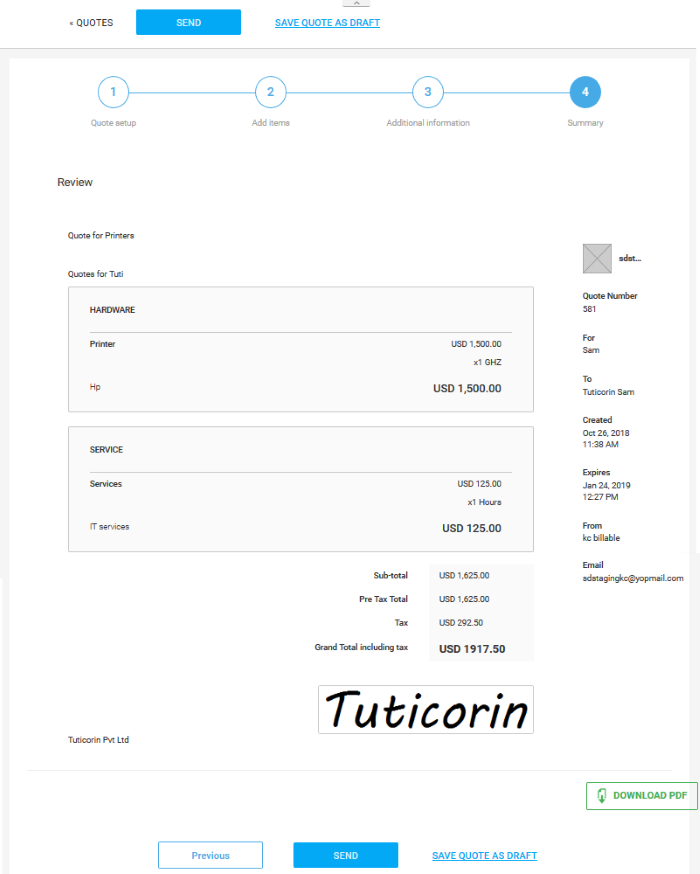
- Click 'SAVE QUOTE AS DRAFT'. The quote will remain in 'Draft' status until you send it.
- To forward the quote to the customer from QM, click the 'Send' button. The quote 'Status' will change to 'Published'.

-
Clicking the link in the mail will take the customer to the quote page

-
The customer will be able to send a feedback on the quote to QM, by entering their message in the Feedback field. See Answer a Feedback for more details on answering the feedback.
- The quote will be added to the list in the quotes interface with the status 'Published'.
- If you have skipped sending the quote to the customer, the quote will be saved as a draft.

- Click on the name of a quote to view, edit or forward a draft
- Click 'Options' at top right, to perform various actions on it

- Edit - Allows you to add or remove items, categories, change title, header/footer text and more
- Preview as customer - Displays the quote page as it would be shown to the customer
- Make Template - Allows you to save the quote as a template, if you want to re-use the quote for other customers
- Accept - Change the status of the quote to 'Accepted' if it is accepted by the customer by any out-of-band communication
- Reject - Change the status of the quote to 'Rejected' if it is rejected by the customer by any out-of-band communication
- Withdraw - Withdraws the quote from the customer.
Generate a Quote from Service Desk Ticket
Quotes that arrive from the Service Desk module will have the suffix 'Service Desk' in the title. You can edit the quote to add items and forward it to the customer:

The quote details screen contains the details of the service desk ticket, internal notes from the service desk staff and a link to access the ticket.
Generate the quote from the draft
- Click the draft ticket from the 'Quotes' interface or 'Home' screen, to open the quote details screen
- Click 'Options' menu at the top right of the details screen and select 'Edit'
The form for creating a quote will open with the quote workflow pre-populated.

-
Enter the details of the customer and items to be included in the quote
The process is similar to adding details for a new quote and forwarding the quote to the customer. See explanation above for more details.