


CWPP
- Click 'Settings' > 'Cloud Security Settings'
- Click 'Integrations' > 'CWPP'
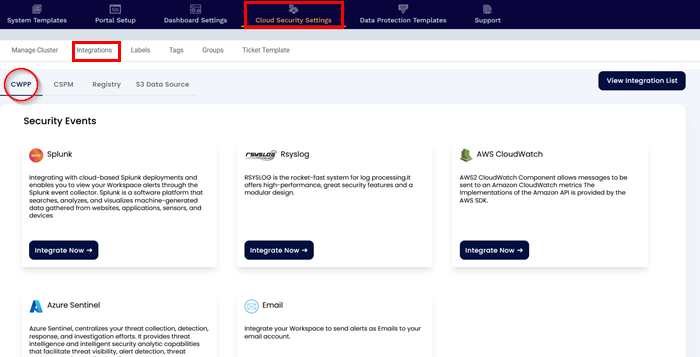
Under the CWPP subsection, we can integrate with various SIEM and ticketing tools like
Splunk is a software platform to search, analyze, and visualize machine-generated data gathered from websites, applications, sensors, and devices.
Xcitium integrates with Splunk and monitors your assets and sends alerts for resource misconfigurations, compliance violations, network security risks, and anomalous user activities to Splunk. To forward the events from your workspace you must have Splunk Deployed and HEC URL generated first for Splunk Integration.
a. Prerequisites
Set up Splunk HTTP Event Collector (HEC) to view alert notifications from Xcitium in Splunk. Splunk HEC lets you send data and application events to a Splunk deployment over the HTTP and Secure HTTP (HTTPS) protocols.
To set up HEC, use instructions in Splunk documentation. For source type, _json is the default; if you specify a custom string on Xcitium, that value will overwrite anything you set here.
Select Settings > Data inputs > HTTP Event Collector and make sure you see HEC added in the list and that the status shows that it is Enabled.
b. Steps to Integrate
- Click Cloud Security Settings > Integrations
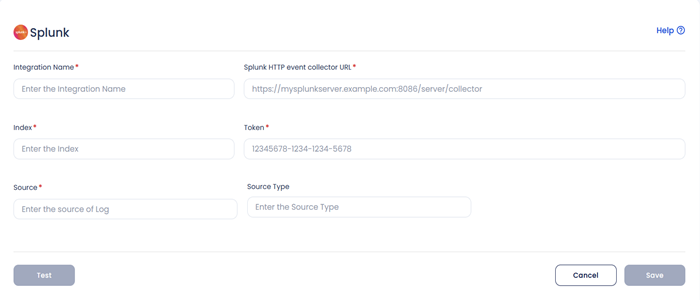
- Click CWPP > Splunk
- Select Integrate now on Splunk
- Enter the following details to configure Splunk.
- Integration Name: Enter the name for the integration. You can set any name. e.g., sh Test Splunk
- Splunk HTTP event collector URL: Enter your Splunk HEC URL generated earlier.e.g., sh https://splunk-xxxxxxxxxx.com/services/collector
- Index: Enter your Splunk Index, once created while creating HEC. e.g., sh main
- Token: Enter your Splunk Token, generated while creating HEC URL. e.g., sh x000x0x0x-0xxx-0xxx-xxxx-xxxxx00000
- Source: Enter the source as http: sh kafka
- Source Type: Enter your Source Type here, this can be anything and the same will be attach to the event type forwarded to splunk. e.g.,sh _json
- Click Test to check the new functionality, you will receive the test message on configured slack channel. e.g.,sh Test Message host = xxxxxx-deployment-xxxxxx-xxx00 source = http:kafka sourcetype = trials
- Click Save to save the Integration.
To forward the events to RSyslog you must first set up the RSyslog Integration.
a. Prerequisites
- A running RSyslog server.
- Host name/IP, Port number, Transport type (TCP or UDP)
Note: To deploy RSyslog server, follow RSyslog Documentation.
b. Steps to Integrate
- Click Cloud Security Settings > Integrations
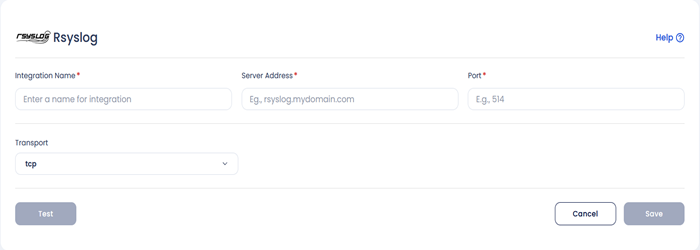
- Click CWPP > Rsyslog
- Select Integrate now on Rsyslog
- Fill up the following fields:
- Integration Name: Enter the name for the integration. You can set any name of your choice. e.g., Container Security Alerts
- Server Address: Enter your RSyslog Server address here, IP address or fully qualified domain name (FQDN) of the RSyslog server e.g.,rsyslog.mydomain.com or 35.xx.xx.xx
- Port: The port number to use when sending RSyslog messages (default is UDP on port 514); you must use the same port number. e.g., 514
- Transport: Select UDP, or TCP as the method of communication with the RSyslog server
- Integration Name: Enter the name for the integration. You can set any name of your choice. e.g., Container Security Alerts
- Click Test to check the new functionality, you will receive the test message on configured RSyslog Server. -Test message Please ignore!!
- Click Save to save the Integration. You can now configure Alert Triggers for RSyslog Events.
a. Prerequisites
AWS Access Key / AWS Secret Key is required for this Integration.
Note: Please refer this link to create access keys link
b. Steps to Integrate
- Click Cloud Security Settings > Integrations
- Click CWPP > AWS CloudWatch
- Select Integrate now on AWS CloudWatch
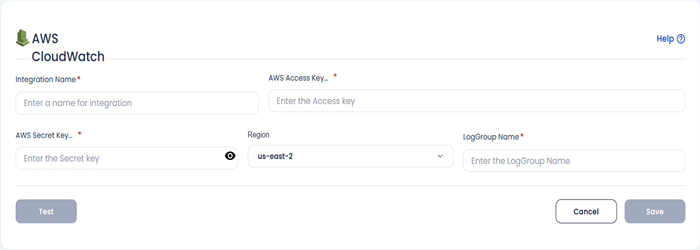
- Here you'll be able to see these entries:
- Integration Name: Enter the name for the integration. You can set any name.
- AWS Access Key: Enter your AWS Access Key here.
- AWS Secret Key: Enter your AWS Secret Key here.
- Region Name: Enter your AWS Region Name here.
- LogGroup Name: Enter your AWS LogGroup Name here.
- Once you fill every field then click the button this will test whether your integration is working or not.
- Click the Save button.
To forward the events to Azure Sentinel, we need Azure Logic App – Webhook and Azure Sentinel Subscription.
Steps to Integrate
- Click Cloud Security Settings > Integrations
- Click CWPP > Azure Sentinel Integration
- Select Integrate now on Azure Sentinel Integration
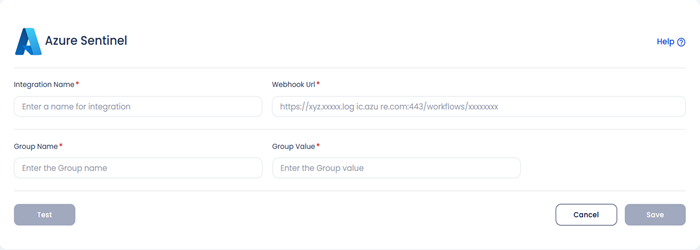
- Fill up the following fields:
- Integration Name: Enter the name for the integration. You can set any name of your choice. e.g., Container Security Alerts
- Webhook URL: Enter your Azure Logic App's Webhook URL here. e.g., https://xyz.xxxxx.log ic.azu re.com:443/workflows/xxxxxxxx
- Group Name: You can specify any group name based on your prefernece, this can be used to filter the events. This works as a key value pair, where key is Group Name and Group Value is the value for the Key Group Name. e.g., K8s Cluster
- Group Value: You can add any value to this group value. e.g., Dev Team Cluster
- Click Test to check the new functionality, you will receive the test message on configured Azure Sentinel. -Test message Please ignore!!
- Click Save to Save the Integration
Creating webhook using the Azure Logic App
Azure Logic Apps is a cloud platform where you can create and run automated workflows with little to no code. Using the visual designer and selecting from prebuilt operations, you can quickly build a workflow that integrates and manages your apps, data, services, and systems.
To create a webhook using the logic app.
Step 1: Search for the logic app in the Azure portal.
Step 2: Add the new logic app and fill in the relevant details.
Step 3: After creating the logic, it will appear in the logic app dashboard.
Step 4: Open the app and click on the go-to resource button.
Step 5: Select the http request to receive the logs.
Step 6: Click on the new step and click HTTP after that click on the Azure log analytics to receive the alert data.
Step 7: Add the connection name, workspace ID, and workspace key you can get the workspace ID and key in the log analytics workspace tab.
Step 8: Click on the Integration and click on the Agents tab.
Step 9: Click on the Azure log analytics data collector and click JSON request body as the body and log name, After the setup is done you will receive a webhook URL.
Integrate your Workspace to send alerts as emails to your email account.
Steps to Integrate
- Click Cloud Security Settings > Integrations
- Click CWPP > Email Integration
- Select Integrate now on Email Integration
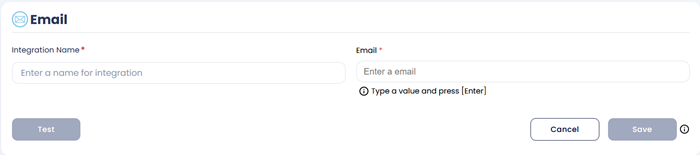
- Fill up the following fields:
- Integration Name: Enter the name for the integration. You can set any name of your choice. e.g., Container Security Alerts
- Email: Enter Email here. e.g., xcitium@yopmail.com
- Click Test to check the new functionality.
- Click Save to save the Integration.
To send an alert notification via Slack you must first set up the Slack notification Channel.
a. Prerequisites
You need a valid and active account in Slack. After logging into your Slack channel, you must generate a Hook URL.
Note: To generate Hook URL, follow the steps, Webhooks-for-Slack.
b. Steps to Integrate
- Click Cloud Security Settings > Integrations
- Click CWPP > Slack Integration
- Select Integrate now on Slack Integration
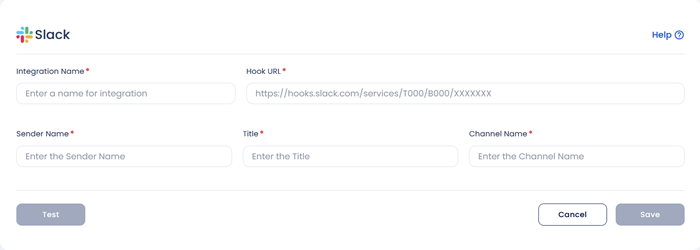
- Fill up the following fields:
- Integration Name: Enter the name for the integration. You can set any name. e.g., Container Security Alerts
- Hook URL: Enter your generated slack hook URL here. e.g., https://hooks.slack.com/services/T000/B000/XXXXXXX
- Sender Name: Enter the sender name here. e.g., Xcitium User
- Channel Name: Enter your slack channel name here. e.g., livealertsforcontainer
- Click Test to check the new functionality, you will receive the test message on configured slack channel. Test message Please ignore!!
- Click Save to save the Integration.
Integrate Xcitium with Jira and receive Xcitium alert notifications in your Jira accounts. With this integration, you can automate the process of generating Jira tickets with your existing security workflow.
To set up this integration, you need to coordinate with your Jira administrator and gather the inputs needed to enable communication between Xcitium and Jira.
a. Prerequisites
- You need a Jira Site URL, Email, UserID & API token, Project key for this integration.
- To create a JIRA token, go to https://id.atlassian.com/manage-profile/security/api-tokens, and click on create an API token.
b. Steps to Integrate
- Click Cloud Security Settings > Integrations
- Click CWPP > Jira Integration
- Select Integrate now on Jira Integration
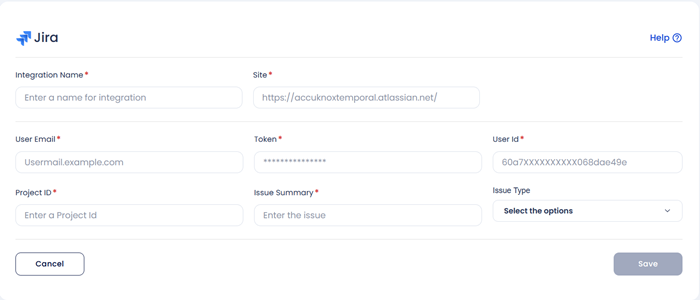
- Enter the following details to configure JIRA.
- Integration Name: Enter the name for the integration. You can set any name. e.g.,Test JIRA
- Site: Enter the site name of your organisation. e.g., https://jiratest.atlassian.net/
- User Email: Enter your Jira account email address here.e.g., jira@organisation.com
- Token: Enter the generated Token here from https://id.atlassian.com/manage-profile/security/api-tokens. .e.g., kRVxxxxxxxxxxxxx39
- User ID: Enter your Jira user ID here. You can visit people section and search your name to see the User ID. For more details check here. e.g., 5bbxxxxxxxxxx0103780
- Project ID: Enter your Project key here, each project in an organisation starts with some keyvalue and is case sensitive. Breakdown of a jira ticket to identify Project ID: https://[JIRA-SITE]/browse/[PROJECT ID]-1414, e.g., DEVSECOPS
- Issue Summary: Enter the summary for the JIRA tickets to be viewed in each JIRA tickets created. e.g., Issue generated form High Severity Incidents on onboarded cluster.
- Issue Type: You can choose from the dropdown. i.e., Story and Bug
- Click Test to check if the entered details are being validated, If you receive Test Successful, you have entered a valid JIRA credentials.
- Click Save to save the Integration.