


Profiles for iOS Devices
iOS profiles let you specify a device's network access rights, restrictions and other general settings.
Process in Brief:
-
Click 'Assets' > 'Configuration Templates' > 'Profiles'.
-
Click 'Create' > 'Create iOS Profile'.
-
Type a name and description for your profile then click the 'Create' button. The profile will now appear in 'Assets' > 'Configuration Templates' > 'Profiles'.
-
New profiles have only one section - 'General'. Click 'Add Profile Section' to add settings for various security and management features. Each section you add will appear as a new tab.
-
Once you have fully configured your profile you can apply it to devices, device groups, users and user groups.
-
You can make any profile a 'Default' profile by selecting the 'General' tab then clicking the 'Edit' button.
This part of the guide explains the processes above in more detail, and includes in-depth descriptions of the settings available for each profile section.
Create an iOS profile
-
Click 'Assets' > 'Configuration Templates' > 'Profiles'
-
Click the 'Create' button > 'Create iOS Profile':
.png)
-
Enter a name and description for the profile
-
Click the 'Create' button
The new profile will open at the 'General Settings' section:
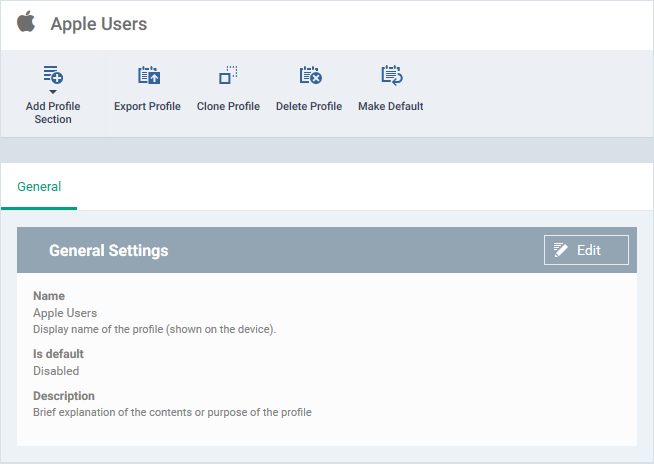
-
The profile is not a 'default' profile at this stage. A 'default' profile is one that is applied automatically to any device which matches its operating system. You can have multiple 'default' profiles per operating system.
-
Click the 'Make Default' button if you want this profile to be a default.
-
Alternatively, click the 'Edit' button on the right of the 'General' settings screen and enable 'Is Default'.
-
Click 'Save'.
The next step is to add profile sections.
-
Each profile section contains a range of settings for a specific management feature.
-
For example, there are profile sections for 'Email', 'Single Sign-On', 'LDAP', 'Cellular Networks' and so on.
-
You can add as many different sections as you want when building your device profile.
-
To get started:
-
Click 'Add Profile Section'
-
Select the component that you want to include in the profile:
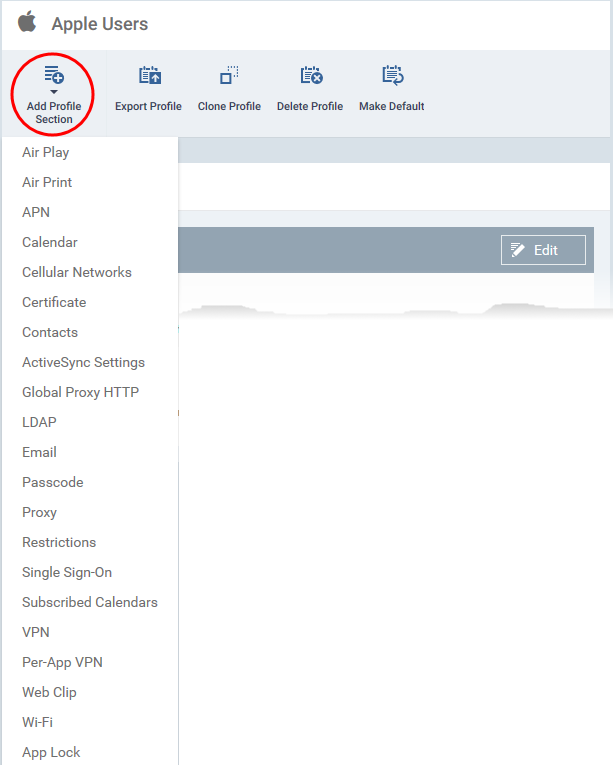
-
Configure the component as required
-
Click 'Save'
-
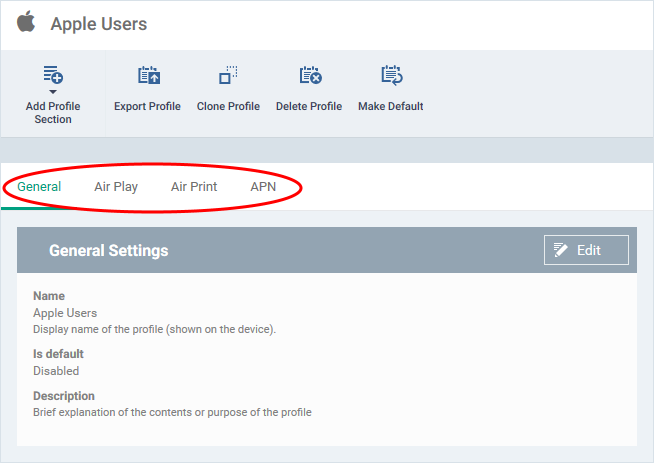
This adds a new tab for the component to the profile:
The following links explain more about each section:
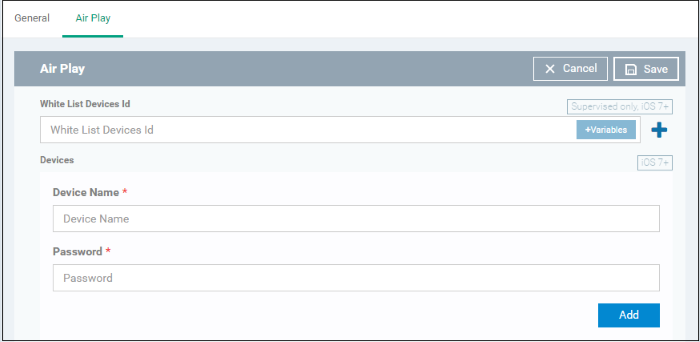
These settings let you whitelist
devices which can play content from managed iOS devices via Apple
Airplay. Example devices are televisions, monitors, stereo systems.
|
Note: If you do not create a whitelist then managed mobile devices will be able to broadcast to any Airplay capable device. |
-
Click 'Air Play' from the 'Add Profile Section' drop-down
|
Form Element |
Description |
|---|---|
|
White List Devices ID |
Enter the identifier of the output device that you want to whitelist for Air Play. The ID numbers of the devices should be entered in the format as given below: XX:XX:XX:XX:XX:XX Note: The whitelist is applicable for supervised iOS 7+ devices and will not apply for all other devices. Click the variables button Click the Click |
|
Device Name |
Enter the name of the Air Play output device
that you entered above. Click the variables button
|
|
Password |
Enter the password for the Air Play destination that you entered above. |
|
Add |
Click this button to add another 'Devices' section. |
 button to add more 'Device ID'
fields.
button to add more 'Device ID'
fields.  beside an item to remove it from the
list.
beside an item to remove it from the
list.-
Click the 'Save' button.
The 'Air Play' device is added to the list.
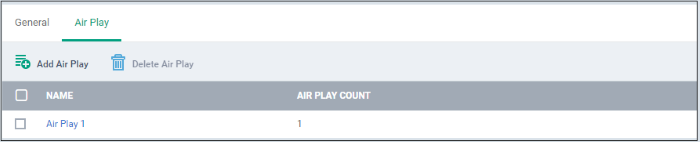
You can add multiple Air Play devices to the profile.
-
Click 'Add Air Play' to add more devices
-
Click a device name to edit its settings
You can edit the settings or remove the section from the profile at anytime. See Edit Configuration Profiles if you want help with this.
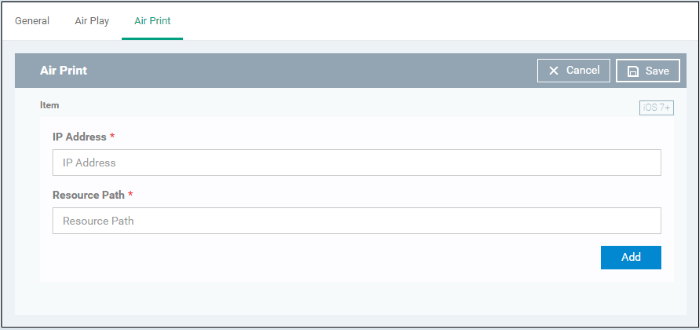
These settings let you specify the default printer your devices use with the 'Air Print' feature.
-
Click 'Air Print' from the 'Add Profile Section' drop-down
|
Form Element |
Description |
|---|---|
|
IP Address |
Enter the network address of the Air Print printer you wish to use. |
|
Resource Path |
Enter the resource path of the printer. For example: printers/Canon_MG5300_series |
|
Add |
Click this button to add another Air Print section. |
You can add more printers by repeating the process. To remove a printer, click the 'X' button beside the printer.
-
Click the 'Save' button.
The printer is added to the list.

-
Click 'Add Air Print' and repeat the process to add more printers.
-
Click the name of a printer to view and edit its settings of a printer.
You can edit the settings or remove the section from the profile at anytime. See Edit Configuration Profiles for more details.
|
Note: APN settings have been deprecated in favor of cellular settings in iOS 7 and above. |
-
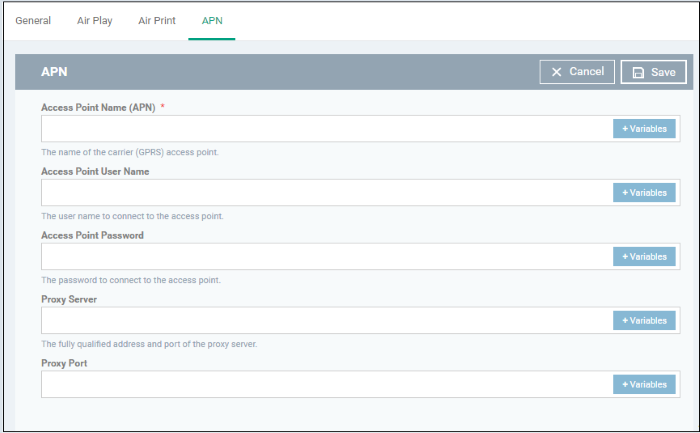
Click 'APN' from the 'Add Profile Section' drop-down
|
Form Element |
Description |
|---|---|
|
Access Point Name (APN)* |
Enter the name of the GPRS access point
provided by the cellular service provider. Click the variables button |
|
Access Point User Name / Access Point Password |
Enter the login of the APN account to connect
to the access point. Click the variables button |
|
Proxy Server / Proxy Port |
Enter the host name and connection port of the
proxy server. Click the variables button |
Fields marked * are mandatory.
-
Click the 'Save' button.
You can edit the settings or remove the section from the profile at anytime. See Edit Configuration Profiles for more details.
-
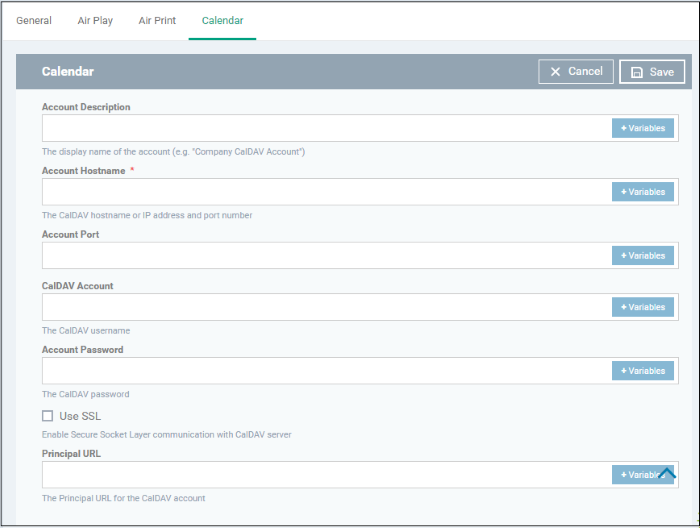
Click 'Calendar' from the 'Add Profile Section' drop-down
|
Form Element |
Description |
|---|---|
|
Account Description |
Enter the display name of the CalDav account. Click the variables button |
|
Account Host Name* |
Enter the CalDav host name or IP address. Click the variables button |
|
Account Port |
Enter the port number on
which to connect to the server. Click the variables button |
|
CalDav Account |
The user name of the
CalDav user. Click the variables button |
|
Account Password |
The password for the CalDav account. Leave the field blank. The user will be prompted to enter the password while configuring the account for the first time. After it is validated, the users can access the account without entering the credentials. |
|
Use SSL |
If enabled, SSL connection will be established with the CalDav server. |
|
Principal URL |
The URL of the CalDav account. Click the variables button |
Fields marked * are mandatory.
-
Click the 'Save' button after entering or selecting the parameters.
The calendar account host will be added to the list.

-
Click 'Add Calendar' to add more calendar servers
-
Click the host name of a calendar server to view and edit its settings
You can edit the settings or remove
the section from the profile at anytime.
|
Note: A cellular network setting cannot be applied if an APN setting is already installed. This feature is available for iOS 7 and later versions only. |
-
Click 'Cellular Networks' from the 'Add Profile Section' drop-down
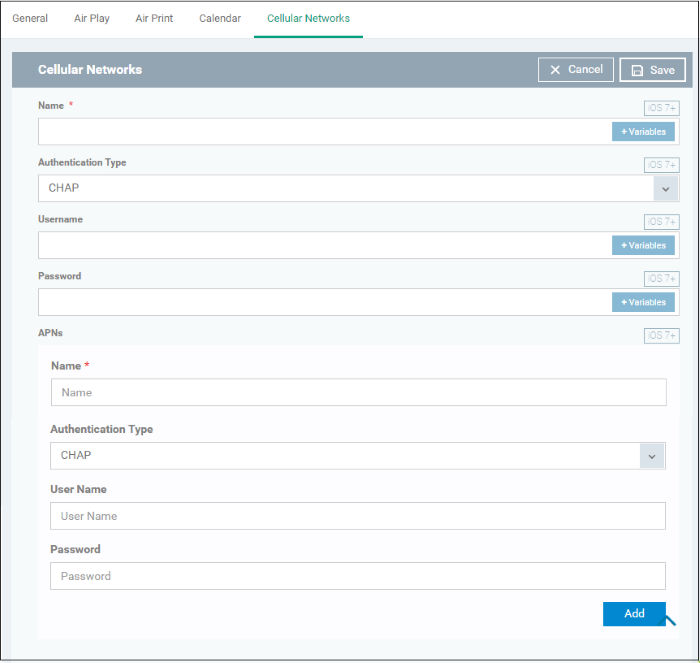
|
Form Element |
Description |
|---|---|
|
Name |
Enter the name for this configuration,
specifying the cellular service provider. Click the variables button |
|
Authentication Type |
Select the user authorization type used by the service provider. The options are CHAP or PAP. |
|
Username / Password |
Enter login credentials for the provider network. This is required to authenticate the request. Click the variables button |
|
APNs |
|
|
Note:
You can add more APN accounts for a single service
provider by clicking the |
|
-
Click 'Save'
This will add a 'Cellular Networks' tab to the profile. You can edit the settings or remove the section at anytime. See Edit Configuration Profiles if you want help with this.
The certificate settings area lets you upload certificates which can be used to secure other aspects of Xcitium. For example, you can select your uploaded certificates in the 'Wi-Fi, 'Exchange Active Sync' and 'VPN' areas.
-
Click 'Add profile section' > 'Certificate'
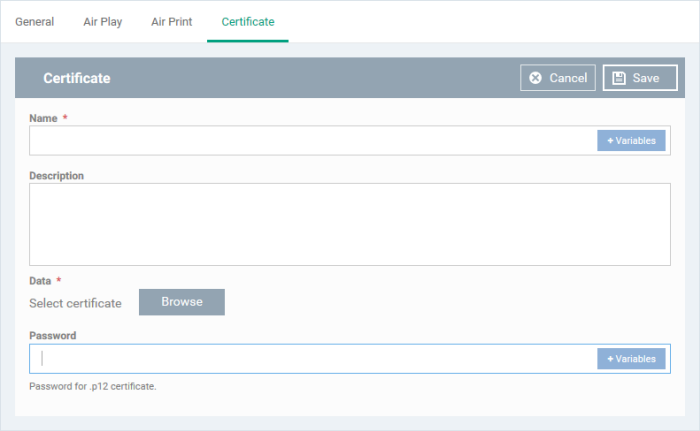
|
Form Element |
Description |
|---|---|
|
Name |
Enter a label for the certificate. Click the variables button |
|
Description |
Enter a brief description for the certificate. |
|
Data |
Click 'Browse' and upload you certificate. Supported extensions - 'p12'. 'pub', '.crt', '.key'. |
|
Password |
Enter the password for importing the certificate. |
-
Click the 'Save' button.
The certificate will be added to the certificate store.

-
Click 'Add Certificate' and repeat the process to add more certificates.
-
Click on the name of a certificate to view the certificate key and edit its name.
You can add any number of certificates to the profile and remove certificates at anytime. See Edit Configuration Profiles for more details.
-
Click 'Contacts' from the 'Add Profile Section' drop-down

|
Form Element |
Description |
|---|---|
|
Account Description |
Enter the display name
of the CardDav account. Click the variables button |
|
Account Host Name* / Account Port* |
Enter the CardDav server details. This includes hostname / IP address and server port. Click the variables button |
|
Account Username / Account Password |
The login credentials of the CardDav user
account. Click the variables button |
|
Use SSL |
If enabled, a secure SSL connection will be used for communications with the CardDav server. |
|
Principal URL |
Enter the 'Principal URL' of the CardDav account. |
Fields marked * are mandatory.
-
Click the 'Save' button after entering or selecting the parameters.
The contact account is added to the list.
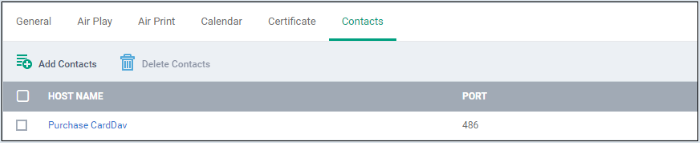
-
Click 'Add Contacts' and repeat the process to add more accounts
-
Click the hostname of the contact account to view or edit its details
The settings will be saved and shown under 'Contacts' tab. You can edit the contacts or remove the section from the profile at anytime. See Edit Configuration Profiles for more details.
-
Click 'Add Profile Section' > 'ActiveSync Settings'
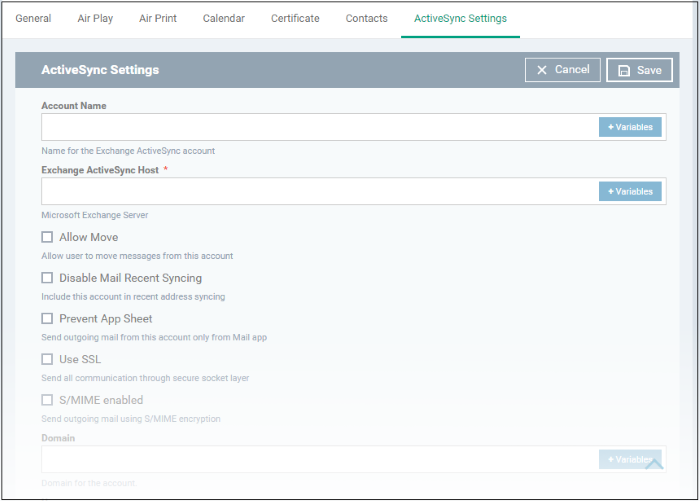
|
Form Element |
Description |
|---|---|
|
Account Name |
Enter the Exchange ActiveSync account name. Click the variables button |
|
Exchange ActiveSync host* |
Enter the Exchange host name (Microsoft
Exchange Server). Click the variables button |
|
Allow Move |
If enabled, the user can move sent or received mails to another account. |
|
Disable Mail Recent Syncing |
If enabled, recently used emailed addresses are not synced with other devices via iCloud. |
|
Prevent App Sheet |
If enabled, mails cannot be sent using third-party applications. |
|
Use SSL |
If enabled, communication between Exchange server and devices will be encrypted using SSL. |
|
S/MIME Enabled |
If enabled, users can sign and encrypt email messages from their devices. Please note that certificates have to be installed in users' devices before this feature can be used. |
|
Domain |
Email domain name. Click the 'Variables'
button |
|
User Name |
User name for the account. Click the variables button |
|
Email Address |
Address of the email
account. Click the 'Variables'
button |
|
Password |
Leave the field blank. The user will be prompted to enter the password while configuring the email account for the first time. After it is validated, the users can access the email account without entering the password. |
|
Past days of mail to sync |
Choose the period for which the emails are to be kept synchronized between the device and the exchange server from the recent past, from the drop-down. |
|
User Certificate |
Select the user client authentication certificate from the drop-down or upload it using the 'Add New' button. |
-
Click the 'Save' button.
This adds the ActiveSync section to the profile. You can edit the settings or remove the section from the profile at anytime. See Edit Configuration Profiles for more details.
-
Click 'Add Profile Section' > 'Global Proxy HTTP'
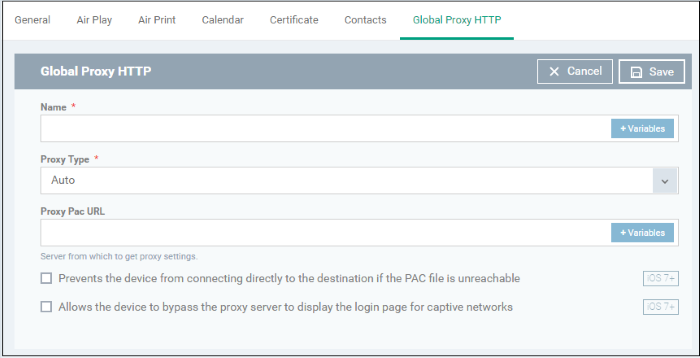
|
Form Element |
Description |
|---|---|
|
Name |
Enter the host name of the proxy you want devices to use. Click the variables button |
|
Proxy type |
Select the proxy type from the drop-down. The options available are:
If you select 'Manual', enter the IP address of the proxy server, proxy server port, proxy username and proxy password in the respective fields. If you select 'Auto', enter the URL of the Proxy Pac, select whether or not the device can directly connect to the destination if Pac server is not reachable and whether or not the device can bypass the proxy server to display the login page for captive networks from the respective check box options. Click the variables button |
-
Click the 'Save' button.
This will add a 'Global Proxy HTTP' section to the profile. You can edit the settings or remove the section from the profile at anytime. See Edit Configuration Profiles for more details.
-
Click 'Add Profile Section' > 'LDAP'
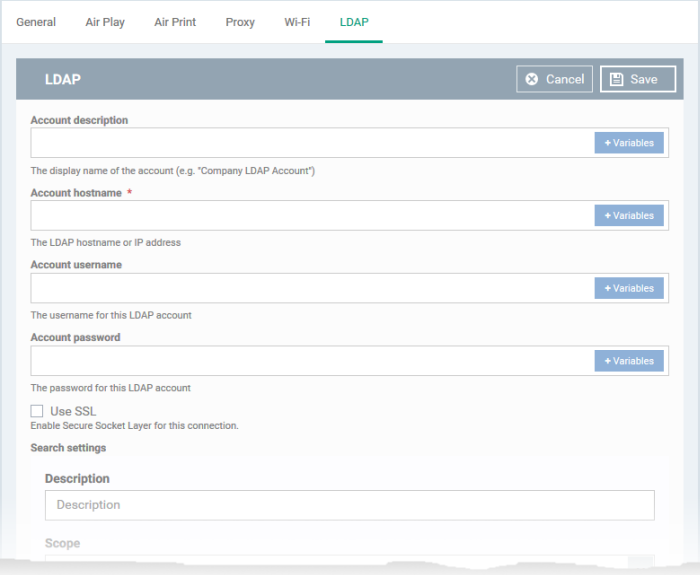
|
Form Element |
Description |
|---|---|
|
Account description |
Enter the display name of the LDAP account. Click the variables |
|
Account hostname |
Enter the hostname or IP address of the AD server. Click the variables button |
|
Account Username / Account Password |
Login credentials for the LDAP account. Click the variables button |
|
Use SSL |
If enabled, the communication will be encrypted. |
|
Search settings |
Configure the settings for searching email contacts from the LDAP server. See 'Search the LDAP directory' below for more details. |
Admins can search for email contacts in the domain using the search feature.

|
Form Element |
Description |
|---|---|
|
Description |
Enter a label for the search |
|
Scope |
Level of search on the LDAP tree structure.
|
|
Search base |
Enter the search base for which the search will be restricted. For example, you might want to allow users to search only for other email users via LDAP. |
-
You can add more searches by clicking the
 button.
-
To remove an item, click the
 button.
-
Click the 'Save' button.
The LDAP account will be added to the list.
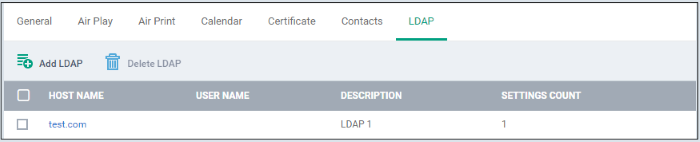
You can add multiple LDAP accounts.
-
Click 'Add LDAP' and repeat the process to add more LDAP servers
-
Click the hostname of an LDAP account to view and edit its settings
This will add a 'LDAP' section to the profile. You can edit the settings or remove the section from the profile at anytime. See Edit Configuration Profiles for more details.
-
Click 'Add Profile Section' > 'E-mail'
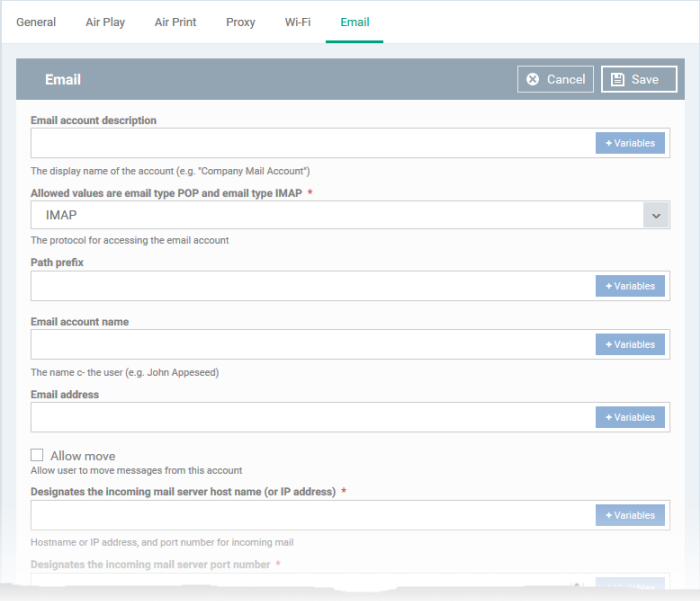
|
Form Element |
Description |
|---|---|
|
Email account description |
Enter a label for the email account. Click the variables button |
|
Allowed values are email type POP and email type IMAP * |
Select the mail protocol. Possible values are IMAP and POP. |
|
Path prefix |
This will be visible if
IMAP is chosen as Email Type in the previous step. Enter
the path of the inbox in the field. Click the variables button |
|
Email account name |
Enter a label to identify the user's email account at the incoming mail server, if the profile is for a single user. Click the variables button See Create and Manage Custom Variables for more details on variables. The email address of the users to whom the profile is associated will be automatically added to the profile while rolling out the same to the devices. |
|
Email address |
Enter the email address of the user at the incoming mail server If the profile is for a single user. Click the variables button The email address of the users to whom the
profile is associated will be automatically added to the profile
while rolling out the same to the devices. See Create and Manage Custom Variables for more details on variables. |
|
Allow move |
If enabled, the user can move sent or received mails to another account. |
|
Designates the incoming mail server host name (or IP address)* |
Enter the host name of the incoming mail
server or its IP address. Click the variables button |
|
Designates the incoming mail server port number* |
Enter the server port number used for incoming
mail service. For POP3, it is usually 110 and if SSL is enabled
it is 995. For IMAP, it is usually 143 and if SSL is enabled it
is 993. Click the variables button |
|
Incoming mail server username |
Enter the username for the email account of the user at the incoming mail server if the profile is for a single user. Click the variables button See Create and Manage Custom Variables for more details on variables. The email usernames of the users to whom the profile is associated will be automatically added to the profile while rolling out to the devices. |
|
Allowed values are email auth password and email auth none * |
Select the type of authentication method for the mail account from the drop-down. The options available are:
|
|
Incoming password |
Leave the field blank. If authentication is chosen in the previous step, then user needs to enter the password while configuring the email account for the first time. After it is validated, the users can access the email account without entering the password. |
|
Incoming mail server use SSL |
If enabled, communication between incoming mail server and devices is encrypted using SSL. |
|
Outgoing mail server host name* |
Enter the host name or IP address of the outgoing (SMTP) mail server for a single user. Click the variables button See Create and Manage Custom Variables for more details on variables. |
|
Designates the outgoing mail server port number* |
Enter the server port
number used for outgoing mail service. If no port number
is specified then ports 25, 587 and 465 are used in the given
order. Click the variables button |
|
Outgoing mail server username |
Enter the username for the email account of the user at the outgoing (SMTP) mail server if the profile is for a single user. Click the variables button See Create and Manage Custom Variables for more details on variables. The email usernames of the users to whom the profile is associated are automatically added to the profile while rolling out to the devices. |
|
Outgoing mail server authentication* |
Select the type of authentication method for outgoing mail server from the drop-down. The options available are:
|
|
Outgoing password |
Leave the field blank. If authentication is chosen in the previous step, then user needs to enter the password while configuring the email account for the first time. After it is validated, the users can access the email account without entering the password. |
|
Outgoing password same as incoming password |
If enabled, the password for incoming mail server will be used for outgoing mail server too. |
|
Disable email recents syncing |
If enabled, recently used email addresses are not synced with other devices via iCloud. |
|
Signing and encryption per-message |
If enabled, the device digitally signs and encrypts your mail per-message. |
|
Prevent App Sheet |
If enabled, outgoing mails can be sent from this account only via mail app. |
|
Outgoing mail server Use SSL |
If enabled, communication between outgoing mail server and devices is encrypted using SSL. |
|
S/MIME enabled |
If enabled, users can sign and encrypt email messages from their devices. Please note that certificates have to be installed in users' devices before this feature can be used. |
-
Click the 'Save' button.
The e-mail account will be added to the profile.

You can add several email accounts to the same profile.
-
Click 'Add Mail' and repeat the process to add more email accounts.
-
Click the name of an email account to view and edit its settings
You can edit the settings or remove the section from the profile at anytime. See Edit Configuration Profiles for more details.
-
Click 'Passcode' from the 'Add Profile Section' drop-down

|
Form Element |
Description |
|---|---|
|
Allow simple value |
Allows users to use repeated or sequential characters in their passwords. For example, '9999' or ABCD. |
|
Require alphanumeric value |
Compels users to use at least one number or letter in their passwords. |
|
Minimum passcode length |
The minimum number of characters that a password should contain. The option is available to set from 1 to 16. |
|
Minimum number of complex characters |
The minimum number of symbols (non alphanumeric characters such as *, %, @) that a password should contain. The option is available to set from 1 to 4. |
|
Maximum passcode age |
Enter the maximum number
of days that a password can be valid. The available option
is from 1 day to 730 days. Click the variables button |
|
Maximum idle time |
Select the period of time in minutes that a device can be idle before it's screen is automatically locked. |
|
Passcode history |
New passwords should not
match previously used passwords. Specify the number of last used
passwords that should be stored for comparison. Click the variables button |
|
Maximum grace period for device lock |
Select the period from the drop-down how soon the device can be unlocked since last used without prompting the user to enter the password. The option is available from 'Immediately' to '4 Hours' If 'Immediately' is selected, the user has to enter the password each time the device is unlocked. |
|
Maximum number of failed attempts |
Select the number of unsuccessful login attempts that can be tried by a user before the device is wiped clean of all its data and settings. The option is available to set from 4 to 10. After 6 unsuccessful login attempts, there will be a time delay before a password can be entered again and the time delay period increases with each failed login attempt. This time delay begins only after the sixth attempt, so if you select the period as 6 or lower, there will be no time delay and data will be erased after the final attempt. |
|
Allows the user to modify Touch ID |
If enabled, allows user you to modify the biometric authentication to unlock your device, make purchases and so on. |
-
Click 'Save'.
You can edit the settings or remove the section from the profile at anytime. See Edit Configuration Profiles for more details.
-
Click 'Proxy' from the 'Add Profile Section' drop-down
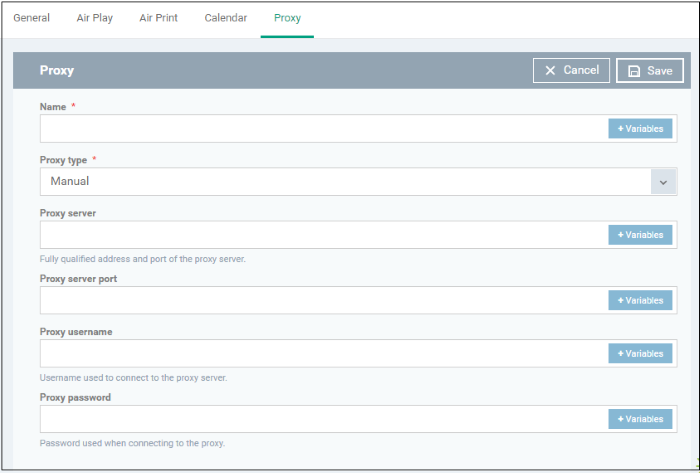
|
Form Element |
Description |
|---|---|
|
Name |
Enter a label for the proxy to be shown to the device users. Click the variables button |
|
Proxy |
Select the proxy type from the drop-down. The options available are:
If you select 'Manual',
enter the details for IP address of the proxy server, proxy
server port, proxy username and proxy password in the
respective fields.
If you select 'Auto', enter the URL of the
Proxy Pac. Click the variables button |
-
Click the 'Save' button.
The proxy server configuration is added to the profile.
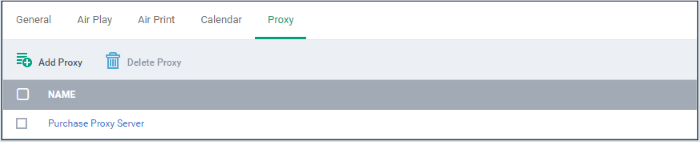
You can add more proxy server accounts to the profile.
-
Click 'Add Proxy' and repeat the process to add more proxy server accounts.
-
Click the name of a proxy server account to view or edit its details.
This will add a 'Proxy' section to the profile. You can edit the settings or remove the section from the profile at anytime.See Edit Configuration Profiles for more details.
-
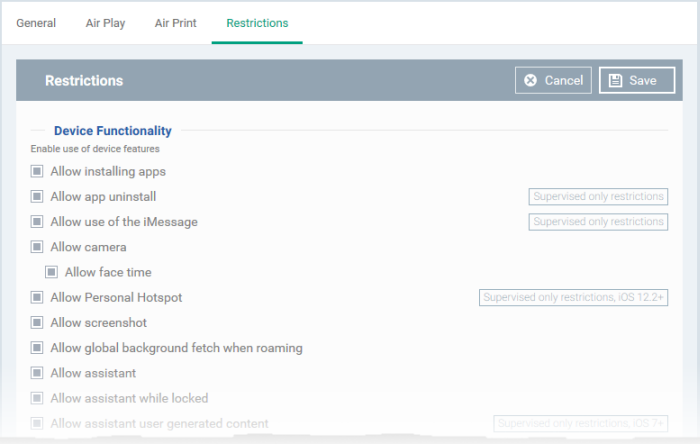
Click 'Restrictions' from the 'Add Profile Section' drop-down
|
Device Functionality |
|
|---|---|
|
Form Element |
Description |
|
Allow installing apps |
The user can install or update apps from the Apple App Store. If left unchecked, the App Store icon is removed from the device's home screen. |
|
Allow app uninstall |
The user can to uninstall applications. |
|
Allow use of the iMessage |
The user can quickly and easily chat over iMessage or SMS/MMS. |
|
Allow camera |
The user can to take photos, videos or use FaceTime (if enabled). If left unchecked, the camera icon is removed from the device and camera is disabled. |
|
Allow face time |
The user can use FaceTime. Please note the 'Allow face time' can be enabled only if 'Allow Camera' is enabled. |
|
Allow Personal Hotspot |
Allows users to setup Wi-Fi hot-spots from their device, and allow other devices to connect. |
|
Allow screen shot |
Allows users to take screenshots on their device. |
|
Allow global background fetch when roaming |
Select this to allow the device to sync data when in roaming mode abroad. |
|
Allow assistant |
If enabled, users can use Siri voice commands and dictation. |
|
Allow assistant while Locked |
If enabled, users can use Siri even when the device is locked. The checkbox will be active only when 'Allow Assistant' is enabled. |
|
Allow assistant user generated content |
If enabled, users can use Siri to query user-generated content from the Internet or device. (Supervised mode only.) |
|
Forces the use of the profanity filter assistant |
If enabled, enforces profanity filter for Siri. |
|
Allow voice dialing |
Select this to allow the user to dial their phone using voice commands. |
|
Allow passbook while locked |
If enabled, Passbook notifications will be displayed even when the device is locked. |
|
Allow in app purchases |
Select this to allow the user to make in-app purchases from the device. |
|
Force iTunes store password entry |
If enabled, users have to enter their Apple ID to enter the iTunes store. |
|
Allow multiplayer gaming |
Select this to allow the user to play multiplayer games in Game Center. |
|
Allow adding Game Center friends |
If enabled, users can add friends in Game Center. |
|
Allow account modification |
Select this to allow user account modifications on devices. Note: This feature is available for iOS 7+ and supervised devices only. |
|
Allow air drop |
Select this to allow Air Drop on devices. Note: This feature is available for iOS 7+ and supervised devices only. |
|
Allow find my friends modification |
Select this to enable Find My Friends feature on devices. Note: This feature is available for iOS 7+ and supervised devices only. |
|
Allow fingerprint for unlock |
Select this to enable Touch ID to unlock devices. Note: This feature is available for iOS 7+ and supervised devices only. |
|
Allow Game Center |
If enabled, users can access Game Center, an online multiplayer social gaming network. Note: This option is available for supervised devices only. |
|
Allow host pairing |
Select this to allow host pairing on devices. Note: This feature is available for iOS 7+ and supervised devices only. |
|
Allow lock screen control center |
Select this option to allow Control Center to
be displayed in the lock screen. Note: This feature is available for iOS 7 and later versions. |
|
Allow lock screen notifications view |
Select this option to allow Notification Center
to be displayed on the lock screen. Note: This feature is available for iOS 7 and later versions. |
|
Allow lock screen today view |
Select this option to allow the Today View from
Notification Center to be displayed in the lock screen. Note: This feature is available for iOS 7 and later versions. |
|
Allow OTAPKI updates |
Select this option to allow over-the-air public key infrastructure (OTAPKI) updates on the device. Note: This feature is available for iOS 7 and later versions. |
|
Allow UI configuration profile installation |
Select this option to allow users to install UI
configuration profiles. Note: This option is available for supervised devices only. |
|
Force limit ad tracking |
Select this to limit ad tracking on devices. Note: This feature is available for iOS 7 and later versions. |
|
Force Wifi Whitelisting |
If enabled, the device will connect only to whitelisted Wifi connections. Make sure at least whitelisted Wifi connection is available. Note: This option is available for supervised devices only for iOS 10.3 and later versions. |
|
Forces all devices receiving AirPlay requests from this device to use a pairing password |
If enabled, forces the use of pairing password for all other devices sending AirPlay requests to the device. |
|
Allow managed applications from using cloud sync |
If enabled, users can restrict managed apps backing up any data to iCloud, while still allowing it for user downloaded apps. |
|
Allow the "Erase All Content And Settings" option in the Reset UI |
If enabled, users can remove his/her personal
information: credit or debit card, photos, contacts, music, or
apps. Note: This feature is available for supervised devices only. |
|
Spotlight will return Internet search results |
If enabled, the spotlight features will provide suggestions from the Internet, iTunes, and the App Store for the user to quickly find any file, documents, emails, apps contacts and more on the device. (For supervised devices only.) |
|
Allow the "Enable Restrictions" option in the Restrictions UI in Settings |
If enabled, users can enable or disable 'Enable Restrictions' option in the 'Restrictions' user interface on the device. (For supervised devices only.) |
|
Allow activity continuation |
If enabled, user can control data flow through iCloud. |
|
Allow backed up enterprise books |
If enabled, users can backup iBooks and restrict synchronization to iCloud. |
|
Enterprise books notes and highlights will be synced |
If enabled, allows the user to to sync Enterprise books, notes and highlights to iCloud. |
|
Allow podcasts |
If enabled users can receive their favorite podcasts. Note: This feature is available only for supervised devices with iOS 8 and later versions. |
|
Allow definition lookup |
If enabled, allows the user to enable or
disable spell check and definition features on the device. Note: This feature is available only for supervised devices with iOS 8.1.3 and later versions. |
|
Allow predictive keyboard |
If enabled, users can enable or disable the predictive keyboard feature. Note: This feature is available only for supervised devices only with iOS 8.1.3 and later versions. |
|
Allow keyboard auto-correction |
If enabled, allows user to enable/disable
keyboard auto-correct feature. Note: This feature is available only for supervised devices with iOS 8.1.3 and later versions. |
|
Allow keyboard spell-check |
If enabled, allows user to enable/disable
keyboard spell check feature. Note: This feature is available only for supervised devices with iOS 8.1.3 and later versions. |
|
Paired Apple Watch will be forced to use wrist detection |
If an Apple Watch is paired with the device, the device forces the Apple Watch to enable Wrist Detection. Note: This feature is available for iOS 8.2 and later versions. |
|
Allow music service and music |
If enabled, it allows third-party apps to add music to user's iCloud music library. Note: This feature is available for iOS 9.0 and later versions. |
|
Allow iCloud Photo Library |
If enabled, allows the user to upload photos and videos to iCloud photo library. |
|
Allow News |
If enabled, users can subscribe to news services. Note: This feature is available only for supervised devices with iOS 9.0 and later versions. |
|
Causes AirDrop to be considered an unmanaged drop target |
If enabled, all targets specified for the AirDrop feature will be considered as unmanaged drop targets. Note: This feature is available for iOS 9.0 and later versions. |
|
Enable the App Store on the home screen |
If enabled, displays the AppStore icon on the home screen of the device. |
|
Allow keyboard shortcuts |
If enabled, allows the user to create and use keyboard shortcuts for typing snippets. Note: This feature is available only for Supervised devices with iOS 9.0 and later versions. |
|
Allow pairing with an Apple Watch |
If enabled, allows the user to pair the device with an Apple Watch. Note: This feature is available only for Supervised devices with iOS 9.0 and later versions. |
|
Allow device passcode from being added, changed, or removed |
If enabled, users can create and modify screenlock passcodes for the device. Note: This feature is available only for supervised devices with iOS 9.0 and later versions. |
|
Allow device name modification |
If enabled, allows users to change the device
name. Note: This feature is available for only Supervised devices with iOS 9.0 and later versions. |
|
Allow wallpaper modification |
If enabled, allows user to change wallpaper
displayed on the device. Note: This feature is available only for supervised devices with iOS 9.0 and later versions. |
|
Allow automatic download applications |
If enabled, allows applications in the device to automatically download and install apps and updates. Note: This feature is available only for supervised devices with iOS 9.0 and later versions. |
|
Allow enterprise application trust |
If enabled, 'Trusted' status is automatically applied to enterprise applications. Note: This feature is available for iOS 9.0 and later versions. |
|
Allow enterprise application trust modification |
If enabled, users can manually change the Trust status of enterprise applications. Note: This feature is available only for Supervised devices with iOS 9.0 and later versions. |
|
Allow radio service |
If enabled, users can use Radio services on their device. Note: This feature is available only for Supervised devices with iOS 9.3 and later versions. |
|
Allow notifications modification |
If enabled, user can modify 'Apple Push Notifications' settings on the device. Note: This feature is available only for Supervised devices with iOS 9.3 and later versions. |
|
Whitelisted application bundles |
Add applications to the app whitelist. The applications in the whitelist will be skipped from security checks during installation and usage.
For more details on obtaining the App bundle
ID, see the explanation at the end of this section. Click the variables button
Note: This feature is available only for supervised devices with iOS 9.3 and later versions. |
|
Blacklisted application bundles |
Add applications to the app blacklist. The applications in the blacklist will not be allowed to be installed or used.
For more details on obtaining the App bundle
ID, see the explanation at the end of this section. Click the variables button
Note: This feature is available only for Supervised devices with iOS 9.3 and later versions. |
|
Security and privacy |
|
|
Allow diagnostic submission |
If enabled, the device will be enabled to submit its iOS diagnostic information to Apple. |
|
Allow untrusted TLS prompt |
If enabled, users will be prompted if they want
to trust unverified certificates. This setting applies to Calendar accounts, Contacts, Safari and to Mail. |
|
Force encrypted backup |
If left unchecked, users can select whether or not to encrypt backups from the device to iTunes in a local computer. If this option is enabled, the backup data from the device to iTunes in local computer will be automatically encrypted. |
|
Content ratings |
|
|
Allow explicit music and podcasts |
Content providers of iTunes flag their explicit content for easy identification. If enabled, explicit content including music and video will be displayed in iTunes store instead being hidden, in the device. |
|
Allow iBookstore |
If enabled, users can access iBookstore, an online bookstore from Apple. Note: This option is available only for supervised devices. |
|
Allow iBookstore erotica |
If enabled, users can download media tagged as
erotica from iBooks.
Note: This feature is available only for Supervised devices with versions prior to iOS 6.1. |
|
Rating region |
Select the region whose content ratings are to be followed, from the drop-down. |
|
Rating movies |
Choose the content rating to be allowed for watching movies. |
|
Rating TV Shows |
Choose the content rating to be allowed for watching the TV shows. |
|
Rating apps |
Choose the rating to be allowed for using apps. |
|
Applications |
|
|
Allow use of iTunes Store |
If enabled, users can access iTunes store. If left unchecked, iTune store is disabled and its icon will be removed from the home screen. |
|
Allow Safari |
If enabled, users can use Safari for browsing internet. If left unchecked, the Safari browser app will be disabled and its icon will be removed from the home screen. |
|
Allow auto fill |
If enabled, the 'auto-fill' feature will be enabled for Safari, to automatically fill details such as user name, password, credit card details and so on in web forms. |
|
Allow java script |
If enabled, java script features will be supported by Safari. |
|
Allow popups |
If enabled, popups will be allowed in Safari. |
|
Force fraud warning |
If enabled, Safari displays alerts to users when visiting websites that are identified as compromised or fraudulent. |
|
Accept cookies |
Select the option on when Safari can accept cookies, from the drop-down. The available options:
|
|
Allow app cellular data modification |
If enabled, user can modify cellular data usage settings for individual apps on the device. Note: This feature is available only for Supervised devices with iOS 7 or later versions. |
|
Allow open from Managed to Unmanaged |
If enabled, users can send data from managed apps to unmanaged apps. Note: This feature is available for iOS 7 and later versions. |
|
Allow open from Unmanaged to Managed |
If enabled, users can send data from unmanaged apps to managed apps. Note: This feature is available for iOS 7 and later versions. |
|
Autonomous single app mode permitted app bundle IDs |
iOS apps built with the functionality of single App Lock, can provoke App Lock for them under certain scenarios in Autonomous single app mode. Administrators can specify the apps for which the mode can be enabled, by entering their App bundle IDs.
For more details on obtaining the App bundle
ID, see the explanation at the end of this section. Click the variables button
Note: This feature is applicable only for Supervised devices with iOS 7 or later versions. |
|
iCloud |
|
|
Allow cloud keychain sync |
If enabled, the Apple Keychain data on the device will be synced to iCloud. Note: This feature applies only to iOS 7 and later versions. |
|
Allow cloud backup |
If enabled, users can backup their device data to iCloud. Note: This feature applies only to iOS 7 and later versions. |
|
Allow cloud document sync |
If enabled, users can synchronize documents on their device with iCloud. Note: This feature applies only to iOS 7 and later versions. |
|
Allow photo stream |
Users can use Photo Stream. Note: This feature applies only to iOS 7 and later versions. |
|
Allow shared stream |
If enabled, users can share and view photos in Photo Stream. Note: This feature applies only to iOS 7 and later versions. |
-
Click the 'Save' button.
You can edit the settings or delete the section at any time. See Edit Configuration Profiles for more details.
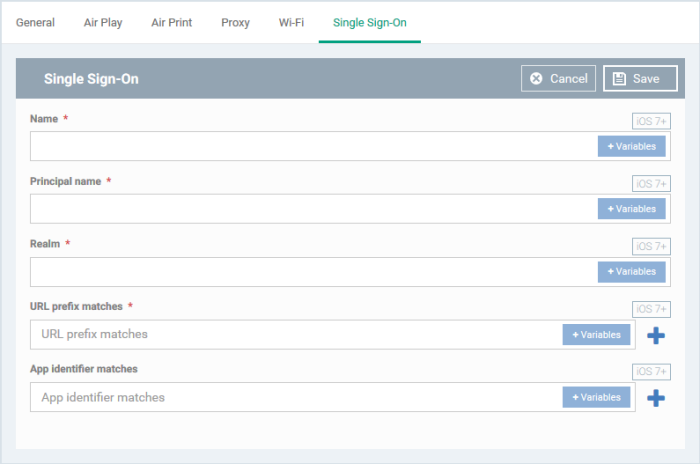
These settings are used to configure Kerberos authentication and are applicable for iOS 7 or later versions only. You can add several Single Sign On accounts to a profile.
-
Click 'Single Sign-On' from the 'Add Profile Section' drop-down
|
Form Element |
Description |
|---|---|
|
Name* |
Enter a label for the account. Click the variables button |
|
Principal name* |
Enter the Kerberos
principal name. Click the variables button |
|
Realm* |
Enter the Kerberos realm name with upper-case
characters. Click the variables button |
|
URL prefix matches* |
Enter the URL prefix,
which must be matched in order to use this account for
Kerberos authentication over HTTP. Click the variables button Click the Click the |
|
App identifier matches |
Enter the bundle IDs of apps that are allowed
to use this Single Sign-On account for logging-in to respective
account. If this field is left blank, this login matches all app
bundle IDs. Click the variables button Click the Click the |
-
Click the 'Save' button.
The account will be added to the Single Sign-On section of the profile.
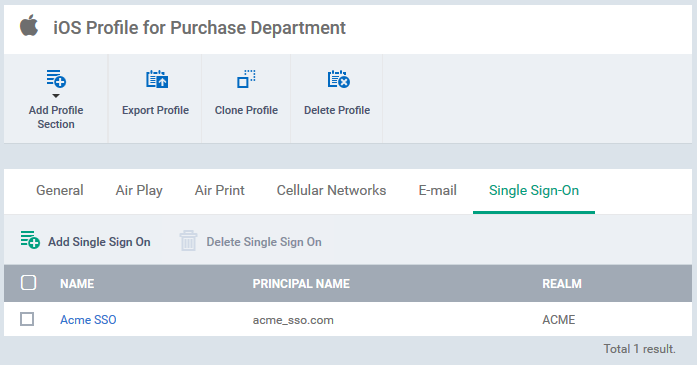
You can add several SSO accounts to the profile.
-
Click 'Add Single Sign-On' and repeat the process to add more SSO accounts
-
Click the name of an account to view and edit its details
This will add a 'Single Sign-On' section to the profile. You can edit the settings or remove the section from the profile at anytime. See Edit Configuration Profiles for more details.
-
Click 'Subscribed Calendars' from the 'Add Profile Section' drop-down
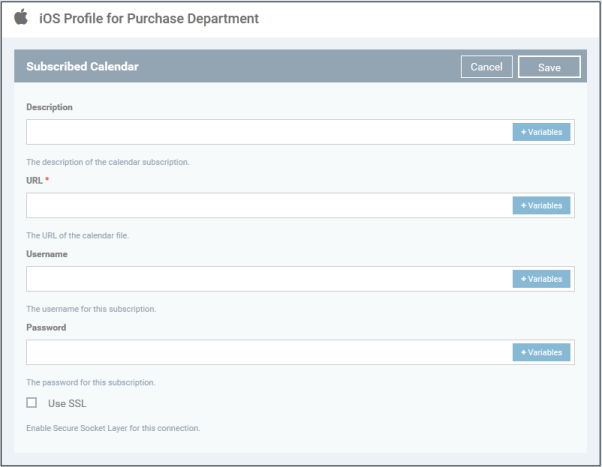
|
Form Element |
Description |
|---|---|
|
Description |
Enter a description of the calendar
subscription. Click the variables button |
|
URL* |
Enter the URL of the calendar account to be
subscribed. Click the variables button |
|
Username |
The user name for the subscription. Click the variables button |
|
Password |
The password for the subscription. Leave the field blank. The user will be prompted to enter the password while configuring the account for the first time. After it is validated, the users can access the account without entering the credentials. |
|
Use SSL |
If enabled, SSL connection will be established with the calendar server, if available. |
-
Click the 'Save' button.
The calendar account will be added.
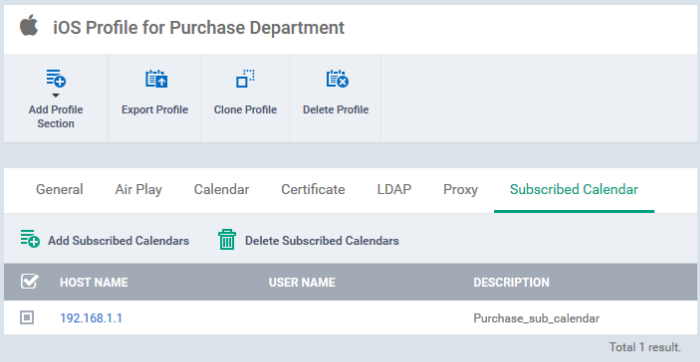
You can add several calendar accounts for a profile.
-
Click 'Add Subscribed Calendars' and repeat the process to add more calendar accounts.
-
Click the host name of a calendar account to view and edit its details.
This will add a 'Subscribed Calendar ' section to the profile. You can edit the settings or remove the section from the profile at anytime. See Edit Configuration Profiles for more details.
-
Click 'Add Profile Section' > 'VPN'
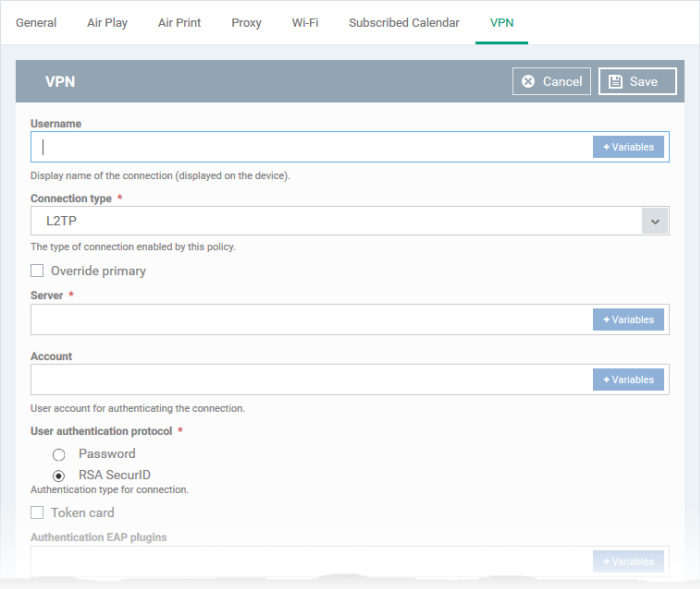
|
Form Element |
Description |
|---|---|
|
User name |
Enter a label for the connection. This is shown on the device. Click the variables button |
|
Connection type* |
Options available are:
The connection parameters for each type are explained in the table below. |
|
Proxy |
This drop-down shows any proxies you added to the proxy settings section of the profile.
See Proxy settings if you want help to add a new proxy. |
|
Connection Type |
Description |
|---|---|
|
L2TP |
Override primary - Force VPN for all connections, including those to external domains:
Server - Enter IP address or host name
of the VPN server. Click the variables button Account - Enter the VPN account user
name. Click the variables button User authentication protocol - Select the authorization type the device uses to connect to the VPN server. The available options are 'Password' and 'RSA SecurID'.
For more details on variables, see Create and Manage Custom Variables. |
|
PPTP |
Override primary- Force VPN for all connections, including those to external domains:
Server - Enter the IP address or host
name of the VPN server. Click the variables button Account - Enter the VPN account user
name. Click the variables button User authentication protocol - Select the authorization type the device uses to connect to the VPN server. The available options are 'Password' and 'RSA SecurID'
For more details on variables, see Create and Manage Custom Variables for more details. |
|
IP SEC |
Override primary- Force VPN for all connections, including those to external domains:
Server - Enter the IP address or host
name of the VPN server. Click the variables button Account - Enter the VPN account name.
Click the variables button Password - Enter the password for the
account. Click the variables button Authentication Method - Select the authorization type the device uses to connect to the VPN server.
For more details on variables, see Create and Manage Custom Variables. |
|
Cisco Any Connection and F5 SSL |
Override primary- Force VPN for all connections, including those to external domains:
Remote Address - Enter the IP address
or host name of the VPN server. Click the variables button Auth name - Enter the VPN account name.
Click the variables button Authentication method - Select the authorization type the device uses to connect to the VPN server.
For more details on variables, see Create and Manage Custom Variables. |
|
Juniper SSL |
Override primary - Force VPN for all connections, including those to external domains:
Remote Address - Enter the IP address
or host name of the VPN server. Click the variables button Auth name - Enter the VPN account user
name. Click the variables button Realm - Enter the name of the
authentication server. Click the variables button Role - Enter the role of the user.
Click the variables button Authentication method - Select the authorization type the device uses to connect to the VPN server.
For more details on variables, see Create and Manage Custom Variables. |
|
Open VPN |
Override primary- Force VPN for all connections, including those to external domains:
Remote Address - Enter the IP address
or host name of the VPN server. Click the variables button Certificate ID - The drop-down shows certificates uploaded for the profile. Select the client certificate you want to use for authentication. See the explanation of adding certificates to the profile for more details. Click 'Add New' to upload the a new certificate.
On demand enabled - Create rules to auto-establish the VPN connection based on the domains accessed. You can create a list of domains and specify the VPN connection establishment type for each domain.
Vendor config Key - The 'Key' string in the Open VPN server configuration file (in .ovpn format).
Value - The 'Value' string in the Open VPN configuration file
For more details on variables, see Create and Manage Custom Variables. |
-
Click the 'Save' button.
The VPN connection is added to the profile.
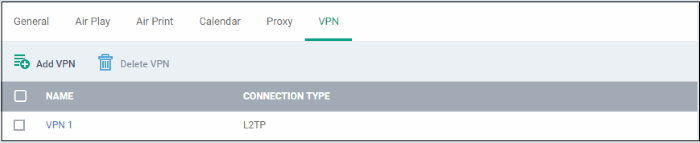
You can add several VPN accounts to the profile.
-
Click 'Add VPN' and repeat the process to add more VPN accounts.
-
Click the name of a VPN account to view and edit its settings
This will add a 'VPN' section to the profile. You can edit the settings or remove the section from the profile at anytime. See Edit Configuration Profiles for more details.
|
Note: If you would like to connect only certain apps to VPN, then this feature allows you to configure the settings. This feature is available for iOS 7 and later versions. |
-
Click 'VPN Per App' from the 'Add Profile Section' drop-down

-
On Demand Match App Enabled - Select this checkbox to enable per-app VPN connection.
-
Safari domains - Domains for which a VPN connection is established when visited through Safari browser.
Click the variables button
to insert dynamic values. See Create and Manage Custom Variables for more details on variables.
Click the
button to add more domains in the field.
Click the
button to remove a domain from the list
For details on other settings please see 'VPN settings'.
-
Click the 'Save' button.
The VPN per App settings for the specified VPN server will be saved and added to the list.
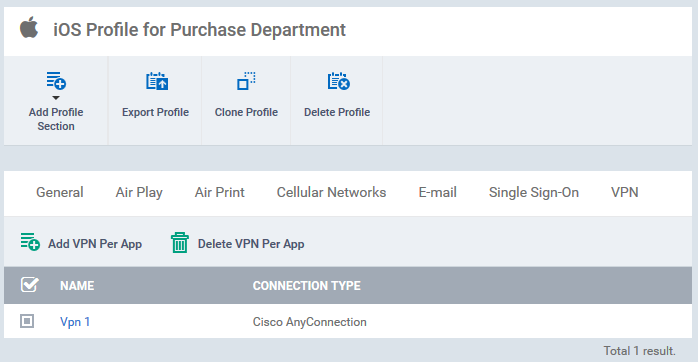
You can add multiple VPN servers for the profile.
-
Click 'Add VPN per App' and repeat the process to add more VPN accounts
-
Click on a VPN account name to view and edit its settings
This will add a 'Per-App VPN' section to the profile. You can edit the settings or remove the section from the profile at anytime. See Edit Configuration Profiles for more details.
-
Click 'Web Clip' from the 'Add Profile Section' drop-down
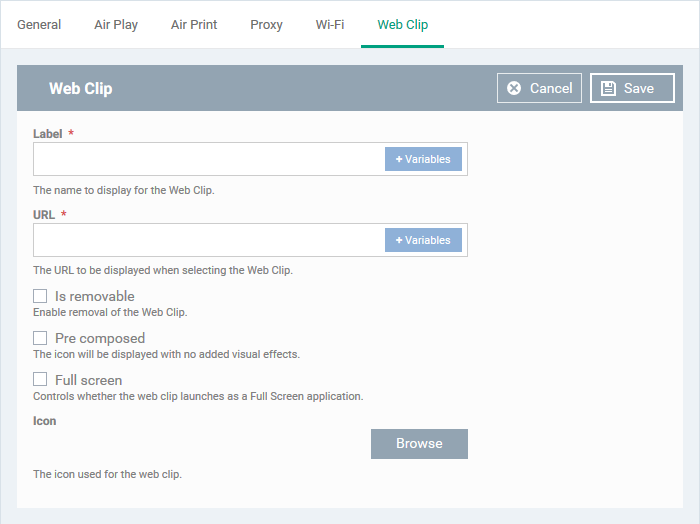
|
Form Element |
Description |
|---|---|
|
Label* |
Enter a name for the web clip. Click the variables button to insert dynamic values. See Create and Manage Custom Variables for more details on variables. |
|
URL* |
The website address visited when the clip is
opened. Click the variables button |
|
Is removable |
If enabled, users can remove the web clip from their devices. |
|
Pre composed |
If enabled, the web clip icon will be shown with no added visual effects. |
|
Full screen |
If enabled, the user can choose to view the web clip full screen mode. |
|
Icon |
Upload the image to be used as icon for the web clip. |
-
Click the 'Save' button.
The web clip will be added to the list.
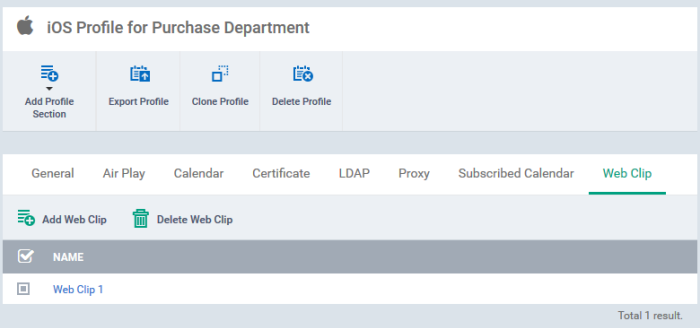
You can add multiple web clips for a profile.
-
Click 'Add Web Clip' and repeat the process to add more webclips
-
Click the name of a web clip to view and edit its settings
The settings will be saved and shown under the 'Web Clip' tab. You can add more web clips and edit the settings or remove the section from the profile at anytime. See Edit Configuration Profiles for more details.
-
Click 'Wi-Fi' from the 'Add Profile Section' drop-down

|
Form Element |
Description |
|---|---|
|
SSID* |
Enter a unique identifier (Service Set Identifier) of the wireless network that the device should connect to. Note: In iOS 7 and later versions, this is optional if the 'Domain Name' value is set. |
|
Auto join |
The device will automatically connect to the configured wireless network. |
|
Hidden network |
Select this option if the specified wireless network is hidden and not visible to Wi-Fi scans. |
|
Encryption type |
Select the type of encryption used by the wireless network from the drop-down. The available options are:
The Password field will appear if any of the options, 'WEP', 'WPA / WPA2' and 'Any' are chosen. If any of the Enterprise encryption type is chosen, then select the supported protocols and configure authentication. The options available are: TLS, LEAP, TTLS, PEAP, EAP-FAST, Use Pac, Provision pac and Provision Pac Anonymously, PAP, CHAP, MS CHAP ans MS CHAP V2 |
|
Password |
Enter the password to connect to the Wi-Fi network. If left blank, the user will be prompted to enter the password when the device attempts to connect to the network. |
|
Proxy |
The proxy servers you added to the proxy settings section of the profile are available for selection in the 'Proxy' drop-down
You can also add new proxy servers:
|
|
Is hotspot |
If enabled, the network is treated as a hotspot. |
|
Service provider roaming enabled |
If enabled, devices can connect to roaming service providers. |
|
Enter the domain name of the Wi-Fi network to
which the device has to connect. This is optional and can be provided instead of
SSID. Click the variables button Note: This feature applies only to iOS 7 and later versions. |
|
|
Displayed operator name |
Enter the name of the Wi-Fi network provider,
to be shown on the device to the user. Click the variables button Note: This feature applies only to iOS 7 and later versions. |
|
Roaming consortium OIs |
Enter the Roaming Consortium Organization
Identifier of the Wi-Fi network provider to which the devices will
connect to. Click the variables button
Note: This feature applies only to iOS 7 and later versions. |
|
NAI Realm Names |
Enter the Network Access Identifier (NAI) realm
names used for Wi-Fi hotspot 2.0. Click the variables button
Note: This feature applies only to iOS 7 and later versions. |
-
Click the 'Save' button.
The Wi-Fi network will be added to the list.

You can add multiple Wi-Fi networks to the profile.
-
Click 'Add Wi-Fi' and repeat the process to add more Wi-Fi networks
-
Click the SSID of a WiFi network to view and edit its settings
This will add a 'Wi-Fi' section to the profile. You can edit the settings or remove the section from the profile at anytime. See Edit Configuration Profiles for more details.
The 'App Lock' section allows you to restrict the ability of specific applications to use device resources. You can add only one application with app restriction settings for a profile. If you want to impose restrictions on several applications, create a profile for each and apply those profiles to the managed devices, as required.
-
Click 'App Lock' from the 'Add Profile Section' drop-down

|
Form Element |
Description |
|---|---|
|
Identifier |
Specify the app to be included. You can add an Apple iTunes Store App or Enterprise App.
For more details on getting the App bundle ID
of an application, see the explanation given below this table. Click the variables button Note: This feature applies only to iOS 7 and later versions. |
|
Disable touch |
Touch screen inputs will be disabled for the app. |
|
Disable device rotation |
The app will not be able to change display orientation. |
|
Disable volume buttons |
The app will not be able to modify device volume. |
|
Disable ringer switch |
Inputs through the ringer switch will be disabled for the app. |
|
Disable sleep wake button |
Inputs through the power/lock/wake button will be disabled for the app. |
|
Disable auto lock |
The device will not auto-lock when this app is running. |
|
Enable voice over |
Allows the user to use the voice over feature on the device for this app. |
|
Enable zoom |
Allows the user to zoom-in/zoom-out the display for this app |
|
Enable invert colors |
Allows the user to invert the colors for the display screens of this app. |
|
Enable assistive touch |
Allows the user to use the 'Assistive Touch' feature on the device for this app. |
|
Enable speak selection |
Allows the user to use the 'Speak Selection' feature on the device for this app. |
|
Enable mono audio |
Allows the user to choose mono mode for audio output of this app. |
|
VoiceOver |
Automatically switches ON the 'Voice Over' feature for the app. |
|
Zoom |
Automatically switches ON the 'zoom-in' feature for the app. |
|
Invert colors |
Automatically switches ON the 'Invert Colors' feature when the app is used. |
|
Assistive touch |
Automatically switches ON the 'Voice Over' feature when the app is used. |
-
Click Save after configuring the parameters and options
The settings will be saved and shown under 'App Lock' tab. You can edit the settings or remove the 'App Lock' section from the profile at anytime See Edit Configuration Profiles for more details.
App Store Application:
-
Find the iTunes Store download URL of the app. Example: https://itunes.apple.com/us/app/cmdm/id807480077?mt=8.
-
Copy the number after the id in the URL. (Here it is: 807480077).
-
Open https://itunes.apple.com/lookup?id=807480077 where you replace the ID with the one you looked up.
-
Search the output for "bundleID". In this example: "bundleId":"com.Xcitium.cmdm.client". So the Bundle ID is com.Xcitium.cmdm.client