Communication Client and Xcitium Client - Security Application Update Settings
-
The updates section of a Windows profile lets you configure how and when managed devices should check for client updates.
-
You can enable automatic updates, specify which version to install, choose update frequency, and enable local updates.
|
Tip:
Alternatively, you can manually update clients as follows:
|
Configure update settings
-
Click 'Assets' > 'Configuration Templates' > 'Profiles'
-
Open the profile you want to work on
Click the 'Updates' tab then 'Edit', if it has already been added to the profile
OR
Click 'Add Profile Section' > 'Updates' if it hasn't yet been added
The section opens at the update
configuration screen:
.png)
There are three tabs:
-
Communication Client - Enable automatic program updates for CC and configure proxy server settings.
-
Xcitium Client - Security - Enable automatic program updates for XCS and configure a schedule.
-
Download Servers - Specify the server from which managed endpoints should collect updates.
-
Open the 'Updates' section of a profile
-
Click the 'Communication Client' tab:
.png)
-
Enable auto-updating Communication Client - Forces the endpoint to check for and install CC program updates at the selected frequency. You can set the location of the download server in the 'Download Servers' tab. Deselect if you want to disable auto updates.
-
Use default Communication Client version - Choose whether or not to always update to the 'default' version.
Enabled = The client will always update to the default version (Default)
Disabled = You can choose the version to which the client updates. Make sure you choose a higher version than already install
Note 1. You can configure the default version in 'Settings' > 'Settings' > 'Portal Set-up' > 'Client Settings' > 'Windows' > 'Xcitium Client'.
Note 2. You can only change the version if 'Change of version while updating' is enabled in 'Settings' > 'Settings' > 'Portal Set-up' > 'Client Settings' > 'Windows' > 'Xcitium Client'. If it is not enabled then the default version is automatically deployed.
-
Update Frequency - Choose how often CC should check for updates. The available options are:
Daily (Default) - The client checks for updates everyday at 6:00 am.
Daily (custom) - The client checks for updates everyday at the time you specify
Weekly - Select the days and times that you want the client to check for updates
On selected days - Choose one or more days in a month to check for updates. For example, you might want to update on the first and third Wednesdays of every month.
Monthly - Select the date and time in a month to check for updates
.png)
-
Enable Communication Client to distribute updates to clients in the same network - Download updates to a managed endpoint, then use that endpoint as the source from which other endpoints collect their updates.
This saves internet bandwidth usage and accelerates updates in large networks.If enabled, your endpoint clients will follow this process at update time:
The endpoint first checks other endpoints to see if the update is installed on them
If available, the client fetches the update from the local endpoint
This endpoint then becomes the source from which other endpoints collect their updates.
You can also choose the types of updates that use this mechanism:
-
Communication Client updates (Version 6.29 or higher)
-
Xcitium Client Security updates (Version 11.4 or higher)
-
Antivirus Database updates (Version 11.4 or higher)
.png)
-
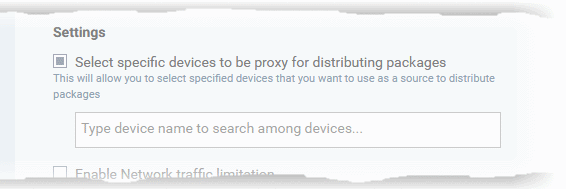
Select specific devices to be proxy for distributing packages - Choose specific devices from which endpoints should collect updates. If you do not enable this option then any device in the local network can act as a source.
-
Enter the names of the target devices in the field provided.
-
You can add multiple devices as sources. Endpoints will collect from the first source they find which has the update.

-
Enable Network traffic limitation - The maximum % of network bandwidth that can be used to share updates. (Default = 30%)
-
Enable device count limitation - The maximum number of devices with which the client is allowed to simultaneously share updates. (Default = 10, Maximum = 20).
-
Use download servers directly in case of any communication issue - If the endpoint cannot contact other endpoints it will instead collect the update from the server in the 'Download Servers' tab.
-
Click 'Save'.
The following table shows how clients will collect updates in different scenarios:
|
|
Option |
Client fetches update from: |
||
|---|---|---|---|---|
|
Enable Communication Client to distribute ... |
Select specific devices to be proxy ... |
Use download servers directly in case ... |
||
|
Scenario 1 |
|
|
|
Any local device which already has the update |
|
Scenario 2 |
|
|
|
Only from selected devices |
|
Scenario 3 |
|
|
|
1. Any device in the local network 2. Download servers |
|
Scenario 4 |
|
|
|
1. Selected devices 2. Download servers |
|
Additional Notes:
|
Xcitium Client - Security
-
Open the 'Updates' section of a profile
-
Click the 'Communication Client - Security' tab:
.png)
-
Enable auto-updating Xcitium Client - Security - Forces the endpoint to check for and install XCS program updates at the selected frequency. You can set the location of the download server in the 'Download Servers' tab. Deselect if you want to disable auto updates.
-
Use default Xcitium Client - Security version - Choose whether or not to always update to the 'default' version.
Enabled = The client will always update to the default version (Default)
Disabled = You can choose the version to which the client updates. Make sure you choose a higher version than already installed. You cannot install a lower version than the current version.
Note 1. You can configure the default version in 'Settings' > 'Settings' > 'Portal Set-up' > 'Client Settings' > 'Windows' > 'Xcitium Client'.
Note 2. You can only change the version if 'Change of version while updating' is enabled in 'Settings' > 'Settings' > 'Portal Set-up' > 'Client Settings' > 'Windows' > 'Xcitium Client - Security'.
If it is not enabled then the default version is automatically deployed.
-
Update Frequency - Choose how often XCS should check for updates. The available options are:
Daily (Default) - The client checks for updates everyday at 6:00 am.
Daily (custom) - The client checks for updates everyday at the time you specify
Weekly - Select the days and times that you want the client to check for updates
On selected days - Choose one or more days in a month to check for updates. For example, you might want to update on the first and third Wednesdays of every month.
Monthly - Select the date and time in a month to check for updates
-
Skip updates if the device is offline - Updates will not be installed if the endpoint is not connected to Xcitium.
-
Reboot Options - Configure how the endpoint should restart after the update is installed:
Force the reboot in - Restart the end-point a certain period of time after installation.
Choice of 5, 10, 15 or 30 minutes
Enter a message in the 'Reboot message' field to inform users about the reboot.
Suppress the reboot - Do not restart the machine after the updates. XCS will only become fully functional after the device is restarted.
Warn about the reboot and let users postpone it - Show an alert to the user which advises them that their computer needs to be restarted.
Enter a custom message which is shown to the user.
Users can restart the endpoint immediately by clicking 'Reboot now', or postpone it by picking a time in the 'Remind me in' drop-down.
-
Virus database Updates - Configure when the endpoint should automatically check for virus signature database updates and apply them
Check for database update every - Specify how often XCS should check for, and automatically install, virus updates.
Do not check for updates if running on battery - Only check for updates if the computer is connected to the mains supply. Useful for laptops or other battery driven devices.
Check for updates during Windows Automatic Maintenance - XCS will check for virus updates when Windows enters maintenance mode. The update check will run at maintenance time in addition to the configured schedule. Only applies to Windows 8 and later.
-
Click 'Save'.
-
The 'Download Servers' tab lets you add and select the servers from which endpoints should collect updates.
-
You may wish to first download updates to a proxy/staging server and have endpoints collect updates from there. This helps conserve overall bandwidth consumption and accelerates the update process when large number of endpoints are involved.
-
You can configure different proxy servers for Xcitium Client Security and Xcitium Client Communication.
|
Note: You need to install the 'ESM Update Mirror' utility on the proxy servers in order to get regular updates from Xcitium.
|
-
Click the 'Download Servers' tab
.png)
By default, Xcitium is set to download updates from the Xcitium servers. You can add your local servers here, edit, reorder the list of servers and remove servers if required.
-
Click 'Add' to add a server
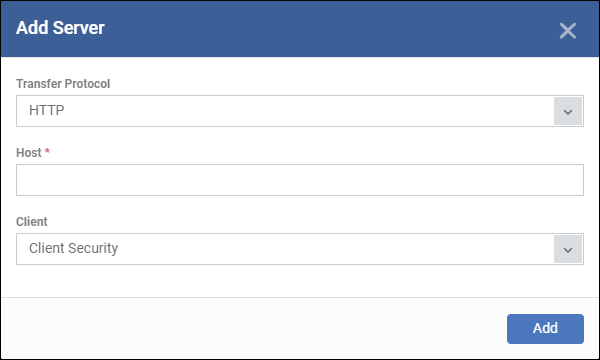
The 'Add Server' dialog is shown.

-
Transfer Protocol - Select HTTP or HTTPS
-
Host - Enter the server details in the 'Host' field, either IP or the host name.
-
Client - Select which items should be collected from the proxy:
Communication Client - Endpoints will collect communication client (CC) updates from the proxy server.
Client Security - Endpoints will collect security client (XCS) updates from the proxy server, including virus database updates.
Communication Client + Client Security - Endpoints will collect CC, XCS, and virus database updates from the proxy.
-
Click 'Add'. Repeat the process to add more servers.
_1.png)
-
Use the 'on-off' switch to enable or disable a server. You need to enable the server in order for endpoints to use it
You can edit, remove or reorder the list of servers.
-
To edit a server details, select it and click the 'Edit' button at the top.
-
Update the details as required and click the 'Set' button
-
To remove a server, select it and click 'Remove' at the top
The updates are checked from the server at the top and moves down the list. You can reorder the list of servers.
-
To reorder the server list, select the server(s) and click 'Move Up' or 'Move Down'
-
Click 'Save' for the changes to updated in the profile.


