Comodo Help
Find the desired product help
SOCaaP

SOCaaP

Version 2.2

English

Print Help
SOCaaP Web Protection > Website Data And Settings > Security Scans > Website Files Security Scans > Malware Scan Settings > Automatic Configuration
  • Introduction
    • Logging-in To The SOCaaP Console
  • Dashboard Overview
    • Summary
    • Alerts,Incidents And Website Vulnerabilities
    • Customer Health
  • SOCaaP Alerts/Escalations
    • Log-in To The Admin Console
    • The Home Screen
    • Service Summary
    • Incidents Overview
      • Incidents
      • Threat Summary
    • Log Collection Summary
    • Threat Communication Graph
    • Tickets
    • Reports
    • Notification Settings
    • Integrate Your Office 365 Account With SOCaaP
  • SOCaaP XDR
    • Log-in To The Admin Console
    • The Main Interface
    • Eveny Query
      • Configure Event Queries
    • Report Generation
    • Administration
      • Event Collection
      • Phantom Settings
      • Manage Users
    • Appendix 1 – Field Groups And Event Items Description
    • Appendix 2 –SOCaaP Supported Logs
  • SOCaaP Web Protection
    • Add Websites
    • The Main Interface
    • The Dashboard
    • Website Data And Settings
      • Website Overview
      • Security Scans
        • Website Scans
        • Website Files Security Scans
          • Malware Scan Settings
            • Automatic Configuration
            • Manual Configuration
          • Run A Scan And View Results
          • Notifications, Malware Removal And Scheduled Scans
        • Vulnerability Scans
          • CMS Vulnerability Scans
          • OWASP Top 10 Vulnerability Scans
      • Content Delivery Network
        • Activate CDN For A Website
        • CDN Settings
        • View CDN Metrics
      • Firewall
        • WAF Statistics
        • WAF Events
        • Configure WAF Policies
        • Manage Custom Firewall Rules
      • SSL Configuration
      • DNS Configuration
      • Add Trust Seal To Your Websites
      • Back Up Your Website
        • Backup Settings
        • On-Demand Backup
        • View Backup Records And File Statistics
        • Restore And Download Website Files
        • Delete Backups
    • Manage Your Profile
  • Sensor Installation
    • Requirements
    • (Option 1) Create Installation Media
    • (Option 2) Deploy Virtual Machine Environment
      • Create A New Virtual Machine
      • Configure Memory Size
      • Configure Hard Disk
      • Configure Hard Disk File Type
      • Configure Storage On Physical Hard Disk
      • Configure Size Of Virtual Hard Disk
      • Configure Network Settings
      • Select VM Startup Disk
    • Sensor Installation Steps
    • Sensor Configuration Steps
      • Login To The Web Portal
      • User Settings
      • Configure Network
      • Configure Timezone
      • Key Activation
      • (Optional) Valkyrie Key Verdict
      • (Optional) Forward Log
  • Frequently Asked Questions
  • About Xcitium Security Solutions

Automatic Configuration


You need to provide FTP details for your site to enable automatic configuration. SOCaaP Web Protection will use the details to upload the scanner agent.

  • Open the SOCaaP Web Protection dashboard
  • Select the target website from the menu at top-left
  • Click the 'Scan' tab then 'Server Side Scan' > 'Overview'
  • Click 'Enable Scanner'
  • Select ‘Automatic’ in the server side scanner box:


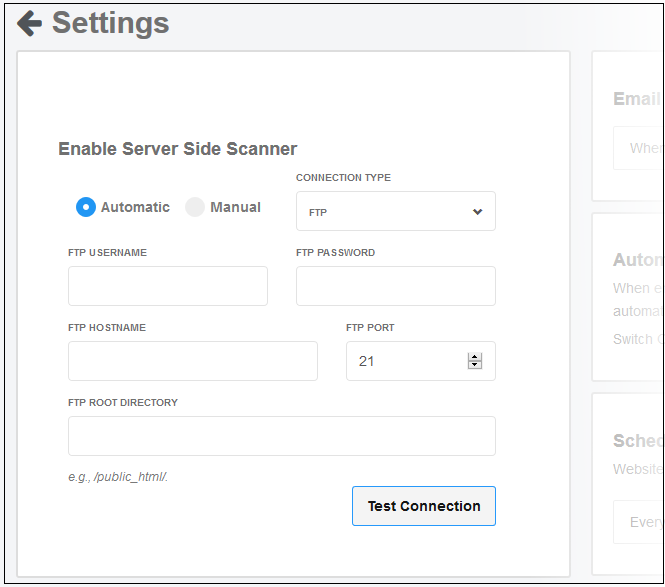
FTP / s/FTP Settings - Table of Parameters

Parameter

Description

Connection Type

 Select FTP or sFTP as required.

FTP Username / FTP Password

Enter the username and password of your FTP server.

Hostname

IP or hostname of your web-server.

Port

 By default, FTP / sFTP connections use ports 21 and 22 respectively. Change this if your web-server uses different ports for FTP connections.

FTP Directory

The path of your web root folder. For example '/public_html/.


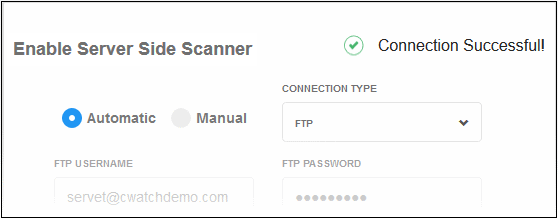
  • Test Connection - Click this after completing all fields. SOCaaP Web Protection will check your settings and, if successful, show a confirmation message as follows:


  • Click 'Save'

SOCaaP Web Protection will upload the agent to your site. You will see 'Server side scanner is enabled' message if everything is successful:


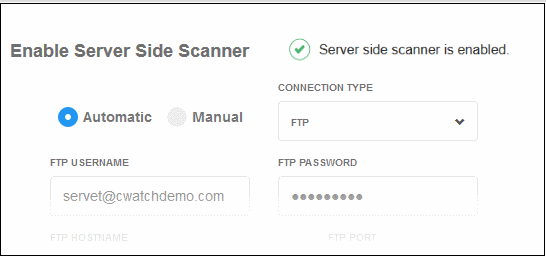
  • Note. Our technicians will also use these FTP settings to access your site IF you request them to remove malware

Add exceptions


You can exclude files from the server-side scan as follows:

  • Scroll down to the exclude file types section:


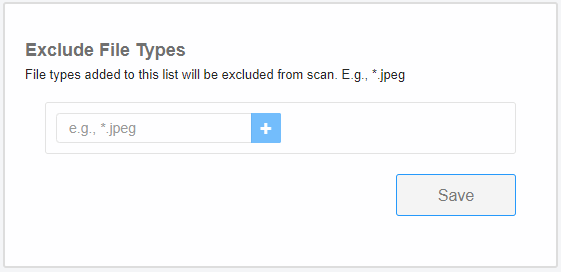
  • Type the extension of the file that you want to exclude. You must prefix the extension with *. For example, *.txt
  • Click '+'
  • Repeat the procedure to add more file extensions

Click 'Save'.

Our Products
  • Free Antivirus
  • Free Internet Security
  • Website Malware Removal
  • Free Anti-Malware
  • Anti-Spam (Free Trial)
  • Windows Antivirus
  • Antivirus for Windows 7
  • Antivirus for Windows 8
  • Antivirus for Windows 10
  • Antivirus for MAC
  • Antivirus for Linux
  • Free Endpoint Security
  • Free ModSecurity
  • Free RMM
  • Free Website Malware Scanner
  • Free Device Manager for Android
  • Free Demo
  • Network Security
  • Endpoint Protection
  • Antivirus for Android
  • Comodo Antivirus
  • Wordpress Security
Cheap CDN
  • Bootstrap CDN
  • Semantic UI CDN
  • Jquery CDN
  • CDN Plans
  • CDN
  • Free CDN
Enterprise
  • Patch Management Software
  • Patch Manager
  • Service Desk
  • Website Down
  • Endpoint Protection Solutions
  • Website Security Check
  • Remote Monitoring and Management
  • Website Security
  • Device Manager
  • ITSM
  • CRM
  • MSP
  • Android Device Manager
  • MDR Services
  • Managed IT Support Services
  • Free EDR
Free SSL Certificate
Support Partners Terms and Conditions Privacy Policy

© Comodo Group, Inc. 2025. All rights reserved.