


Add Networks
Networks can be added using any of the following methods:
- Domains - Add Active Directory domains by specifying their DNS name and NetBios name. See Add Domains for more details.
- Workgroups – Add workgroups by specifying the name of the workgroup. See Add Workgroup for more details.
- IP Address Range(s) – Endpoints to be scanned can be specified by defining the IP range. See Add IP Address Range for more details.
- You can add an AD domain by specifying its DNS domain name and NetBios name.
- If you want to scan only selected endpoints in the domain, you can add Organization Unit (OU) filters.
- Admin login details for the AD server need to be added in the 'Credentials' interface and mapped to the domain. See Credential Management for more details.
To add a domain
- Click 'Scanning Methods' from the menu bar and select the 'Active Directory' tab
- Ensure that the 'Enable Active Directory Scanning' check-box is selected
- Click 'Add Domain'
- Enter the DNS name and NetBios name in the respective fields.

- If you want to enable the domain for scanning, select the 'Enable' checkbox beside the domain name
The domain will be added to the list.
- To
remove a domain click the thrash can icon

To add an OU filter
- Click 'Add OU Filter'
A new row will be added to the list of filters.
- Enter the OU filter in the new row.
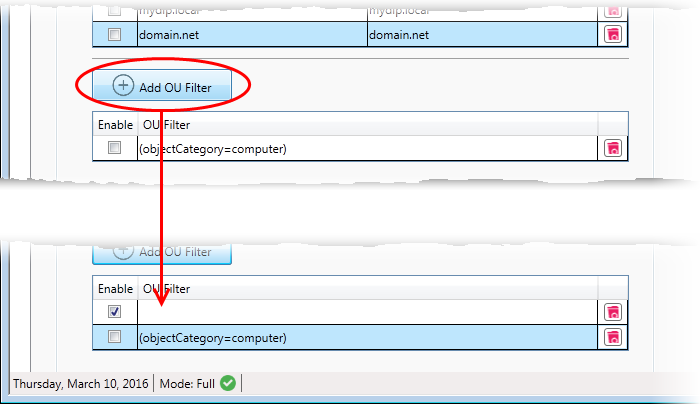
- If
you want to enable the filter, select the 'Enable' check-box
The filter will be added to the list.
- To
remove a filter click the thrash can icon
In order to scan endpoints in a workgroup, 'Workgroup Scanning' has to be enabled in NAT. You can add a workgroup by specifying its name. You must then add an admin password for the domain n the 'Credentials' area and map it to the workgroup. See Credential Management for more details.
- Click 'Scanning Methods' from the menu bar and select the 'Workgroup' tab
- Ensure that 'Enable Workgroup Scanning' check-box is selected
- Click 'Add Workgroup'

- Enter
the name of the workgroup you want to add
- Click the trash can icon to remove a work-group
You can add endpoints within a network by specifying their IP address range. In order to scan those endpoints, 'IP Address Range Scanning' has to be enabled in NAT. The login credentials for the endpoints in the network with administrative privileges are to be added in the 'Credentials' interface and mapped to the IP range from the 'Scanning Methods' interface to enable NAT to scan the endpoints in it. See Credential Management for more details. The credentials mapping can also be done through the 'Scanning Methods' interface.
|
Prerequisite – For mapping the login credentials for the network from the 'Scanning Methods' interface, the credentials should have been added to NAT through the 'Credentials' interface. See Credential Management for more details |
To add an IP Address Range
- Click 'Scanning Methods' on the menu bar and select the 'IP Address Range' tab
The list of IP address ranges added to NAT will be displayed.
- Ensure that 'Enable IP Address Range Scanning' checkbox is selected
- Click 'Add IP Range'
A new row will be added to the list of IP Address ranges.

- Enter the start IP address and the end IP address in the respective fields
- Enter a description for the IP address range in the textbox that appears below the row.
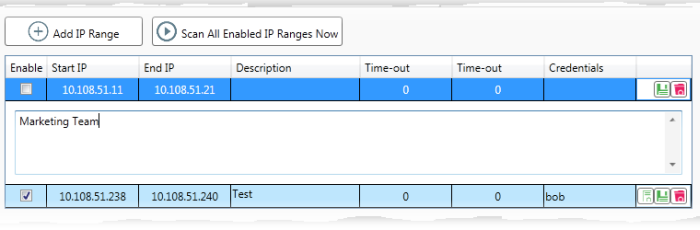
- Enter the time out period for WMI so as to skip scanning the endpoints that are not responsive for the period specified in this field.
|
Note: NAT uses Windows Management Instrumentation (WMI) and Microsoft Baseline Security Analyzer (MBSA) to scan the endpoints identified at the given IP addresses by the Network Mapper (NMAP) tool. |
- Click
'Save'
 at the right of the row to add the IP address
range.
at the right of the row to add the IP address
range.
The next step is to map login credentials to the IP address range.
- Click
'Add Credential'
 at the right of the row.
The 'Set Credentials' dialog will appear with a list of credentials added to NAT.
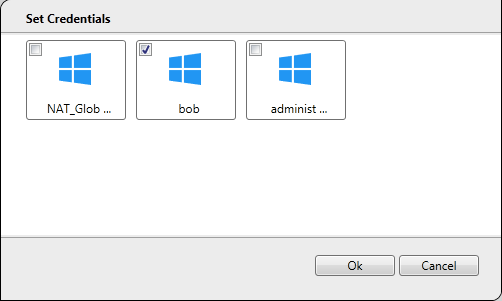
- Click 'Ok' after choosing the credentials to apply to the IP address range
-
Click the trash can icon
to remove an address range