


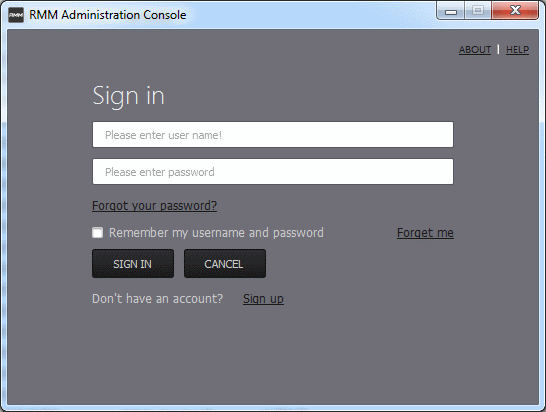
Step 3 - Login to Technician Console
After
installation, the console should automatically open at the login
screen. Enter your Comodo One username (email address) and password
in the respective text fields and click 'SIGN IN'.
- You can open
the console in future by clicking the RMM desktop shortcut or by
clicking 'Start' > 'All Programs' > 'COMODO' > 'RMM
Administration Console' > 'RMM Administration Console'.
The console will open.
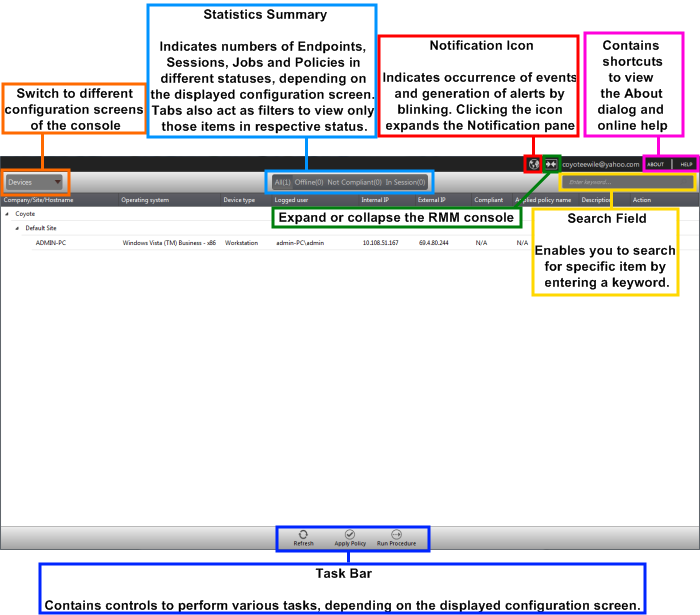
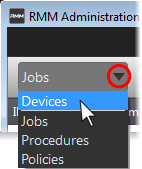
The drop-down the top left enables you to switch between configuration interfaces:
- Devices – Displays enrolled endpoints. You can run procedures and apply policies to endpoints.
- Jobs – Lists jobs that are completed and in progress. You can create new jobs with a set of procedures and execute them on desired endpoints.
- Procedures – Lists all procedures available for deployment to endpoints. Procedures can be run directly on endpoints and/or can be used in jobs to be executed on selected endpoints.
- Policies – Displays active monitoring policies which have been deployed to endpoints. Alerts are generated if a policy is violated. You can view all policies, create new policies and deploy policies to endpoints by clicking the 'Policy Manager' button at the bottom of the interface.
A 'Procedure' is a sequence of one or more actions which is run on managed endpoints. Procedures can be run ad-hoc on any endpoint and multiple procedures can be added to an RMM 'Job'.
To open the procedures interface, choose 'Procedures' from the drop-down at top left. The interface will list any procedures that have already been created.
To create a new procedure
- Click the 'Create' button at the bottom of the interface:
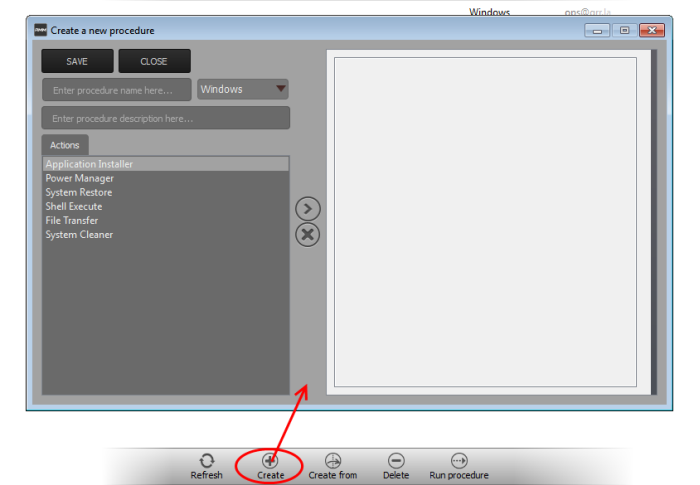
In the new procedure dialog:
- Enter a name and a short description for your procedure and choose the operating system of the target endpoints
- Choose an action from the 'Action' list and click the right arrow to add it to your procedure.
- Next, you need to configure each action you add to your policy. The following table lists the default actions and associated parameters:
|
Action |
Parameters Required |
|---|---|
|
Application Installer |
Choose one of the following install operations:
|
|
Power Manager |
Choose one of the following power control operations:
|
|
System Restore |
Choose whether to create a restore point or to restore the system to a previous state.
|
|
Shell Execute |
Run a particular file on a managed endpoint Basic
Advanced
|
|
File Transfer |
Enter the path of the source file to be copied from the host computer at which the technician console is installed. The file will be copied to the folder c:/lps-temp/file-transfer at the endpoint. |
|
System Cleaner |
Execute one of the following system scanning and cleaning tasks:
|
- Repeat the process to add more actions to the procedure. Actions will be executed in order from top-to-bottom.
- Click 'SAVE' to save your procedure.
- Your new 'Procedure' will be listed in the 'Procedures' interface.It will be available for inclusion in any job created for target endpoints.The procedure can also be run ad-hoc on any endpoint.
- Repeat the process to add more procedures as required.
|
Tip: You can create new procedures using an existing procedure as a template. To do so, select an existing procedure and click 'Create From' at the bottom of the interface. Next, edit procedure actions and parameters as required and click 'Save'. |
To run a procedure
-
Click 'Run Procedure' from the bottom of the interface.
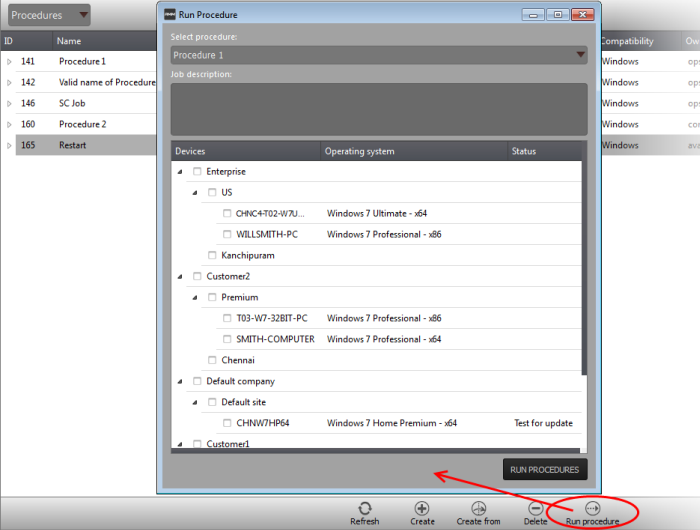
- Choose the procedure you want to run from the drop-down at the top
- Choose the endpoints on which you want to run the procedure and click the 'RUN PROCEDURES' button
A new 'Job'
will be automatically created when you directly run a procedure.
A 'Job' is a collection of one or more RMM procedures. You can construct sophisticated jobs by adding multiple procedures to a single job.
- To open the Jobs interface, choose 'Jobs' from the drop-down at the top left. The 'Jobs' interface displays the jobs created and executed by all admins belonging to your MSP / organization.
To create a new job
- Click 'Job Manager' from the bottom of the interface:
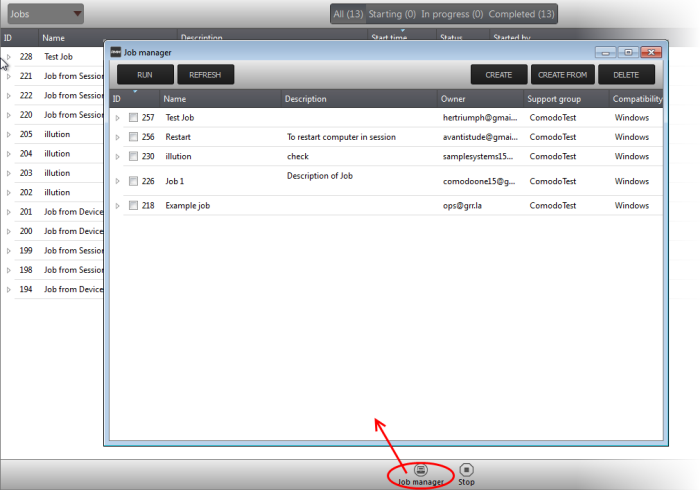
All jobs created so far will be displayed.
- Click 'CREATE' from the top of the 'Job Manager' dialog.
The job creation wizard will start.
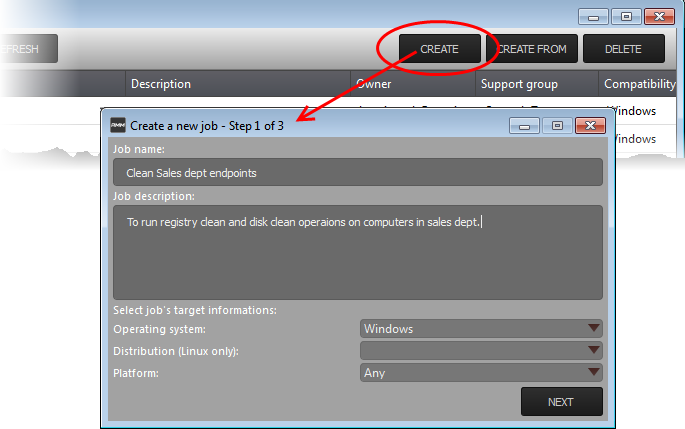
Step 1 – Job Description
- Enter the job details:
- Job Name – Enter a name for the job
- Job Description – Enter a short description of the job
- Operating System – Choose the operating system of the target endpoints
- Platform – Choose the operating system version
- Click 'NEXT' to continue.
-
Select the procedures you wish to add to the job. If you have not yet created any procedures, please refer to this section of the guide.
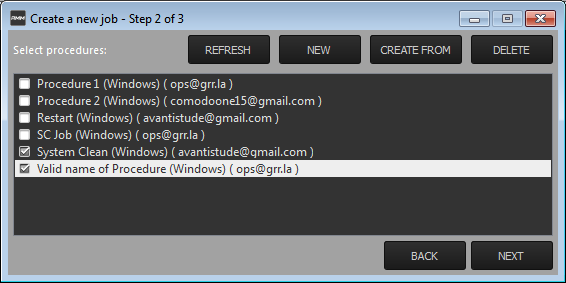
|
Tip: You can add new procedures from this interface too by clicking 'NEW' from the top of the interface. Refer to the previous section 'Create Procedures' for more details. |
- Click 'Next'
Step 3 – Select Target Endpoints
- Select
the endpoints on which you want to execute the job:
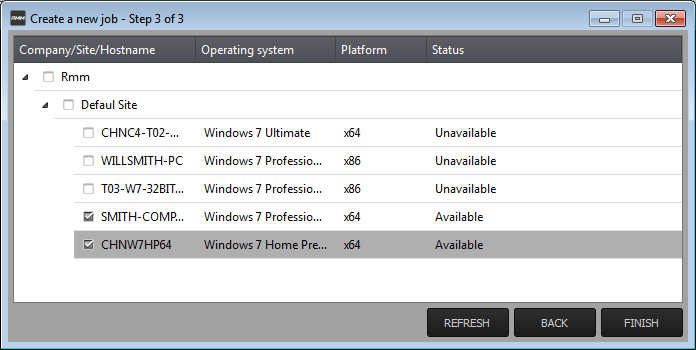
- Click 'FINISH'
The job will be added to the list in the 'Job Manager' interface and will be available for execution at any time.
To execute a saved job
- Click 'Job Manager' from the task bar
- Choose the job(s) you want to execute
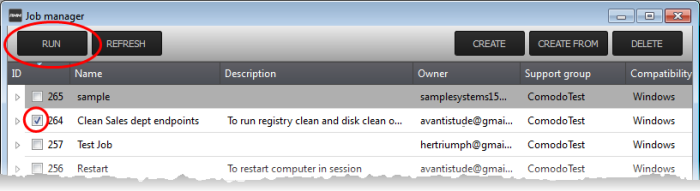
- Click 'RUN' from the title bar of the Job Manager interface.
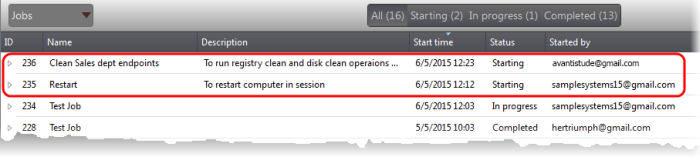
The job(s) will be started and their status will be indicated in the 'Jobs' interface.
Create and Apply Monitoring Policies
Remote Monitoring and Management (RMM) monitors enrolled endpoints based on the policies applied to them. You can create policies to monitor various system events, and define whether service desks tickets are created if an endpoint violates the policy. Admins can remediate the issues by running jobs or procedures on the endpoint or by initiating a support session with the end-user.
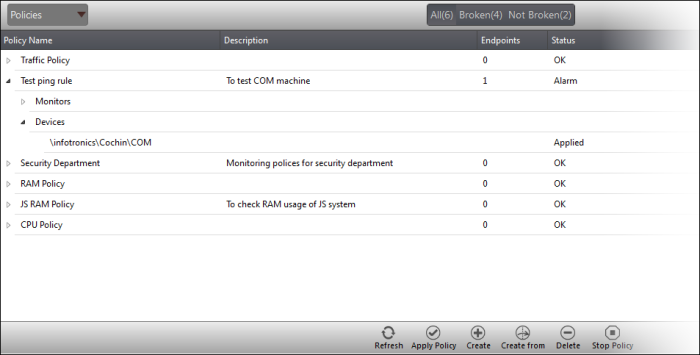
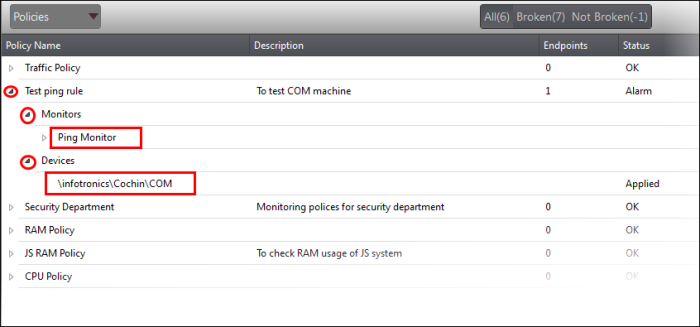
- To open the 'Policies' interface, choose 'Policies' from the drop-down at the top left. The interface displays which policy is in effect on an endpoint and whether or not the endpoint is compliant with its policy. New policies can be created by clicking the 'Create' button at the bottom of the interface.
To create a new policy
- Click 'Create' from the bottom of the interface
The 'Create policy' interface will open.
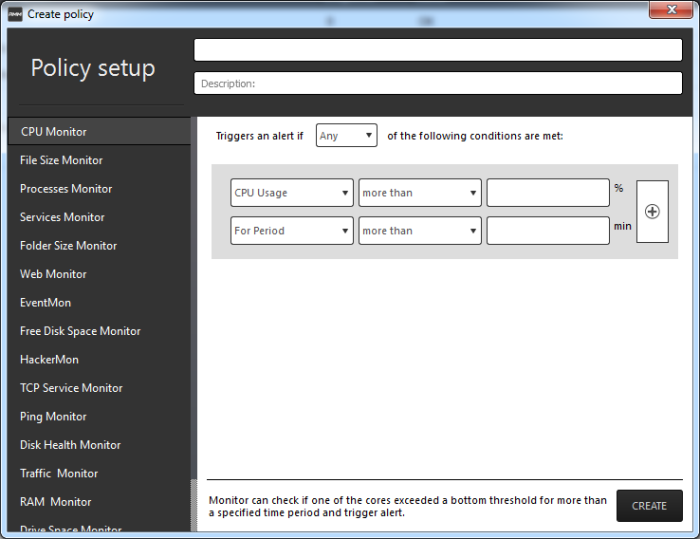
- Enter a name and a short description for the policy in the respective fields
- Choose the monitoring module from the left.
- Specify the conditions and thresholds of the rule in the right pane. Your rules are automatically saved as you go along, so you can freely select other modules on the left if you wish to add more rules to the policy.
|
Tip: You can add any number of conditions for a particular rule by clicking the '+' button at the right. To remove a condition, click the 'X' button to the right. |
- Add more modules to the policy by selecting them on the left.
- Click 'Create' to save your policy.
To apply a policy to endpoints
Policies can be applied from the 'Devices' and 'Policies' interfaces.
- Click 'Apply Policy' from either of these interfaces

The 'Apply Policy' dialog will open with a list of endpoints enrolled for your account.
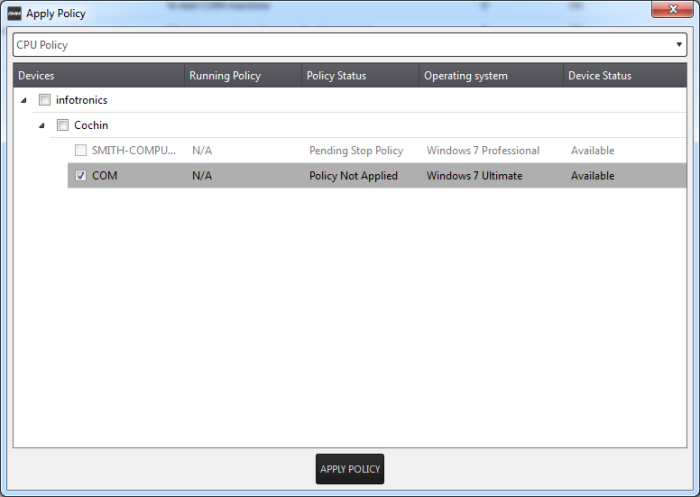
- Select the policy you wish to apply from the drop-down at the top

- Choose the endpoints to which the policy should be applied and click 'Apply Policy'.
|
Tip: Clicking the arrow at the right of a policy name displays the policy's rules. |
If any of the
monitored parameters exceed the thresholds set by the policy, the
endpoint will be indicated as non-compliant (under the 'Compliant'
column) in the Devices interface. Also, a support ticket will be
automatically created in Service Desk. The Administrator can view the
details of the breach by logging-into the Service Desk and resolve
the issue by:
The support session enables you to take remote desktop control of the client computer and perform maintenance tasks and resolve issues identified in them. By establishing a support session you can:
- Perform actions like cleaning the client's computer, power management, system restore, file transfer, system inventory audit and so on
- Run procedures to correct issues identified by
policy violation service desk requests
Initiating a support session from the technician console
If you require to perform a maintenance operation or run procedures you can initiate the session by clicking 'Takeover' from the 'Devices' interface.
- Open 'Devices' interface by choosing Devices from the drop-down at the top-left

-
Click 'Take Over' under 'Action' in the row of the device (endpoint) to which the support session is to be started.
A session will be established.
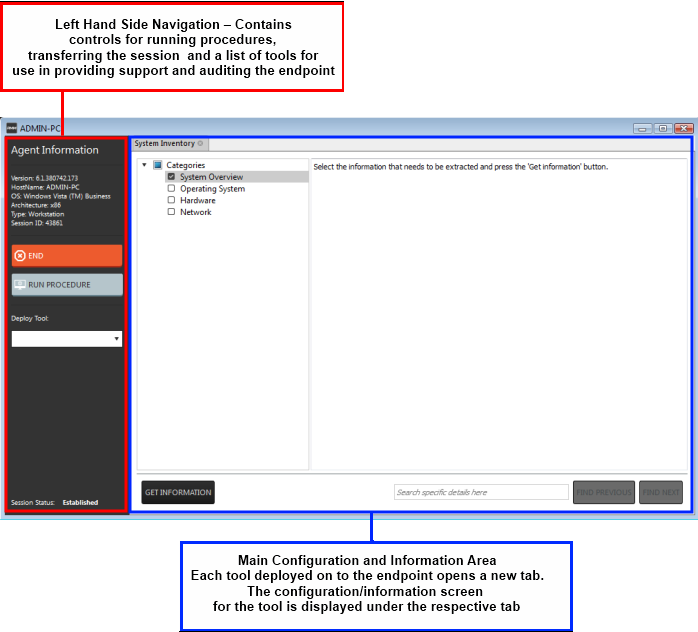
Left Hand Side Navigation – The left hand side navigation contains controls and buttons for various tasks like running a procedure, deploying tools on to the endpoint to perform various actions and audits, transfer the support session to other clients and so on.
- END – Concludes the support session and closes the session window for the endpoint.
- RUN PROCEDURE – Allows you to run procedures on the endpoint. You can select procedures from those that are available in the 'Procedures' interface. Refer to the section Run a Procedure for more details.
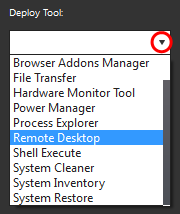
- Deploy Tool – Allows you to select tools for performing various tasks such as system cleaning, power management, system restore and so on. Refer to the section Execute pre-defined actions on the endpoint for more details
Main Configuration and Information Area– The main configuration and information area displays the configuration screens for the tools selected from the 'Deploy Tool' drop-down.
Next, see:
Execute Pre-Defined Actions on the Endpoint
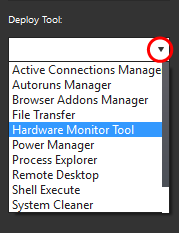 |
The 'Deploy Tool' drop-down contains handy diagnostic and repair tools which can be deployed to endpoints. For example, you can view all running processes and kill unnecessary processes, access the command line interface of the endpoint, run system clean operations and so on. The service session window console allows any number of tools to be deployed concurrently on to the endpoint. Each tool opens a new tab in the 'main configuration area and displays options and results pertaining to the tool. The following table provides the list of tools available for deployment. |
|
Table of Available Tools for Deployment on to Endpoint |
|
|---|---|
|
Tools |
Description |
|
Active Connections Manager |
Allows you to view all currently active network connections (applications, processes and services), individual connections that each application is responsible for and terminate any unsafe processes that are running on the endpoint. |
|
Autoruns Manager |
Allows you to view and edit start-up items, services, drivers, system programs and so forth, that are loaded when the endpoint boots up. |
|
Browser Add-Ons Manager |
Allows you to to identify the browser add-ons installed on the browsers and to remove unsafe or malicious add-ons. |
|
File Transfer |
Allows you to transfer any file between the your computer and the endpoint. |
|
Hardware Monitoring Tool |
Allows you to track and monitor the hardware index to check whether the computer is overheating or voltage is out of the acceptable range to preclude an operating system failure. |
|
Power Manager |
Allows you to shut down and restart the endpoint, if required after a critical operation like editing the Windows Registry of the endpoint. |
|
Process Explorer |
Allows you to quickly identify, monitor and terminate any unsafe processes that are running on the endpoint. The Process Explorer shows ALL running processes, even those triggered by malware in the computer and those that were invisible or very deeply hidden. |
|
Remote Desktop |
Allows you acquire control of the client's computer through Remote Desktop connection in order to investigate and resolve issues. Refer to the section 'Access the Endpoint through Remote Desktop Connection' for more details. |
|
Shell Execute |
Allows you to open the command prompt window of the endpoint and execute shell commands. |
|
System Cleaner |
Allows you to perform Registry clean operation to remove obsolete and unwanted registry entries to boost up system performance and disk clean operations to remove junk or garbage files which occupy a considerable space in the endpoint. |
|
System Inventory |
Allows you to view the hardware and software resources of the endpoint. The 'System Inventory' audit provides a valuable information for determining compatibility of the hardware with the operating systems, and identifying any changes to a system that might develop problems. |
|
System Restore |
Allows you to revert the endpoint to a previously created restore point (including system files, installed applications, Windows Registry, and system settings) to that of a previous point in time. You can also create a
restore point with the present configuration of the endpoint to
restore it to the present condition in future. |
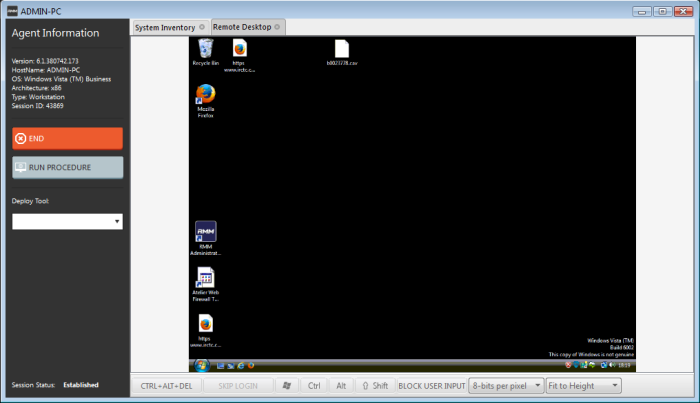
Access Endpoints through Remote Desktop Connection
 |
RMM allows you to
gain remote desktop access to the endpoint and execute necessary
actions to solve issues. During the time the you are working with the
endpoint, the end-user can view the actions taken by you and can
operate the computer simultaneously. If the end-user wishes, he/she
can even terminate the desktop connection by clicking Disconnect from
the client chat window. |
To initiate a remote desktop connection
Take over the endpoint having the RMM client installed and a session is established. Click the remote desktop option and then you can perform tasks like 'Run Procedure'.
The desktop of the endpoint will open in a new 'Remote Desktop' tab in the main configuration area.
You can also execute pre-defined procedures on the endpoint from the support session interface.
To run a procedure
-
Click RUN PROCEDURE from the left.
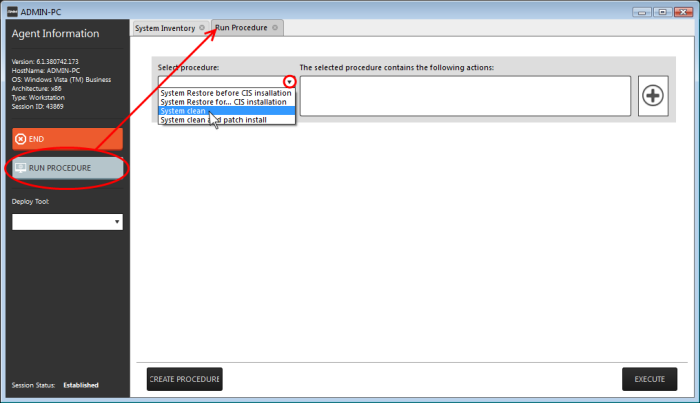
A new Run Procedure tab will open
in the main configuration area. The Select Procedure drop-down will
display the pre-configured procedures which are available at the
'Procedures' interface. For more details on creating and managing
procedures, refer to the section Create
Procedures.
- Choose the procedure to be run at the endpoint from the 'Select procedure' drop-down.
The sequence of actions contained in the chosen procedure will be displayed in the list at the right.
- Repeat the process to add more procedures by clicking the '+' button at the right end
- Click 'Execute'.
A job will be created with the list of selected procedures for the endpoint and will be executed.