


RMM - Bulk Enrollment via Active Directory
This tutorial briefly explains how
you can install the RMM agent on multiple endpoints using the Active
Directory and group policy (GPO) and enroll them for monitoring.
Software Requirements
- AD Server – Windows Server 2008 or higher
- Endpoints – Windows 7 or higher
Please note the method described below for creating a group policy (GPO) and deploying them is for Windows Server 2008 Standard and for other server versions the steps may vary slightly.
Step 1 – Get the enrollment
code/link from the RMM admin console
The enrollment code/link for RMM agents is unique for each company site. All endpoints that have an
agent installed upon them will be listed under the selected site in
the RMM admin console.
To generate an enrollment code/link, click the 'Add Device(s)' button at the bottom of the RMM admin console
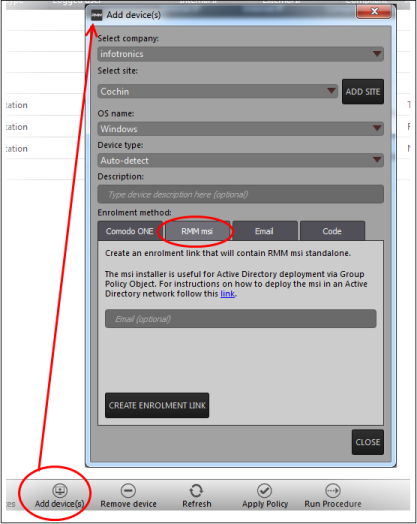
- Select company: Choose the company for which you want to bulk enroll endpoints
- Select
site: Choose the location from the
drop-down. Please note the enrollment code/link for the selected
site is unique and endpoints that are installed with the downloaded
agent using this enrollment code/link will be listed under the
selected site in the RMM admin console.
Step 2 – Download the RMM agent
The next step is to download the agent from the 'RMM msi' tab. The standalone RMM installer is used to enroll endpoints in bulk using Active Directory via Group Policy Object method.
After downloading the agent, save it in the AD server from where you want to enroll the endpoints.
Step 3 – Create a shared network folder and configure permission level
Now that you have downloaded the .msi agent setup file, the next step is to create a shared folder in the network.
- Browse to the location where you want to create a shared folder and create a new folder.
- Name the folder, for example RMM_agent
- Select that folder, right-click and select 'Share' or from the menu toolbar

- Since all endpoints need to have at least read access to this shared folder, select 'Everyone' from the drop-down and click the 'Add' button

-
Ensure the 'Permission Level' is set to 'Reader' and click the 'Share' button at the bottom

-
Note down the location of this shared folder and click the 'Done' button

Step 4 – Create a Group Policy and Assign the package
The next step is to create a group policy that will install the RMM agent onto the endpoints.
- Click 'Start' > 'Administrative Tools' > 'Group Policy Management'
- Right-click
on the domain name and click 'Create a GPO in this domain and Link
it here...' option

-
Enter a name for the group policy in the 'New GPO' dialog

- Click 'OK'
The newly added group policy will be listed.
- Right-click on the policy and click the 'Edit' option

The 'Group Policy Management Editor' will be displayed.
- Expand 'Computer Configuration' > 'Policies' > 'Software Settings'

- Right-click on 'Software installation' and select 'New' > 'Package'

- In the 'Open' dialog, enter the path of the shared folder that was noted before, select the file and click the 'Open' button

- In the 'Deploy Software' dialog, select 'Assigned'

- Click
'OK'
Step 5 – Run a GPO update
In order to install the RMM agent, you need to run a GPO update in the command prompt.
- Open the command prompt and type gpupdate and click the 'Enter' button

The group policy update will be run
and a message displayed.

Step 6 – Restart the endpoints
After the group policy update is
run successfully, the endpoints must be restarted for the RMM agent
to be installed.
That's it. You have now successfully enrolled endpoints via AD using the GPO method. You can see the endpoints listed in the RMM admin console under the respective customer site in the 'Devices' screen.
|
Note: If you try to manually install RMM agent on an endpoint where the GPO was deployed and then removed, you may get an error during the agent installation. Visit the Microsoft support site at https://support.microsoft.com/en-us/mats/program_install_and_uninstall and run the tool on the endpoint. |