Step 5 - Configure Network Connections for Firewall Devices (Optional)
- A firewall device should have network adapter ports to connect to different network zones.
- By default, port 1 on the FW device is automatically configured for LAN with IP 192.168.0.15.
- The number of ports shown in the CM network configuration screen depends on the number of adapters on the FW device. These ports will be shown as Port 2, Port 3, Port 4 etc.
- If required, you can define new interfaces for different network zones in central manager and configure the ports in the firewall device to connect to the new interfaces.
In brief:
- Configured ports and zones (such as LAN, WIFI, Internet) on the FW devices will be imported to CM when the devices are enrolled.
- To view the imported network settings and zone configurations in CM, click 'System' > 'Dashboard' > select the device > 'Action' > 'Network Configurations'
- You can define new interfaces (zones) for the ports in CM for a FW device.
- Click 'Interfaces' on the left, then 'Add Zone'.
- Define a new zone (such as LAN, WIFI, Internet) and click 'Save'.
- Next, click 'System' > 'Dashboard' > select the device > 'Action' > 'Network Configurations'
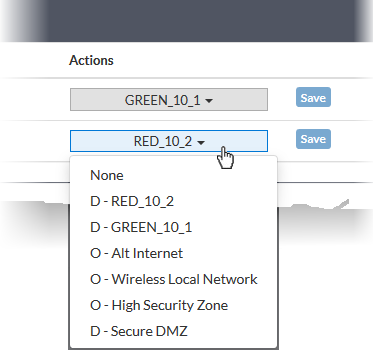
- Click the drop-down in the 'Actions' column beside a port that you want to configure and select the zone. The zone options include imported zones and configured zones in CM. Zones added for organizations will be prefixed with 'O' and for devices with 'D'.
- Click 'Save'. The new network interface configuration for the port will be updated on the FW device.
To add new network zone interfaces
- Click 'Interfaces' on the left
- Select an organization or device from the drop-down in the title bar (next to the word 'Interfaces')
- Select an organization to manage interfaces for all devices belonging to the organization
- Select an individual device to manage the interfaces for a specific device
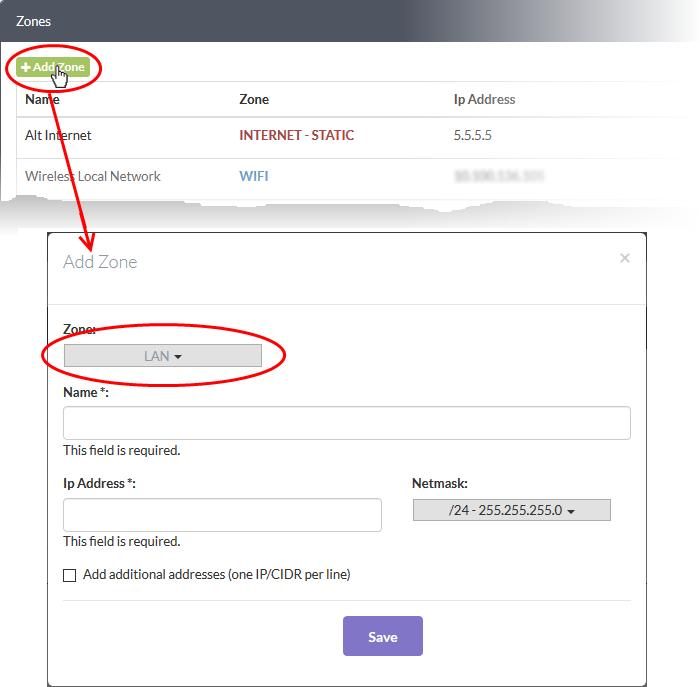
The 'Zones' screen shows all the interfaces created for the selected organization/device.
The following sections explain how to configure network zone interfaces:
Add untrusted external network zones like WAN for connecting to the internet
- Click the 'Add Zone' button at the top-left of the 'Zones' screen
- Select 'Internet' from the 'Zone' drop-down

- Type - Choose the interface type through which the firewall device will connect to the internet. Options are:
- STATIC - The external network interface is in a LAN and has a fixed IP address and netmask. An example is a router in which the DFW device is assigned a fixed IP address.
- DHCP - The external network interface receives its network configuration through dynamic host control protocol (DHCP) from a local server, router, or modem.
- PPPoE - The external interface is connected to an ADSL modem through an ethernet cable. Select this option only if the modem uses the Point-to-Point Protocol over Ethernet (PPPoE) to connect to the service provider.
- Configure the parameters for the selected
interface type
Device Settings
- Name - Enter a label to identify the interface
- IP Address - The address that will be assigned to the interface
- Netmask - Choose the network mask containing the possible masks from the drop-down (e.g. /24 - 255.255.255.0)
- Add additional addresses - Enable this box if you wish to add additional IP address(es)/netmask(s) to the interface
- Default gateway - Enter the IP address of the gateway through which the firewall connects to the internet
- DNS Settings - Enter the IP addresses/hostnames of the primary and secondary DNS servers you wish to use
Uplink Settings
- Uplink is Enabled - The uplink will be activated after you click 'Save'. Deselect this if you don't want to enable the uplink device at this time. You can enable the uplink later by editing the interface from the dashboard of the firewall device console
- Start uplink on boot - The uplink will start automatically on every restart of the DFW device. Deselect this checkbox if you want to manually start the uplink when required
- Uplink is managed - The uplink will be managed by Dome Firewall and its details displayed in the firewall dashboard. Deselect this option if you do not want the uplink details to be shown in the dashboard
- Backup Profile - Select if you want to specify an alternate uplink connection which will become active in the event this one fails. Choose the alternative uplink from the drop-down
Advanced Settings:
- The 'Advanced Settings' pane lets you specify the MAC address and the Maximum Transmission Unit (MTU) of data packets for the interface. These settings are optional
- Click the 'Advanced Settings' link if you need to specify custom values for these fields
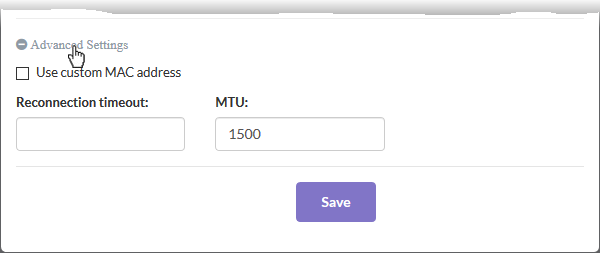
- Use custom MAC address - The firewall will automatically detect the MAC address of the network adapter port and will populate it in the MAC address column. Enable 'Use custom MAC address' if you need to override and replace the default MAC address of the external interface. Enter the MAC address in the text box that appears below the checkbox.
- Reconnection timeout - Specify the maximum period in seconds that the uplink should attempt to reconnect in the event of a connection failure. The connection timeout period depends on the ISP configuration. If you are unsure, leave this field blank.
- MTU - Enter the Maximum Transmission Unit (MTU) of the data packets that can be sent over the network.
- Click 'Save'.
The interface will be added to the
list.
Add trusted internal network zones like LAN, DMZ and Wi-Fi interfaces
- Click the 'Add Zone' button at the top-left of the 'Zones' screen.
- Select 'LAN', 'WIFI' or 'DMZ' from the 'Zone' drop-down as required.
- Configure the following for the internal network zone:
- Name - Enter a label to identify the interface.
- IP Address - Enter the IP address of the interface as pre-configured in the network
- Netmask - Choose the network mask containing the possible masks from the drop-down (e.g. /24 - 255.255.255.0)
- Add additional addresses - Enable to add additional IP address(es)/netmask(s) to the interface. Enter the additional address(es)/netmask(s) one per line in the text box that appears.
- Click 'Save'.
The interface will be added to the list.
To view and manage the network connections for a device
- Click 'System' on the left then select 'Dashboard' to open the dashboard
- Click the 'Actions' button on the tile of the device
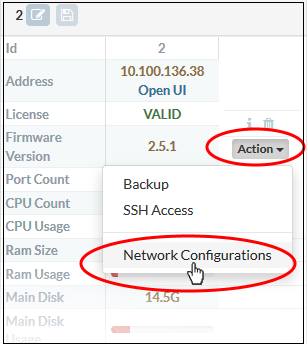
- Choose 'Network Configurations' from the options
The 'Network Settings' dialog for the device will appear.

- Use the drop-down in the 'Actions' column to select the interface (zone) for each port in the firewall device
- Organization interfaces are prefixed 'O', and are available for all devices in the organization
- Individual interfaces are prefixed 'D' and are available only for a specific device
- Click 'Save'.