Step 4 - Generate and Send a
Quote
Now that you have created your products ('Items') and your customers, you can create and send a quote.
Note - this step explains how to create a basic quote from scratch. You can also create time-saving templates which can be selected in the 'New Quote' screen.
The new quote can be configured and executed in four steps:
The setup stage has two areas:
- Quote setup
- Private note
|
Quote Setup - Description Form Fields |
|
|---|---|
|
Quote setup - Specify the quote recipient and configure basic quote details. |
|
|
*To |
Select a recipient that you added in Step 2 - Add Contacts. Enter a customer or company name in part or full. Matching contacts will be displayed for you to select. The quote will be sent to the email address you have on record for the customer. |
|
*Subject |
The subject line of the quote email. |
|
Expires on |
The date up to which the quote is valid.
|
|
Style |
Select the appearance of the quote.
|
|
Private
notes - Add comments for your reference and internal communication. These notes will not be shown in the quote sent to the customer. |
|
|
Note heading |
Title related to your note. |
|
Note text |
Brief information of the internal note. To add additional notes for the quote, click the 'ADD ONE MORE NOTE' button:
|
Fields marked as * are mandatory.
-
Click 'Next' to proceed into the next step
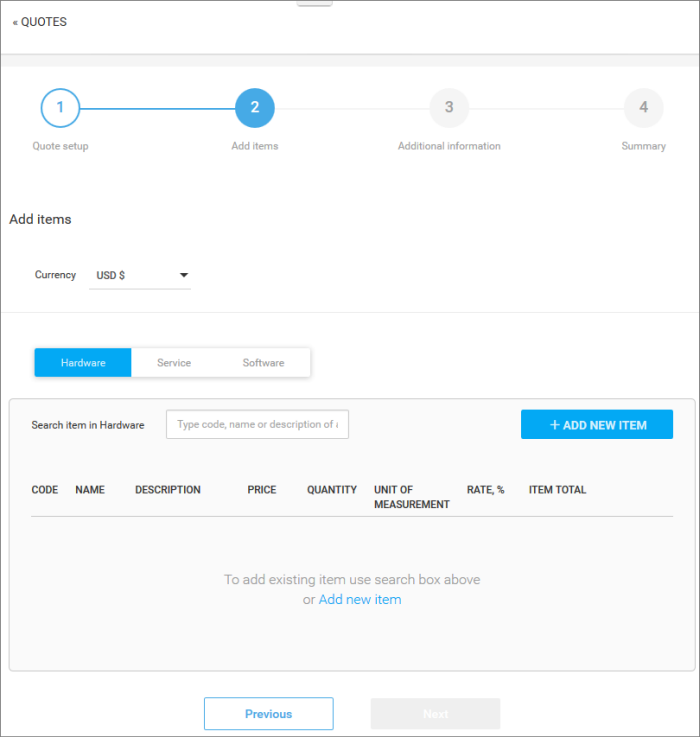
The 'Add items' stage allows you to add fields which is available in the customer quote page.

- Specify the currency which you want to use in the quote (default = USD). If you change currency, all items will be charged in the new currency at the current exchange rate. You can manually change the exchange rate should you desire.
- To add products to the quote, choose the category into which your item fits then start searching the item in the text box
- If you wish to add a brand new item instead (one that does not exist in Quote manager), click the 'ADD NEW ITEM' button and follow the guidance in Step 2 - Add Items.
- Repeat the process to add more items
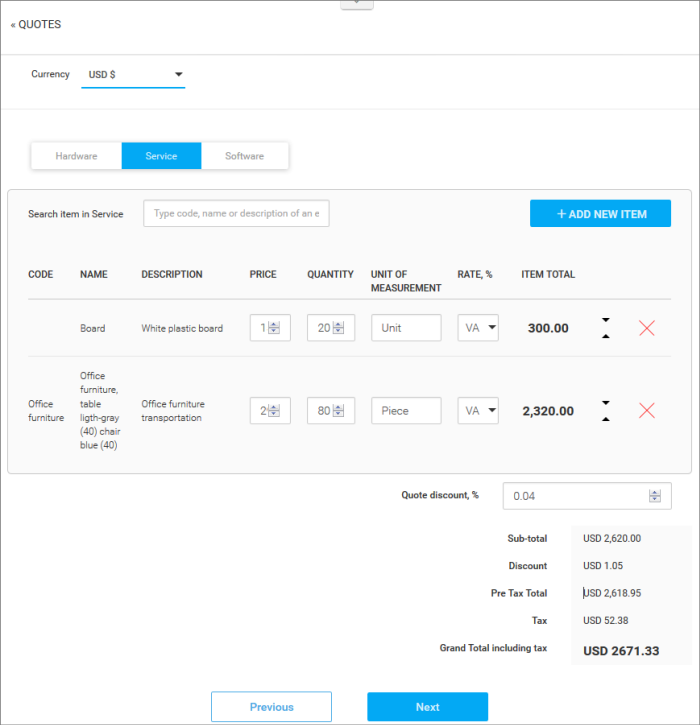
- To remove an item click 'X' at the right of the Item name
- To re-order the items in the list use the 'Up' and 'Down' arrows at the right end of the item details
- After creating the item, QM will return you to the 'Add items' interface with the new item added.
- Enter the discount that can be applied to the item price in the 'Quote discount' field.
- Code, name and description will auto-complete with the defaults on record for the item.
- You can modify 'Price', 'Quantity', 'Unit Of Measurement', 'Tax' and 'Quote discount' on the quote.
- Set a client discount (optional). Enter the % discount you want to offer on the total price.
- Click '+ Add New Item' to add more products and services to the quote.
- The total value for all items, including tax, is displayed on the lower-right of the form.

-
Click 'Next'
Step 3 – Additional Information
The 'Additional Information' step allows you to define whether your image signature and contact details such as phone, email, website and heading and / or footer will be displayed in the quote page.
-
Click 'Next' to continue
The summary step allows you to review the quote and take the following actions:
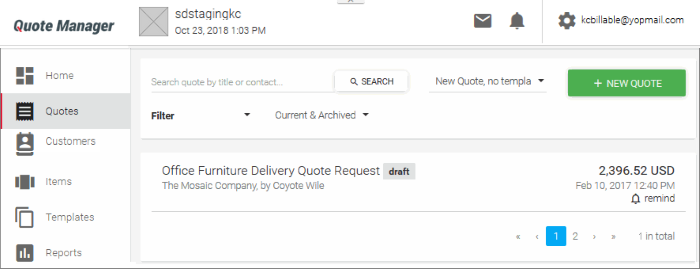
- Save quote as draft - Store the quote for later. The quote will be shown in the quote list with a status of 'Draft' until you send it.
- Send - Immediately forward the quote to the customer. The quote status will change to 'Published'. See below for more information on what happens next.
- Previous - Click if you want to update any of the information you have entered so far.
- To send the quote from QM, click the 'Send' button. The quote 'Status' will change to 'Published'

- Customers will receive a notification email which contains a link to a web-page containing your quote. Customers can provide feedback or accept/reject your quote on this page. Your quote is securely hosted on https://quote.comodo.com. See Step 5 for more details on quote finalization
- You can set reminders per quote from main 'Quotes' interface.
- Click 'Quote Manager', then click any quote in the list.
- Click 'Download PDF' on the details screen if you want to print/archive the quote, or if you wish to send it to the contact manually.
- Click 'Show Quote Activity' to show an itemized history of events pertaining to the quote.

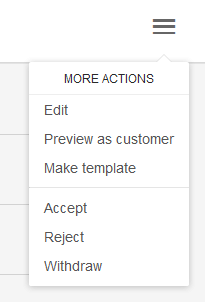
- The menu (top right) contains additional actions which allow you to edit the quote, preview it as a customer, convert the quote to a template or to withdraw the quote:

- All feedback from your customer regarding the quote will also be stored on the quote detail screen. Please see step 5 for more details on this


