


Step 2 - Add Customers and Their Assets
The next step is to add your customers and their assets to cWatch in order to monitor their networks. Customer assets are the networks, endpoints and web servers from which logs will be collected.
Add a new customer
Customers added to your Comodo One / Comodo Dragon / ITarian account are automatically available in cWatch.
- Login to your Comodo One / Comodo Dragon / ITarian MSP account
- Click 'Management' then 'Customers.'
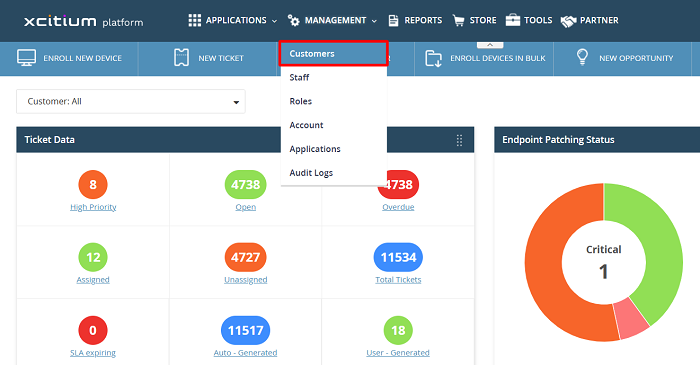
- Click the 'New Customer' button:
_1.png)
- Complete each field on the form then click 'Save' to add the customer.
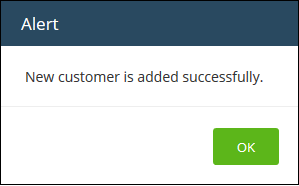
- Click 'OK' in the confirmation dialog:
- Repeat the process to add more customers.
In the cWatch interface, you can view the customers in the dashboard and asset management screens.
- Next, you need to:
- Add customers' assets to cWatch Network for monitoring
- To open the cWatch interface, login to your Comodo One / Comodo Dragon / ITarian MSP account, click 'Applications' then 'cWatch'
- The cWatch admin console will open at the dashboard:
Add customer assets
- Open the 'Asset Management' interface by clicking the 'Menu' button, then 'Assets' > 'Asset Management'.
- Select the customer whose assets are to be added from the left.
Customer details will be shown on the right.
- Click 'Manage' at the bottom:
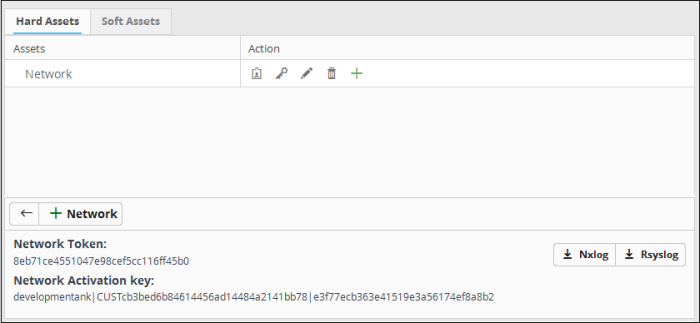
The interface for adding customer's assets will open. It contains two tabs:
- Hard Assets - Assets such as networks and zones to be monitored by entering their start and end IP addresses.
- Soft Assets - Assets such as services which are hosted on the network.
The hard assets tab contains a default customer network and token. You can use this to add endpoints or create a new network with another name.
|
Hard Assets: Action – Controls |
|
|---|---|
|
|
Clicking this icon displays the authentication token and download buttons for the pre-configured RSYSLOG and NXLOG configuration script files for the network/zone in the lower right pane. |
|
|
Allows you to reset the authentication token for the network/zone and generate new one. Once the token is changed, the old token becomes invalid. The cWatch Network server will not be able to collect logs from RSYSLOG and NXLOG utilities at endpoints with configuration script file containing the old token. |
|
|
Allows you to edit the name and IP address range of the network or the zone. |
|
|
Allows you to delete the network or zone. Deleting a network also deletes the zones configured under it. |
|
|
Allows you to add a zone to the network. |
Add hard assets
- Select the customer from the left in the 'Asset Management' interface and click the 'Mange' button on the right pane.
- Click the 'Hard Assets' tab
- Click the 'Network' button at the bottom of the right pane.
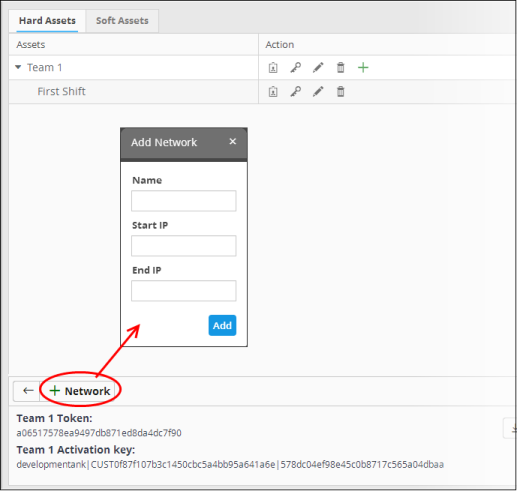
The 'Add Network' dialog will appear.
- Name - Enter the name of the network in the field.
- Start IP - Enter the start IP address if a range of endpoints are to be added. If a single endpoint is to be added, enter its IP address in both the 'Start IP' and 'End IP' fields.
- End IP - Enter the end IP address if a range of endpoints are to be added. If a single endpoint is to be added, enter its IP address in both the 'Start IP' and 'End IP' fields.
- Click the 'Add' button.
The network will be added and a
unique authentication token and agent activation key will be
generated for the network. Clicking the ![]() button in the new network
row will display the token and the key at the bottom of the right
pane.
button in the new network
row will display the token and the key at the bottom of the right
pane.
- Repeat the process to add more networks.
To add a zone to a network
- Click
the
 button in the row of the network.
The 'Add Zone' dialog will appear.
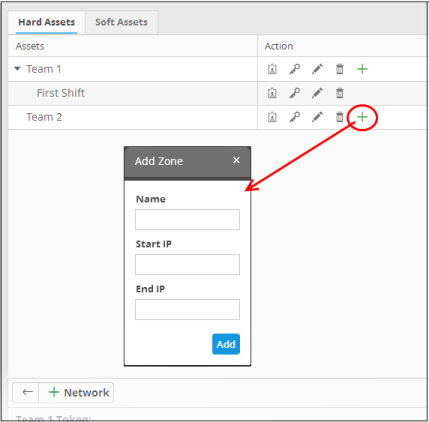
- Name - Enter the name of the zone in the field.
- Start IP - Enter the start IP address if a range of endpoints are to be added for the zone. If a single endpoint is to be added, enter its IP address in both the 'Start IP' and 'End IP' fields.
- End IP - Enter the end IP address if a range of endpoints are to be added for the zone. If a single endpoint is to be added, enter its IP address in both the 'Start IP' and 'End IP' fields.
- Click the 'Add' button.
The Zone will be added to the network and a unique
authentication token will be generated for the zone. Clicking the
button in the row of the new zone will display the token and the key
at the ![]() bottom of the right pane.
bottom of the right pane.
Now that you have added endpoints to be monitored in the Hard Assets area, the next step is to run the Nxlog and Rsyslog configuration files on endpoints with Nxlog and Rsyslog utilities. See Step 3 for more details.
The 'Soft Assets' interface allows
administrators to create and manage a list of important URLs, domains
or IP addresses, which acts as a reference list for the
operators/administrators/analysts. If items displayed in this screen are affected by an incident, the operator/administrator/analyst may decide to, for example, escalate the incident from high to critical.
To add soft assets for a customer
- Open the 'Asset Management' interface by clicking the 'Menu' button, then 'Assets' > 'Asset Management'.
- Select
the customer whose assets you wish to add from the left
The Customer Details pane will open in the right.
- Click 'Manage' at the bottom left of the right pane and choose the 'Soft Assets' tab.
- Click the 'Add' button from the bottom of the right pane.
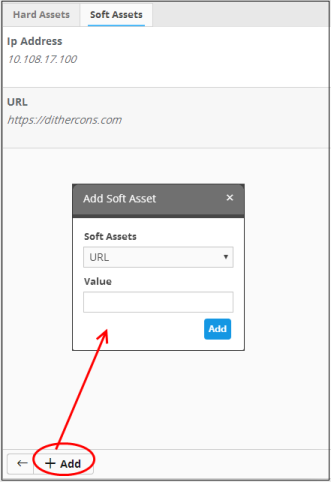
The 'Add Soft Asset' dialog will be displayed.
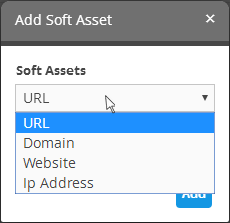
- Choose the type of soft asset that you want to add from the 'Soft Assets' drop-down.
- Enter the value for the selected soft asset in the 'Value' field.
- Click the 'Add' button.
The soft asset will be added to the list for the customer.