Comodo Help
Find the desired product help
Endpoint Manager

Endpoint Manager

Endpoint Manager Quick Start Guide 7.2

English

Print Help Download Help
Endpoint Manager - Quick Start > Step 4 - Enroll User Devices
  • Endpoint Manager - Quick Start
    • Step 1 - Enrollment And Configuration
    • Step 2 - Configure EM Communications
    • Step 3 - Add Users
    • Step 4 - Enroll User Devices
    • Step 5 - Create Groups Of Devices (optional)
    • Step 6 - Create Configuration Profiles
    • Step 7 - Apply Profiles To Devices Or Device Groups

Step 4 - Enroll User Devices


The next step is to add user devices for management. 

    • Each license covers one mobile device or one Windows / Mac / Linux endpoint per user.
        • If you add more than one device for a user then an additional license is required. You can purchase additional licenses from the Comodo website.

            Enroll user devices

            • Click 'Users' > 'User List' on the left
              • Select users for whom you want to enroll devices then click 'Enroll Device' above the table
                Or
                • Click the 'Add' button  on the menu bar and choose 'Enroll Device'.

                Step 1 - Device Options

                • Current device - Enrolls the device you are currently using. You may disregard this option at this stage as we are adding multiple devices with the 'Other device' option.
                • Other device - Add devices owned by the users you selected previously. Those users should already be listed in the 'Specify User' box:


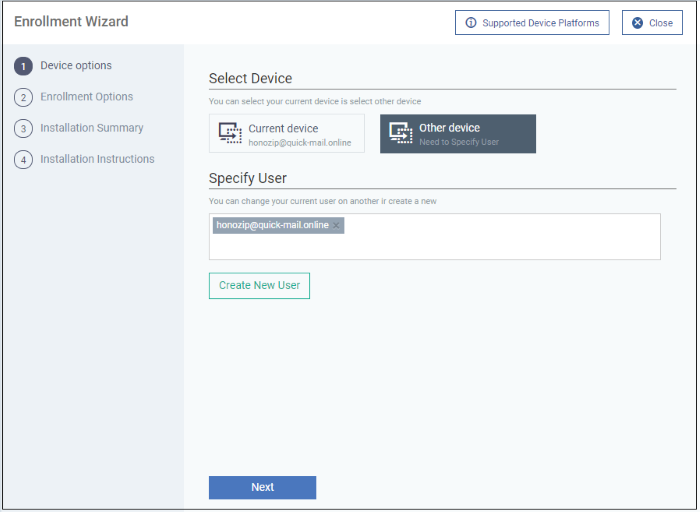
                • You can add additional, existing users by simply typing their email address in the box. Endpoint Manager will auto-suggest users that have already been created. 
                • Create New User - Click if you want to add a new user to Endpoint Manager. You cannot add devices unless you have first added the users that own them. The add-user process is explained here.
                • Click 'Next' to proceed to step 2.
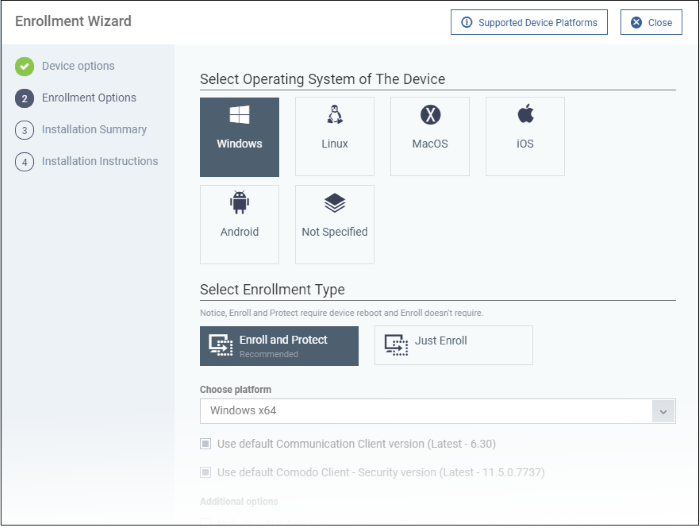
                Step 2 – Enrollment Options


                TLDR -

                • Click ‘Not Specified’ if you only want to install the communication client on target devices. The wizard will detect the target operating system and send the appropriate client to the device user.
                • Click one of the operating system tiles if you also want to install the security client. Make sure the target devices use the operating system you selected.

                There are two broad ways you can enroll devices:


                Option 1 – Enroll + Protect - Single Operating System

                • Click one of the operating system boxes to enroll devices of that type. Please make sure all your target devices use this operating system.
                • The wizard will send enrollment mails that only provision the OS you chose.
                • After choosing the OS, you can customize enrollment options as required. You can configure items such as enrollment type, reboot policy, client version, configuration profile and device name.


                Option 2 - Enroll Only - Multiple Operating Systems

                • Click the ‘Not Specified’ box. This option installs only the communication client, and doesn’t install the security client.
                • Your target devices can be a mix of operating systems rather than a single OS. This option auto-detects the OS of the device and emails the appropriate client link to the user.
                • The latest version of the communication client is installed on each device. The MDM profile is installed on MAC devices
                • Note – You can use this option to quickly connect devices to Endpoint Manager, then go back later and install the security client if required.

                Enrollment Type


                Applies to Windows, Mac and Linux devices.

                • Enroll and Protect – Installs both the communication client and the security client.
                • Just Enroll – Installs only the communication client

                Background. There are two types of client:

                • Communication Client – Connects the device to Endpoint Manager for central management. It is mandatory to install this client.
                • Security Client – This is the security software. Depending on the operating system, it includes antivirus, firewall, threat-containment, web-filtering, and more. It is optional to install this client.

                Click 'Next' to skip to step 3 if you are happy with your choices on this page.

                OR

                Use the following links to read more about the various settings per OS:

                • Windows
                • Linux
                • Mac OS
                • iOS / Android


                Windows


                Setting

                Description

                Choose platform

                Select Window OS version. 64 bit, 32 bit, or hybrid.


                The hybrid package will auto-detect and install the correct version.

                Use default Communication Client version

                This client enrolls the endpoint for central management.

                • You can only change the CCC version if enabled in portal settings. If the option is not enabled then the 'Default version' is deployed.

                Use default Communication Client Security version

                This client installs security software such as antivirus, firewall and auto-containment.

                • You can only change the CCS version if enabled in portal settings. If the option is not enabled then the 'Default version' is deployed.

                Additional options

                AV Database - Choose whether to include the latest virus database with the installation package. This increases the size of the package.


                If disabled, the client will download the latest database anyway when you run the first virus scan.

                Configuration Profile

                A configuration profile is a collection of settings which specify a device's network access rights, security settings, antivirus scan schedule, and more.


                The default is 'Windows - Security Level 1' profile. Choose a different profile if required.

                • The default profile is recommended for most users and can always be changed later if required.
                • If you want to change it, type the first few characters of a profile name and choose from the suggestions that appear.
                • You can view the settings in a profile at ‘Configuration Templates’ > ‘Profiles’.

                Set Reboot Options

                Endpoints need to be restarted to complete CCS installation. You have the following restart options:

                • Force the reboot in... - Restart the endpoint a certain length of time after installation. Select the delay period from the drop-down. A warning message is shown to the user prior to the restart.
                • Suppress reboot - Endpoint is not auto-restarted. The installation is finalized when the user next restarts the endpoint.
                • Warn about reboot and let users postpone it - Shows a message to the user which tells them that the endpoint needs to be restarted. The user can choose when the restart happens.

                Optional. Type a custom message in the 'Reboot Message' field.

                Device Name Options

                • Do Not Change – The device’s existing name is used to identify the device in Endpoint Manager.
                • Change – Enter a new device name. Note – You can restore the original name from the device list screen if required.


                • Click 'Next' to proceed to step 3

                Linux


                Setting

                Description

                Choose platform

                Select Linux OS version

                • Ubuntu / Debian (Hybrid Package)
                • RHEL / CentOS (Hybrid Package)
                • ‘Hybrid’ just means the package is suitable for both types of OS.

                Device Name Options

                • Do Not Change – The device’s existing name is used to identify the device in Endpoint Manager.
                • Change – Enter a new device name. Note – You can restore the original name from the device list screen if required.


                • Click 'Next' to proceed to step 3


                MacOS


                Setting

                Description

                Select Method

                • With MDM profile (recommended) - Installs both the communication client and the Endpoint manager configuration profile. You can use the full suite of Endpoint Manager tools on your devices
                • Without MDM profile - Installs only the communication client.  'Profile-less' enrollment lets you use Endpoint Manager to manage security while using another platform for general Mac management.

                Device Name Options

                • Do Not Change – The device’s existing name is used as the device label in Endpoint Manager.
                • Change – Enter a new device name. Note – You can restore the original name from the device list screen if required.


                • Click 'Next' to proceed to step 3


                iOS / Android


                Device Name Options:
                • Do Not Change - The device’s existing name is used as the device label in Endpoint Manager.
                • Change - Enter a new device name. Note – You can restore the original name from the device list screen if required
                Click 'Next' to proceed to step 3.


                Step 3 - Installation Summary


                Review your choices so far.


                The summary you see depends on the operating system and enrollment type:


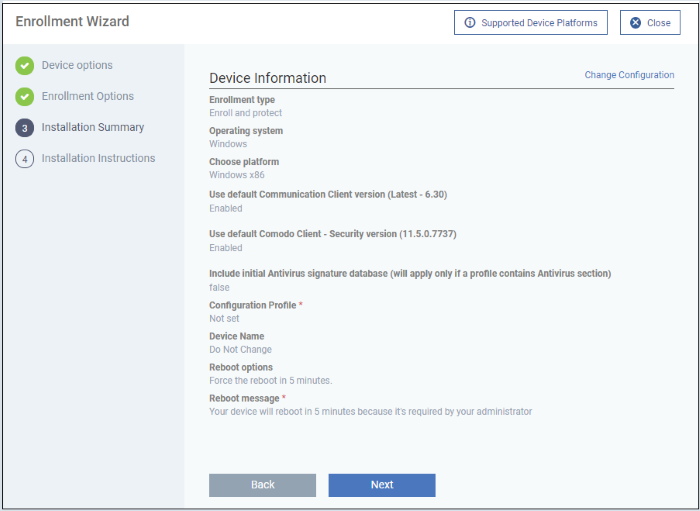
                  • Click ‘Back’ or 'Change Configuration' (top-right) to revise your choices.
                    • Click 'Next' to proceed to step 4


                    Step 4 - Installation Instructions


                    The final step is to send out the enrollment emails to the device owners:


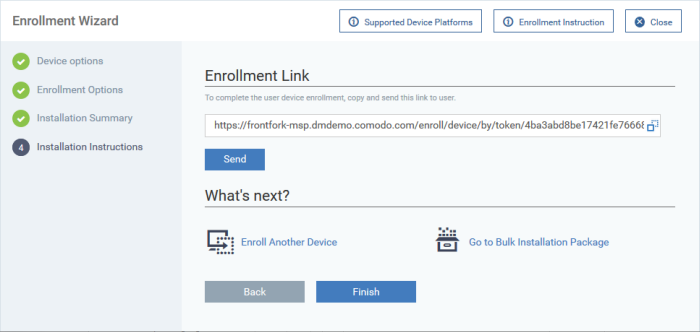
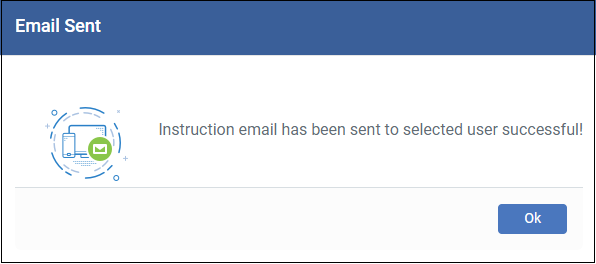
                    • Send – Click this to send enrollment mails to users with the settings you choose in steps 1, 2 and 3.


                    • Enroll Another Device – Takes you back to step 1
                    • Go to Bulk Installation Package – Takes you to bulk installation package screen to configure and enroll users in bulk. See 'Bulk Enrollment of Devices'
                    • Click 'Finish' to close the window.

                    Note – If you chose 'Current Device' in step 1, then you can enroll your device in two ways:

                    1. Download the client in the final step. Follow the instructions and complete the enrollment procedure.

                    2. Click 'Enrollment Instructions' at top-right, click the appropriate enrollment link to your device and complete the procedure.

                      An example mail that is sent to users is shown below:


                      • Clicking the link will take the user to a page which lets them download the appropriate communication client/profile:
                      Tip: Here's two other ways you can enroll devices for users:
                      • Click 'Users' > 'User List' > click the name of a user to open their details screen > click 'Enroll Device'
                      • Click 'Devices' > 'Device List' > 'Enroll Device'

                      Enroll devices

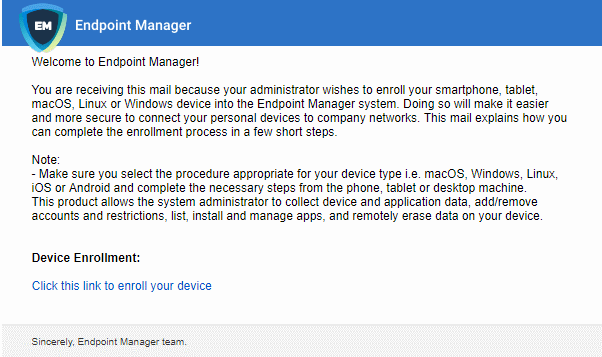
                      • The user should open the mail on the device itself and click the device enrollment link.
                      • This starts a wizard which lets them download the appropriate client software for their device. An example is shown below:


                      • Once installed, the client software will connect the device to Endpoint Manager.
                      • The following sections explain the enrollment process on different operating systems:
                      • Enroll Android Devices 
                      • Enroll iOS Devices
                      • Enroll Windows Endpoints
                      • Enroll Mac OS Devices
                      • Enroll Linux OS Endpoints 


                      Enroll Android Devices
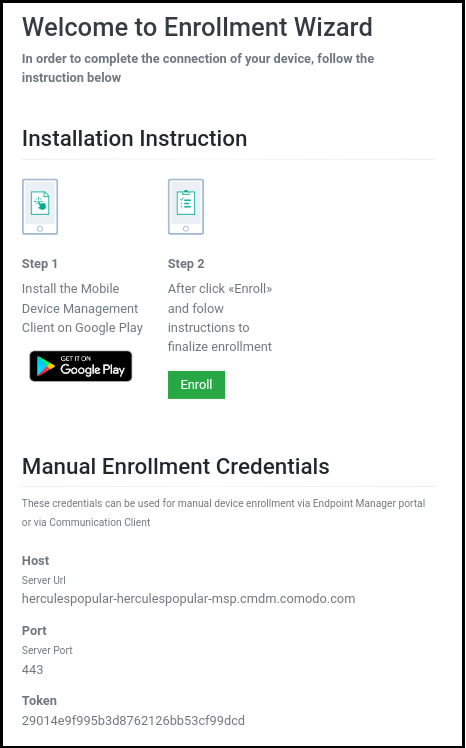
                      • There are two steps to enroll Android devices:

                      • Step 1 - Download and Install the agent
                        • Step 2 - Configure the client to enroll the device


                            Step 1 - Download and Install the communication client

                            • The user should open the mail on the device itself and open the device enrollment link.
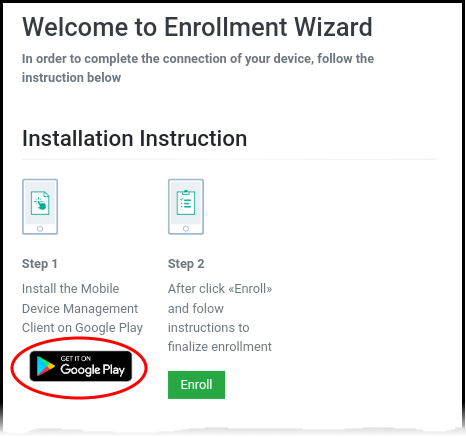
                            • Next, tap 'Get it on Google Play' to download and install the client software.


                              Step 2 - Configure the communication client
                              • After installation in step 1, the user should go back to the device enrollment page and tap the 'Enroll' button under 'Step 2':


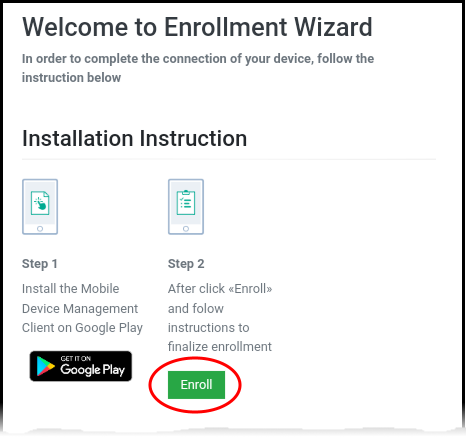
                              Next, the user has to tap 'Activate' to enroll the device.

                              Enroll iPhones, iPods and iPads

                              • Device owners should open the mail on the device itself and tap the enrollment link. This will take them to the device enrollment wizard.


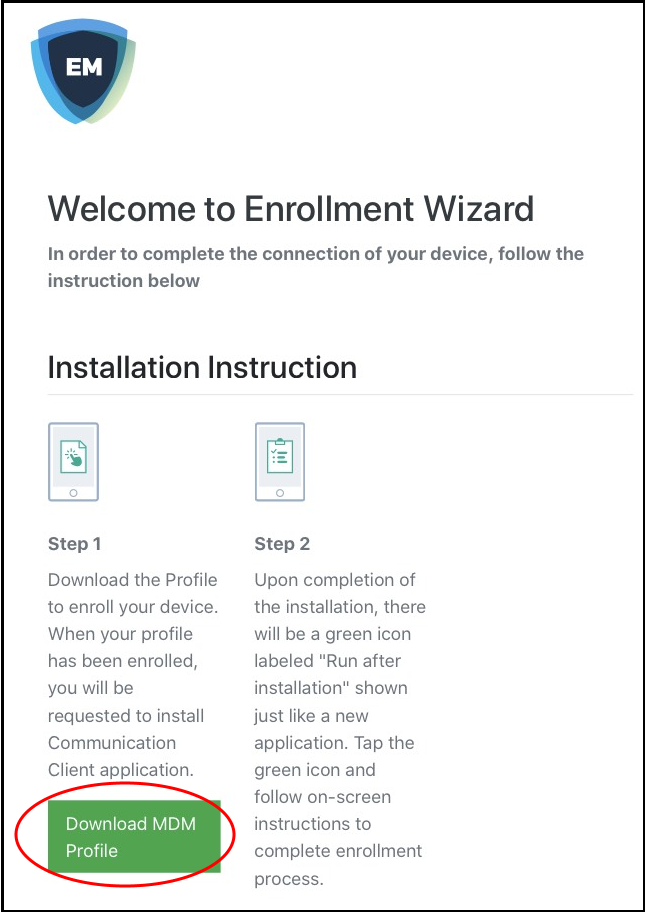
                              • Tap 'Download MDM Profile'

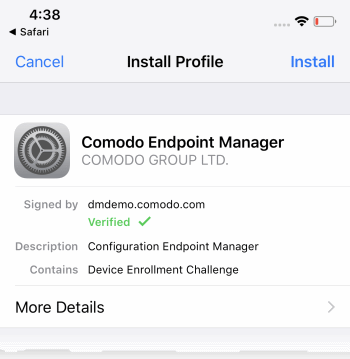
                              The 'Install Profile' wizard starts:


                              Note: Users must keep their device switched on at all times during enrollment. The enrollment process may fail if the device auto-locks or enters standby.

                              • Tap 'Install' and follow the steps in the wizard. 
                              • Then touch ‘Install’ at the app installation screen.
                              • The app is required to connect the device to Endpoint Manager: 


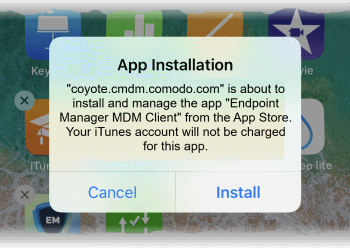
                              • The app is downloaded from the Apple store using the user's account.
                              • After installation, tap the green 'Run After Install' icon on the home screen:


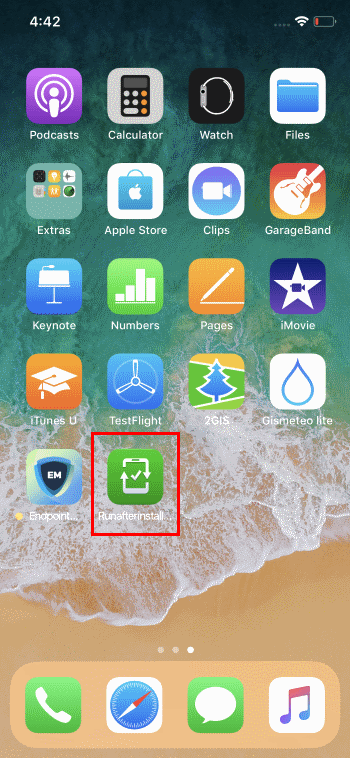
                              The device will be enrolled and connected to EM.


                              Enroll Windows PCs

                              • Users should open the mail on the device itself and open the device enrollment link
                              • The following wizard opens:


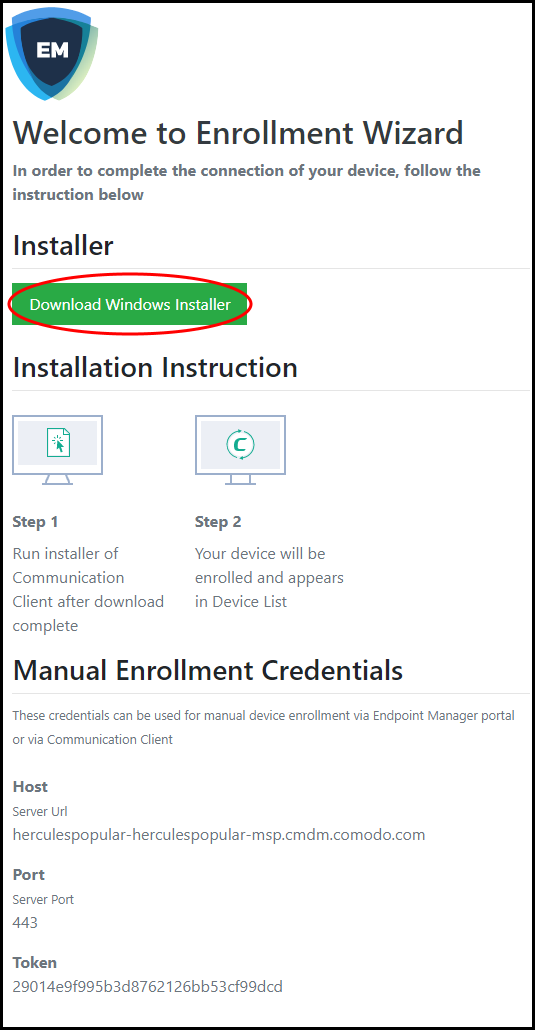
                              • Click the 'Download Windows Installer' button.
                              • The EM client setup file gets downloaded.
                              • Double-click on the file to install the communication client.

                              The device automatically gets added to Endpoint Manager once installation is complete. Comodo Client Security is installed if you chose it in the setup wizard. You also have the option to install CCS manually after device enrollment.


                              The client icon  appears at the bottom-right of the endpoint screen.

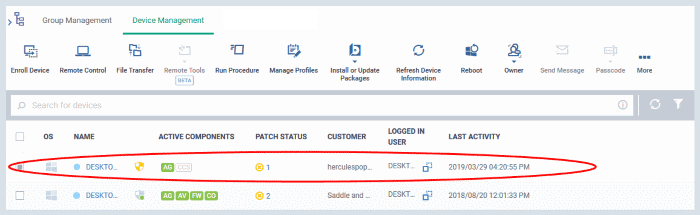
                              • You can check whether the devices are successfully enrolled from the 'Devices' > 'Device List' interface.


                              Enroll Mac OS Devices

                              • Users should open the mail on the device itself and open the device enrollment link
                              • The device enrollment wizard starts:


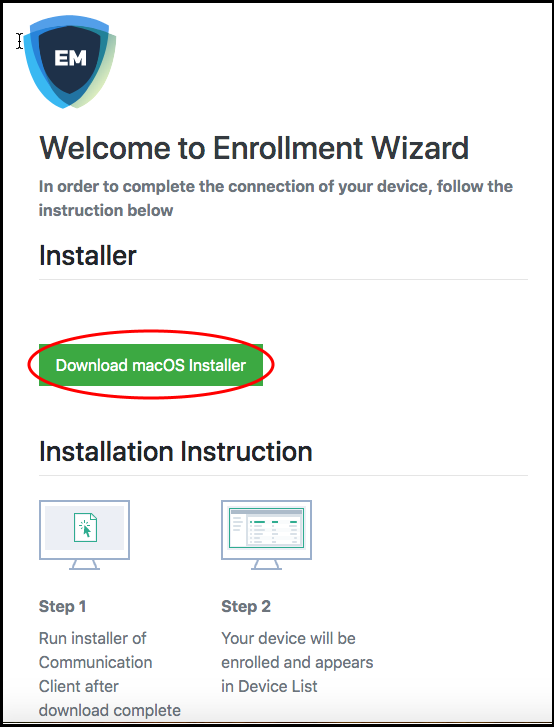
                              • Click 'Download mac OS Installer' in the wizard and save the setup file
                              • Open the setup file to install the communication client.


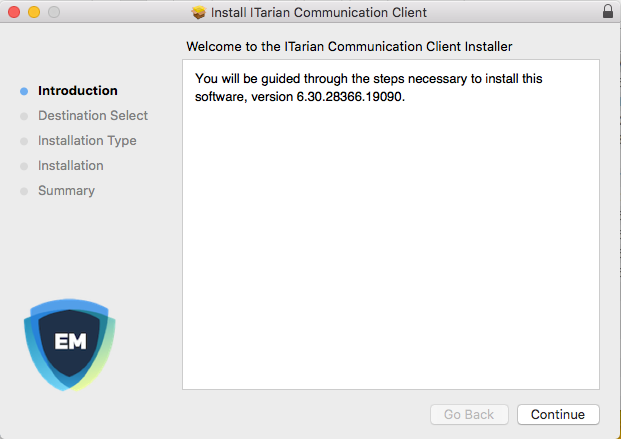
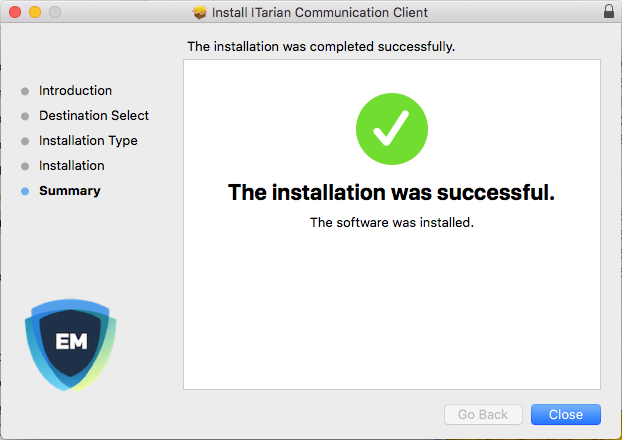
                              • Follow the wizard to complete the installation.


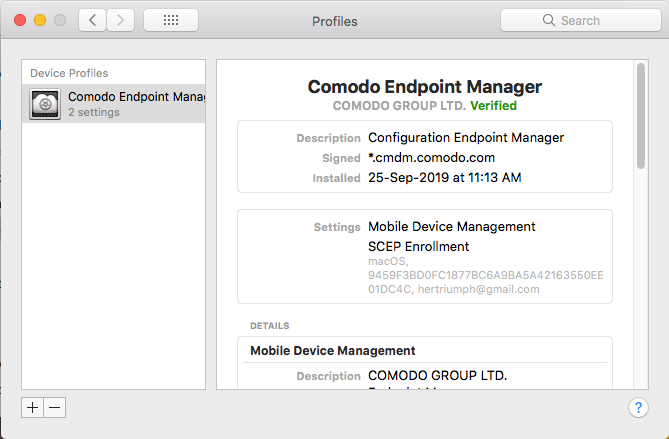
                              • The profiles screen will show you details of the Endpoint Manager profile, if you have chosen to install it.


                              • The device is automatically added to Endpoint Manager once installation is complete. CCS is installed if you included it in the setup wizard.

                              Enroll Linux Devices

                              • Users should open the mail on the device itself and open the device enrollment link
                              • The device enrollment wizard starts:


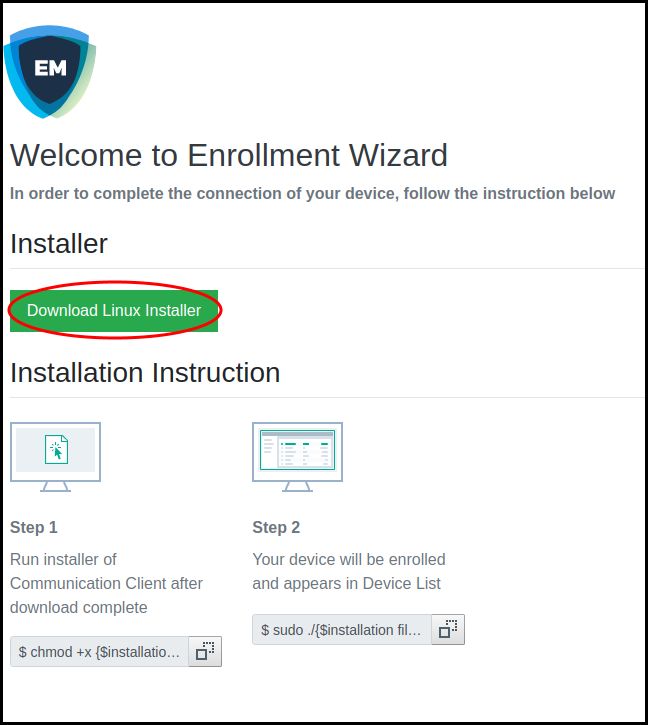
                              • Click the 'Download Linux Installer' button and save the file: 

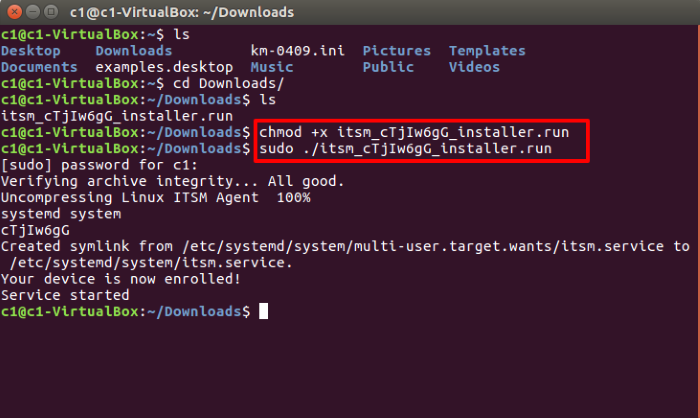
                              The communication client can be installed the device by completing the following:

                              1. Change installer mode to executable - enter the following command:

                              $ chmod +x {$installation file$}

                              1. Run installer with root privileges - enter the following command:

                              $ sudo ./{$installation file$}

                              For example:

                              chmod +x itsm_cTjIw6gG_installer.run

                              sudo./itsm_cTjIw6gG_installer.run


                              • The device is automatically added to Endpoint Manager once installation is complete. CCS is installed if you included it in the setup wizard.
                              Our Products
                              • Free Antivirus
                              • Free Internet Security
                              • Website Malware Removal
                              • Free Anti-Malware
                              • Anti-Spam (Free Trial)
                              • Windows Antivirus
                              • Antivirus for Windows 7
                              • Antivirus for Windows 8
                              • Antivirus for Windows 10
                              • Antivirus for MAC
                              • Antivirus for Linux
                              • Free Endpoint Security
                              • Free ModSecurity
                              • Free RMM
                              • Free Website Malware Scanner
                              • Free Device Manager for Android
                              • Free Demo
                              • Network Security
                              • Endpoint Protection
                              • Antivirus for Android
                              • Comodo Antivirus
                              • Wordpress Security
                              Cheap CDN
                              • Bootstrap CDN
                              • Semantic UI CDN
                              • Jquery CDN
                              • CDN Plans
                              • CDN
                              • Free CDN
                              Enterprise
                              • Patch Management Software
                              • Patch Manager
                              • Service Desk
                              • Website Down
                              • Endpoint Protection Solutions
                              • Website Security Check
                              • Remote Monitoring and Management
                              • Website Security
                              • Device Manager
                              • ITSM
                              • CRM
                              • MSP
                              • Android Device Manager
                              • MDR Services
                              • Managed IT Support Services
                              • Free EDR
                              Free SSL Certificate
                              Support Partners Terms and Conditions Privacy Policy

                              © Comodo Group, Inc. 2025. All rights reserved.