Comodo Help
Find the desired product help
Xcitium Secure Email Gateway MSP

Xcitium Secure Email Gateway MSP

Office 365 Integration Guide

English

Print Help
Configure Office 365 Settings > Outbound Flow Setup On Office 365
  • Introduction
    • Email Flow Explanation
  • Configure Office 365 Settings
    • Inbound Flow Setup On Office 365
      • Add An Email Flow Rule To Bypass Spam Filtering
      • Add An Email Flow Rule To Lock Down Exchange Online
    • Outbound Flow Setup On Office 365
      • Add An Email Flow Rule To Use The Secure Email Gateway Outbound Connector
  • About Xcitium Security Solutions

Outbound Flow Setup on Office 365


To set up outbound flow set up in Office 365:

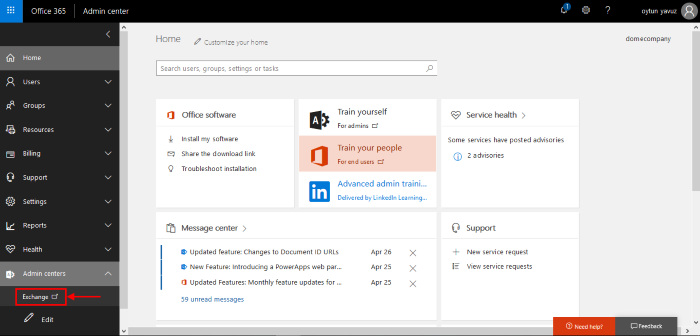
  • Login to your Microsoft Office 365 administrator center account
  • Click 'Admin' from the left-menu
  • Click 'Exchange':


  • Click 'mail flow' on the left
  • Click 'connectors' in the top navigation:


  • To add an 'Outbound Connector':
  • Select 'Office 365' in 'From' drop-down menu 
  • Select 'Partner Organization' in the 'To' drop-down menu:


  • Click 'Next'
  • Enter a descriptive name for the outbound connector in the 'Name' field
  • Click 'Next'


  • 'When do you want to use this connector?' - Select 'Only when I have a transport rule set up that redirects messages to this connector'
  • Click 'Next':


  • 'How do you want to route email messages'
  • Select 'Route through these smart hosts'
  • This will relay messages to the Secure Email Gateway MTA.
  • The FQDN is in the confirmation email sent to you after we finished provisioning your Secure Email Gateway instance.
  • Enter the FQDN in the space provided then click 'Next':


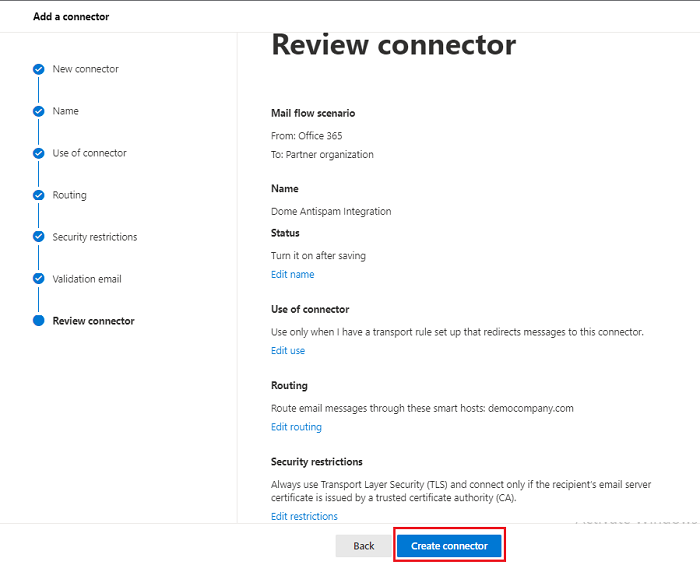
  • 'How should Office 365 connect to your partner organization's email server?' - Select:
  • 'Always use Transport Layer Security (TLS) to secure the connection'

AND

  • 'Issued by a trusted certificate authority'.

This will make sure the connection to the mail server is securely encrypted and authentic.

  • Click 'Next'


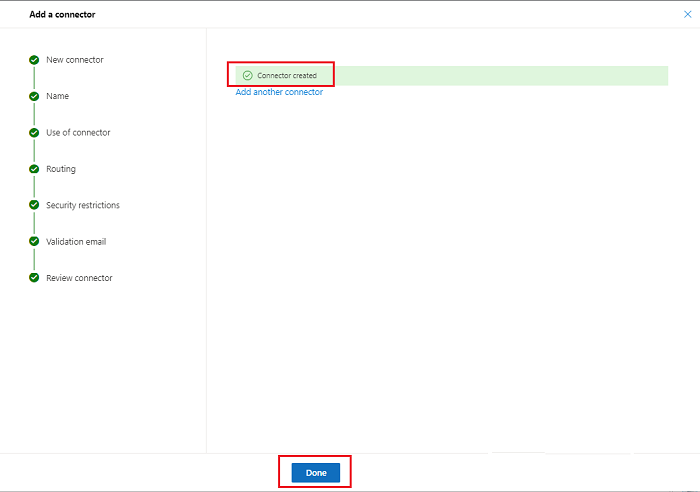
  • 'Validate this connector' - Add an email address at which you can receive mail in the field provided, then click 'Validate'. Office 365 will send you an email to test all settings are correct:


  • Click 'Next' 


  • click ' Create Connector'


Our Products
  • Free Antivirus
  • Free Internet Security
  • Website Malware Removal
  • Free Anti-Malware
  • Anti-Spam (Free Trial)
  • Windows Antivirus
  • Antivirus for Windows 7
  • Antivirus for Windows 8
  • Antivirus for Windows 10
  • Antivirus for MAC
  • Antivirus for Linux
  • Free Endpoint Security
  • Free ModSecurity
  • Free RMM
  • Free Website Malware Scanner
  • Free Device Manager for Android
  • Free Demo
  • Network Security
  • Endpoint Protection
  • Antivirus for Android
  • Comodo Antivirus
  • Wordpress Security
Cheap CDN
  • Bootstrap CDN
  • Semantic UI CDN
  • Jquery CDN
  • CDN Plans
  • CDN
  • Free CDN
Enterprise
  • Patch Management Software
  • Patch Manager
  • Service Desk
  • Website Down
  • Endpoint Protection Solutions
  • Website Security Check
  • Remote Monitoring and Management
  • Website Security
  • Device Manager
  • ITSM
  • CRM
  • MSP
  • Android Device Manager
  • MDR Services
  • Managed IT Support Services
  • Free EDR
Free SSL Certificate
Support Partners Terms and Conditions Privacy Policy

© Comodo Group, Inc. 2025. All rights reserved.