Application Rules
-
See Overview of Policies and Rules for an explanation of rule and policy structure and how these are represented in the main Application Rules interface
-
See Application Network Access Control interface for an introduction to the rule setting interface
-
See Creating and Modifying Network Policies to learn how to create and edit network policies
-
See Understanding Network Control Rules for an overview of the meaning, construction and importance of individual rules
-
See Adding and Editing a Network Control Rule for an explanation of individual rule configuration
Overview of Policies and Rules
Whenever an application makes a request for Internet or network access, Comodo Firewall allows or denies this request based upon the Firewall Policy that has been specified for that application. Firewall Policies are, in turn, made up from one or more individual network access rules. Each individual network access rule contains instructions that determine whether the application should be allowed or blocked; which protocols it is allowed to use; which ports it is allowed to use and so forth.
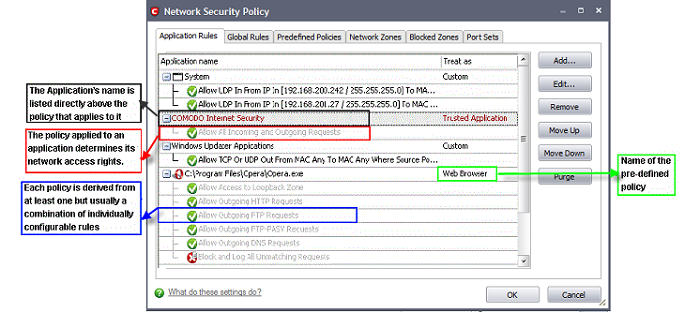
If you wish to modify the firewall policy for an application:
-
Double click on the application name to begin 'Creating or Modifying Network Policy'
-
Select the application name, right-click and choose 'Edit' to begin 'Creating or Modifying Network Policy'
-
Select the application name and click the 'Edit...'button on the right to begin 'Creating or Modifying Network Policy'
If you wish to modify an individual rule within the policy:
-
Double click on the specific rule to begin 'Adding and Editing a Network Control Rule'
-
Select the specific rule right-click then choose 'Edit' to begin 'Adding and Editing a Network Control Rule'
-
Select the specific rule and click the 'Edit...' button on the right to begin 'Adding and Editing a Network Control Rule'
Users can also re-prioritize policies or re-assign individual rules to another application's policy by dragging and dropping.
Although each policy can be defined from the ground up by individually configuring its constituent rules, this practice would be time consuming if it had to be performed for every single program on your system. For this reason, Comodo Firewall contains a selection of predefined policies according to broad application category. For example, you may choose to apply the policy 'Web Browser' to the applications like 'Internet Explorer', 'FireFox' and 'Opera'. Each predefined policy has been specifically designed by Comodo Firewall to optimize the security level of a certain type of application. Users can, of course, modify these predefined policies to suit their environment and requirements. For more details, see Predefined Policies.
Application Network Access Control interface
Network control rules can be added/modified/removed and re-ordered through the Application Network Access Control interface. Any rules created using Adding and Editing a Network Control Rule is displayed in this list.
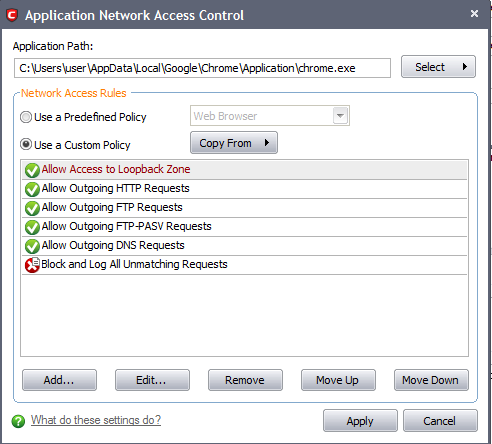
Comodo Firewall applies rules on a per packet basis and applies the first rule that matches that packet type to be filtered (see Understanding Network Control Rules for more information). If there are a number of rules in the list relating to a packet type then one nearer the top of the list is applied.
Users can re-order the priority of rules by simply dragging and dropping the rule in question. Alternatively, select the rule you wish to re-prioritize and click either the 'Move Up' or 'Move Down' button. To begin creating network policies, first read 'Overview of Policies and Rules' then 'Creating and Modifying Network Policies'.
Creating and Modifying Network Policies
To begin defining an application's network policy, you need take two basic steps.
1. Select the application that you wish the policy to apply to
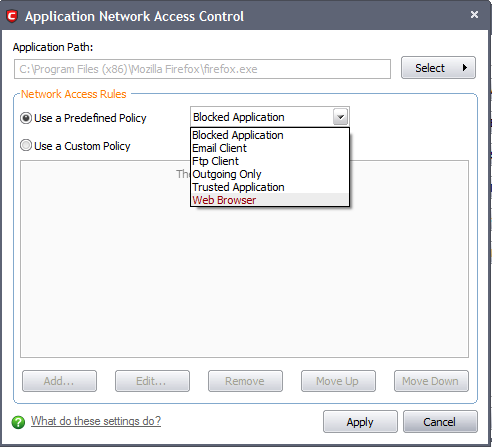
If you wish to define a policy for a new application (i.e. one that is not already listed) then click the 'Add...' button in the main application rules interface. This brings up the 'Application Network Access Control' interface shown below:
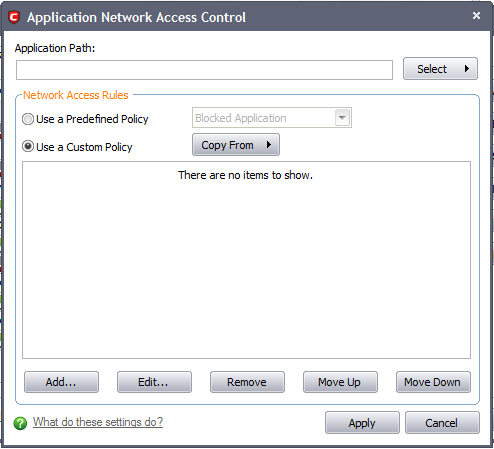
Because this is a new application, the 'Application Path' field is blank. (If you are modifying an existing policy, then this interface shows the individual rules for that application's policy).
Click 'Select' button.
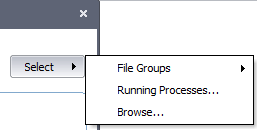
You now have 3 methods available to choose the application for which you wish to create a policy - File Groups; Running Processes; and Browse...
-
File Groups - choosing this option allows you to create firewall policy for a category of pre-set files or folders. For example, selecting 'Executables' would enable you to create a firewall policy for any file that attempts to connect to the Internet with the extensions .exe .dll .sys .ocx .bat .pif .scr .cpl . Other such categories available include 'Windows System Applications' , 'Windows Updater Applications' , 'Start Up Folders' etc - each of which provide a fast and convenient way to apply a generic policy to important files and folders. To view the file types and folders that are affected by choosing one of these options, you need to visit the Defense+ area of Comodo Internet Security by navigating to: Defense+ > Protected Files and Folders> Groups...
More details on Files and File Groupings is available in this help guide in the Protected Files and Folders and Blocked Files sections.
-
Running Processes - as the name suggests, this option allows you to create and deploy firewall policy for any process that is currently running on your PC.
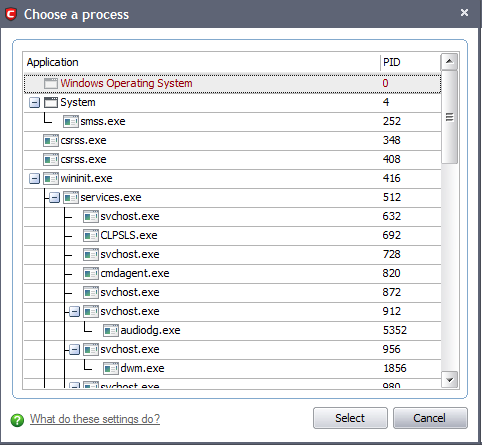
You can choose an individual process (shown above) or the parent process of a set of running processes. Click 'Select' to confirm your choice.
|
Note: A more detailed and powerful 'View Active Process List' is available in the Defense+ Tasks. |
-
Browse... - this option is the easiest for most users and simply allows you to browse to the location of the application for which you want to deploy the firewall policy. In the example below, we have decided to create a firewall policy for the Opera web browser.
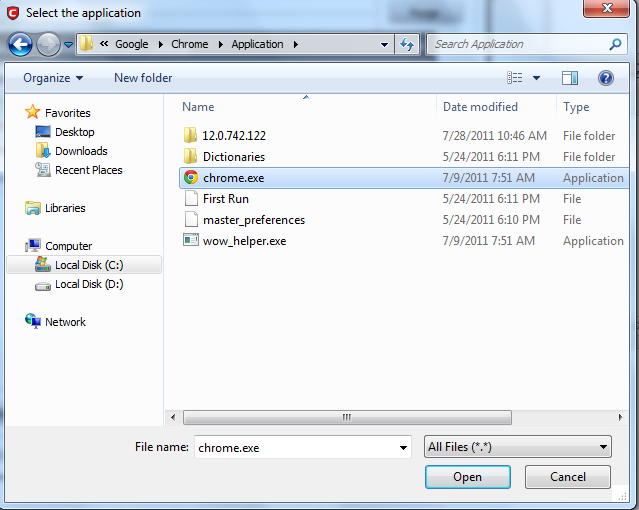
Having selected the individual application, running process or file group, the next stage is to Configure the rules for this application's policy.
2.Configure the rules for this application's policy
There are two broad options available for creating a policy that applies to an application - Use a Predefined Policy or Use a Custom Policy.
-
Use a Predefined Policy - Selecting this option allows the user to quickly deploy a existing policy on to the target application. Choose the policy you wish to use from the drop-down menu. In the example below, we have chosen 'Web Browser' because we are creating a policy for the 'Opera' browser. The name of the predefined policy you choose is displayed in the Treat As column for that application in the interface(Default = Disabled).
|
Note: Predefined Policies, once chosen, cannot be modified directly from this interface - they can only be modified and defined using the Predefined Policies interface. If you require the ability to add or modify rules for an application then you are effectively creating a new, custom policy and should choose the more flexible Use Custom Policy option instead. |
-
Use a Custom Policy - designed for more experienced users, the Custom Policy option enables full control over the configuration of firewall policy and the parameters of each rule within that policy (Default=Enabled).
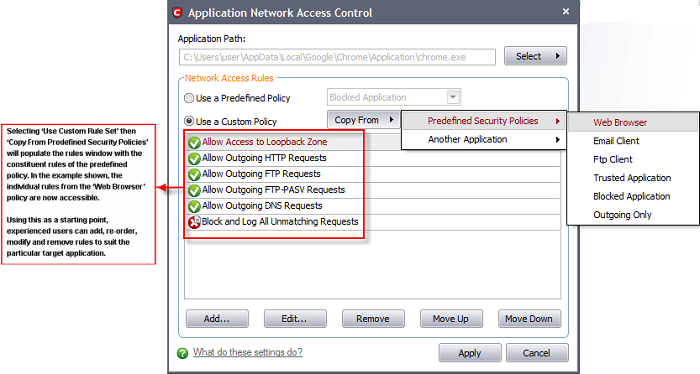
You can create an entirely new policy or use a predefined policy as a starting point by:
-
Clicking the 'Add...'button to add individual network control rules. See 'Adding and Editing a Network Control Rule' for an overview of the process.
-
Use the 'Copy From'button to populate the list with the network control rules of a Predefined Firewall Policy.
-
Use the 'Copy From' button to populate the list with the network control rules of another application's policy.
|
General Tips:
|
Understanding Network Control Rules
At their core, each network control rule can be thought of as a simple IF THEN trigger - a set of conditions (or attributes) pertaining to a packet of data from a particular application and an action it that is enforced if those conditions are met.
As a packet filtering firewall, Comodo Firewall analyzes the attributes of every single packet of data that attempts to enter or leave your computer. Attributes of a packet include the application that is sending or receiving the packet, the protocol it is using, the direction in which it is traveling, the source and destination IP addresses and the ports it is attempting to traverse. The firewall then tries to find a network control rule that matches all the conditional attributes of this packet in order to determine whether or not it should be allowed to proceed. If there is no corresponding network control rule, then the connection is automatically blocked until a rule is created.

The actual conditions (attributes) you see* on a particular Network Control Rule are determined by the protocol chosen in Adding and Editing a Network Control Rule.
If you chose 'TCP' , 'UDP' or 'TCP and 'UDP', then the rule has the form: Action | Protocol| Direction |Source Address | Destination Address | Source Port | Destination Port
If you chose 'ICMP', then the rule has the form: Action | Protocol| Direction |Source Address | Destination Address | ICMP Details
If you chose 'IP', then the rule has the form: Action | Protocol| Direction |Source Address | Destination Address | IP Details
Action:The action the firewall takes when the conditions of the rule are met. The rule shows 'Allow', 'Block' or 'Ask'.**
Protocol:States the protocol that the target application must be attempting to use when sending or receiving packets of data. The rule shows 'TCP', 'UDP', 'TCPor UDP', 'ICMP' or 'IP'
Direction:States the direction of traffic that the data packet must be attempting to negotiate. The rule shows 'In', 'Out' or 'In/Out'
Source Address:States the source address of the connection attempt. The rule shows 'From'followed by one of the following: IP , IP range , IP Mask , Network Zone , Host Name or Mac Address
Destination Address:States the address of the connection attempt. The rule shows 'To' followed by one of the following: IP , IP range , IP Mask , Network Zone , Host Name or Mac Address
Source Port:States the port(s) that the application must be attempting to send packets of data through. Shows 'Where Source Port Is' followed by one of the following: 'Any', 'Port #', 'Port Range' or 'Port Set'
Destination Port:States the port(s) on the remote entity that the application must be attempting to send to. Shows 'Where Source Port Is' followed by one of the following: 'Any', 'Port #', 'Port Range' or 'Port Set
ICMP Details:States the ICMP message that must be detected to trigger the action. See Adding and Editing a Network Control Rule for details of available messages that can be displayed.
IP Details:States the type of IP protocol that must be detected to trigger the action: See Adding and Editing a Network Control Rule to see the list of available IP protocols that can be displayed here.
Once a rule is applied, Comodo Firewall monitors all network traffic relating to the chosen application and take the specified action if the conditions are met. Users should also see the section 'Global Rules' to understand the interaction between Application Rules and Global Rules.
*If you chose to add a descriptive name when creating the rule then this name is displayed here rather than it's full parameters. See the next section, 'Adding and Editing a Network Control Rule' , for more details.
** If you selected 'Log as a firewall event if this rule is fired' then the action is postfixed with "& Log". (e.g. Block & Log)
Adding and Editing a Network Control Rule
The Network Control Rule Interface is used to configure the actions and conditions of an individual network control rule. If you are not an experienced firewall user or are unsure about the settings in this area, we advise you first gain some background knowledge by reading the sections 'Understanding Network Control Rules' , 'Overview of Rules and Policies' and 'Creating and Modifying Network Policies'.
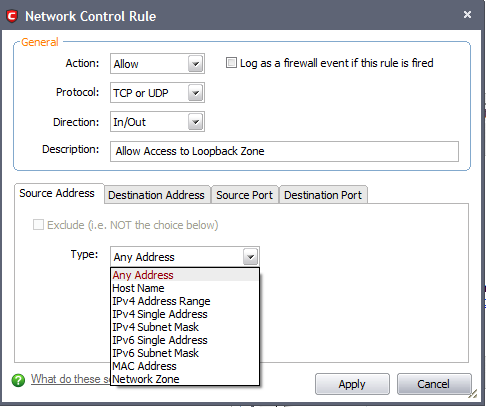
Action: Define the action the firewall takes when the conditions of the rule are met. Options available via the drop down menu are 'Allow' (Default), 'Block' or 'Ask'.
Protocol: Allows the user to specify which protocol the data packet should be using. Options available via the drop down menu are 'TCP', 'UDP', 'TCPor UDP' (Default), 'ICMP' or 'IP'
|
Note: Your choice here alters the choices available to you in the tab structure on the lower half of the interface. |
Direction: Allows the user to define which direction the packets should be traveling. Options available via the drop down menu are 'In', 'Out' or 'In/Out' (Default).
Log as a firewall event if this rule is fired: Checking this option creates an entry in the firewall event log viewer whenever this rule is called into operation. (i.e. when ALL conditions have been met) (Default = Disabled).
Description: Allows you to type a friendly name for the rule. Some users find it more intuitive to name a rule by it's intended purpose. ( 'Allow Outgoing HTTP requests'). If you create a friendly name, then this is displayed to represent instead of the full actions/conditions in the main Application Rules interface and the Application Network Access Control interface.
Protocol
-
TCP', 'UPD' or 'TCP or UDP'
If you select 'TCP', 'UPD' or 'TCP or UDP' as the Protocol for your network, then you have to define the source and destination IP addresses and ports receiving and sending the information.
Source Address and Destination Address:
-
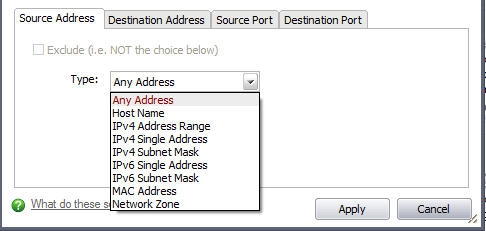
You can choose any IP Address by selecting Any Address (Default) in the Type drop-down box. This menu defaults to an IP range of 0.0.0.0- 255.255.255.255 to allow connection from all IP addresses.
-
You can choose a named host by selecting a Host Name which denotes your IP address.
-
You can choose an IPv4 Range by selecting IPv4 Address Range - for example the range in your private network and entering the IP addresses in the Start Range and End Range text boxes.
-
You can choose a Single IPv4 address by selecting IPv4 Single Address and entering the IP address in the IP address text box, e.g., 192.168.200.113.
-
You can choose IPv4 Mask by selecting IPv4 Subnet Mask. IP networks can be divided into smaller networks called sub-networks (or subnets). An IP address/ Mask is a subnet defined by IP address and mask of the network. Enter the IP address and Mask of the network.
-
You can choose a Single IPv6 address by selecting IPv6 Single Address and entering the IP address in the IP address text box, e.g., 3ffe:1900:4545:3:200:f8ff:fe21:67cf.
-
You can choose IPv6 Mask by selecting IPv6 Subnet Mask. IP networks can be divided into smaller networks called sub-networks (or subnets). An IP address/ Mask is a subnet defined by IP address and mask of the network. Enter the IP address and Mask of the network.
-
You can choose a MAC Address by selecting MAC Address and entering the address in the address text box.
-
You can choose an entire network zone by selecting Zone. This menu defaults to Local Area Network. But you can also define your own zone by first creating a Zone through the 'Network Zones' area.
-
Exclude (i.e. NOT the choice below): The opposite of what you specify is applicable. For example, if you are creating an Allow rule and you check the Exclude box in the Source IP tab and enter values for the IP range, then that IP range is excluded. You have to create a separate Allow rule for the range of IP addresses that you DO want to use.
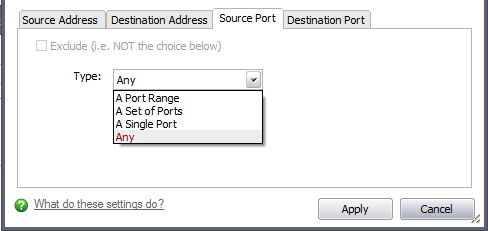
Source Port and Destination Port:
Enter the source and destination Port in the text box.
-
You can choose any port number by selecting Any - (set by default) , 0- 65535.
-
You can choose a Single Port number by selecting Single Port and selecting the single port numbers from the list.
-
You can choose a Port Range by selecting Port Range and selecting the port numbers from the From and To list.
-
You can choose a predefined Port Set by choosing A Set of Ports. If you wish to create a port set then please see the section 'Port Sets'.
-
ICMP
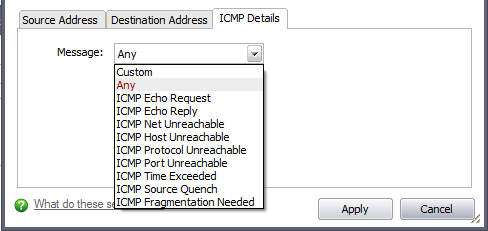
When you select ICMP as the protocol in General Settings, you are shown a list of ICMP message types in the 'ICMP Details' tab alongside the Destination Address tabs. The last two tabs are configured identically to the explanation above. You cannot see the source and destination port tabs.
-
ICMP Details
ICMP (Internet Control Message Protocol) packets contain error and control information which is used to announce network errors, network congestion, timeouts, and to assist in troubleshooting. It is used mainly for performing traces and pings. Pinging is frequently used to perform a quick test before attempting to initiate communications. If you are using or have used a peer-to-peer file-sharing program, you might find yourself being pinged a lot. So you can create rules to allow / block specific types of ping requests. With Comodo Firewall you can create rules to allow/ deny inbound ICMP packets that provide you with information and minimize security risk.
-
Type in the source/ destination IP address. Source IP is the IP address from which the traffic originated and destination IP is the IP address of the computer that is receiving packets of information.
-
Specify ICMP Message , Types and Codes. An ICMP message includes a Message that specifies the type, that is, the format of the ICMP message.
When you select a particular ICMP message , the menu defaults to set its code and type as well. If you select the ICMP message type 'Custom' then you are asked to specify the code and type.
IP
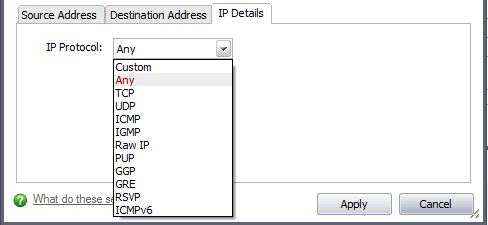
When you select IP as the protocol in General Settings, you are shown a list of IP message type in the 'IP Details' tab alongside the Source Address and Destination Address tabs. The last two tabs are configured identically to the explanation above. You cannot see the source and destination port tabs.
-
IP Details
Select the types of IP protocol that you wish to allow, from the ones that are listed.
Comodo Internet Security User Guide | © 2012 Comodo Security Solutions Inc. | All rights reserved


