


Add Users
In order to apply specific policies for users, you have to:
- Install SWG agent on the devices (recommended), or use traffic forwarding via proxy chaining / ICAP methods.
- Configure user authentication settings
- Traffic forwarding via SWG agent - No need to select an authentication and traffic forwarding option on the Locations interface.
- Traffic forwarding via proxy chaining / ICAP methods - Select the appropriate authentication and traffic forwarding option in the Locations interface.
- Select a user authentication method – Hosted DB auth method supports traffic forwarding via all three methods – SWG agent, proxy chaining and ICAP. Active Directory supports only SWG Agent.
- Create user-specific policies and apply them. See Create Policies and Apply Policies.
- Add users to Comodo SWG. This section explains how to add users.
There are three ways to add users:
- Click 'Administration' > 'Authentication Configuration' > 'User Management'
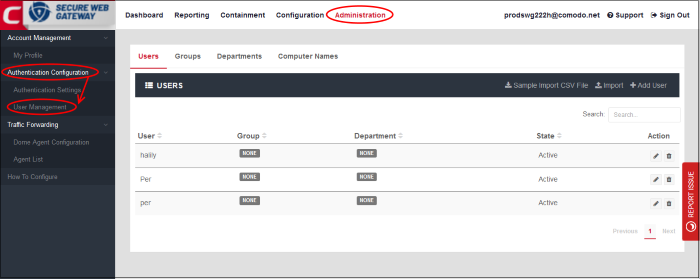
- Click 'Users' and then 'Add User' at top-right
The 'Add User' dialog will open:
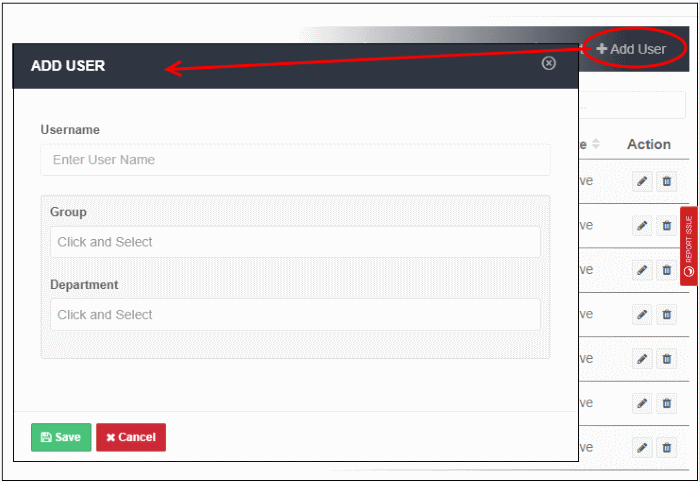
- Username - Enter the username of the user. Please make sure this is same as in 'Users' in Windows.
- Group - Relevant only if 'Hosted DB' is selected in the 'Authentication Settings' interface. Click in the field and select the appropriate group for the user. Groups added to the 'Groups' interface will be listed here.
- To add a group, click 'Administration' > 'Authentication Configuration' > 'User Management' > 'Groups' tab > 'Add Group'
- Enter a name for the group and add any comments in the 'Remarks' field.
- Click 'Save'
-
Department - Relevant only if 'Hosted DB' is selected in 'Authentication Settings' interface. Click on the field and select the appropriate department for the user. Departments added to the 'Departments' interface will be listed here.
- To add a department, click 'Administration' > 'Authentication Configuration' > 'User Management' > 'Departments' tab > 'Add Department'
- Enter a name for the dept. and add any comments in the 'Remarks' field.
- Click 'Save'
- Click 'Save' in the 'Add User' dialog when done
The 'User' will be added and displayed in the list.
You can bulk import users from a CSV file.
- There is a sample .csv file in 'Administration' > 'Authentication Configuration' > 'User Management' > 'Users' > 'Sample Import CSV File'.
- Enter user data separated by commas, as follows:
username,group,department
- Username is mandatory. Other fields are optional.
- Each user should be on a separate line
- Each user can be member of one, several or no groups. They may also be a member of one or no departments.
- If a user is a member of more than one group, the groups should be listed as a comma-separated string and enclosed in double quotes. An example is given below:
- user1,"group1,group2,group3",dept1
- If you want add only the username, then add two commas after the username. See example below:
- user2,
- If you add a non-existent group or department to the .csv, then the group/department will be auto-created in the interface. Click 'Administration' then 'Groups' or 'Departments' to view these items.
Import users from a CSV file
- Click 'Administration' > 'Authentication Configuration' > 'User Management' > 'Users' tab
- Click 'Import' on the right

- Locate your .csv file and click 'Open'
All 'Users' will be imported and displayed in the list.
Sync via Active Directory
- Relevant if you chose 'Active Directory' as the method of user authentication.
- After installation and configuration, AD users and groups will be automatically added to Comodo SWG and will be visible under 'User Management'.
- The agent will automatically synchronize with AD every 3 hours.
- This method is explained in. See 'Active Directory'