Create Policies
- Click 'Configuration' in the top-menu to open the policy configuration interface.
-
Comodo SWG ships with default profiles for 'Security Policy', 'Web Content Policy' and 'Policy Time-Schedule'.
- Default 'Global Policy' is applied to users / devices under trusted networks and roaming users / devices with SWG agent.
- You can create user-specific, endpoint-specific and network-specific policies.
Create a new policy
To create a policy, you first need to configure and save three components:
Once you have saved them:
- Click 'Policy' at the top of the left-hand menu.
- Click 'New Policy' on the right to start the
policy creation wizard.
Before that, though, let's configure the security, web content policies and time-schedules.
A security policy contains two elements:
Advanced Threat Protection Settings
Click 'Configuration' > 'Security Policy' > 'Advanced Threat Protection' to open this interface.
- Global Advanced Threat Protection Settings (lower panel) - Configure overall protection settings, blocked files and blocked countries. These settings are automatically applied to ALL policies. If you make changes here they will be automatically implemented in all policies.
- APT Policy Exceptions (upper panel) - Lets you create a profile with blacklisted and whitelisted items. These will form exceptions to the settings in the 'Global Advanced...' section.
- You can then add the exceptions profile to a policy. The final policy will implement the 'Global Advanced Threat...' settings minus the items in the exception profile.
- If you do not want to specify any exceptions then simply use the 'Default Profile' in your policy.
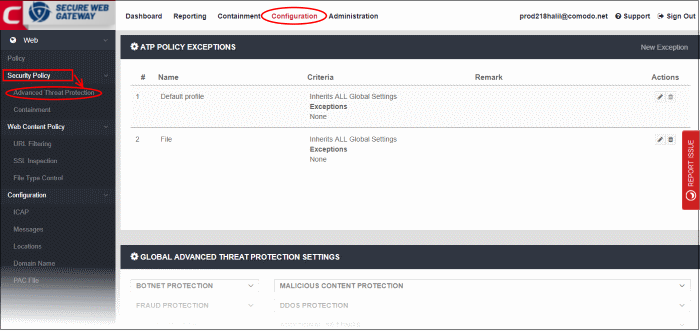
The interface is divided into four sections:
Allows you to specify domains will should ignored by the Advanced Threat Prevention system.
|
Add Policy Exceptions - Table of Column Descriptions |
|
|---|---|
|
Column Header |
Description |
|
Name |
The label of the policy containing the exceptions. |
|
Criteria |
Specifics of the exception.
|
|
Remark |
Comments provided for the policy exception. |
|
Actions |
You can edit and / or delete an exception. Please note that the default profile cannot be deleted but exceptions can be added. |
To add a new ATP policy exception, click 'New Exception' at the top right
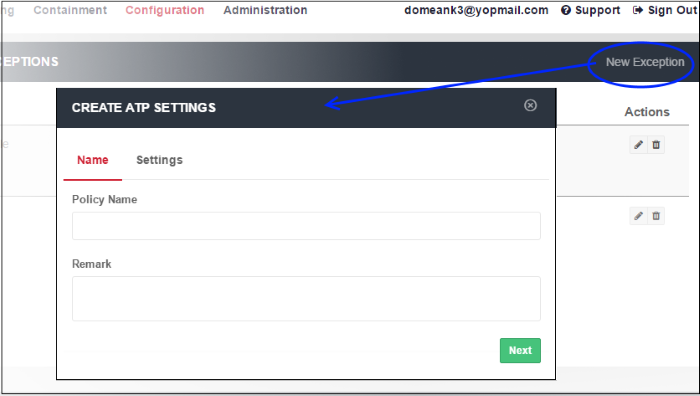
- Policy Name - Enter a descriptive label for the ATP exception.
- Remark - Enter any comments you wish to add about the exception.
- Click 'Next' to proceed or 'Settings' if you wish to specify domain whitelist and blacklist.
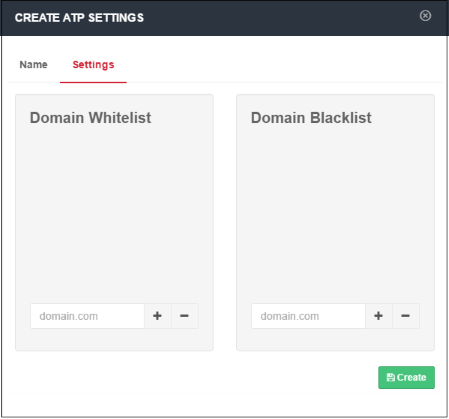
- Domain Whitelist - Domains that you want to exempt from SWG filtering rules. Please note this list takes priority over all other settings. All files downloaded from white-listed websites will be allowed, even those that are potentially malicious. Make sure the sites that are white-listed are safe. Click the '+' button after entering the domain name in the field. To remove a domain name, select it and click the '-' button.
- Domain Blacklist - Domains from which users are banned from downloading files. Users are still allowed to visit blacklisted sites, but are not able to download files from them. The 'Blacklisted Domains' tile on the dashboard shows attempts to download files from blacklisted sites.Click the '+' button after entering the domain name in the field. To remove a domain name, select it and click the '-' button.
- Click 'Create'.
The new ATP policy exception will be created and displayed on the list.
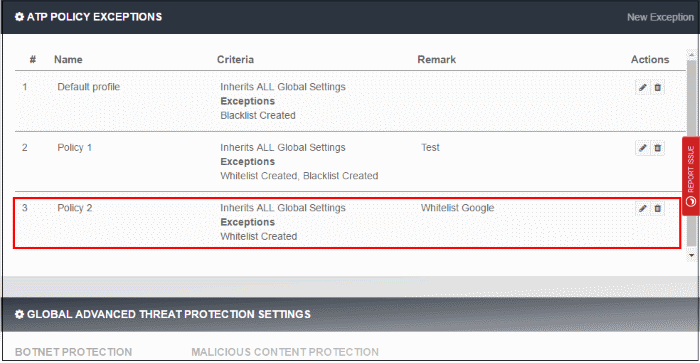
This new ATP policy will be available for selection when creating / editing a SWG policy. See Applying Policies.
Global Advanced Threat Protection Settings
Displays the built-in protection settings. The available settings are:
- Botnet Protection - Command and Control Servers (C & C Servers)
- Malicious Content Protection - Malicious content sites, Malicious URLs, Browser exploits
- Fraud Protection - Phishing sites
- DDOS Protection - Distributed Denial of Service attacks
- XSS Protection - Cookie stealing
- Additional Settings - Password-protected archive files, Unscannable file types
- Tunneling - TOR nodes, P2P nodes and VPN servers
- Remote Access Protection - Remote access services and brute force / scanner

- Click on a protection type to expand the box and view all settings.
- Use the switches to enable or disable specific settings.
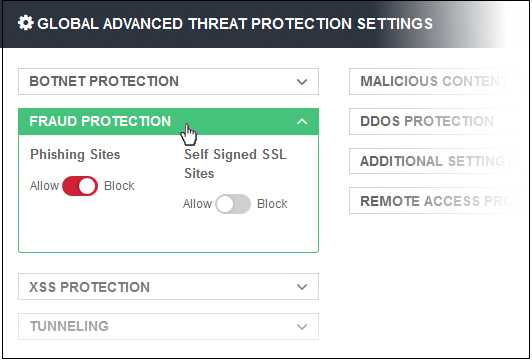
- The setting will be applied globally, to all protected domains and endpoints.
- You can create a policy with exceptions which you can to deploy to a particular network or endpoint. See 'ATP Policy Exceptions' to find out how to add exceptions to the global settings.
Allows to upload SHA1 hash values of files that should be blocked globally on the enrolled networks while trying to download.

- Clicking on the link will open the 'Global Blocked File List' page from where you can upload the SHA1 hash values of the files that you want to be blocked from downloading.
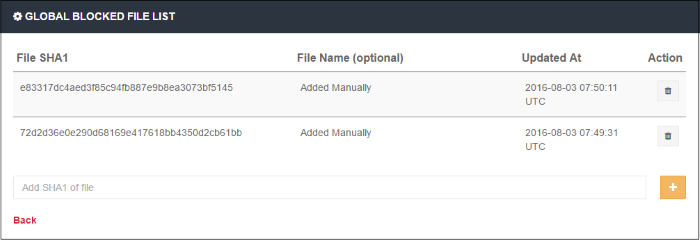
The list of SHA1 hash values already uploaded will be displayed.
- To upload hash value of a file, enter the value in the field and click the '+' button. The value will be added and displayed.
- To remove a hash value from the list, click the trash can icon beside it. Click' OK' in the confirmation screen to remove the SHA1 value.
- Click 'Back' to return to ATP settings interface.
Allows you to block websites that are hosted in specific countries. You can add multiples countries.
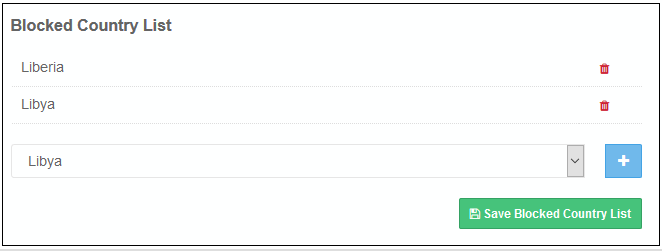
- Select the country from the drop-down and click the '+' button
- Click 'Save Blocked Country List' to save your changes
To remove a country from the list, click the
trash can icon beside it.
Configure Containerization Settings
- Click 'Configuration' > 'Security Policy' > 'Containment', to open this interface.
- Containerization is a security technology whereby 'unknown' files are run inside a secure, virtual environment. This isolation prevents them from potentially attacking the endpoint or stealing data.
- A file can have one of three trust ratings – 'safe', 'malicious' or 'unknown'. Safe files are allowed to run on the host, while malicious files are deleted or quarantined.
- 'Unknown' files are those for which no trust rating exists in our database. They could not be classified as definitely safe, nor definitely malicious.
- Unknown files are delivered to the endpoint wrapped in Comodo's containment technology. Contained files write to a virtual file-system, cannot modify other processes, and are denied access to the registry and user data.
- The 'Containerization Settings' interface lets you configure which file-extensions are run in the container. You can also specify the maximum number of nested archives that should be unpacked and checked.
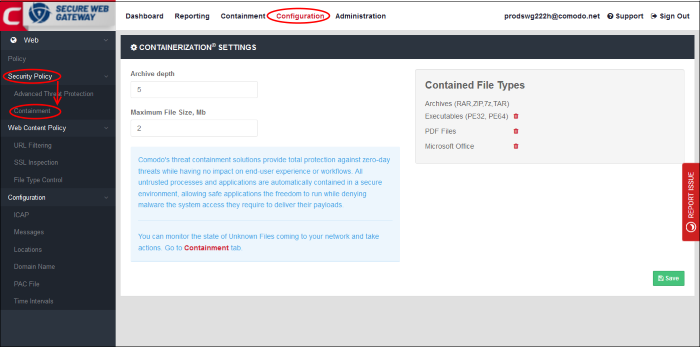
- Archive Depth - Maximum level the archive files will be unpacked to check for file within archive files. Enter the value till which the zip files will be checked. If the archive depth is more than the provided value, the files inside the exceeded layer will not be checked. For example, if the value is provided as 5, then files will be checked up to 5 layers only and others will be allowed to pass.
- Maximum File Size, MB - Enter the maximum file size that SWG should scan the archive files.
- Contained File Types - Displays the types of files that are scanned and sandboxed if required.
- Archives - File types with extensions RAR, ZIP, 7z and TAR. This type cannot be deleted from the list.
- Executables - Executable files of both 32 and 64 bit types inside the archive. You can remove this type by clicking the trash can icon beside it. If required, it can be added again by clicking the '+' button.
- PDF Files - Files with PDF extension inside the archive will be scanned. You can remove this type by clicking the trash can icon beside it. If required, it can be added again by clicking the '+' button.
- Microsoft Office - Files inside the archive with extensions of MS Office such as .doc, .xls and so on. You can remove this type by clicking the trash can icon beside it. If required, it can be added again by clicking the '+' button.
- Click the 'Save' button at the bottom.
The statuses of unknown files that
are downloaded can be viewed in the 'Containment' interface. You can
navigate to the page by clicking the 'Containment' tab at the top of
the interface. See 'Unknown
Threat Statistics' for more details.
There are three elements in a web content policy:
- Configure which categories of website should be allowed or blocked. You can also create your own domain whitelist or blacklist.
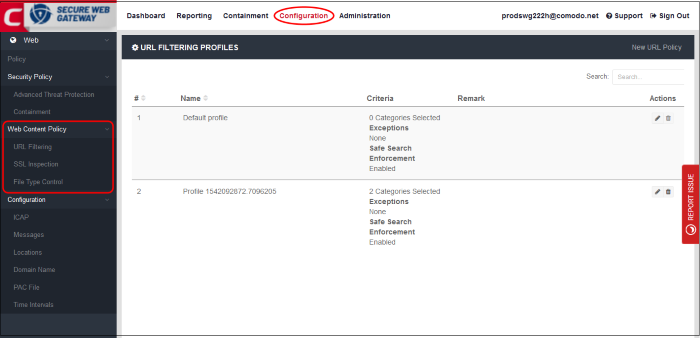
- Click 'Configuration' > 'Web Content Policy' > 'URL Filtering', to open this interface.
|
URL Filtering Profiles - Table of Column Descriptions |
|
|---|---|
|
Column Header |
Description |
|
Name |
Label of the URL filtering profile. You can sort the profiles in alphabetical order by clicking on the column header. |
|
Criteria |
The number of categories included in the profile. Place your mouse anywhere in the criteria area to view the categories. |
|
Remark |
Comments for the profile. |
|
Actions |
Edit or delete a profile. |
- Click 'New URL Policy' at the top right
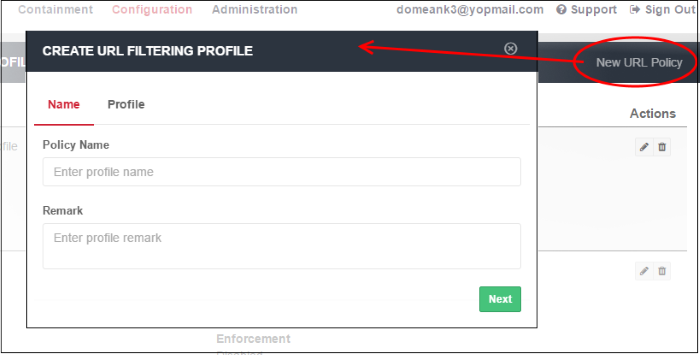
- Name:
- Policy Name – Create a label for the URL filtering profile.
- Remark – Add helpful comments about the profile.
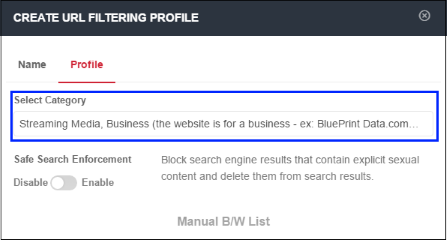
- Click 'Next' or 'Profile' to specify categories:
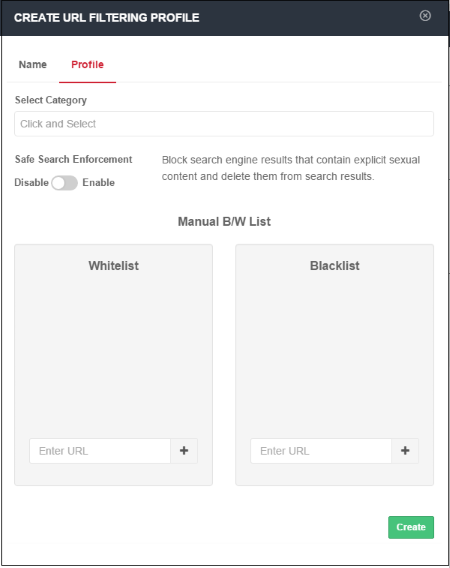
Category
- Website categories that can be allowed or blocked will be displayed in the 'Select Category' drop-down.
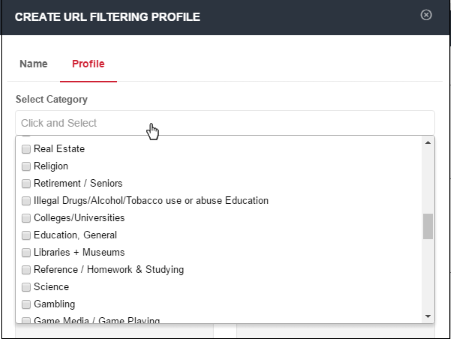
- You can select multiple categories at the same time. 'Select all' allows you to include all available categories. Please review and deselect any categories you wish to allow.
- All selected categories will be blocked. Website categories that are not selected will be allowed.
- Click anywhere outside the drop-down to add your selected categories.
- You can choose to add exclusions to a
category. See Manual B / W
List for more details.
Safe Search Enforcement
Allows you to configure so as to block and delete inappropriate search engine results such as results that contain explicit sexual content.

- Click on the toggle button to enable or disable safe search enforcement feature.
- This section lets you add exceptions to the URL filtering categories that were defined above.
- For example, if you block 'Shopping websites' but add amazon.com to the whitelist, then amazon.com is allowed but all other shopping sites are blocked.
- Similarly, any website you add to the blacklist will be blocked even if it belongs to an allowed category.
- The B /W list defined here is different from the one done in ATP under security policy. The Security Policy B/W list allows the user to visit the blacklisted websites but prevents them from downloading any files. See 'ATP Policy Exceptions'.
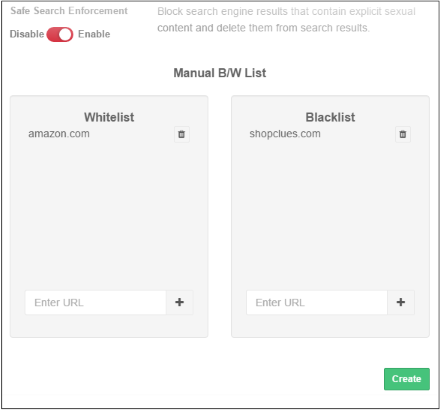
- Whitelist - Add domains that you want to exempt from Comodo SWG URL filtering rules. Please note the list here takes priority over the category setting. Make sure the sites that are whitelisted are safe. Click the '+' button after entering the domain name in the field. To remove a domain name, click the trash can icon beside it.
- Blacklist - Specify domains that should be blocked even if it belongs to an allowed category. Click the '+' button after entering the domain name in the field. To remove a domain name, click the trash can icon beside it.
- Click 'Create'.
The URL filtering policy will be added and will be
available for selection while creating / editing a policy. See 'Apply
Policies'.
Configure SSL Inspection Settings
- Specify whether Comodo SWG should check if websites use an SSL certificate from a trusted CA. You can then choose whether to allow or block sites that use an untrusted certificate.
- Download and install the Comodo SWG certificate. This is required if you want SWG to decrypt, analyze and apply policies to content served by https websites. The certificate should be installed on users' browsers or deployed to networks via Group Policy Object (GPO).
- Create exceptions to allow trusted domains, IPs and networks
- Click 'Configuration' > 'Web Content Policy' > 'SSL Inspection', to open this interface.
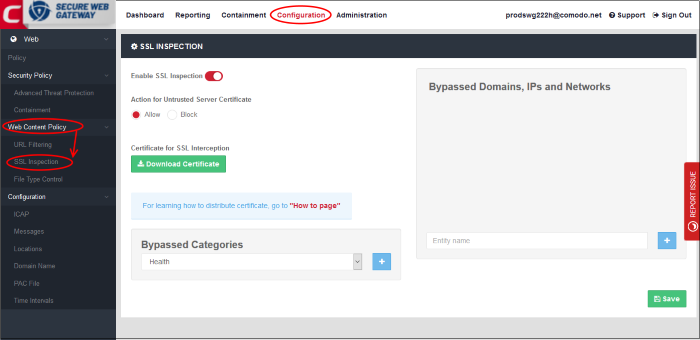
Enable SSL Inspection
- SSL inspection checks whether a website uses a certificate from a trusted certificate authority (CA).
- Choose whether you want to allow or block sites which use an untrusted certificate - one that is not from a trusted CA.
- You must enable this for SWG to monitor HTTPS traffic and apply relevant policies. See 'Certificate for SSL Interception' for help to install SWG SSL certificate.
- Click 'Save' for your changes to the page to take effect.
Bypassed Domains
Add domains, IPs and networks whose certificates will be not checked by Comodo SWG.
- Enter the URL of a website, domain, domain name with wildcard, IP or network in CIDR format in the field and click the '+' button. Repeat the process to add more exceptions.
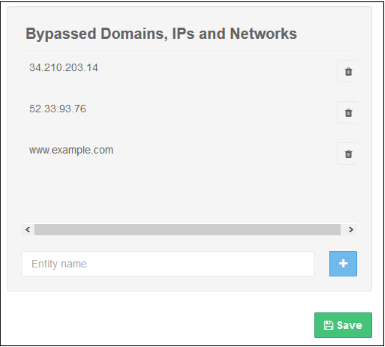
- To remove a website from the list, click the trash can icon beside it.
- Click 'Save' for your changes to the page to take effect.
Certificate for SSL Interception
- You have to download and install the Comodo SWG certificate in order to decrypt and apply policy to HTTPS websites.
- Once the certificate is installed, Comodo SWG can apply all rules to HTTPS sites as it does for non-secure sites.
- Make sure 'Enable SSL Inspection' is on.
- Click the 'Download Certificate' button. You can also download the certificate from 'Administration' > 'How to Configure' > 'SSL Interceptions' > 'Download Node Certificate'.
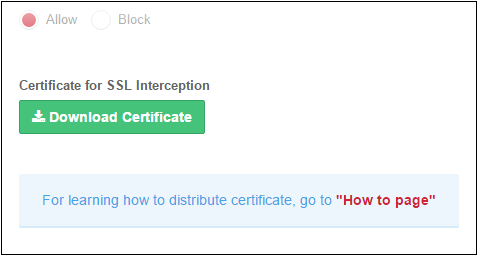
- Installation - click the 'How to page' link and follow the instructions in the 'SSL Interception' tab.
- Note – You can generate a new Comodo SWG certificate or upload your own certificate for HTTPS traffic monitoring.
- Go to 'Administration' > 'How to Configure' > 'SSL Interceptions' tab
- Click 'Generate Certificate' under 'Generate Node Certificate' – This will replace the current SSL certificate in the node.
- Upload Combined PEM File – To use your own SSL certificate, click 'Browse...' , select the certificate then click 'Upload'.
- Click 'Download Certificate'. Follow the instructions under 'Browsers' / 'Windows Group Policy'' for help to install the certificate.
Bypassed Categories
The list of bypassed categories is provided by Comodo. Sites in bypassed categories are not subject to Comodo SWG filters and can be freely accessed by end-users. Please contact us at domesupport@comodo.com if you want to add or remove categories from the list.

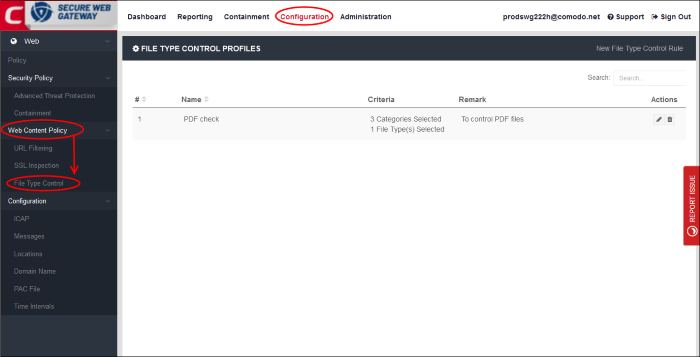
- Click 'Configuration' > 'Web Content Policy' > 'File Type Control' to open this interface.
- File type control lets you block the download of certain file types from specific website categories.
- Example. If you select 'ZIP' as the file type and 'Gambling' as the category, then .zip files cannot be downloaded from any site in the gambling category.
|
File Type Control Profiles - Table of Column Descriptions |
|
|---|---|
|
Column Header |
Description |
|
# |
Rule number. |
|
Name |
Label of the file control profile. You can sort the profiles in alphabetical order by clicking on the column header. |
|
Criteria |
Displays the number of file types selected for the profile and the website categories selected. Place your mouse cursor over 'Categories Selected' to view individual categories and file types. |
|
Remark |
Comments for the profile. |
|
Actions |
Edit or delete a profile. |
- Click 'New File Type Control Rule' at type right
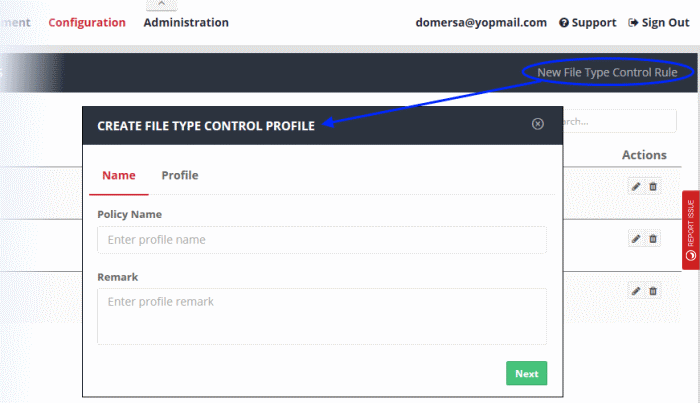
- Name:
- Policy Name – Create a label to identify the policy.
- Remark – Add comments to describe the policy.
- Click 'Next' or 'Profile' to specify file types and categories:
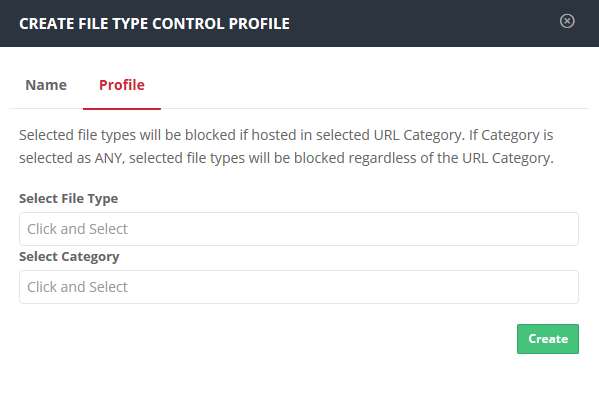
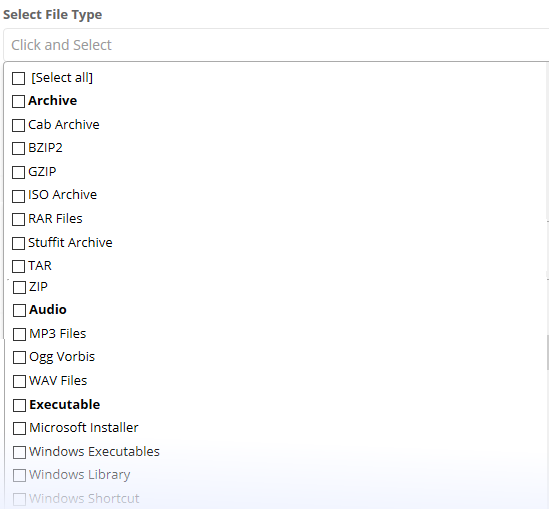
- Select the file formats you want to restrict from the available list in the 'Select File Type' field
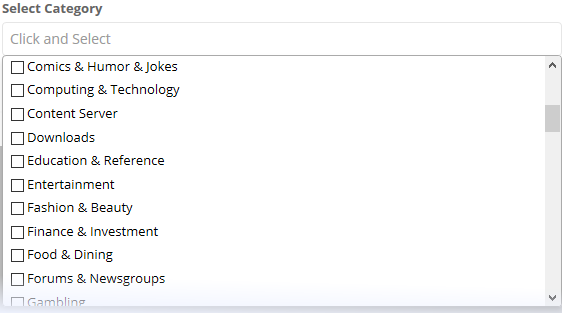
- Select the category of websites from where you want to the selected file types to be blocked.
- Click 'Create'
Create a Policy Time-Schedule
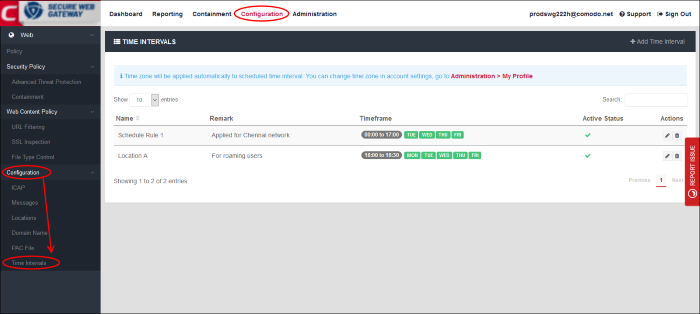
- Click 'Configuration' > 'Configuration' > 'Time Intervals'.
- You can configure Comodo SWG to activate a policy only at specific times. This interface lets you create the schedules which you then add to a policy.
- The time zone used is as set in 'Administration' > 'My Profile'.
|
Time Intervals - Table of Column Descriptions |
|
|---|---|
|
Column Header |
Description |
|
Name |
Schedule label. |
|
Remark |
Short description of the schedule. |
|
Timeframe |
Shows the times when a policy is active under this schedule. |
|
Active Status |
Shows whether or not the schedule is currently active. This status also applies to any policies which use the schedule.
|
|
Actions |
Edit or delete a schedule. |
Create a new time schedule
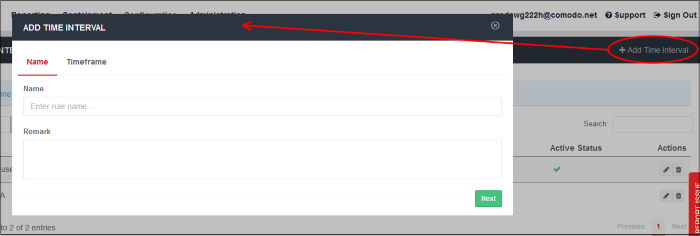
- Name – Enter an appropriate label for the schedule
- Remark – Enter a short description for the schedule
- Click 'Next' or 'Timeframe' to pick the times that the schedule should apply
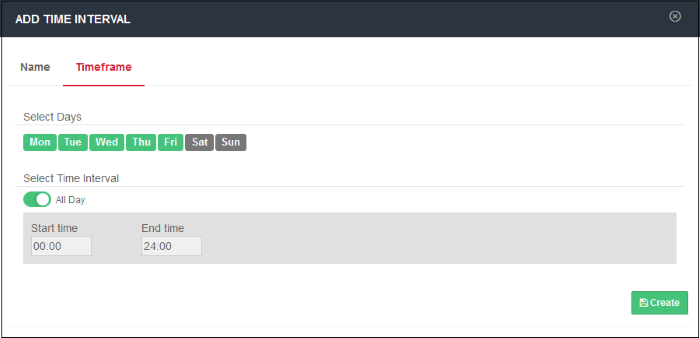
'Saturday' and 'Sunday' are disabled by default. The default interval is 'All Day'.
- Select Days - Click the days that you want the schedule to be active
- Select Time Interval:
- All Day - The schedule will be active 24 hrs for the scheduled days
- To configure a particular time period, switch 'All Day' to disable it and select the period
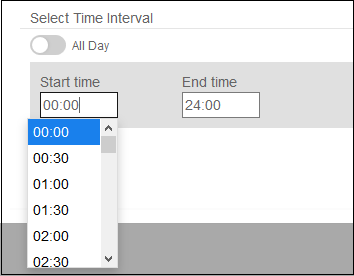
- Select the time period from the 'Start time' and 'End time' drop-downs. The schedule will be active for the configured period for the scheduled days.
- Click 'Create' when done.
The time-schedules will be added to the list and will be available for selection when creating a policy.
The next step is to apply policies to networks / users. See Apply Policies.


