Manage Projects
Click 'Staff Panel' > 'Projects'
- Service desk projects allow staff to plan delivery time-lines for larger scale tasks which may involve multiple sub-tasks.
- Each task can be assigned a total duration, completion percentage and billable time.
- You can also create sub-tasks and associate a task with one or more tickets.
- Projects are displayed as a Gantt chart, allowing you to easily track overall progress.

Existing
projects are listed in the first column.
Sorting the items
- Click a column header to sort items in ascending/descending order
The 'Show records' drop-down on the right allows you to select the number of entries to be displayed per page. The options range from 10 records per page up to 100. The default value can be set in the 'My Profile' interface. You can navigate to different pages by clicking 'Next' and 'Prev'.
Search Option
- The 'Search' field allows you to filter by project name. Enter the parameter fully or partly in the 'Search' field and click the 'Search' button.
- The 'From' and 'To' date fields allows you to filter by time periods. Enter or select the date from the calendars and click the 'Search' button.
- You can group name and date filters to refine your search.
- To clear filters and display all projects, clear the search fields (or simply click the 'Projects' link).
Column Headers
- Project Name - The name of project added.
- Duration - The total duration of a project is the combined duration of its individual tasks.
- Completion - The total completion status of a project is calculated from the completion percentage of individual tasks in the project.
- Time Spent – Total time spent in individual tasks, sub tasks and tickets.
- Billable Time - Total billable time spent in individual tasks, sub tasks and tickets.
- Start Date – Date at which the project was started, or is due to start.
- End Date – Date and which the project was completed, or is due to be completed. Completion date is calculated from the total duration of individual tasks in the project.
Staff members can create new projects and integrate tasks to it. You should specify a duration for each task/sub-task.
Create a new project
- Click 'Add New Project' from the 'Projects' interface

The 'Project Properties' dialog will appear.
- Enter a name for the project
- Enter the project start date by clicking the calendar icon beside 'Start Date'
- Click 'Save'
A new project will be created and the project page will be displayed. The project title will be added as the root task to the project. You can add sub-tasks at required hierarchy levels and associate tickets with them.

- Select the root task and click 'Add New Task' button at the top right

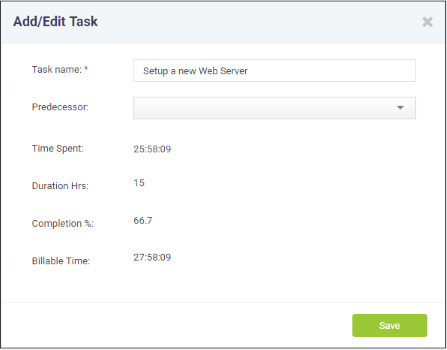
The 'Add/Edit Task' dialog will appear.
- Enter the name of the task
- Predecessor (optional). Select a task which must be completed before the new task can begin
- If the task is in-progress, enter the completion percentage in the 'Completion %' 'field
The time spent field will be automatically populated from the entered values.

- Enter the quantity of chargeable hours in the 'Billable Time' field using the sliders and click 'Save'.
- Repeat the process to add more tasks.
- To add another main task, select the project and click 'Add New Task'. This will create a sibling task.

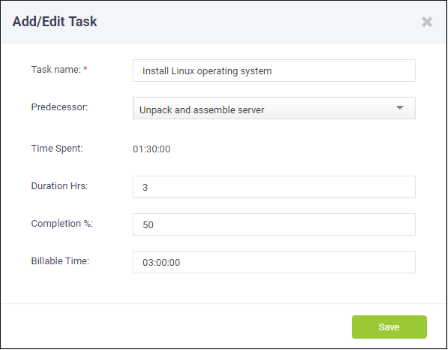
The 'Add/Edit Task' dialog will appear.
- Enter the name for the task
- Enter the predecessor to continue from the previous task/subtask
- Enter the time duration required (in hours) to complete the task in the 'Duration' field
- If the task is in-progress, enter the completion percentage on it in the 'Completion %' 'field
The time spent field will be automatically populated from the entered values.
- Enter the quantity of chargeable hours in the 'Billable Time' field using the sliders and click 'Save'.
- Repeat the process to add more tasks.
- To add a sub-task to a main-task:
- Select the parent level task
- Click the 'Add New Task' button and repeat the process as outlined above.
The duration and completion percentage of the parent task will be updated as per the figures entered in the corresponding fields of all sub-tasks.
- To link a ticket to a task
- Select the task/sub-task to which the ticket is to be linked and click 'Add New Ticket' button

The Add/Edit ticket dialog will appear.
The time spent and billable time will be automatically populated for the progress of the ticket so far.
- Enter the ticket number or subject of the ticket in the 'Search Ticket' field and choose the ticket to be added from the drop-down options. Please note that the time spent will be displays the actual time spent based on the duration hrs and completion percentage entered.
- Enter the predecessor to continue from the previous task/subtask.
- Enter the duration for the ticket completion and the completion percentage in the respective fields.

- Click 'Save'.
The ticket will be linked to the task.

The time spent on the task and the billable time will be fetched from the ticket details and automatically updated. You can also add sub-tickets to a task/sub-task, which is processed concurrently with the main tickets. The duration and completion percentage of the sub tickets will not count towards the total duration and completion percentage of the project.
- To delete a task, sub-task, ticket or a sub-ticket, select the item and click 'Delete Item'.
- Click 'Save' in the project viewer interface to save your changes.
View
the Project Status and Update it
Administrators or staff members can view the status of individual tasks and sub-tasks, tickets and sub-tickets and overall progress of a project from the Project Viewer interface.
View a project
- Open the Projects interface by clicking 'Projects' on the left from the 'Staff Panel'
- Click a project name to open the project time-line:

The tasks, sub-tasks, tickets and sub-tickets added to the project are displayed as a tree structure in the first column. The left hand side pane shows the details of each item and the right hand side pane shows progress of each item as a Gannt chart.
|
Project Viewer - Column Descriptions |
|||
|---|---|---|---|
|
Column Header |
Parent level Task |
Child Task |
Tickets/Sub Tickets |
|
Duration |
The total duration of a parent level task is the combined duration of its child tasks and tickets. |
Duration of the individual task, as entered while adding/editing it or the combined duration of the tickets linked to it. Note: Sub tickets are excluded for calculation of duration. |
Duration of the ticket |
|
Completion |
The total completion status of a parent level task is calculated from the completion percentages of child tasks and tickets. |
The completion percentage of individual task or the combined completion percentages of tickets linked to it. Note: Sub tickets are excluded for calculation of completion status. |
Completion percentage of individual ticket |
|
Time Spent |
Total time spent in child tasks and tickets. |
Time spent on individual task or the combined time spent on tickets linked to it, excluding the sub-tickets. Note: Sub tickets are excluded for calculation of time spent. |
Time spent on individual ticket |
|
Billable Time |
Total billable time spent in child tasks and tickets. |
Billable time spent on individual task or the combined billable time spent, from tickets linked to it, excluding the sub-tickets. Note: Sub tickets are excluded for calculation of billable time spent. |
Billable time spent on individual ticket |
|
Start |
Date at which the task was started, or is due to start. |
Date at which the task was started, or is due to start. |
Date at which the ticket was started. |
|
End |
Date and which the task was completed, or is due to be completed. Completion date is calculated from the total duration of child tasks. |
Date at which the individual task was completed, or is due to be completed. Completion date is calculated from the duration of the individual task or the total duration of tickets linked to it. |
Date at which the individual ticket was completed, or is due to be completed. |
- To add a new item, click the respective button from the top right and enter the details of the item in the 'Add/Edit Task' or 'Add/Edit Ticket' dialog. For more details, see the explanation above.
Edit/update a task
- Click the pencil icon at the left of the item or double click on the respective bar in the Gannt chart.
Parent Level Task

- Task Name - Displays the name of the task. You can change the name of the task by directly editing the field.
- Click 'Save' for your changes to take effect
Child Level or Terminal Task

- Task Name - Displays the name of the task. You can change the name of the task by directly editing the field.
- Predecessor - Displays the previous task/sub-task from which the present task has to be continued.
- Time Spent - Displays the actual time spent based on the duration hrs and completion percentage entered.
- Duration - Allows you to update the time duration required (in hours) to complete the task
- Completion % - Allows you to update the completion percentage
- Billable Time - Allows you update the billable time spent on the task
- Click 'Save' for your changes to take effect
- Click 'Save' in the 'Projects' interface
To update a ticket or a sub-ticket
- Click the pencil icon at the left of the item or double click on the respective bar in the Gannt chart.
The 'Add/Edit Ticket' dialog will appear for the respective task.
- To change the ticket item linked to the task, enter the new ticket number/subject of the ticket in the Search Ticket field.
- To change the Duration, directly enter the new duration in the Duration field
- To change the completion percentage, enter the new completion level in the Completion % field
The 'Time Spent' and 'Billable Time' are fetched from the ticket and are uneditable.
- Click 'Save' for your changes to take effect.
The duration and completion percentage will automatically be updated for the task to which the ticket is linked.
- Click 'Save' in the 'Projects' interface
Projects that are completed or no longer required, can be removed from Service Desk.
Remove project(s)
- Open 'Projects' interface by clicking the 'Projects' tab from the 'Staff Panel'
- Select the project(s) to be removed and click 'Delete'

A confirmation dialog will appear.

- Click
'Yes, Do it!' to remove the project.


