Manage User Groups
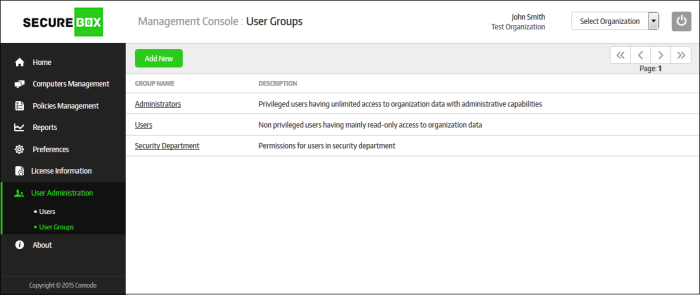
Users that are added to the management console have to be placed in a group in order to manage an organization. By default, there are two groups shipped with the console, Administrators and Users. The 'Administrative' user group provides unlimited access to the organization with administrative capabilities whereas the 'Users' group provides mainly read-only privileges to organization data. In addition, you can also create groups with different privilege levels and add user into them as per the organization's requirement.
To manage users groups, click 'User Administration' on the left and then 'User Groups' below it:

|
User Groups – Table of Column Description |
|
|---|---|
|
Column |
Description |
|
Group Name |
The name of the user group that was provided while adding. The 'Administrators' and 'Users' groups are shipped with the console. These two default groups cannot be deleted but other details such as privilege levels can be edited. Clicking on a user group name will open the 'User Group Properties' screen. Refer to the 'To edit a user group' for more details. |
|
Description |
The description provided for the group while adding. |
Sorting options
Clicking any column heading sorts the entries based on the ascending/descending order of the entries as per the information displayed in the respective column.
The screen allows administrators to:
- Click the 'Add New' button at the top of the table

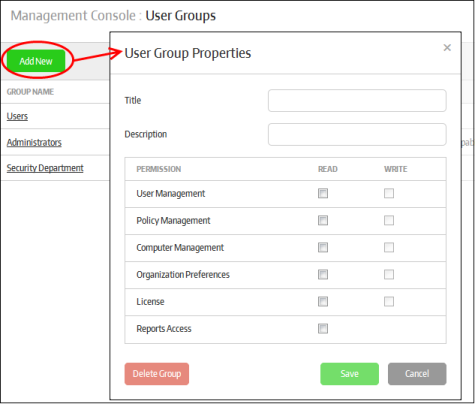
The 'User Group Properties' screen will be displayed:
|
User Group Properties – Form Parameters |
|
|---|---|
|
Form Element |
Description |
|
Title |
Enter the name of the group |
|
Description |
Enter an appropriate description for the group |
|
Permissions – Allows you to define read/write privileges for the users in the group
|
|
|
User Management |
This area allows the management of users such as add user, add groups and more. Refer to the section 'Users and User Groups' for more details. |
|
Policy Management |
This area allows management of policies such as create new polices, edit and more. Refer to the section 'Policies' for more details. |
|
Computer Management |
This area allows to manage computers such as enroll new endpoints, create groups, assign policies and more. Refer to the section 'Endpoints and Endpoint Group' for more details. |
|
Organization Preferences |
This area allows to configure the management console settings. Refer to the section 'Configuring the Management Console' for more details. |
|
License |
View details of current license, add and buy additional licenses. Refer to the section 'License Information' for more details. |
|
Reports Access |
View the threats detected by Secure Box and report of activities on the endpoints related to secure box. Refer to the section 'Reports' for more details. |
- Click the 'Save' button
The newly added user group will be listed in the screen and will also be available for selection while adding/editing users. Refer to the section 'Managing Users' for more details about adding / editing users. The users after logging-in to the console can manage the organization as per the privileges assigned for his/her group.
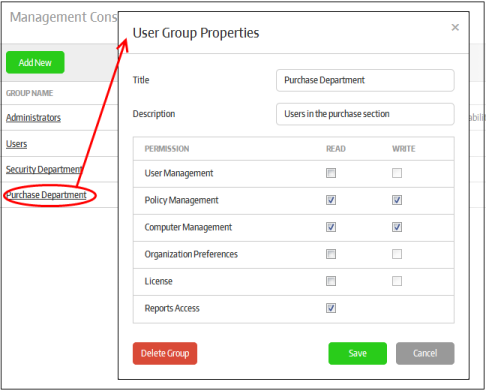
- Click on the name of the user group that you want to edit
The 'User Group Properties' screen with details of the selected user will be displayed.

- Edit the details as required. Please note if you change privileges for the group, the users in the group will be automatically assigned the new permissions. Refer to the section 'To add a new user group' for more details about privileges.
- Click the 'Save' button
You cannot delete a group in which users are available. To delete a group, you have to first reassign the users to another group or delete them from the user list. You can only delete a group that has no users in it.
- Click on the name of the user group that you want to delete
The 'User Group Properties' screen with details of the selected user will be displayed.

-
Click the 'Delete Group' button
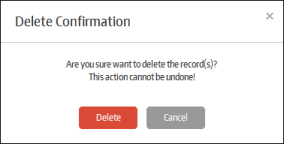
A confirmation dialog will be displayed.

- Click
'Delete' to confirm removal of the user group


