Manage Endpoint Groups
All enrolled endpoints must be placed in an endpoint group. After creating an endpoint group you can apply security policies to them and schedule quarantine periods according to your requirements. All newly enrolled endpoints are placed in the default group. You can move them to different groups at any time. Refer to 'Assigning Endpoints to Groups' if you need help with this.
The policy to be applied to a group is selected while creating the group. You can change the policy at any time by editing the group. Only one policy can be applied to a group at a time.
The 'default' group also can be edited so it applies a policy to newly enrolled endpoints.
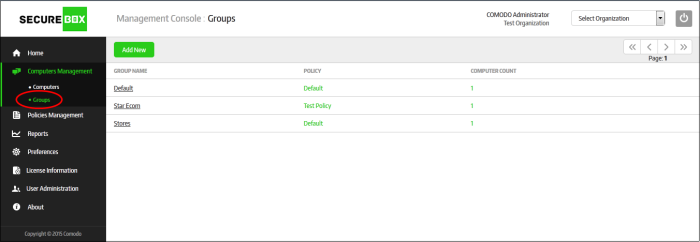
To manage endpoint groups, click 'Computers Management' on the left and then 'Groups' below it:

|
Computer Groups – Table of Column Description |
|
|---|---|
|
Column |
Description |
|
Group Name |
The name of the endpoint group provided /edited while creating editing it. Clicking on a name will display the 'Group Properties' screen. Refer to the section 'Creating a New Endpoint Group' and 'Editing Endpoint Groups' for more details. |
|
Policy |
The name of the policy assigned to the endpoint group. A 'Default' policy will be assigned to the default endpoint group. Clicking on a policy name will open the 'Policy Management' interface. Refer to the section 'Polices' for more details about managing policies. |
|
Computer Count |
The number of endpoints that are assigned to the group. Refer to the section 'Assigning Endpoints to Groups' for more details. Clicking on a number will open the 'Computers' interface with list of computers in that group. Refer to the section 'Managing Endpoints' for more details. |
Sorting option
Sorting the entries
Clicking on the 'Group Name' column heading sorts the entries based on the ascending/descending order of the entries as per the information displayed in the column.
The interface allows an administrator with appropriate privileges to:


