


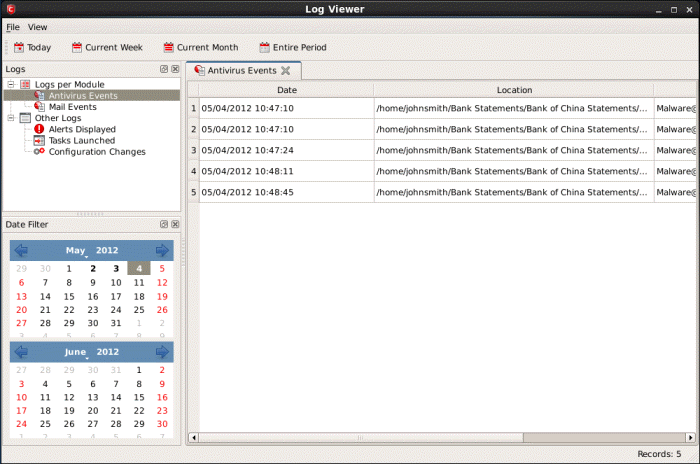
View Antivirus Events
Comodo Antivirus documents the results of all actions performed by it in extensive but easy to understand reports. A detailed scan report contains statistics of all scanned objects, settings used for each task and the history of actions performed on each individual file. Reports are also generated during real-time protection, and after updating the anti-virus database and application modules.
To view a log of Antivirus Events
-
Click 'View Antivirus Events' from the main Antivirus Task Manager Screen.
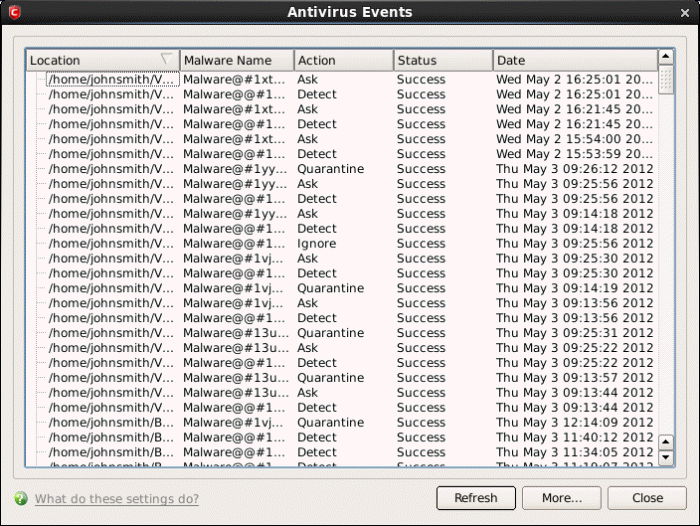
Column Description
- Location - Indicates the location where the application detected with a threat is stored.
- Malware Name - Name of the malware event that has been detected.
- Action - Indicates action taken against the malware through Antivirus.
- Status - Gives the status of the action taken. It can be either 'Success' or 'Fail'.
- Date - Indicates the date of the event.
Sorting the Entries
-
Click on any column header to sort the entries alphabetically, ascending or descending order as the case may be.
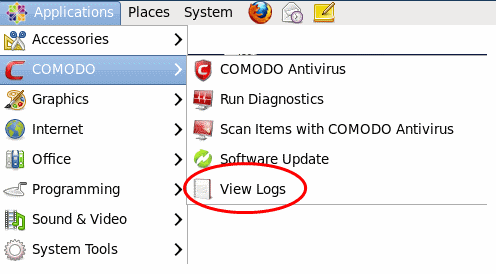
Comodo Antivirus Log Viewer Module
-
Click 'More ...' to load the full Comodo Antivirus Log Viewer module.
OR
-
Click 'View Logs' in the Applications menu in the panel to load the full Log Viewer module.
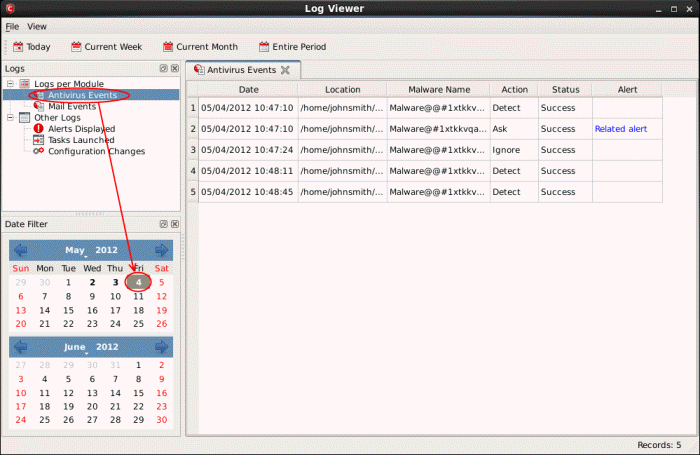
This window contains a full history of logged events in two categories: Logs per Module and Other Logs.
It also allows you to build custom log files based on specific filters and to export log files for archiving or troubleshooting purposes.

The Log Viewer Module is divided into three sections. The top panel displays a set of handy, predefined time Filters. The left panel the types of Logs. The right hand side panel displays the actual events that were logged for the time period you selected in the top panel and the type of log selected in the left panel (or the events that correspond to the filtering criteria you selected).
The Logs per Module option contains the logged events of Antivirus modules and Other Logs options contains logged events of the following:
- Alerts Displayed: Displays the list of various alerts that were displayed to the user, the response given by the user to those alerts and other related details of the alert.
- Tasks Launched: Displays the various Antivirus tasks such as updates and scans that have taken place. This area will contain a log of all on-demand and scheduled AV scans and the result of that scan.
- Configuration Changes: Displays a log of all configuration changes made by the user in the CAVL application.
Comodo Antivirus allows you to create custom views of all logged events according to user defined criteria.
Clicking on any of the preset filters in the top panel alters the display in the right hand panel in the following ways:
- Today - Displays all logged events for today.
- Current Week - Displays all logged events during the current week. (The current week is calculated from Monday to Sunday that holds the current date.)
- Current Month - Displays all logged events during the month that holds the current date.
- Entire Period - Displays every event logged since CAVL was installed. (If you have cleared the log history since installation, this option shows all logs created since that clearance).
The example below shows an example display when the Antivirus Events for 'Today' are displayed.
|
Note: The type of events logged by the Antivirus modules of CAVL differ from each other. This means that the information and the columns displayed in the right hand side panel change depending on which type of log you have selected in the top and left hand side panel. For more details on the data shown in the columns, see View Mail Events. |
User Defined Filters:
Having chosen a preset time filter from the top panel, you can further refine the displayed events according to specific filters. The type of filters available for Antivirus logs differ to those available for Mail logs. The table below provides a summary of available filters and their meanings:
|
Available Filters - Logs per Module |
|
|---|---|
|
Antivirus Filter |
Mail Filters |
|
Action - Displays events according to the response (or action taken) by the Antivirus |
Sender - Displays events according to the name of the sender |
|
Location - Displays only the events logged from a specific location |
Subject - Displays only the events according to the subject in the mail |
|
Malware Name - Displays only the events logged corresponding to a specific malware |
From IP - Displays only the events with a specific From IP address |
|
Status - Displays the events according to the status after the action taken. It can be either 'Success' or 'Fail' |
Location - Displays only the events logged from a specific location |
|
|
Type - Displays only the events logged corresponding to specific type of mailware in the mail |
|
|
Malware Name - Displays only the events logged corresponding to a specific malware |
| Spam - Displays only the events logged corresponding to a specific spam mail | |
|
|
Action - Displays events according to the response (or action taken) by CAVL |
|
|
Status - Displays the events according to the status after the action taken. It can be either 'Success' or 'Fail' |
Creating Custom Filters
Custom Filters can be created through the Advanced Filter Interface. You can open the Advanced Filter interface either by using the View option in the menu bar or using the context sensitive menu.
-
Click View > Advanced Filter to open the 'Advanced Filter' configuration area.
Or
-
Right click on any event and select 'Advanced Filter' option to open the corresponding configuration area.
The 'Advanced Filter' configuration area is displayed in the top half of the interface whilst the lower half displays the Events, Alerts, Tasks or Configuration Changes that the user has selected from the upper left pane. If you wish to view and filter event logs for other modules then simply click log name in the tree on the upper left hand pane.
The Advanced Log filter displays different fields and options depending on the log type chosen from the left hand pane (Antivirus, Mail).
This section will deal with Advanced Event Filters related to 'Antivirus Events' and will also cover the custom filtering that can be applied to the 'Other Logs' (namely 'Alerts Displayed', 'Tasks' Launched' and 'Configuration Changes'). The Mail Advanced Event Filters is dealt in the respective section.
Antivirus Events - Advanced Filters
To configure Advanced Filters for Antivirus events
-
Select 'View > Advanced Filter'
-
Select 'Antivirus Events' under 'Logs Per Module'
You have 4 categories of filter that you can add. Each of these categories can be further refined by either selecting or deselecting specific filter parameters or by the user typing a filter string in the field provided.
-
Click the 'Add' button when you have chosen the category upon which you wish to filter.
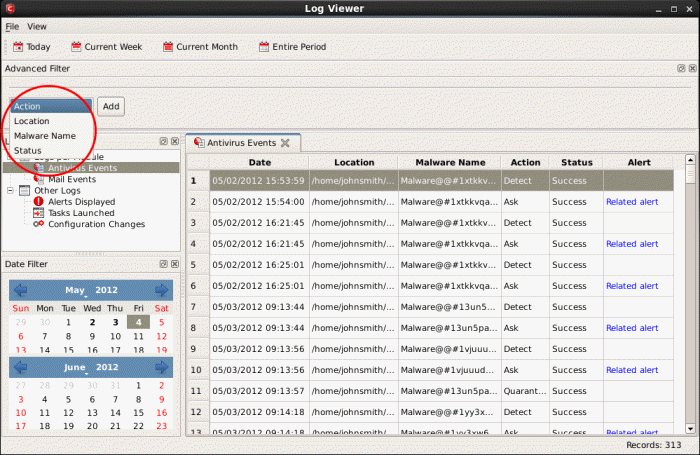
Following are the options available in the 'Add' drop-down:
-
Action: Selecting the 'Action' option displays a drop-down field and a set of specific filter parameters that can be selected or deselected.

- Quarantine: Displays events where the user chose to quarantine a file
- Remove: Displays events where the user chose to delete an item
- Ignore: Displays events where the user chose to ignore an item
- Detect: Displays events for detection of a malware
- Ask: Displays events when user was asked by alert concerning some Antivirus event
- Restore: Displays events of the applications that were quarantined and restored.
The filtered entries are shown directly underneath.
For example, if you checked the 'Quarantine' box then selected 'Not Equal', you would see only those Events where the Quarantine Action was not selected at the virus notification alert.
-
Location: Selecting the 'Location' option displays a drop-down field and text entry field.

a. Select 'Contains' or 'Does Not Contain' option from the drop-down field.
b. Enter the text or word that needs to be filtered.
The filtered entries are shown directly underneath.
For example, if you select 'Contains' option from the drop-down field and enter the word 'unclassifiedMalware' in the text field, then all events containing the word 'unclassifiedMalware' in the Location field will be displayed directly underneath. If you select 'Does Not Contain' option from the drop-down field and enter the word 'System' in the text field, then all events that do not have the word 'System' will be displayed directly underneath.
-
Malware Name: Selecting the 'Malware' option displays a drop-down field and text entry field.

a. Select 'Contains' or 'Does Not Contain' option from the drop-down field.
b. Enter the text or word that needs to be filtered.
The filtered entries are shown directly underneath.
Refer to the example given for 'Location' option for better understanding.
-
Status: Selecting the 'Status' option displays a drop-down field and a set of specific filter parameters that can be selected or deselected.

a. Select 'Equal' or 'Not Equal' option from the drop-down field. 'Not Equal' will invert your selected choice.
b. Now select the checkboxes of the specific filter parameters to refine your search. The parameter available are:
- Success: Displays Events that successfully executed (for example, the database was successfully updated)
- Failure: Displays Events that failed to execute (for example, the database failure to update correctly)
Refer to the example given for 'Action' option for better understanding.
|
Note: More than one filter can be added in the 'Advanced Filter' pane. After adding one filter type, the option to select the next filter type automatically appears. You can also remove a filter type by clicking the 'Remove' option at the end of every filter option. |
Other Logs - Advanced Filters
The Advanced Filter function for Alerts Displayed, Tasks Launched and Configuration Changes are the same in Antivirus and Mail interfaces.
To configure Advanced Filters for Alerts Displayed
-
Select 'View > Advanced Filter'.
-
Under 'Other Logs', select 'Alerts Displayed'.
This will open the Advanced Filter pane above the other two panes . From here, you can chose the category of filter from a drop-down box. Each of these categories can be further refined by either selecting or deselecting specific filter parameters or by the user typing a filter string in the field provided.
-
Click 'Add' when you have chosen the category upon which you wish to filter.
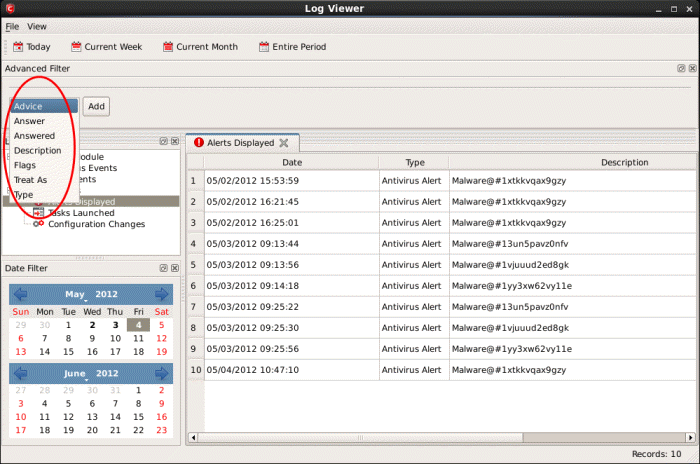
The following table lists the various filter categories and parameters for 'Alerts Displayed'.
|
Available Filters - Other Logs - Alerts Displayed |
|
|---|---|
|
Filter Option |
Description |
|
Type |
Displays the type of alert. It can be a Mail or Antivirus alert |
|
Description |
Displays the name of the event |
|
Advice |
Suggests an advice that can be executed by the user for that event |
|
Answered |
Displays the date and time on which the alert was answered |
|
Flags |
Filters the events based on the flags set for them. |
|
Answer |
Displays the answer that was given by you for the alert |
|
Treat As |
Displays the type of policy, if any, for the corresponding event type |
To configure Advanced Filters for Tasks Launched
-
Select 'View > Advanced Filter'.
-
Under 'Other Logs', select 'Tasks Launched'.
This will open the Advanced Filter pane above the other two panes. From here, you can chose the category of filter from a drop-down box. Each of these categories can be further refined by either selecting or deselecting specific filter parameters or by the user typing a filter string in the field provided.
-
Click 'Add' when you have chosen the category upon which you wish to filter.
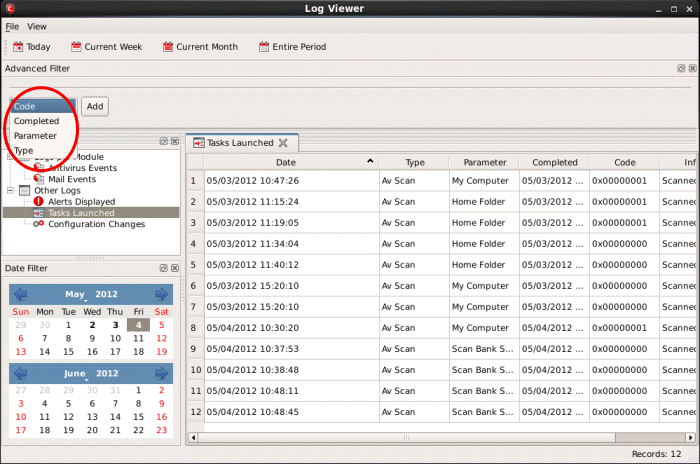
The following table lists the various filter categories and parameters for 'Tasks Launched'.
|
Available Filters - Other Logs - Tasks Launched |
|
|---|---|
|
Filter Option |
Description |
|
Type |
Displays the type of task. It can be an antivirus update or scan type. |
|
Parameter |
Displays the name of the scan profile. This column is populated only if 'Av Scan' option is displayed in 'Type' column. |
|
Completed |
Displays the date and time at which the task was executed. |
|
Code |
Displays a code value if the task was not performed successfully and for task updates it shows a standard value: 0x00000001 if base is up to date |
To configure Advanced Filters for 'Configuration Changes'
-
Select 'View' > 'Advanced Filter'
-
Under 'Other Logs', select 'Configuration Changes'
This will open the Advanced Filter pane above the other two panes. From here, you can chose the category of filter from a drop-down box. Each of these categories can be further refined by either selecting or deselecting specific filter parameters or by the user typing a filter string in the field provided.
-
Click 'Add' when you have chosen the category upon which you wish to filter.
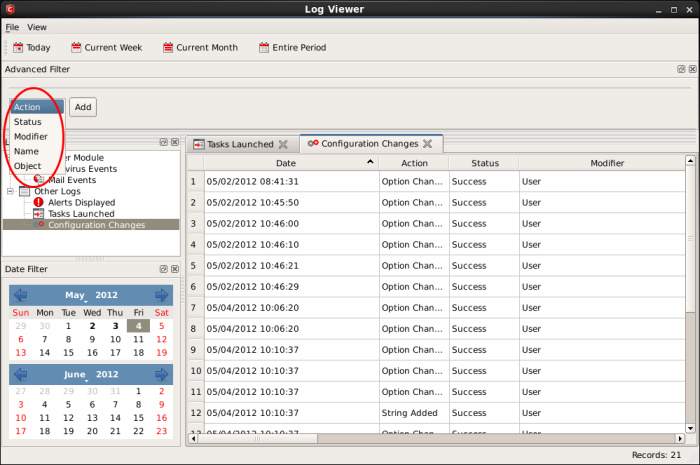
The following table lists the various filter categories and parameters for 'Configuration Changes'.
|
Available Filters - Other Logs - Configuration Changes |
|
|---|---|
|
Filter Option |
Description |
|
Action |
Displays events according to the response (or action taken) by Antivirus. |
|
Modifier |
Displays events sorted based on whether the configuration was changed by the User or Antivirus alert. |
|
Object |
Displays the object for which the configuration change took place. |
|
Name |
Displays the name of the configuration entry, if it can be determined |
|
Status |
Displays the events according to the status after the action taken. It can be either 'Success' or 'Fail'. |
Date Filter
The Date Filter can be seen in the lower left hand pane. Using the Date Filter you can easily see the events on a particular date or on a date range.
To view the events on a particular date
- Click the right arrow or the left arrow to select the required month and year. You can also select the month by clicking the down-arrow beside the month name and select from the list.

2. Now, click the required date. The events on that particular date is displayed.

To close the Date Filter
-
Click the 'X' symbol in Date Filter.
Or
-
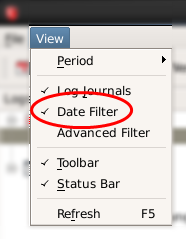
Click 'View' in the menu bar and click the 'Date Filter' option. This is a toggle command and you can repeat this step to make the Date Filter appear.
Exporting Log Files to HTML
Exporting log files is useful for archiving and troubleshooting purposes. After making your choice and setting the filters. the log displayed can be directly exported as HTML file. There are two ways to export log files in the Log Viewer interface - using the context sensitive menu and via the 'File' menu option.
-
File Menu
-
Select the event for which the log report is to be taken.
-
Click 'Export' from the File menu.
-
Select the location where the log report has to be saved, provide a file name and click 'Save'.
-
Context Sensitive Menu
-
Right click in the log display window to export the currently displayed log file to HTML.
You can export a custom view that you created using the available Filters by right clicking and selecting 'Export' from the context sensitive menu. Again, you are asked to provide a file name and save location for the file.