


Enroll Endpoints for Management
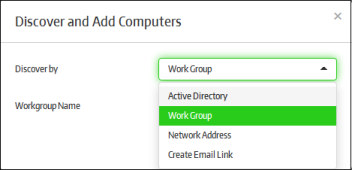
SecureBox allows administrators to enroll computers for central management using any of the following methods:
- Active Directory
- Work Group
- Network Address
- Email Link
The first three methods are suitable for enrolling local computers using a Secure Box management console that is installed on-premises. Endpoints are automatically discovered and added for management per the 'Auto-Discovery Settings' configured in the 'Preferences'
section. The 'Email Link' method is used for enrolling endpoints over
the internet and is the only method available for customers using
the SaaS version of CMC.
To enroll endpoints
- Click
'Computers Management' on the left
- Select 'Computers' from the sub-menu:
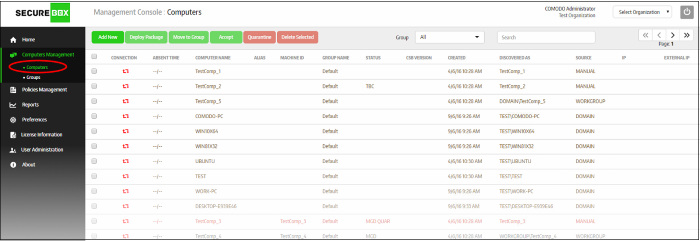
- Click the 'Add New' button

- This will open the 'Discover and Add Computer' dialog.
- Click the 'Discover by' drop-down and select the method by which you want to add the endpoints:
Click the following links for
explanation on each enrollment method:
Enrollment via Active Directory
Please note endpoint enrollment via AD will work only if CMC is added to your domain during on-premise installation. Refer to the section Initial Setup for more details.
- Select the 'Active Directory' option from the drop-down
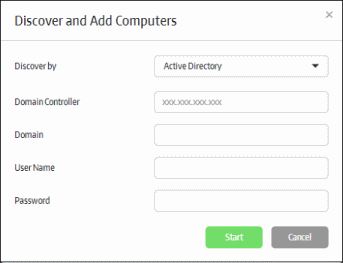
- Enter the required Active Directory configuration information and click the 'Start' button
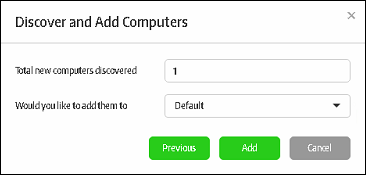
The management console will run a scan to discover endpoints and, if available, will show the number of endpoints discovered and provide the option to add them to endpoint groups. Refer to the sections 'Creating a New Endpoint Group' and 'Assigning Endpoints to Groups' for more details.

- Select your desired endpoint group from the drop-down and click the 'Add' button.
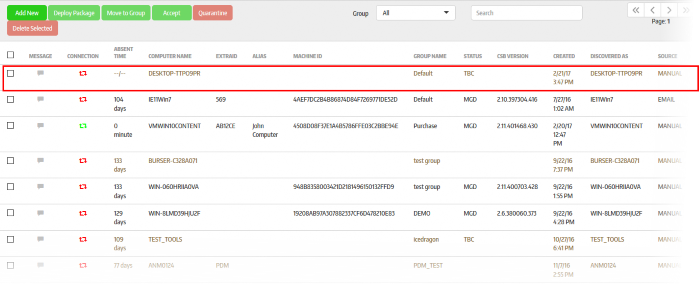
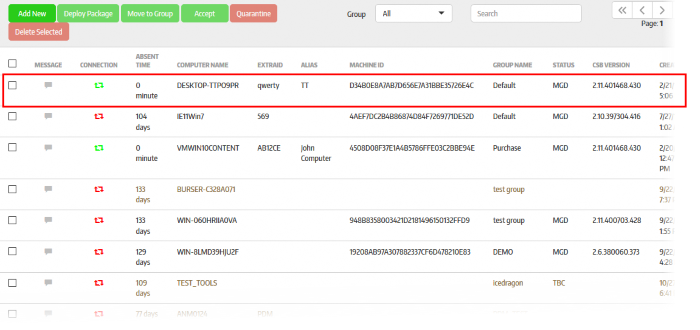
The newly enrolled endpoints will be added to the 'Computers' screen:
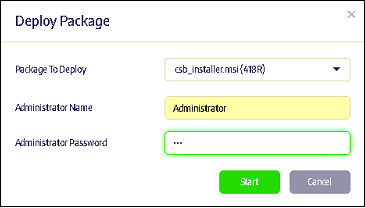
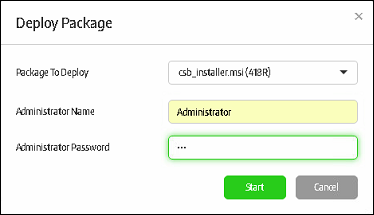
The next step is to deploy the CSB package that should be installed on the endpoints. Installing a package will allow you to assign policies and manage the endpoint.
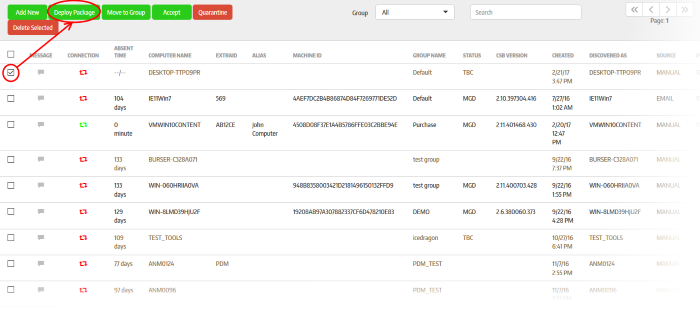
- Click the 'Deploy Package' button after selecting the endpoint
-
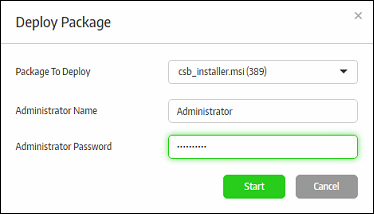
Select the package to deploy to the selected endpoint from the first field.
- Enter the Active Directory domain credentials and click the 'Start' button
The selected package will be deployed and the status of the endpoint will change to 'MGD TBC' - meaning it has to be accepted by the administrator. If the 'Auto accept' option was enabled while adding the organization, then enrolled endpoints will be automatically accepted. Refer to the section 'Adding a New Organization' for more details.
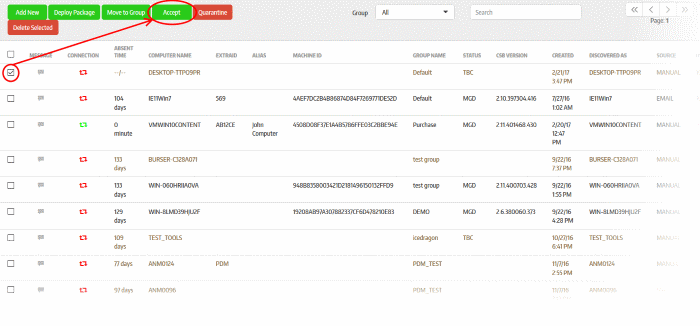
- Select
the endpoint and click 'Accept'
The 'Accept Confirmation' dialog will be displayed.
- Alias Name (Optional) - Specify an alternative name for the endpoint so you can easily track it in the console.
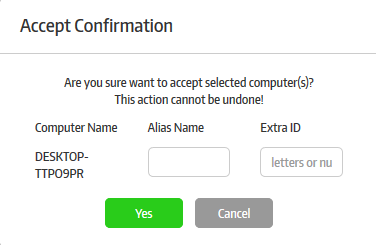
- Extra ID (Optional) - The 'Extra ID' is an identification tag assigned to the endpoint. This tag is added to the X-token of the HTTP header in the HTTP requests generated by secure URL applications from the endpoint. The console uses the extra ID and the machine ID to authenticate the endpoint during initial registration and subsequent connection requests. Extra IDs should be specified as a combination of letters and numbers in the text box.
The endpoint will be shown as connected and managed in the screen.
Refer to the sections Endpoints and Endpoints Groups and Policies to know how to manage endpoints and deploy polices.
Please note endpoint enrollment via WG will work only if CMC is not added to the domain during premise installation. Refer to the section Initial Setup for more details.
- Select the 'Work Group' option from the drop-down
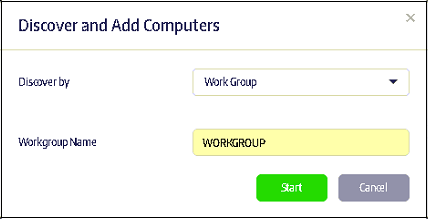
The management console will run a scan to discover endpoints. You then have the option to add discovered endpoints to an endpoint group. Refer to the sections 'Creating a New Endpoint Group' and 'Assigning Endpoints to Groups' for more details.

- Select the endpoint group from the 'Would you like to add them to' drop-down and click the 'Add' button.
The newly enrolled endpoints will be added to the 'Computers' screen:
The next step is to deploy the CSB package that should be installed on the endpoints. Installing a package will allow you to assign policies and manage the endpoint.
The 'Deploy Package' dialog will be displayed.
- Select the package to deploy to the selected endpoint(s) from the first field.
- Provide the credentials of the network and click the 'Start' button
The selected package will be deployed and the status of the endpoint will change to 'MGD TBC' - meaning it has to be accepted by the administrator. If the 'Auto accept' option was enabled while adding the organization, then enrolled endpoints will be automatically accepted. Refer to the section 'Adding a New Organization' for more details.
- Select the endpoint and click 'Accept'
The 'Accept Confirmation' dialog will be displayed.
- Alias Name (Optional) - Specify an alternative name for the endpoint so you can easily track it in the console.
- Extra ID (Optional) - The 'Extra ID' is an identification tag assigned to the endpoint. This tag is added to the X-token of the HTTP header in the HTTP requests generated by secure URL applications from the endpoint. The console uses the extra ID and the machine ID to authenticate the endpoint during initial registration and subsequent connection requests. Extra IDs should be specified as a combination of letters and numbers in the text box.
- Click 'Yes'
Refer to the sections Endpoints and Endpoints Groups and Policies to find out how to manage endpoints and deploy polices.
Enrollment via Network Address
Please note endpoint enrollment via
Network Address will work only if CMC is not added to the domain during
premise installation. Refer to the section Initial
Setup for more details.
- Select the 'Network Address' option from the drop-down
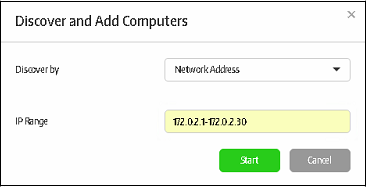
The management console will run a scan to discover endpoints. You will see the number of endpoints discovered and will have the opportunity to add them to an endpoint group. Refer to the sections 'Creating a New Endpoint Group' and 'Assigning Endpoints to Groups' for more details.
- Select the destination endpoint group from the drop-down and click the 'Add' button.
The next step is to deploy the CSB package that should be installed on the endpoints. Installing a package will allow you to assign policies and manage the endpoint.
The 'Deploy Package' dialog will be
displayed.
- Select the package to deploy to the selected endpoint(s) from the first field.
- Provide the credentials of the network and click the 'Start' button
The selected package will be deployed and the status of the endpoint will change to 'MGD TBC' - meaning it has to be accepted by the administrator. If the 'Auto accept' option was enabled while adding the organization, then enrolled endpoints will be automatically accepted. Refer to the section 'Adding a New Organization' for more details.
- Select the endpoint and click 'Accept'
The 'Accept Confirmation' dialog will be displayed.
- Alias Name (Optional) - Specify an alternative name for the endpoint so you can easily track it in the console.
- Extra ID (Optional) - The 'Extra ID' is an identification tag assigned to the endpoint. This tag is added to the X-token of the HTTP header in the HTTP requests generated by secure URL applications from the endpoint. The console uses the extra ID and the machine ID to authenticate the endpoint during initial registration and subsequent connection requests. Extra IDs should be specified as a combination of letters and numbers in the text box.
- Click 'Yes'
Refer to the sections Endpoints and Endpoints Groups and Policies to know how to manage endpoints and deploy polices.
- Click the 'Create Email Link' option from the drop-down:
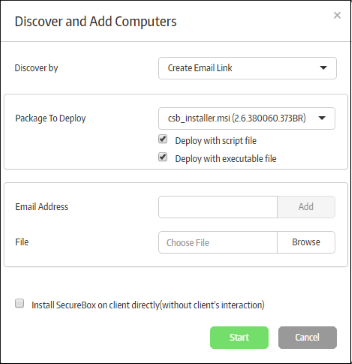
- Select the installer package from the drop-down
- Deploy with script file / Deploy with executable file - You have the option to install the package via script or executable.
- Enter the email address to which the CSB installer package download link will be sent and click the 'Add' button. Repeat the process to add more recipients.
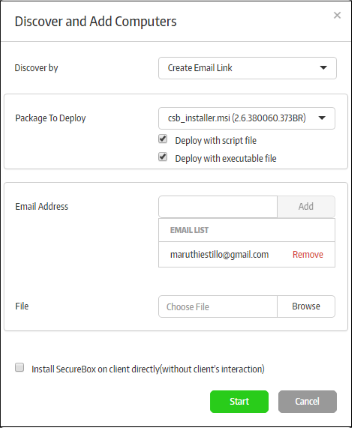
- For bulk enrollment, you can use the 'File' option. Recipient email addresses should be entered on each line of a .txt file. Click 'Browse', navigate to your file and click the 'Open' button. All imported recipients will be listed in the dialog:
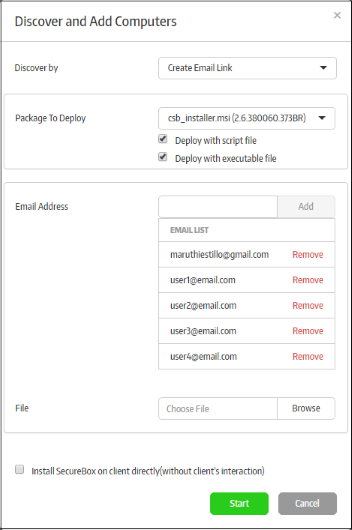
- To remove a recipient, click the 'Remove' link
- 'Install Secure Box on client directly (without client's interaction)' – If selected, the endpoint user will only see the installation progress bar. They will not be shown the EULA or the configuration page
- Click the 'Start' button
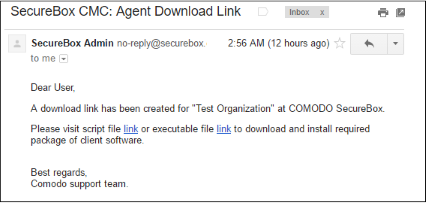
The user should click any of the links to download the CSB installer package and save it on the endpoint.
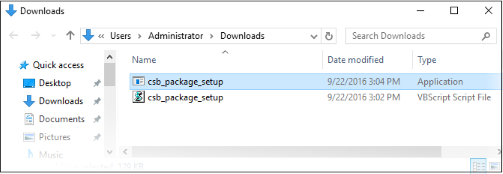
- Double-clicking on any package will start the installation on the endpoint:
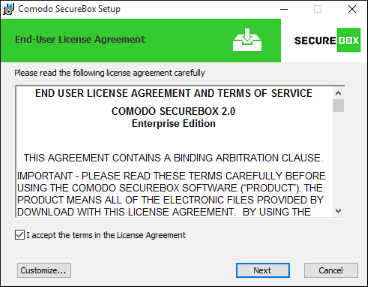
- Click the 'Customize' button to change CSB installation path. The default installation path is C:/Program Files (x86)/COMODO/Comodo SecureBox.

- The CMC server address and CMC customer ID are auto-populated and are required to apply policies configured in the management console. Administrators should complete the 'LDAP' and 'External IP address' fields if you have an 'on-premise' CMC installation.
- Next, read and agree to the license agreement then click the 'Next' button.

On completion of installation, an installation ID will be generated and will be displayed. The end-user can communicate the installation ID to the administrator for the identification of endpoint at the console.
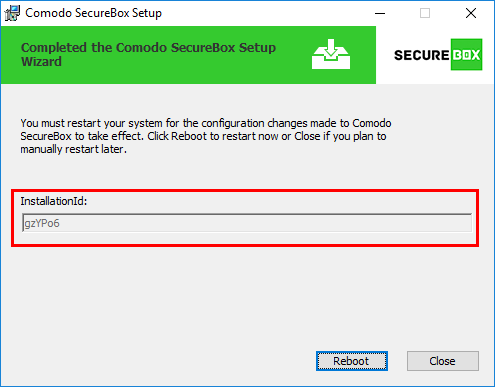
The endpoint needs to be restarted to complete the installation. After rebooting, the endpoint will appear on the 'Computers' screen as 'MGD TBC' - meaning it needs to be approved by an administrator. The installation ID generated at the endpoint will be displayed in the 'Status' column of the 'Computers' interface.
If the option is selected as 'Auto accept' while adding organization, then enrolled endpoints will be automatically accepted. Refer to the section 'Adding a New Organization' for more details.
- Select
the check box and click 'Accept'
The 'Accept Confirmation' dialog will be displayed.
- Alias Name (Optional) - Specify an alternative name for the endpoint so you can easily track it in the console.
- Extra ID (Optional) - The 'Extra ID' is an identification tag assigned to the endpoint. This tag is added to the X-token of the HTTP header in the HTTP requests generated by secure URL applications from the endpoint. The console uses the extra ID and the machine ID to authenticate the endpoint during initial registration and subsequent connection requests. Extra IDs should be specified as a combination of letters and numbers in the text box.
- Click 'Yes'
The endpoint will be automatically placed in the 'Default' group. To move it to a different group, first select the endpoint then click the 'Move to Group' button. See 'Assigning Endpoint to Groups' and 'Managing Endpoint Groups' if you need more help with groups.