Quick Start
This tutorial explains how staff can add end users who needs support, create organizations, add knowledge base articles and manage their time sheets.
Step 1 – Login to the Admin Console
To access the Service Desk Module, login to Comodo Dragon at https://platform.comodo.com/app/login
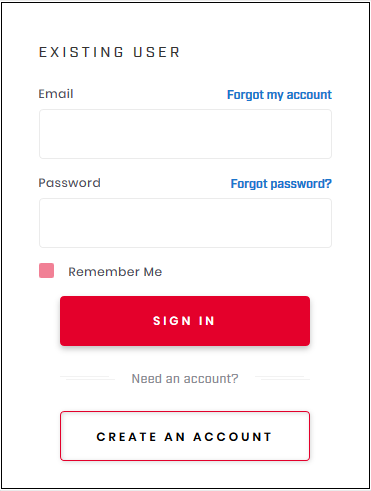
- Email - The email ID that you provided while registering your account.
- Password - Enter the credentials
- If you have forgotten your account details or password, click the link and complete the reset process
- If two-factor authentication is setup for the account then follow the on-screen instructions. The instructions will tell you how to configure the authentication application on your iOS or Android device
- Open the Google Authenticator app on your paired device and enter the displayed code. Please note this code changes frequently
- Click 'Sign In'
- Once logged-in, click 'Licensed Applications' at the top then 'Service Desk'
By default, Service Desk will open at 'Staff Panel' > 'Open Tickets'.
- Click > 'Staff Panel' > 'Users' > 'User Directory'
- New users can self-enroll then submit tickets at your customer facing client portal
- Your client portal URL has the format https://company-name.servicedesk.comodo.com.
- Users that self-enroll will be sent an account activation mail
- Admins can also manually enroll new users:
- Click 'Staff Panel' > 'Users' > 'User Directory' > 'Add New User' OR 'Import'
- All users, regardless of enrollment method, can be added to a customer as explained in step 3.
- You can set the default registration method for manually enrolled users in 'Admin Panel' > 'Settings' > 'Users'. See User Registration Settings in the Service Desk admin guide for more details.
- This section explains how to add individual users:
- Open the 'Staff Panel'> 'Users' > 'User Directory'
- Click the 'Add New User' link at the top
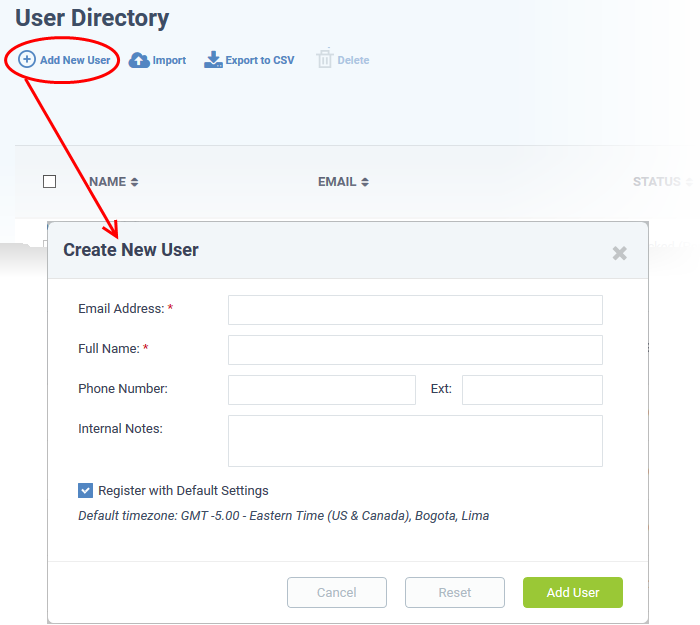
- Email Address: User's mail address. After registration, users can login to your support web portal using the email address as username.
- Full Name: The first and last names of the user.
- Phone Number: The contact number of the user.
- Internal Notes: Enter any notes regarding the user.
- Register with Default Settings: Select whether the registration should use the settings in 'Admin Panel' > 'Settings' > 'Users'
- Leave selected if you want to use the default settings.
- Deselect to choose a different registration method.
- See User Registration Settings in the Service Desk admin guide if you need help with this.
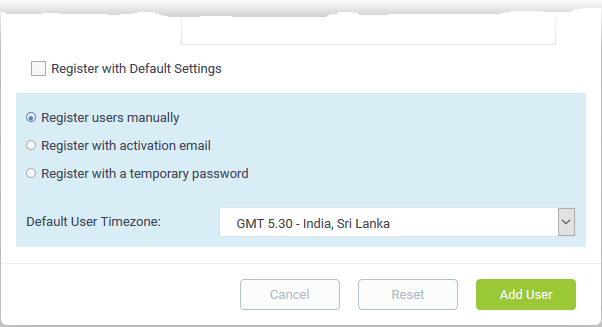
- Register users manually - The user is initially added a guest and needs to be manually registered afterwards. You can register a guest as follows:
- Click ‘Users’ > ‘User Directory’ > click on the name of the guest > Click the ‘Register’ button
- Register with activation email - The user is initially added as a guest and sent a mail which contains a link to register their account.
The link leads to your support web portal where the user will create a password and so register their account. After registration, the user can login and manage/view their tickets.
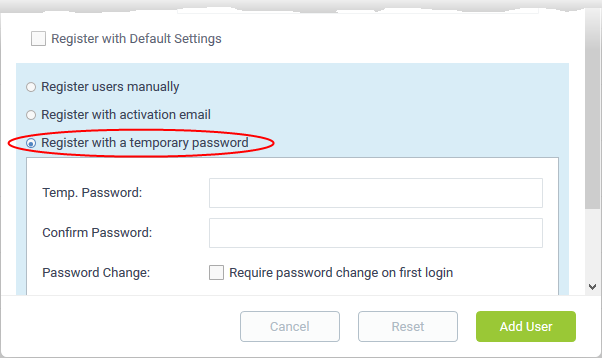
- Register with a temporary password - Create a temporary account password which registers the user immediately.
You need to send the password and URL of your support portal to the user. This allows them to login and manage their tickets.
- 'Require password change on first login' - Enable to force the user to create a new password after first login (recommended):
- Click
'Add User'.
The user is added as a guest or registered user depending on your selection above. After a user is registered, you can manage their account and assign them to a customer company.
You can also import users from a .CSV file by clicking the 'Import' button. The process of enrolling users is the same as explained above. See Manage Users and Customers for more details.
Step 3 - Create new customers and assign users to customers
- A customer is an organization, usually a company or business from whom you will accept tickets. 'Users' are the people who actually submit the tickets.
- You can assign users to a customer in the 'User Directory' interface.
There are two options to add a customer:
- Create
a customer in the Comodo Dragon Interface (preferred)
Customers added to CD are fully managed, which means they are also available in other CD modules (Service Desk, Endpoint Manager, Dome Shield).
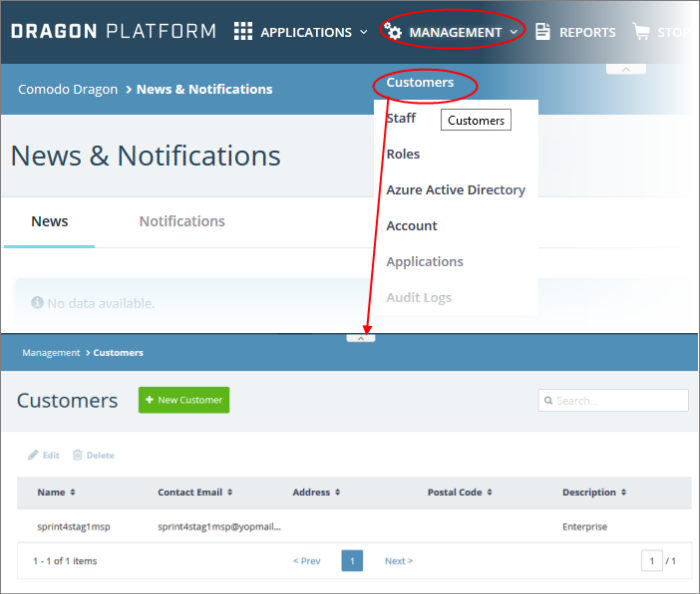
- Click 'Management' > 'Customer' > 'New Customer' to create a customer in CD.
- Create
a customer in Service Desk
Customers added directly to Service Desk are 'standalone' customers. They are not visible in CD nor available to other CD modules.
- Click 'Staff Panel' > 'Users' > 'Customers' > 'Add New Customer' to add a customer to Service Desk.
You can also create a new customer directly from a user's detail screen.
Add a new customer
Add a customer in CD interface
|
Note: Only CD MSP users can add multiple customers. CD Enterprise users can add standalone customers in the SD interface. |
- Log in at https://platform.comodo.com/app/login
- Click 'Management' > 'Customers'
- The interface shows any existing customers added to Comodo Dragon:
- Click the 'New Customer' button:
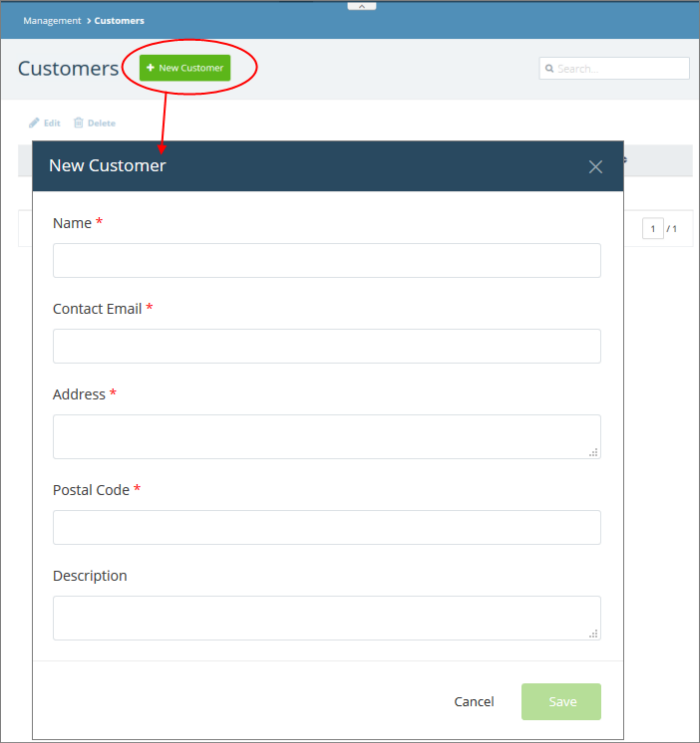
- Complete all mandatory fields then click 'Save'.
- Click
the 'Customers' button in the main navigation to view your new
customer.
Add a standalone customer to Service Desk
- Click 'Staff Panel' > 'Users' > 'Customers'
- Click 'Add New Customer' at the top
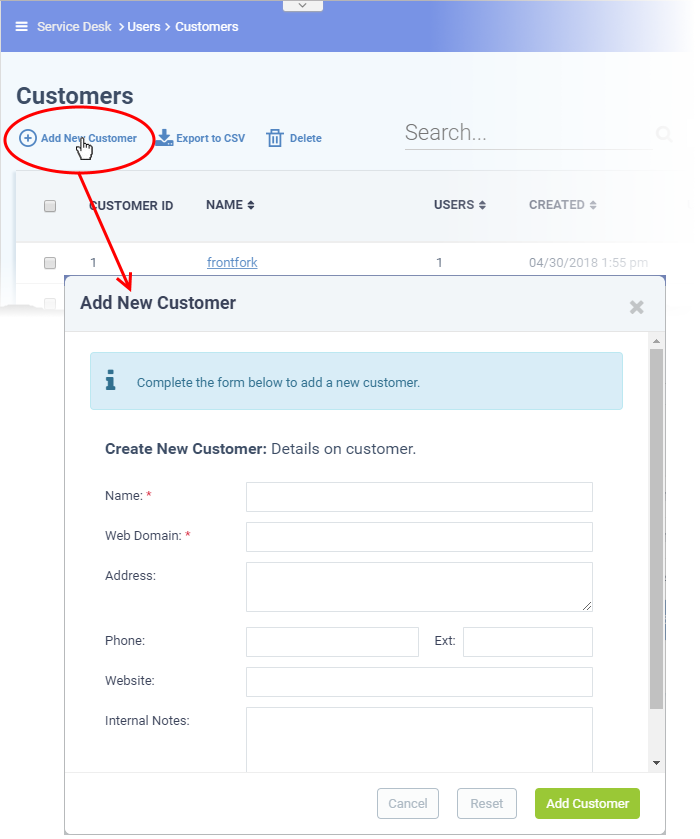
- Name: Enter a label for the customer company.
- Web Domain: Enter the name of the email domain used for employees of the company.
- Service Desk creates two new users with email addresses in this domain - 'Monitor Agent' and 'Patch Management Agent'. These accounts are used to receive automatically generated tickets from Endpoint Manager.
- They also assign to the customer any guests who submit tickets from an email at their domain.
- Address and Phone: Contact details of the company.
- Website: URL of the customer's public-facing / marketing website.
- Internal Notes: Enter any comments about the customer.
- Click 'Add Customer' after completing the form.
Staff can now configure customer settings, users and billing rates. See 'Manage Customers' later in this guide for help with this.
Assign users to a customer
- Open the 'Staff Panel'
- Click 'Users' > 'User Directory'
- Click on the name of a user to open their details page.
- Click the 'Add Customer' link as shown:
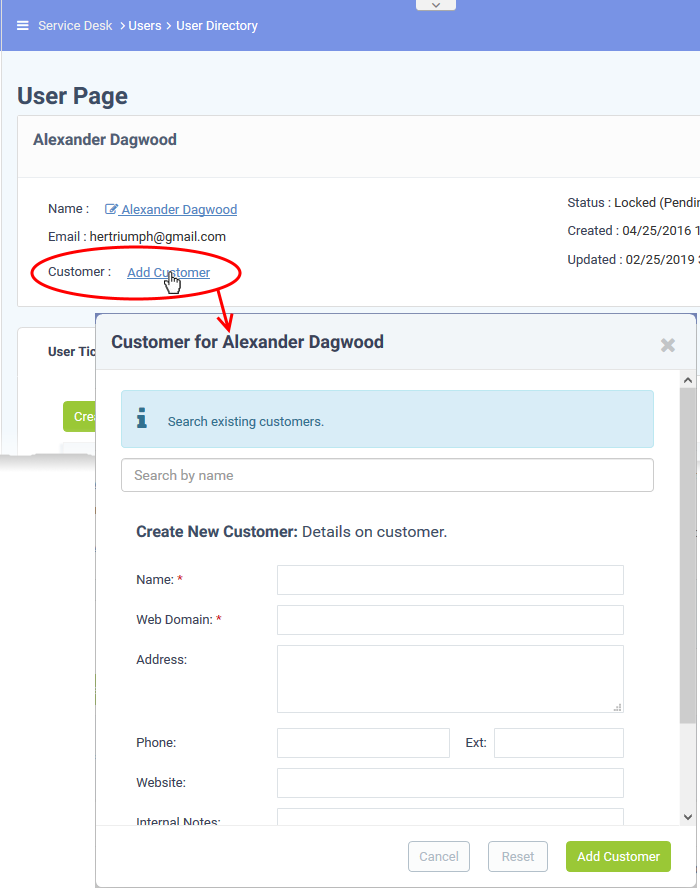
You can assign the user to an existing customer or to a new customer.
- Add
user to an existing customer - Type the first few
letters of the customer name in the search field. Select from the
suggestions.
A confirmation appears after choosing the customer:
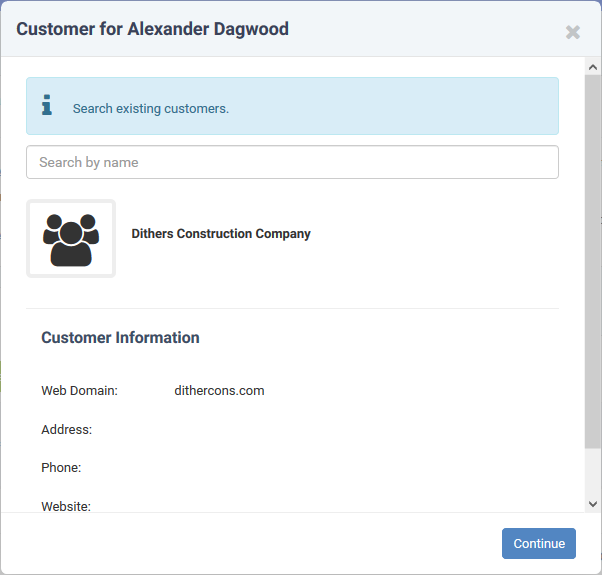
- Click 'Continue'.
The user will be added to the customer.
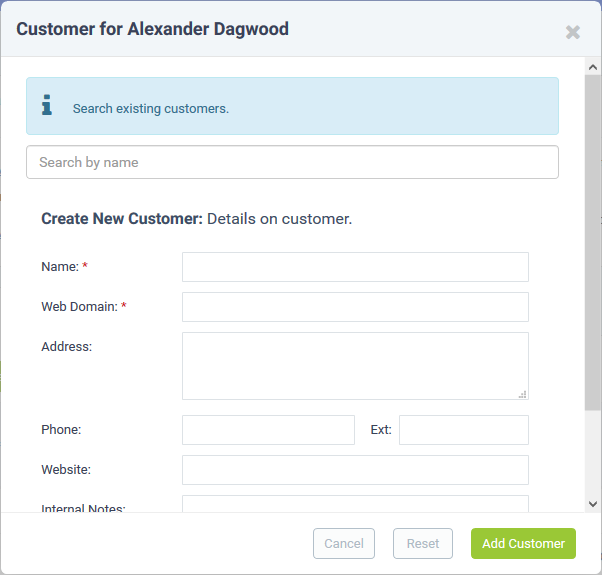
- Alternatively, complete all fields to create a new customer, then click 'Add Customer':
-
See Manage Customers if you need help to create a new customer.
The new customer and user are added to Service Desk.
Click 'Staff Panel' > 'Tickets' to view tickets sent in by users:
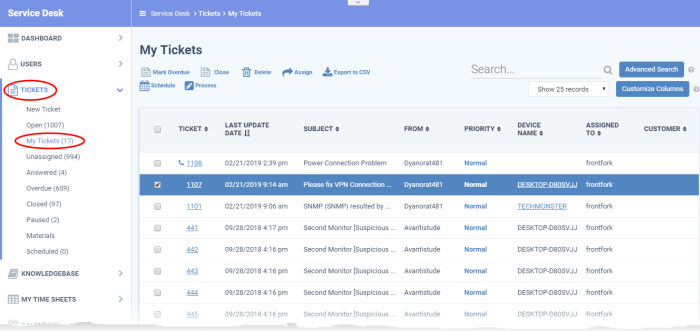
- Use the menu on the left to filter tickets by status. Filters include 'Open', 'Answered', 'Unassigned', 'My tickets', 'Overdue', 'Closed' and 'Paused'. You can customize the columns shown in each view. See 'Manage Tickets' to find out more.
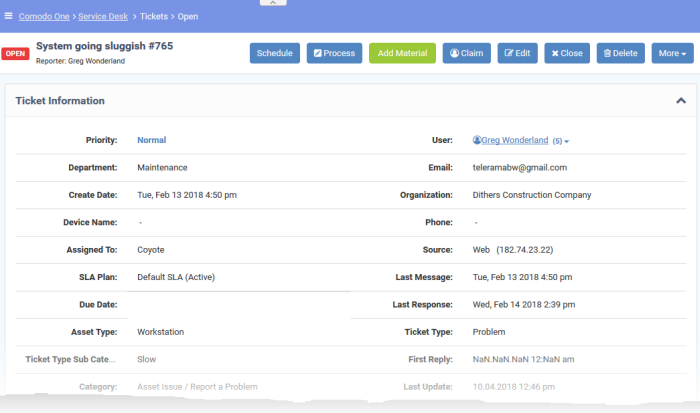
- Click any ticket number to open the ticket's detail page.
- The details page lets you view ticket history, reply to the ticket, reassign it, add materials, and more.
-
The structure of your tickets can be customized as required in 'Admin Panel' > 'Settings' > 'Tickets'. See 'Ticket Settings and Options' help with this.
The 'Knowledgebase' allows you to:
- Create a set of FAQs which will be shown on your support portal to help users find answers to common problems.
- Create FAQ categories. FAQs must be placed in a category.For example, you can create a category called 'Hardware' and place all hardware related FAQs in it.
- Create canned responses. Canned responses are pieces of text which can be quickly pasted into ticket replies.
To create an FAQ:
-
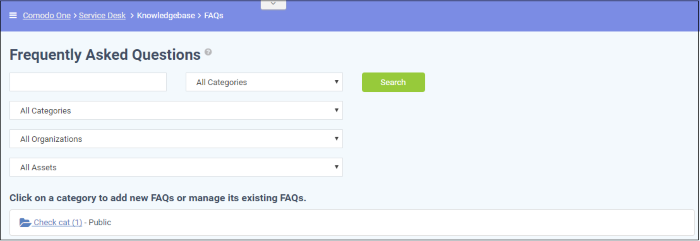
Click 'Staff Panel' > 'Knowledgebase' to open the interface:
2. Create an FAQ category.
- Individual FAQs must be assigned to a category.
- Go to 'Knowledgebase' > 'Categories' to view and edit available categories.
- If no suitable categories exist for your FAQ then you should create one.
- Make sure the category type is set to 'Public'.
2. Create your FAQ
See 'Manage Knowledgebase' for further help.
- Go to 'Knowledgebase' > 'FAQs' > Click the category to which you wish you add your FAQ
- Click 'Add New FAQ' and write your FAQ into the form
- Select 'Public' as the 'Listing Type'
- Click 'Add FAQ' to publish to the customer portal.
Step 6 - Manage Your Time Sheets
The 'My Time Sheets' interface allows you to:
- Create time sheets to record your activities
- Submit time sheets for approval
- You can enter activities manually and / or import tasks from tickets
To create a time sheet
- Click 'My Time Sheets' on the left then 'New Time Sheet'
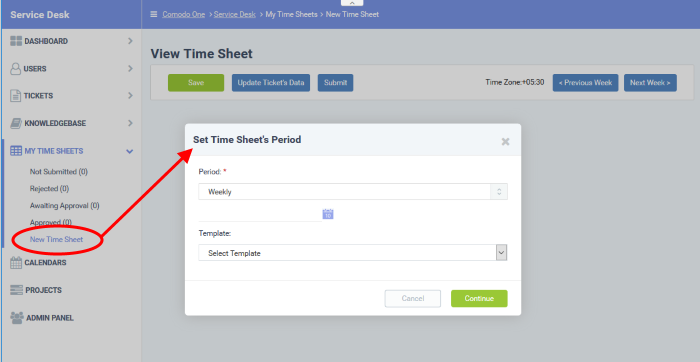
- Select the period from the 'Period' drop-down. The available options are:
- Weekly - Allows you to select current week or any previous/forth coming week starting from Sunday to Saturday, by clicking the clicking the calendar icon beside it.
- First Half of Month - Allows you to include the first fortnight of the current month or any month.
- Second Half of Month - Allows you to include the second fortnight of the current month or any month.
- Monthly - Allows you to include a full month from 1st to 30th/31st of the current month or any month.
- Click 'Done' after selecting your preferred period.
- Select the time sheet template, if required, from the 'Template' drop-down. The templates that are available here are configured in the Admin panel under 'Staff' > 'Timesheet Templates'
- Click 'Continue' after selecting the template (if required) and date range to be covered by the sheet.
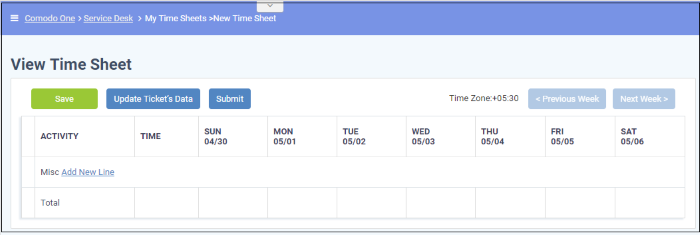
A new sheet will be added for the date range with a status of 'Not Submitted'. You can update activities on the sheet and click 'Save'
To update a time sheet
- Click
the time sheet to be updated from the 'Time Sheets' interface
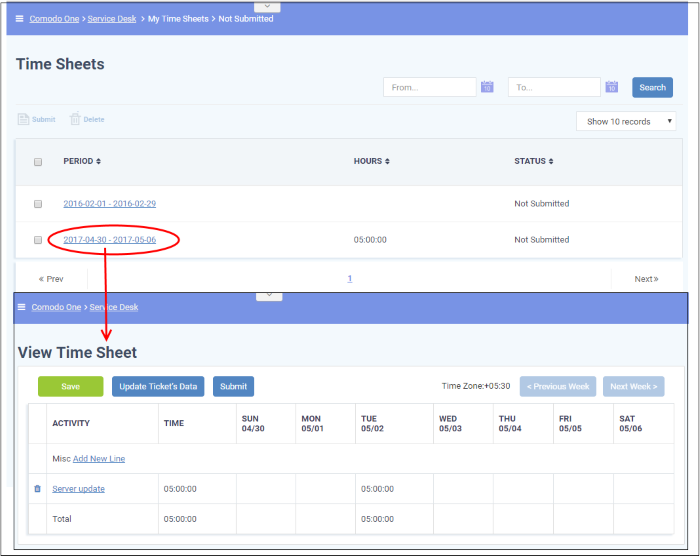
The screen for updating the time sheet will open, displaying each activity in a line, total time spent on it and time spent on them on each day in the time period covered by the time sheet. The screen displays the first week, within the period by default. To view the details on the previous or next weeks, use the 'Previous Week' and 'Next Week' buttons at the top.
- To import the tickets you worked on and time spent, within the time period, click he 'Update Ticket's Data' button.
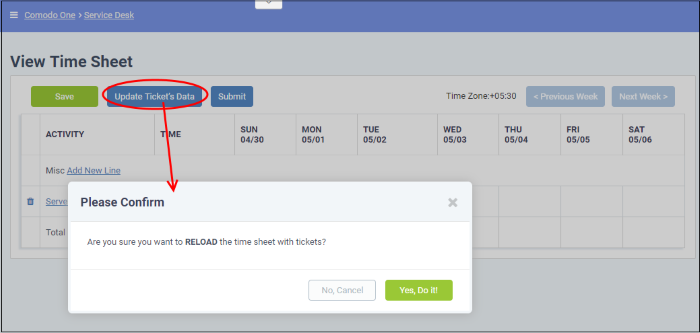
- Click 'Yes, Do it!' in the confirmation dialog
The sheet will be automatically updated with all tickets and time spent covered by the time sheet period. You can repeat this process during the time period to update the sheet with the latest details.

- Click 'Save' for your changes to take effect
- To manually add an activity, click 'Add New Line'
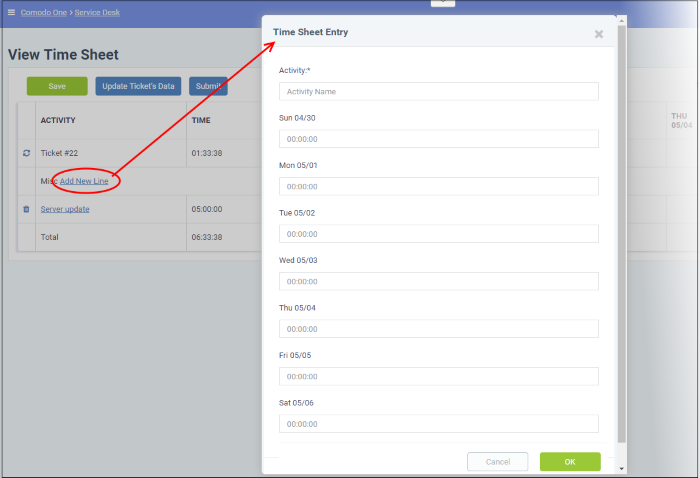
The 'Time Sheet Entry' dialog will appear.
- Enter the name of the Activity in the Activity field
- Enter the time spent on the activity on a day, by clicking inside the field below the day and selecting the hours, minutes and seconds from respective sliders.
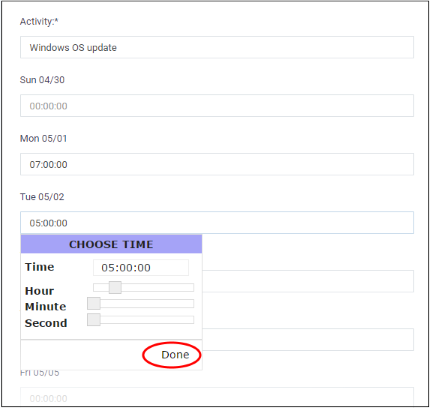
- Click 'Done'
- Repeat adding the time for each day you worked on the same activity
- Click 'OK' in the 'Time Sheet Entry' dialog.
The activity will be added to the list.
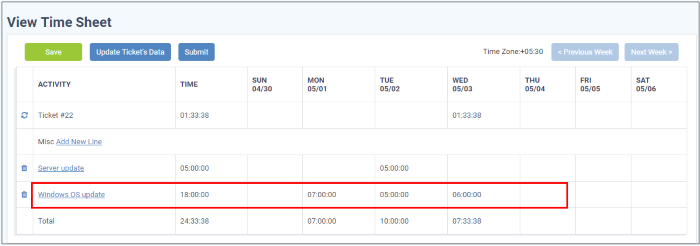
- Click 'Save' for your changes to take effect
You can update the activity at any time by clicking on it.
- To remove an activity, click the trash can icon beside it
- To
submit the sheet for administrator approval, click the 'Submit'
button from the top.


