Customize Name Server and CDN Zone
- Your customers need to configure their website DNS setting to use the CDN service and web application firewall (WAF).
- There are two ways to configure DNS settings:
- Option A - Change the name servers of the domain to Comodo DNS servers. The domain will then use Comodo authoritative DNS.
- Option B - Create DNS 'CNAME' and 'A' records for the domain in cWatch. The admin needs to add these records to their domain's DNS management page. This means the domain will continue to use its existing authoritative DNS.
- cWatch generates 'NS', 'CNAME' and 'A' records for your customer to configure the DNS settings of their website as explained above
- Help to configure these DNS settings is available to your customers in 'CDN' > 'Settings' > 'Activation'.
- See https://help.comodo.com/topic-285-1-848-13908-Activate-CDN-for-a-Website.html in the website admin guide for more details.
- By default, cWatch provides the NS and CNAME records with 'Comodo' branding in the domain names
- You have the option to specify your own name servers, so the NS records generated for your customers do not feature Comodo branding.
- You can also specify a sub-domain for creating the CNAME record.
- You should configure the DNS settings of your name servers to point to Comodo name servers and add a new NS record for CDN subdomain generated for your customers.
Customize name server and CDN settings
- Click the 'Profile' icon at top-right and choose 'Settings'
- Click
the key icon
 in the left-menu
Or
- Click the menu button at top-right and select 'Access'
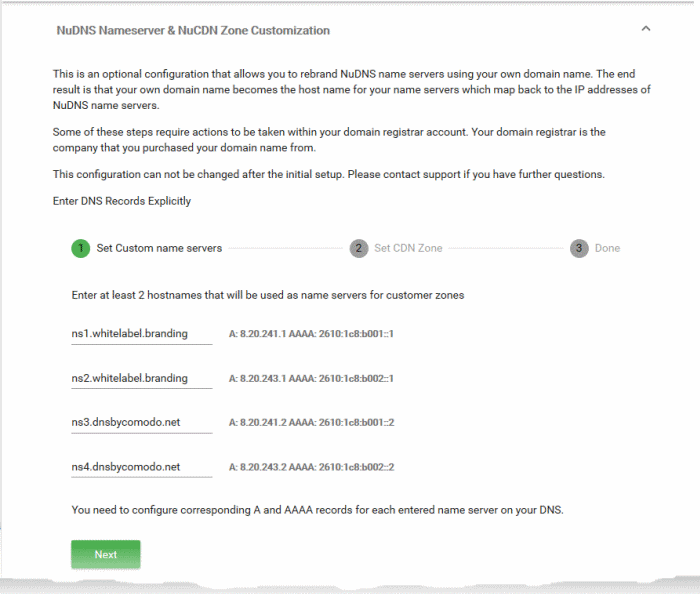
- Click the 'NuDNS Nameserver & NuCDN Zone Customization' stripe
The name server / CDN subdomain customization wizard starts:

- Enter the host names of your name severs (at least two) replacing the existing domain names
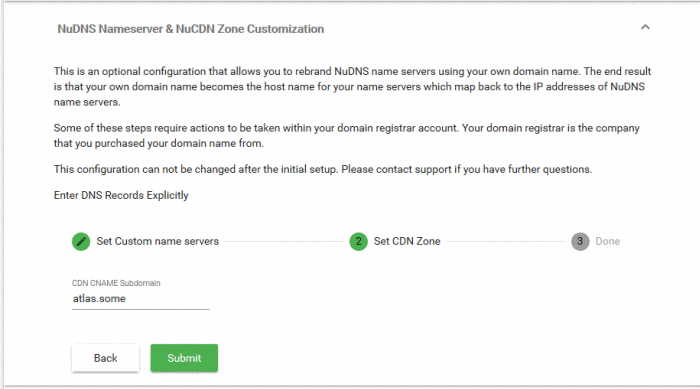
- Click 'Next' The wizard moves to step 2 - 'Set CDN Zone'

- Enter a subdomain name of your choice
- This is used to create a CNAME record for the CDN subdomain for your customers.
- Click 'Submit'

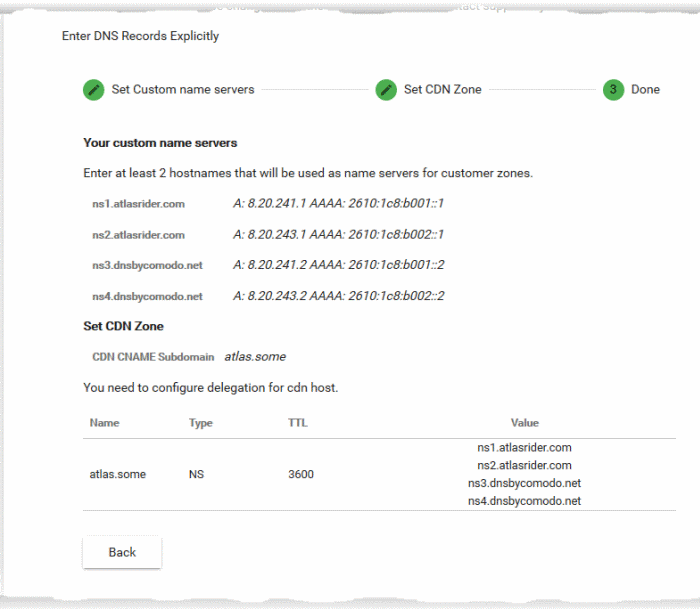
- Note down the A and AAAA records for each name server you specified
- Go to your name server's DNS management page and update their 'A' and 'AAAA' records
- Add a new NS record on the name server with the values given under 'Set CDN Zone'
- Once done, the DNS configuration instructions in the customer portal will be updated with the NS, CNAME and A records as you configured
- Your customers can use them to configure their DNS settings for their websites to enable CDN and WAF services.


