


Manage Live Lists
- The 'Live List Management' interface lets you create and manage 'Live Lists', 'Range List' and 'IP Range List'.
- A single list can have several 'Types', where different sets of values for the same field are used in different queries and correlation rules.
- For example, you can create a live list called 'IP Blacklist'. The list could have two 'types' - 'Internal' (blacklisted IPs of internal hosts) and 'External' (blacklisted IPs of external hosts).
- The two types can be used separately in queries and rules.
- You can also define the validity period of a value.
Please note that the number of lists that can be active at a time depends upon your subscription.
|
Note: The live list management interface only allows you to create and manage lists for various fields. The values for the fields can be manually added from the respective 'List Content Management' interface. See Manage Live List Content, Manage Range List Content and Manage IP Range List Content for more details. |
- To open the 'Live List Management' interface, click the 'Menu' button from the top right, choose 'Lists' options and then click 'Live List Management'.
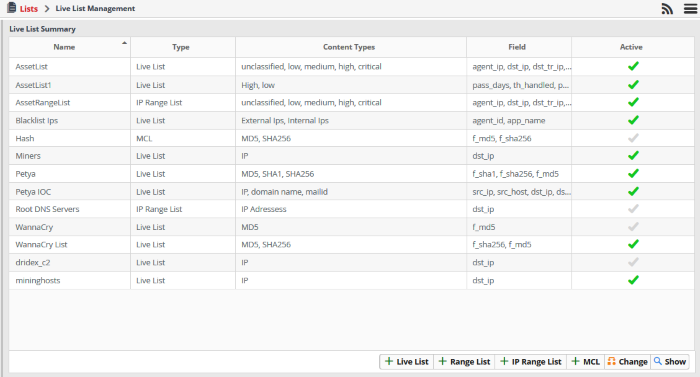
The interface shows all existing live, range and IP lists. You can add new lists, enable or disable lists, and view list values.
Please use the following links to learn more about:
A new live list can be created by specifying a name, adding types and defining the field for which the values are to be populated. The values for the field can be specified only from the 'Live List Content Management' interface. Explanations on adding values to the list types are available in Manage Live List Content.
To create a new list
- Click the 'Add' button at the bottom right of the 'Live List Management' interface.
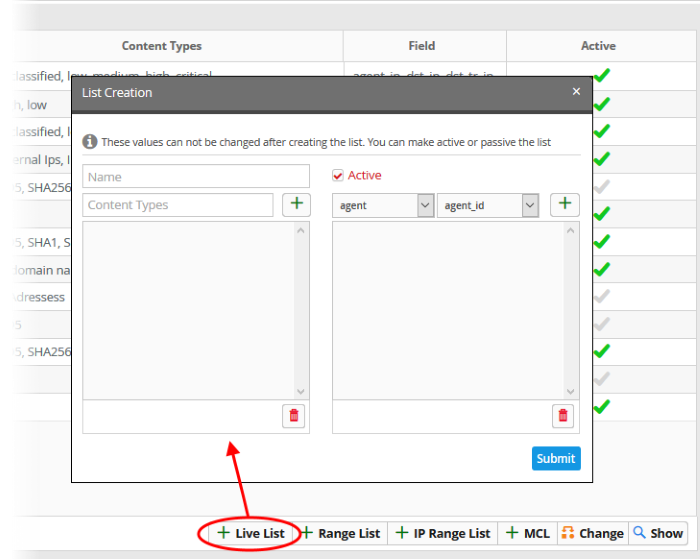
The 'List Creation' dialog will open.
- Enter a name for the live list in the 'Name' field.
- Add
a name for a list type to be create in the 'Content Type' text box and click
the
 button. For example, you can enter 'Internal' or 'External', for which you can define IP addresses in the live list content page.
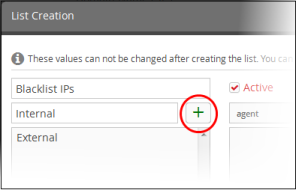
- Repeat the process to add more types for the types.
- To
remove a type, select the type from the list and
click the
 icon.
icon.
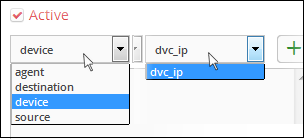
- Specify the field for which the values are to be populated in the list by selecting the 'Field Group' then choose the field from the respective drop-downs and click the
 button. Please note that for live lists, the full list of 'Field Group' will be available for selection.
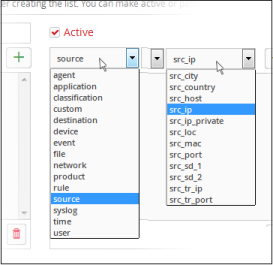
The field will be added to the list of fields in the right pane.
- Repeat the process if you want to add more fields.
- To
remove a field added by mistake, select the field from the list and
click the
 icon.
icon.
- Leave the 'Active' checkbox selected if you want the list to be active on creation. If you want to turn the list active at a later time, clear this checkbox.
- Click the 'Submit' button.
|
Caution: The name, types and field values once configured for a list cannot be changed or removed later. Please re-check these details before clicking 'Submit'. |
The list will be added to cWatch.
The next step is to manage the values for the list. See Manage
Live List Content for more details.
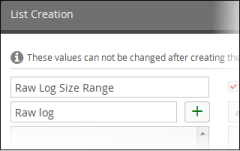
- A new range list can be created by specifying a name, adding types and defining the field for which the values are to be populated.
- The values for the field can be specified only from the 'Range List Content Management' interface.
- Explanations on adding values to the range list types are available in Manage Range List Content.
To create a new range list
- Click the 'Range List' button at the bottom right of the 'Live List Management' interface.
The 'List Creation' dialog will appear.
-
Enter a label for the range list in the 'Name' field.
- Add
a name for the range list type in the 'Type' box. Click the to save the type.
- Repeat the process to add more types for the range list.
- To
remove a type, select the type from the list and
click the trash can icon .
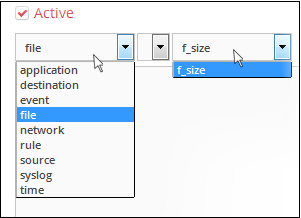
- Specify the field for which the values are to be populated in the list by selecting the field group then choose the field from the respective drop-downs and click the button.
- Please note that for range lists, only appropriate 'Field Groups' will be available.
- That is, the fields available for a field group can be configured for a range.
- For example, if you choose 'File' field group, then the field available for this is 'f_size' for which you can provide a minimum and maximum size.
The field will be added to the list of fields in the right pane.
- Repeat the process if you want to add more fields.
- To
remove a field, select it from the list and
click the icon.
- Leave the 'Active' checkbox selected if you want the range list to be active on creation. If you want to turn the range list active at a later time, clear this checkbox.
- Click the 'Submit' button.
|
Caution: The name, types and field values once configured for a range list cannot be changed or removed later. Please re-check these details before clicking 'Submit'. |
The range list will be added to cWatch. The next step is to manage the values for the range list. See Manage Range List Content for more details.
A new IP
range list can be created by specifying a name, adding types and
defining the field for which the values are to be populated. The
values for the field can be specified only from the 'IP Range List
Content Management' interface. Explanations on adding values to the IP range
list types are available in Manage
IP Range List Content.
To create a new IP range list
- Click the 'IP Range List' button at the bottom right of the 'Live List Management' interface.
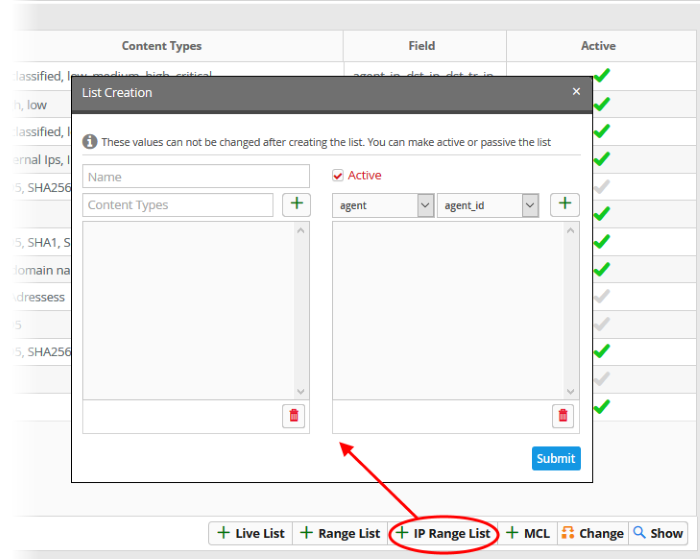
The 'List Creation' dialog will appear.
- Enter a name for the IP range list in the 'Name' field.
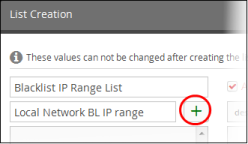
- Add
a name for the IP range list type to be created in the Type text box
and click the button. For
example, you can enter 'Local Network BL IP range' or 'External
Network BL IP range', for which you can define the local IP network
range in the IP range list content interface.
- Repeat the process to add more types for the IP range list.
- To
remove a type, select the type from the list and
click the icon.
- Specify the field for which the values are to be populated in the list by selecting the 'Field Group' then choose the field from the respective drop-downs and click the button. Please note that for IP range lists, only appropriate 'Field Groups' will be available.
That is, the fields available for a field group can be configured
for an IP range. For example, if you choose 'Agent' field group,
then the field available for this is 'agent_ip' for which you can
provide a start and end IP range.
The field will be added to the list of fields in the right pane.
- Repeat the process if you want to add more fields.
- To
remove a field, select the field from the list and
click the icon.
- Leave the 'Active' checkbox selected if you want the IP range list to be active on creation. If you want to turn the IP range list active at a later time, clear this checkbox.
- Click the 'Submit' button.
|
Caution: The name, types and filed values once configured for an IP range list cannot be changed or removed later. Please re-check these details before clicking 'Submit'. |
The IP Range List will be added to cWatch. The next step is to manage the values for the range list. See Manage IP Range List Content for more details.
Changing activation state of lists
Lists can be switched between active and inactive states at any time. The inactive lists do not feed the values to the event queries and the correlation rules in which they are used.
To change the active/inactive state of a list
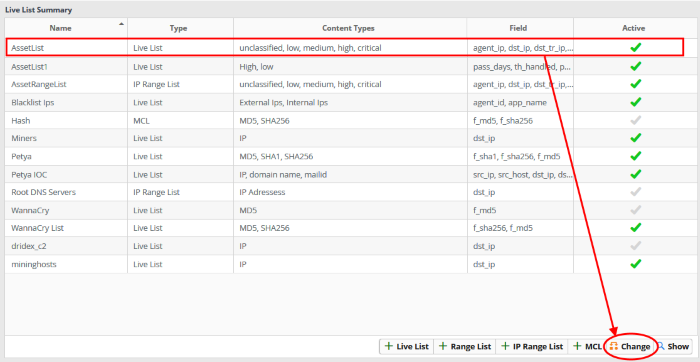
- Choose
the list from the 'Live List Summary' interface and click the
'Change'
 button at the bottom right.
A
confirmation dialog will open.
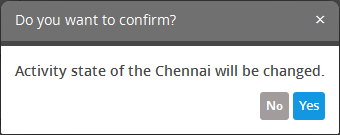
- Click 'Yes' to confirm the change.
The change in
the state of the list will be indicated under the 'Active' column in
the 'Live List Summary' interface.
Viewing
the values entered for a list
Administrators can view and edit values for all list types.
To view the values in a list
- Choose
the list from the 'Live List Summary' interface and click the 'Show'
 button at the bottom right.
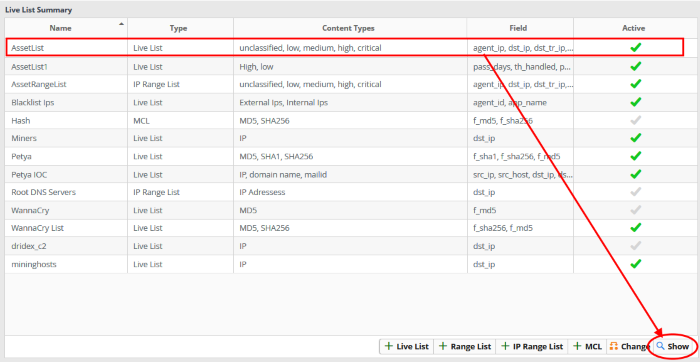
The respective 'List Content Management' interface will open with a list of values added to the list.
See Manage Live List Content, Manage Range List Content and Manage IP Range List Content for more details on adding new values and editing existing values.
Create New Multiple Column Lists
- A new Multiple Column List (MCL) can be created by specifying a name, adding types and defining the field for which the values are populated.
- You can view more than one range of IPs using this interface.
- For example, If you want to track two lists of IPs in a incident, you can add IPs that spread virus as one list and IPs that are infected as another list in the MCL interface.
- The values for the field can be specified from the 'Live List Content Management' interface.
- Explanations on adding values to the list types are available in Manage Multiple Column Lists.
To create a new list
- Click the 'MCL' button at the bottom right of the 'Live List Management' interface.

The 'List Creation' dialog will open.
- Enter a name for the MCL list in the 'Name' field.
- Add
a name for a list type to be created in the 'Content Type' text box
and click the button. For example, you can enter 'Internal' or
'External', for which you can define IP addresses in the MCL list
content page.
- Repeat the process to add more types for the live list.
- To
remove a type, select the type from the list and click the icon.
- Specify
the field for which the values are to be populated in the list by
selecting the 'Field Group' then choose the field from the
respective drop-downs and click the button. Please note that for
live lists, the full list of 'Field Group' will be available for
selection.
The field will be added to the list of fields in the right pane.
- Repeat the process if you want to add more fields.
- To
remove a field added by mistake, select the field from the list and
click the icon .
- Leave the 'Active' checkbox selected if you want the list to be active on creation. If you want to turn the list active at a later time, clear this checkbox.
- Click the 'Submit' button.
|
Caution: The name, types and field values once configured for a list cannot be changed or removed later. Please re-check these details before clicking 'Submit'. |
The list will be added to cWatch. The next step is to manage the values for the list. You can manage these MCL lists only by clicking 'Show' button. See Create the Multiple Column Lists for more details.