


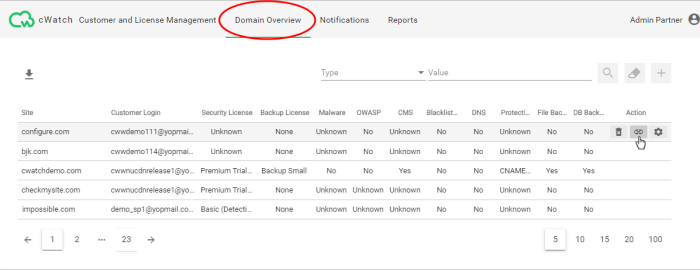
Domain Overview
- Click 'Domain Overview' in the top-menu
- The domain overview is a single pane of glass through which you can monitor the health of all customer websites.
- It shows the security status of managed sites, and provides a launchpad from which you can investigate and configure each site's protection
- You can login to a customer's cWatch account from here, without needing their username and password. This is useful for troubleshooting and configuration.
- You can also remove customer sites that no longer need cWatch protection.
|
Websites - Column Descriptions |
|
|---|---|
|
Column Header |
Descriptions |
|
Site |
The URL of the website. |
|
Customer Login |
The customer account with which the website is associated.Security License |
|
The type of cWatch security license associated with the domain.
|
|
|
Backup License |
The type of cWatch backup license associated with the domain. Storage space and backup/recovery options depend on the license type.
|
|
Malware |
Whether or not threats were found on the site by the most recent virus scan |
|
OWASP |
Whether or not any vulnerabilities in the Open Web Application Security Project (OWASP) top-ten were found by the most recent scan. |
|
CMS |
Whether or not any vulnerabilities specific to the content management system (CMS) were found. |
|
Blacklisted |
Whether or not the site is present on any lists of dangerous websites. Monitored blackists include Google Safe Browsing, Phishtank and Comodo Valkyrie. |
|
DNS |
Whether or not Comodo DNS is enabled on the site. Comodo DNS is required if you want to take advantage of the CDN and WAF services. |
|
Protection |
Whether or not CDN protection is enabled. |
|
CDN |
The method by which the content delivery network is activated on the site.
|
|
File Backup |
Whether or not the website’s files and folders are backed up by the cWatch backup service. |
|
DB Backup |
Whether or the website’s database is backed up by the cWatch backup service. |
|
Actions |
Controls to login to the customer portal, configure site malware scans, and remove the site from protection. See the following sections for help with these actions: |
See the following sections for more help with the interface:
- The fields at top-right let you create custom filters:

- Select your filter category from the 'Type' drop-down
- Enter / select your search criteria in the 'Value' filed
- Click the '+' icon to add more filter conditions
- Click the magnifying glass icon to filter the websites based on your search criteria
- Click the eraser icon to clear the filters and view the complete list of websites
- Click the 'Domain Overview' link in the top-menu
The interface shows managed websites along with license and scan details.
- Apply any filters you require. See Filtering Options above if you need help with this.
- Click the 'Download' arrow at the top-left of the list
- This will generate a CSV file of the sites you requested.
Login to a Customer Account and Manage their Websites
- Click the 'Domain Overview' link in the top-menu
The interface shows managed websites along with license and scan details.
- Identify the website you want to manage.
-
Click the chain link button
 in the 'Actions' column
- This opens the dashboard of the customer to whom the site is registered.
- You can perform all management actions on customer sites from this interface. This includes malware scans, malware removal requests, custom firewall rules configuring backups and more. See the cWatch admin guide at https://help.comodo.com/topic-285-1-848-11000-Introduction-to-Comodo-cWatch-Web-Security.html for detailed information on the products capabilities.
Configure Customer Website for cWatch Protection
- Click the 'Domain Overview' link in the top-menu
The interface shows managed websites along with license and scan details.
- Identify the website you want to manage
- Click
the gear wheel button
 in the 'Actions' column
- This opens the domain settings screen for the site:
The settings screen contains three tabs:
- Malware Scanner - Activate virus scan on the website.
- CDN - Configure CDN cache management settings for the site.
- SSL Certificate - Upload the SSL certificate used to secure the site if it is using HTTPS
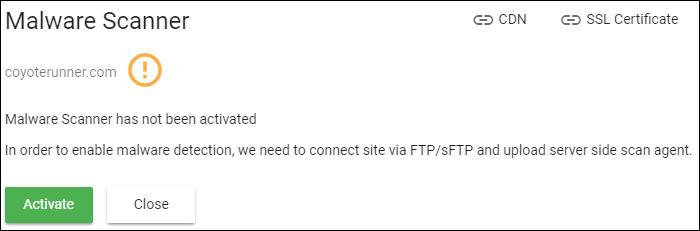
Activate Malware Scanner for a Website
- You need to upload the cWatch agent to the site to activate malware scans.
- You need to provide access details to the site if you want cWatch to automatically upload the file.
- Alternatively, you can simply download the agent and copy it to the site manually.
Activate the malware scanner
- Click the 'Domain Overview' link in the top-menu
- Identify the website on which you want to activate malware scans
- Click
the gear wheel in the 'Actions' column
- Click the 'Malware Scanner' tab on the top-right if it is not already open
- Click 'Activate'
The activation wizard starts:
- Complete the all fields in 'Step 1 - Enter FTP Credentials and click 'Enable Scanner'
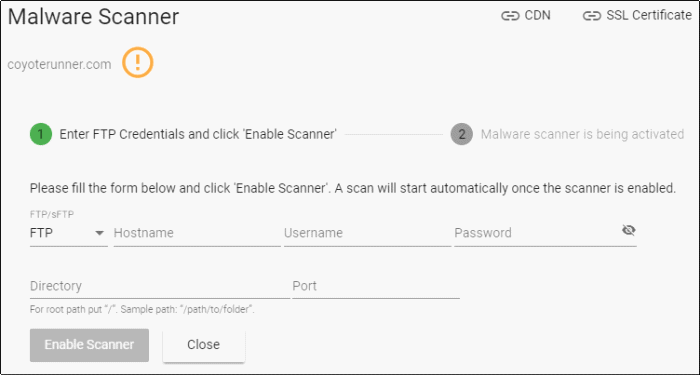
- Connection Type - Select 'FTP' or 'SFTP' depending on the server type used by the website
- SFTP uses an encrypted connection
- Hostname - The IP address or hostname of the server
- Username / Password - Login credentials to the server
- Directory - Location to which cWatch should upload the scanner agent. This must be publicly accessible
- Port - The server port to which cWatch should connect to upload the agent
- Click 'Enable Scanner'
- cWatch will upload the agent and activate the malware scanner.
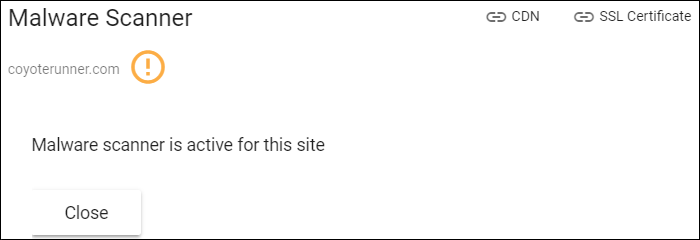
- Once done, cWatch will run scheduled scans on all files hosted on the website. The site admin can also start scans on the site from the 'Malware Scans' page of the customer portal. See http://help.comodo.com/topic-285-1-848-11011-Malware-Scans.html for more details on this.
Configure CDN Cache Management Settings for a site
- The Content Delivery Network (CDN) improves performance and security of client websites.
- You have to configure the site to use Comodo DNS if you want to use the CDN. This can be done in the customer portal. See http://help.comodo.com/topic-285-1-848-12463-Domain-Configuration-Instructions.html for help to do this.
Once configured, the CDN service will:
- Accelerate performance by serving site content from data centers closest to your visitor's location.
- Forward event logs to the Comodo CSOC team who will monitor your traffic to identify anomalous behavior and threats.
-
Implement Comodo web application firewall protection on your domains. The CSOC team constantly improves the Mod Security rules in the firewall to provide cutting edge protection for your customers.
Configure CDN Settings
- Click the 'Domain Overview' link in the top-menu
The interface shows managed websites along with license and scan details.
- Identify the website you want to manage.
- Click
the gear wheel in the 'Actions' column
- Click the 'CDN' tab at top-right
- Cache Settings – Configure how website content is rendered
- Purge Files – Clear the files on the edge servers
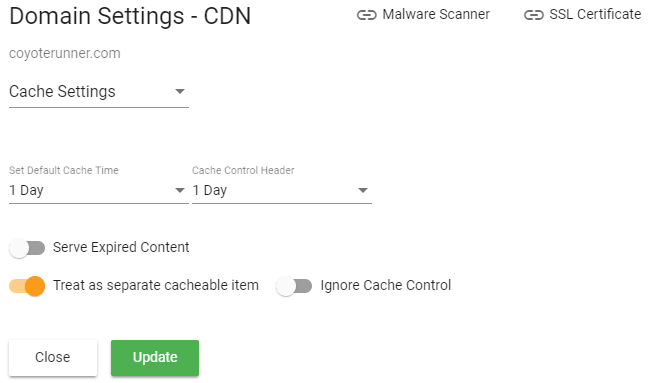
- Select 'Cache Settings' in the drop-down at the top-left
- Configure the following:
|
Cache Settings - Table of Parameters |
|
|---|---|
|
Parameter |
Description |
|
Set Default Cache Time |
How long the CDN should store content fetched from the origin web server. Cached content is delivered to website visitors until this time period expires. After this, the CDN will reconnect to the site and refresh the content. This is useful if your site's cache control headers (CCH) are not used or ignored by the browser on your visitors computer. Background Note: Cache control headers are used to specify how long content fetched from site should remain in the browser cache. The local cache is used by the browser to render the site when it is re-visited by the user, avoiding the need to fetch the content again from the server. |
|
Cache Control Header |
The validity period of the CCH on the end-user's web browser. See 'Background Note' above. This setting lets you control how long cached content should be stored visitor's web browsers. |
|
Serve Expired Content |
CDN to delivers expired content when:
|
|
Treat as separate cacheable item |
Web-pages with query string parameters (e.g.
'?q=something') will be cached as separate files. This will instruct the CDN to update cached files whenever the original pages are updated.
|
|
Ignore Cache Control |
Visitor's browsers will disregard the time to live
(TTL) and header expiry settings of the web-pages. Web browsers will use the 'Set default cache time' setting for the cache time.
|
- Click 'Update' for our settings to take effect
You can manually clear cached content from edge servers if you want to immediately push fresh content.
- Select 'Purge Files' from the drop-down at top-left
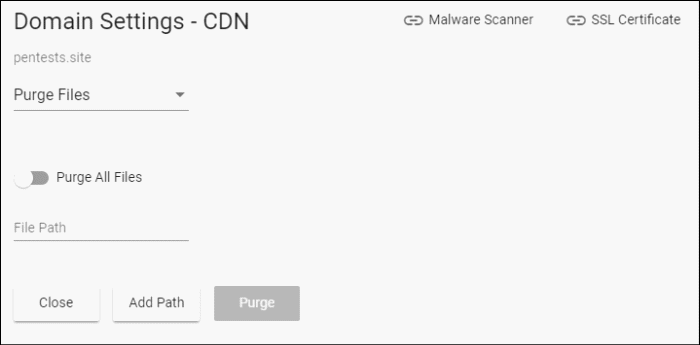
|
Purge CDN Cache on Edge Servers |
|
|---|---|
|
Purge All Files |
Remove all files from the cache. The CDN is forced to reload the website the next time the files are requested.
|
|
Purge Individual Files |
Remove specific files from the cache. CDN will reload only those files the next time same files are requested.
|
Upload an SSL certificate for a Website
- An SSL/TLS certificate is placed on a website to authenticate the domain owner and encrypt all data that passes between the site visitor and the web server.
- Sites that use an SSL certificate have a URL that begins with HTTPS. For example, https://www.example.com
cWatch lets you
to upload an SSL certificate which is already in use on a website.
This will encrypt traffic between the CDN and the origin website.
- Encrypts traffic between the origin server and cWatch CDN servers
- Eliminates privacy risks & vulnerabilities such as eavesdropping and man-in-the-middle attacks
|
Prerequisite - You should have the certificate and keys ready. |
Upload an SSL certificate to a website
- Click the 'Domain Overview' link in the top-menu
The interface shows managed websites along with license and scan details.
- Identify the website you want to manage
- Click
the gear icon in the 'Actions' column
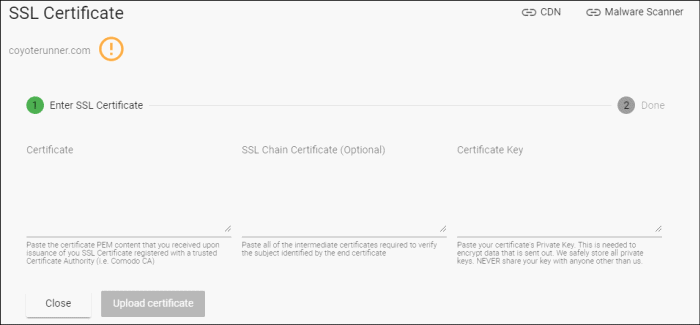
- Click the 'SSL Certificate' tab at top-right
|
SSL Certificate Settings - Table of Parameters |
|
|---|---|
|
Parameter |
Description |
|
Certificate |
Paste the content of your certificate. For
example, the content you are looking for is something like this: -----BEGIN CERTIFICATE----- MIICUTCCAfugAwIBAgIBADANBgkqhkiG9w0BAQQFADBXMQswCQYDVQQGEwJDTjEL MAkGA1UECBMCUE4xCzAJBgNVBAcTAkNOMQswCQYDVQQKEwJPTjELMAkGA1UECxMC VU4xFDASBgNVBAMTC0hlcm9uZyBZYW5nMB4XDTA1MDcxNTIxMTk0N1oXDTA1MDgx NDIxMTk0N1owVzELMAkGA1UEBhMCQ04xCzAJBgNVBAgTAlBOMQswCQYDVQQHEwJD TjELMAkGA1UEChMCT04xCzAJBgNVBAsTAlVOMRQwEgYDVQQDEwtIZXJvbmcgWWFu ZzBcMA0GCSqGSIb3DQEBAQUAA0sAMEgCQQCp5hnG7ogBhtlynpOS21cBewKE/B7j V14qeyslnr26xZUsSVko36ZnhiaO/zbMOoRcKK9vEcgMtcLFuQTWDl3RAgMBAAGj gbEwga4wHQYDVR0OBBYEFFXI70krXeQDxZgbaCQoR4jUDncEMH8GA1UdIwR4MHaA FFXI70krXeQDxZgbaCQoR4jUDncEoVukWTBXMQswCQYDVQQGEwJDTjELMAkGA1UE CBMCUE4xCzAJBgNVBAcTAkNOMQswCQYDVQQKEwJPTjELMAkGA1UECxMCVU4xFDAS BgNVBAMTC0hlcm9uZyBZYW5nggEAMAwGA1UdEwQFMAMBAf8wDQYJKoZIhvcNAQEE BQADQQA/ugzBrjjK9jcWnDVfGHlk3icNRq0oV7Ri32z/+HQX67aRfgZu7KWdI+Ju Wm7DCfrPNGVwFWUQOmsPue9rZBgO |
|
SSL Chain Certificate |
If your certificate contains an intermediate certificate then paste it here. If not, leave this field blank. |
|
Certificate Key |
Private key of your certificate. |
The certificate will be uploaded to the CDN servers to encrypt traffic between the CDN and the origin website.
Note. Removing a website will also invalidate any licenses associated with the site.
- Click the 'Domain Overview' link in the top-menu
The interface shows managed websites along with license and scan details.
- Identify the website you want to manage
- Click
the trash can button
 in the 'Actions' column
- A confirmation screen appears:
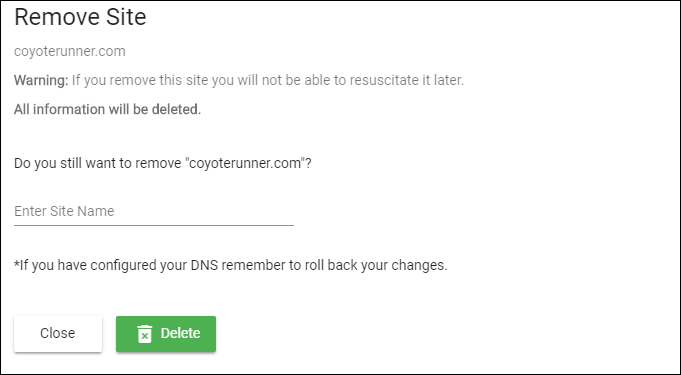
- Enter the domain name of the website in the 'Enter Site Name' field for confirmation
- Click 'Delete'.