


Quality of Service
- Quality of Service (QoS) rules allow you to set the priority of traffic used by various services according to their importance to your organization.
- For example, you may wish to prioritize traffic for interactive services like VoIP over traffic for data transfer.
- You can set bandwidth for both incoming and outgoing traffic.
A QoS rule is built from three building blocks:
- Target Device - A target device is a network interface (LAN, WiFI, Uplink, etc) or network zone to which bandwidth controls are applied. Administrators can allocate maximum downstream and upstream bandwidth in Kbits/s for each selected device. Devices need to be defined before creating classes and rules.
- Class - Classes are logical groups of traffic with specific bandwidth throttling settings. For each device you create, four default 'classes' are automatically created with high, medium, low and bulk traffic priority levels. Administrators can edit the settings of these default classes and add new classes as required. Classes can be added to the rules that you deploy.
- Rule - Implementation of a bandwidth 'class' to the traffic of a selected service from/to a device. Administrators can select traffic according to services (ex: TCP port 22), traffic source or TOS/DSCP flag (Standard IP header) and can apply a traffic class that has been defined previously.
The QoS rules can be created from the Quality of Services interface.
- Click 'Services' on the left and select
'Quality of Service'.
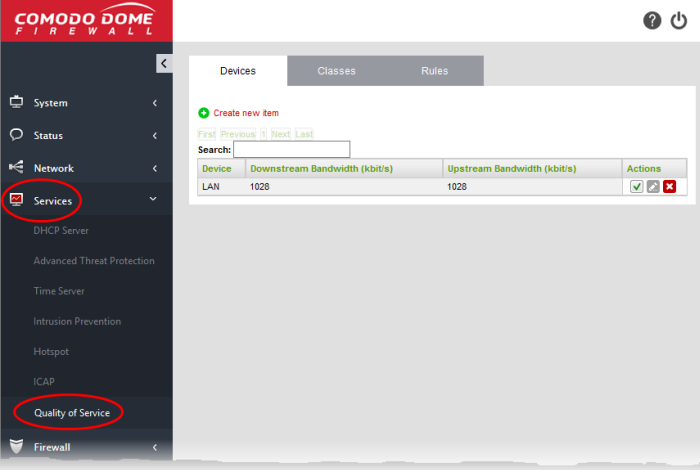
The interface contains three tabs:
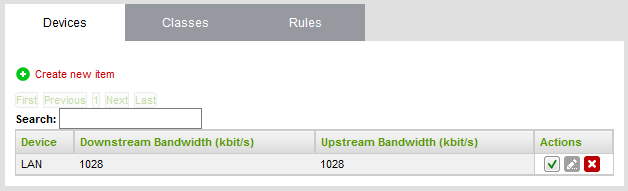
The 'Devices' tab displays the list
of target interfaces configured with bandwidth resource allocations
and allows you to define new target device to be used in a QoS rule.
A target device is a combination of interface device 'Type' (LAN, WiFI, Uplink etc) and that interface's maximum downstream and upstream bandwidth, in Kbits/s.
- It is possible to specify more than one device of the same type. For example, LAN 1 may have a different upstream/downstream speeds to LAN 2
- Once a device is added, all devices of that type will be assigned a color designation to easily identify that type. For example, all 'WIFI' devices will be assigned the color 'Blue'.
- Four default 'Classes' (bandwidth rules) will be automatically created for each device in the 'Classes' tab. These classes are suggestions. They have not yet been applied to any device and can be edited at at anytime.
- Devices are used to form the basis of 'Classes'
See Step 1 - Define the target device for QoS rule for more details about creating a new target device.
|
QoS Devices Table - Column Descriptions |
|
|---|---|
|
Column |
Description |
|
Device |
The target network interface device for a QoS rule. |
|
Downstream Bandwidth (kbit/s) |
The allotted bandwidth for incoming traffic for the device in kbits/sec. |
|
Upstream Bandwidth (kbit/s) |
The allotted bandwidth for outgoing traffic for the device in kbits/sec. |
|
Actions |
Controls for managing the device.
|
 - Enable or disable the
device.
- Enable or disable the
device. - Remove the device.
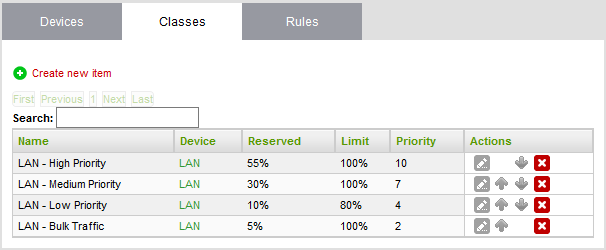
The 'Classes' tab contains a list of bandwidth throttling settings which can be added to a rule. Rules are, in turn, applied to a specific type of traffic. Four priority classes are available for each target device listed in the 'Devices' tab:
- High Priority
- Medium Priority
- Low Priority
- Bulk Traffic
The classes above can be edited as required:
- Admins can modify the maximum and minimum % of available bandwidth that can be used by a class. Available bandwidth was determined in the 'Devices' section.
- Admins can apply 'priority' (High, Medium, low). This determines the process priority level assigned to the traffic relevant to the service defined in the rule.
- Classes can be ordered using the arrow buttons. Classes at the top are the first to be processed when there is insufficient bandwidth for all traffic.
The interface allows administrators to edit existing classes and add new classes. See Step 2 - Manage QoS classes for more details.
|
QoS Classes Table - Column Descriptions |
|
|---|---|
|
Column |
Description |
|
Name |
The label of the class. The auto-created classes include the target device name and the priority in their names. |
|
Device |
The target device associated with the class. |
|
Reserved |
The bandwidth resource reserved for the class, shown as percentage of the bandwidth allotted for the target device. |
|
Limit |
The maximum bandwidth resource that may be used the class, shown as percentage of the bandwidth allotted for the target device. |
|
Priority |
The priority allotted to the class. |
|
Actions |
Controls for managing the class item.
|
 - Opens the 'Edit' interface and enables to
edit the parameters of the class. Refer to the section
- Opens the 'Edit' interface and enables to
edit the parameters of the class. Refer to the section  - Remove the class.
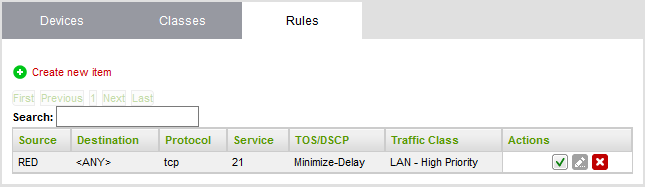
A QoS Rule defines which bandwidth class should be applied to traffic pertaining to a specific service. The 'Rules' tab lets you view existing rules and create new rules to specify the traffic class for a selected service.
|
QoS Rules Table - Column Descriptions |
|
|---|---|
|
Column |
Description |
|
Source |
The source of the traffic pertaining to the service for which the rule is created. The source can be a network zone, interface device, a network, IP address or a MAC Address. |
|
Destination |
The destination of the traffic. The destination can be a network zone or IP address(es) connected to the target network interface device specified in the Traffic Class column. |
|
Protocol |
The protocol adopted by the traffic. |
|
Service |
The service for which the rule is created. |
|
TOS/DSCP |
The Type of Service (TOS)/Differentiated Services Code Point (DSCP) of the service. |
|
Traffic Class |
Select the QoS Class for the traffic. |
|
Actions |
Controls for managing the rule.
|

 - Enable or disable the
rule.
- Enable or disable the
rule.Add
a Qos Rule
Defining a QoS rule involves three steps:
Step 1 - Define the target device for QoS rule
The first step in creating a QoS
rule for a service is to define a target network interface device
with pre-allotted bandwidth resource usage.
To create a target device
- Click 'Services' > 'Quality of Service' on the left
- Select the 'Devices' tab
- Click the Create new item link at the top left
The 'Add Quality of Service Device' pane will open.
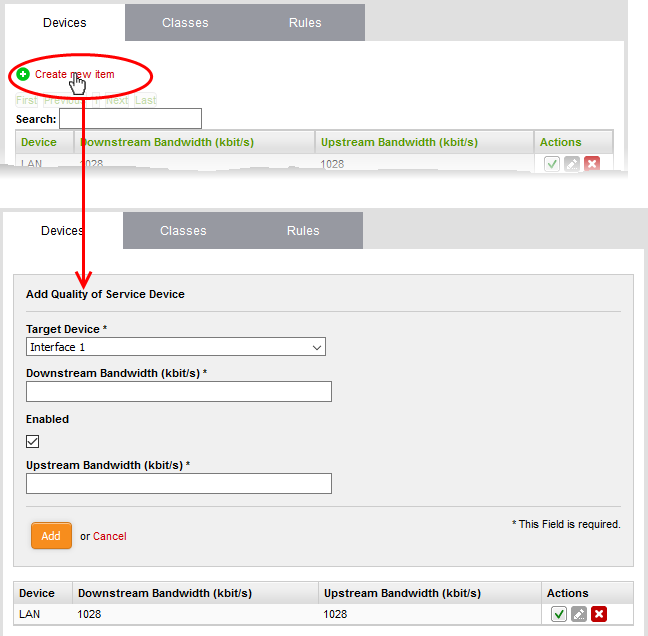
- Enter the parameters for the new target device as shown below:
- Target Device - Select the network interface device from the drop-down
- Downstream Bandwidth - Enter the usable bandwidth for incoming traffic in kbits/sec
- Upstream Bandwidth - Enter the usable bandwidth for outgoing traffic in kbits/sec
- Enabled -Select this checkbox to activate the device immediately upon creation
- Click 'Add' to save the target device with its bandwidth resource allocations.
The target device will be added to the 'Devices' list.
Step 2 - Manage the QoS classes
For each target device added under the 'Devices' tab, four classes are automatically created with different priority levels:
- High Priority
- Medium Priority
- Low Priority
- Bulk Traffic
Each class will be assigned with reserved bandwidth usage from the bandwidth allotted to the target device and a priority ranking between one and ten. The administrator can edit these parameters of the auto-created classes and change their order in the list of classes as the classes and hence the rules using these classes, are processed in order from the top for prioritizing traffic when the available bandwidth for the UTM appliance falls below sufficient level. If needed, the administrator can create new QoC classes for use in rules.
- Open the 'Quality of Service Classes' interface by clicking the 'Classes' tab under 'Services' > 'Quality of Service'
- Click the Create new item link at the top left
The 'Add Quality of Service Class' pane will open.
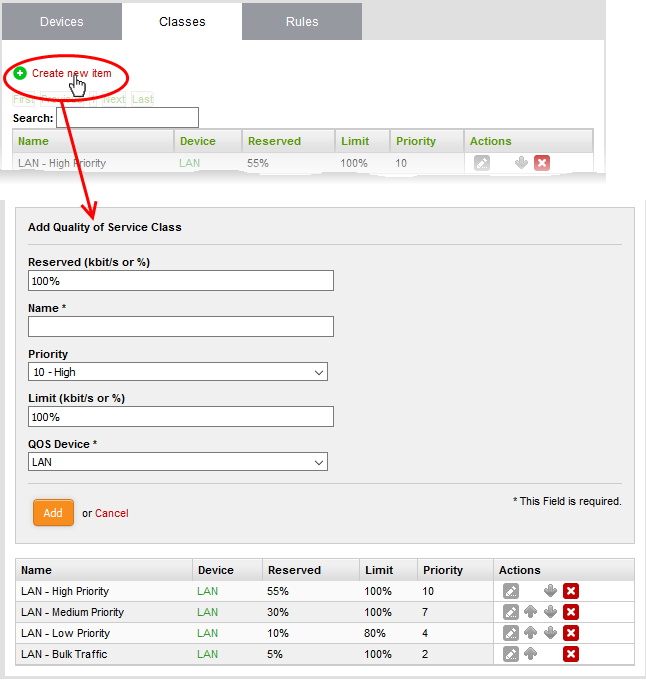
- Enter the parameters for the new class as shown below:
- Reserved – Specify the bandwidth usage that can be reserved for the class, as a percentage of the overall bandwidth resource allotted to the target device. You can choose the target device from the QOS Device drop-down in the same pane
- Name - The name of the class for identification
- Priority - The priority ranking for the class, chosen between 1 an 10 from the drop-down
- Limit - The maximum percentage of the overall bandwidth resource available to the target device, that can be assigned to the class
- QoS Device - The target device for which the class is created, chosen from the drop-down
|
Note: The sum of the reserved bandwidths for all the classes pertaining to a single device cannot exceed 100%. The reserved bandwidth for a single class cannot exceed its limit bandwidth. |
- Click 'Save' to add the QoS class to the list.
To modify the parameters of a class
- Click the 'Edit' icon
 in the row of the class
to be edited, from the Actions column.
in the row of the class
to be edited, from the Actions column.
The 'Edit' pane will appear, enabling the administrator to modify required parameters. The edit pane is similar to the 'Add Quality of Service Class' pane. See the section above for more details.
Step
3 - Create QoS rule for the service
You can specify QoS rule that specifies the QoS class to be adopted by the type of traffic pertaining to a specified class.
To create a new rule
- Open the 'Quality of Service Rules' interface by clicking the 'Rules' tab under 'Services' > 'Quality of Service'
- Click the 'Create new item' link at the top left
The 'Add Quality of Service Rule' pane will open.
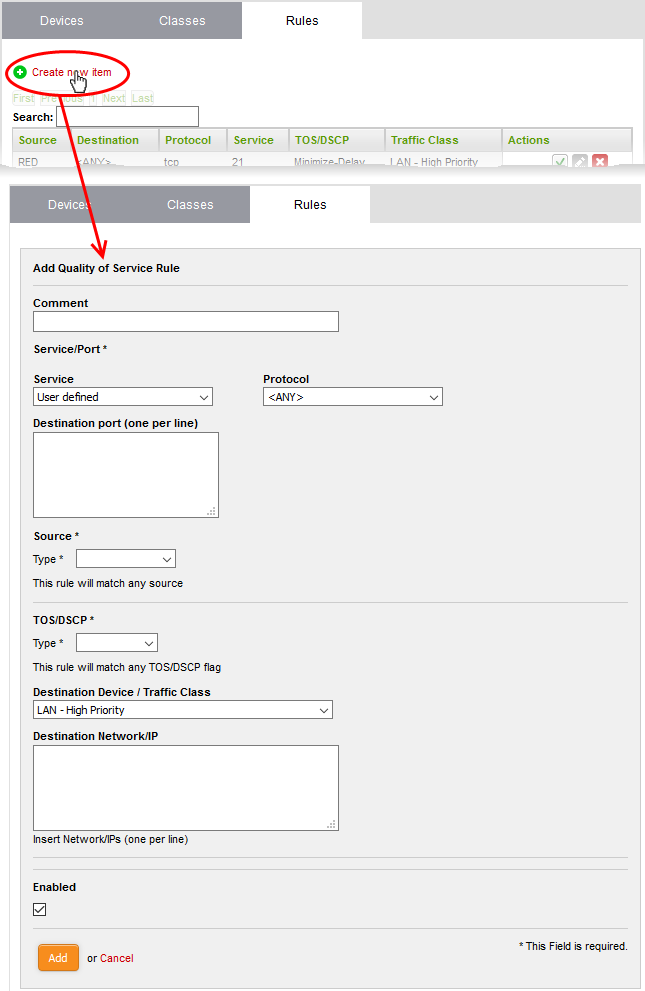
- Enter the parameters for the new rule as shown below:
- Comment - Enter a short description for the rule
- Service/Port - The Service/Port area enables you to specify the service for which the rule is created, the protocol used by the service and the destination port(s).
- Service - Choose the type of service from the drop-down
- Protocol - Choose the protocol used by the service
- Destination port - Specify the destination port(s) of the service one by one, in the 'Destination Port' text box.
|
Tip:
The appliance is loaded with predefined combinations of
service/protocol/port, like HTTP/TCP/80, |
- Source - The Source area enables you to specify the source from which the traffic pertaining to the service originates.
- Choose the type of the source from the Type drop-down. Depending on the chosen type, you need to specify the values in the text box that appears on selecting the type. The options available are:
- Zone/Interface - If the source is a Network Zone/Interface, select the network zone(s)/interface device(s) from the Select interfaces text box.
- Network/IP - If the source is external network(s) or a machine(s), enter the network address(es) or IP address(es) one by one in the text box.
- MAC Address - If the source is machine(s) identified by its/their MAC address(es), enter the MAC address(es) one by one in the textbox.
- TOS/DSCP - The TOS/DSCP area enables you to specify the Type of Service (TOS) or Differentiated Services Code Point (DSCP) parameters,
- Choose the type of the TOS/DSCP parameter to be specified from the Type drop-down. Depending on the chosen type, you need to specify the values in the text box that appears on selecting the type. The options available are:
- TOS - Choose the TOS flag from the Match traffic drop-down, so that the traffic containing the flag will be applied with the rule
- DSCP Class - Choose the DSCP class from the Match traffic drop-down, so that the traffic with the DSCP class will be applied with the rule
- DSCP Value - Enter the DSCP value in the Match traffic text box, so that the traffic with the DSCP value will be applied with the rule
- Destination Device/Traffic Class - The Destination Device/Traffic Class area allows you to select the QOS class to be used for the traffic and the Destination Netwrok/IP.
- The first drop-down displays all the classes added to the QoS Classes interface. Choose the class from the drop-downs
- Enter the network address or IP address of the destination of the traffic in the Destination Network/IP textbox
- Enabled - Select the checkbox if you wish the rule to take effect immediately upon creation.
- Click 'Add' to save your rule. The rule will
be added to the Qos Rules list and will be applied to the traffic,
if enabled.