


Source Network Address Translation
- By default, Dome Firewall states the IP address of the primary uplink device as the source address of all outbound traffic.
- If outgoing traffic from an internal host must contain the host's IP address, then administrators should configure a Source NAT (SNAT) rule. This is useful If a host is running a web or mail service and the outgoing packets should contain the external IP address of the server.
|
Tip: CDome Firewall also allows you to create Destination NAT (DNAT) rules for incoming traffic. DNAT rules redirect service-specific traffic from a port on a host or interface to another host/port combination. See Configure Virtual IP for Destination Network Address Translation for more details. |
SNAT rules can be created and managed from the 'SNAT' interface.
- Click 'Firewall' > 'SNAT' in the left menu to open the SNAT interface
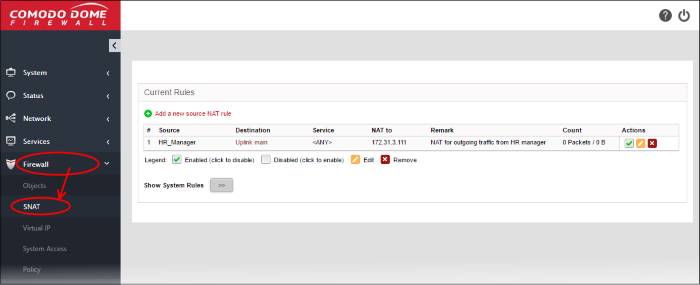
The interface displays all current SNAT rules in effect and allows you to create new rules.
|
SNAT Table - Column Descriptions |
|
|---|---|
|
Column |
Description |
|
# |
ID number of the rule. Translation is applied based on the first matching rule in the list, regardless of other matching rules that follow. |
|
Source |
The firewall object which contains the IP or subnet of the host(s) from which traffic originates. |
|
Destination |
The interface device through which traffic is directed to the external network. |
|
Service |
Protocol and port used by the traffic. |
|
NAT to |
The IP address of the host. This is contained in the headers of outgoing packets. |
|
Remark |
A short description of the rule. |
|
Count |
The number of packets and size of data intercepted by the rule. |
|
Actions |
Displays control buttons for managing the rule.
|
 - Enabled or disable the rule.
-
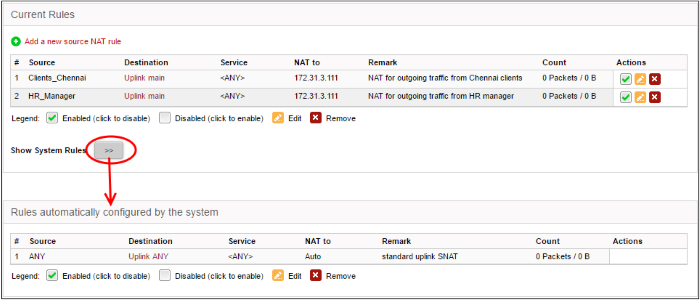
Clicking the right arrow button beside 'Show system rules' displays a list of SNAT rules auto generated by the DFW virtual appliance. These rules cannot be modified or removed.
The source rule can be created by defining the source of the outgoing traffic, destination, service and the IP address to be masqueraded.
To create a new SNAT rule
- Click 'Firewall' > 'SNAT' on the left menu
- Click 'Add a new Source NAT Rule'
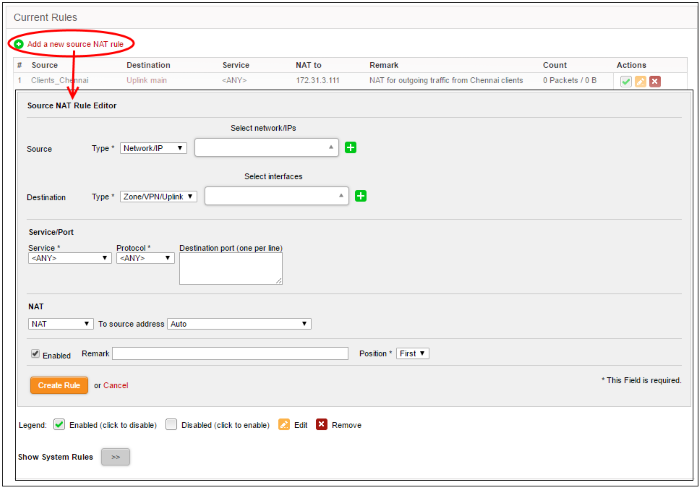
- Enter the parameters for the new rule as shown below:
Source - Specify whether the origin of the traffic to be intercepted by this rule, is a Network address/IP address or the SSL VPN user by choosing the option from the 'Type' drop-down.
-
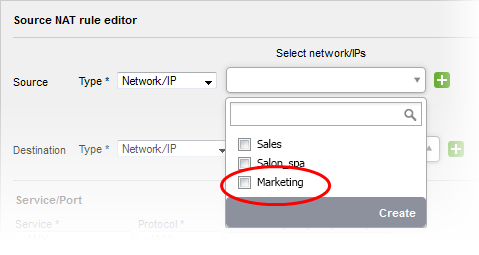
Network address/IP address - Choose the Firewall Object containing the IP address, IP Address Range or the subnet of the host(s) from the 'Select network/IPs' drop-down.
If a firewall object covering the IP address/IP Address range or the subnet to be specified has not been created under the Firewall Objects interface previously, you an create a new object from this interface too.
- Click the drop-down arrow and click 'Create' at the bottom of the list. A new pane for creating a new object will appear.
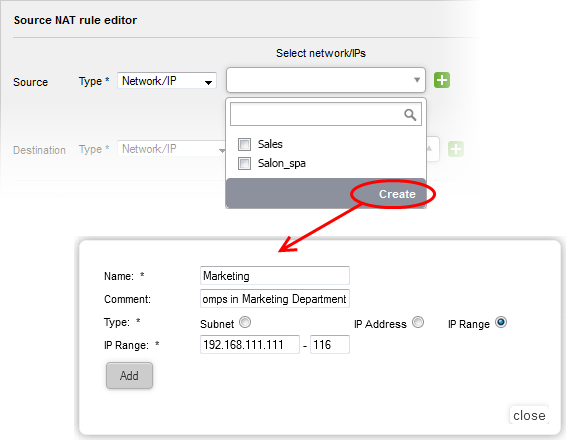
- Name - Specify a name for the object (15 characters max) representing the host(s) included in the object.
- Comment - Enter a short description of the object.
- Type - Select the type by which the hosts are to be referred in the object. The available options are:
- Subnet - Select this if a sub network of computers is to be covered by the object and enter the sub network address
- IP address - Select this if a single host is to be covered by the object and enter the IP address of the host
- IP range - Select this if more than one host is to be covered by the object and enter the IP address range of the hosts
- Click 'Add'.
The new object will be added and will be available for selection from the Select network/IPs drop-down.
The new object will also be added to the list of objects under Firewall Objects and will be available for selection for creating other firewall rules too.
-
SSLVPN User - Choose the SSL VPN user from the 'Select SSLVPN users' drop-down.
Destination - Specify the whether the destination of the traffic is network zone/uplink device/VPN, network address/IP address or the SSL VPN user.
-
Zone/VPN/Uplink - Choose the interface device, the VPN or the physical port to which the interface is connected, from the 'Select interfaces' drop-down.
-
Network address/IP address - Choose the Firewall Object containing the IP address, IP Address Range or the subnet of the host(s) from the 'Select network/IPs' drop-down.
If a firewall object covering the IP address/IP Address range or the subnet to be specified has not been created under the Firewall Objects interface previously, you an create a new object from this interface too. See explanation above for more details.
-
SSLVPN User - Choose the SSL VPN user from the 'Select SSLVPN users' drop-down.
Service/Protocol/Port - Select the type or the service hosted by the source, the protocol and the port used by the service.
-
Service - Choose the type of service from the drop-down
-
Protocol - Choose the protocol used by the service
-
Destination port - Specify the destination port(s) of the service one by one, in the 'Destination Port' text box.
|
Tip:
The appliance is loaded with predefined combinations of
service/protocol/port, like HTTP/TCP/80, |
NAT - The NAT option allows
you to choose whether or not to apply the NAT. On applying NAT, the
IP address/Port contained in the headers of the data packets will be
changed to the IP address selected from the drop-down at the right.
Choose the NAT option from the drop-down at the left. The options
available are:
-
NAT - The NAT will be applied. Choose the source IP address to be contained in the headers of the data packets from the drop-down at the right.
The drop-down at the right displays the network zones, network interface devices and the IP addresses from which the outgoing traffic is allowed.
- Ensure that the outgoing traffic is allowed from the host. Open the Policy Firewall interface by clicking Firewall > Firewall. Add a rule to allow outgoing traffic from the host. See Configure Firewall Policy Rules for more details.
- If you want a static IP address assigned to the server to be shown in the outgoing traffic, then add the IP address as an additional address for the uplink device through which the traffic will be routed to external network.
- Open Uplink Editor interface by clicking Network > Interfaces > Uplink Editor tab
- Click the Edit icon
in the row of the uplink device
- Ensure that the 'Add additional addresses' checkbox is selected, enter the IP address/netmask into the textbox and click 'Update Uplink'.
- Selecting 'Auto' or 'Zone
- IP: Auto' chooses the IP address of the respective outgoing interface
-
No NAT - The Network Address Translation will not be applied
-
Map Network - All IPs from the source subnet will be statically mapped to another network of the same size. Specify the subnet to which the IPs are to be mapped in the textbox at the right.
General Settings - Configure the General Settings to enable/disable, enter a short description and select a position for the rule in the list.
-
Enabled - Leave this checkbox selected if you want the rule to be activated upon creation.
-
Remark - Enter a short description for the rule. The description will appear in the Remark column of the respective Rules interface
-
Position - Set the priority for the rule in the list of rules in the respective rules interface. The rules in the iptables are processed in the order they appear on the list.
-
Click 'Create Rule'. A confirmation dialog will appear.
-
Click 'Apply'. The firewall will be restarted with the new rule applied.