Comodo Help
Find the desired product help
Comodo Dome Firewall

Comodo Dome Firewall

Dome Firewall Virtual Appliance Admin Guide

English

Print Help Download Help
Configure Proxy Services > HTTP/HTTPS Proxy Server > Configure URL And Content Filtering
  • Introduction To Comodo Dome Firewall - Virtual Appliance
    • Install Dome Firewall And Login To The Administrative Console
  • The Main Interface
  • The Dashboard
  • View And Modify System Status And General Configuration
    • Manage Admin Accounts
      • Add And Manage Administrators
      • Manage Administrative Roles
    • License Activation
    • SNMP Settings
    • Central Management
    • Configure SSH Access
    • High Availability
    • View And Update Firmware Version
    • Create And Schedule Backup Of DFW State
      • Manually Create A Backup
      • Schedule Backup Operations
      • Encrypt Backup Archives
      • Export A Backup
      • Import A Backup Archive From A Local Computer
      • Roll Back The Virtual Appliance To A Previous Time Point
      • Reset The Virtual Appliance To Factory Defaults
    • Shutdown Or Restart The Dome Firewall Virtual Appliance
  • View DFW Virtual Appliance Status
    • System Status
    • Network Status
    • System Usage Summaries
    • Network Traffic
    • Network Connections
    • SSLVPN Connections
  • Network Configuration
    • Configure Interface Devices, Uplinks And VLANs
      • Configure Interface Devices
      • Add And Manage Gateway Uplink Devices
      • Create VLANs
    • Routes
      • Add And Manage Static Routes
      • Add And Manage Policy Routing Rules
  • Configure DFW Virtual Appliance Services And Protection Settings
    • DHCP Server
    • Advanced Threat Protection
      • Manage The ATP Profiles
      • Comodo Antivirus
    • Time Server
    • Intrusion Prevention
      • Configure Intrusion Prevention System
      • Manage IPS Rulesets
      • Manage Application Identification Rulesets
    • Configure Wireless Hotspot
      • Configure Captive Portal Service
      • Customize The Login Page
      • Add And Manage Permanent Users
    • Internet Content Adaptation Protocol
    • Quality Of Service
  • Manage Firewall Configuration
    • Firewall Objects
      • Manage Firewall Address Objects
      • Manage Firewall Object Groups
      • Manage Firewall Schedules
      • Active Directory Integration
    • Destination Network Address Translation
    • Source Network Address Translation
    • Configure System Access
    • Configure Firewall Policy Rules
      • Manage Firewall Policy Rules
      • Manage VPN Firewall Rules
  • Configure Proxy Services
    • HTTP/HTTPS Proxy Server
      • Configure URL And Content Filtering
      • HTTPS Proxy
  • Configure Virtual Private Network Settings
    • SSL VPN Server
      • Configure General SSL VPN Server Settings
      • Manage SSL VPN Client Accounts
      • Configure Advanced SSL VPN Server Settings
      • Configure Clients To Connect To Dome Firewall
    • IPsec Configuration
    • Configure L2TP Server
    • Configure IPSec/L2TP Users
  • View Logs
    • Realtime Logs
    • Configure Log Settings
    • Generate Reports
  • Appendix - Minimum Requirements For Software Installations

Configure URL and Content Filtering


The firewall uses Comodo Web Filtering (CWF) to monitor websites accessed through the HTTP proxy service.The feature also allows you to create custom filtering profiles. There are two kinds of filter rules:
  • Filter web-pages by content category.
  • Create whitelist and blacklists of specific URLs.

These profiles can be used as filters in firewall policy rules. See Manage Firewall Policy Rules for more details.


Filtering profiles can be created for different enterprise and home network scenarios. For example, filter profiles may be applied:

  • To beef-up security by automatically blocking malware sites
  • To prevent employees from visiting social networking sites during working hours
  • To implement parental control by blocking inappropriate pages to juvenile users

Filtering profiles can be created and managed in the 'URL Filter' interface.


To configure the Web Filter

  • Click 'Proxy' > 'HTTP/HTTPS' in the left-hand navigation
  • Click the 'URL Filter' tab.


The interface shows existing web filtering profiles and lets you create new profiles. The 'Default Profile' allows access to all pages and is applied to policies which do not have a specific filter profile.

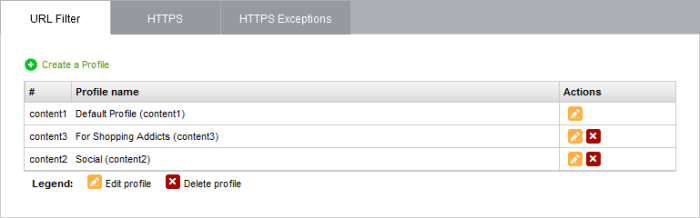
URL Filter - Column Descriptions

Column

Description

#

ID number of the profile.

Profile name

The name of the profile, for easy identification.

Actions

Displays control buttons for managing the profile.


- Opens the 'Profile editor' interface and enables to edit the parameters of the profile. The editor interface is similar to the interface for adding a profile. See Creating a Web Filter Profile for more details.


- Removes the profile.


Creating a Web Filter Profile

A Web Filter profile can be created by specifying the filter parameters in two ways:

  • Specifying the content categories – The web pages having content falling into specified categories will be automatically blocked

  • Creating custom URL Whitelist/Blacklist – The URLs and Domains specified in the whitelist will be passed without filtering and the URLs and domains in the blacklist will be blocked.

A single profile can be created with a combination of both the category filter and whitelist/blacklist.


To create a Web Filtering profile

  • Click the 'Create a Profile' link at the top left of the interface. The 'Profile editor' pane will open for adding a new profile.


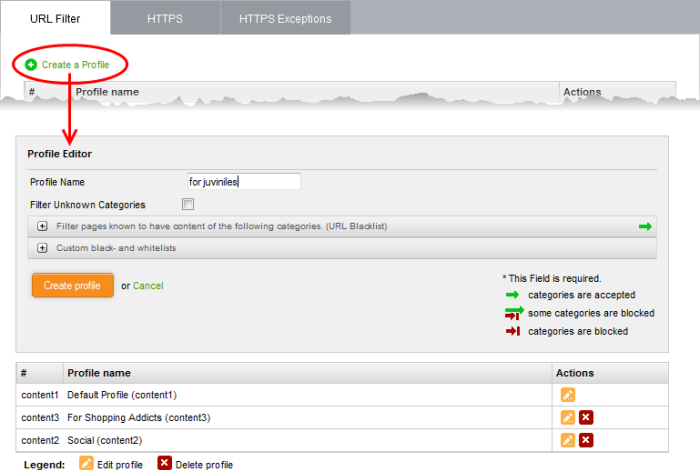
  • Profile Name – Enter a name for the profile to be created, for easy identification
  • Filter Unknown Categories – Select this checkbox if you want the proxy to block all the websites that do not fall under any of the category in the built-in list of categories. The list can be viewed by clicking the ' Filter pages known to have content of the following categories' stripe below the option.
  • To specify the categories for blocking the pages containing the content falling under them, click the 'Filter pages known to have content of the following categories. (URL Blacklist)' stripe.


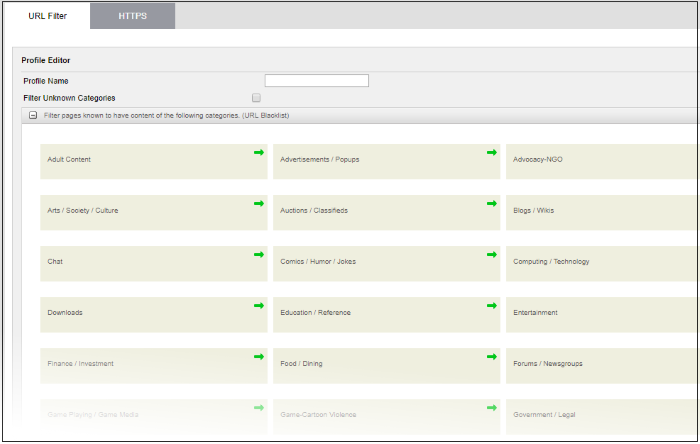
Each main category is displayed as a tile. The arrow at the top right of each tile indicates whether the category is allowed or blocked.


-

Indicates that the category is allowed.


-

Indicates that the category is blocked.


  • To block a category, click on the green arrow. The arrow will turn red, indicating that the category will be blocked.
  • To add URLs to whitelists or blacklists, click the 'Custom black-and whitelists' stripe. The text boxes for entering the whitelist and blacklist domains will open.


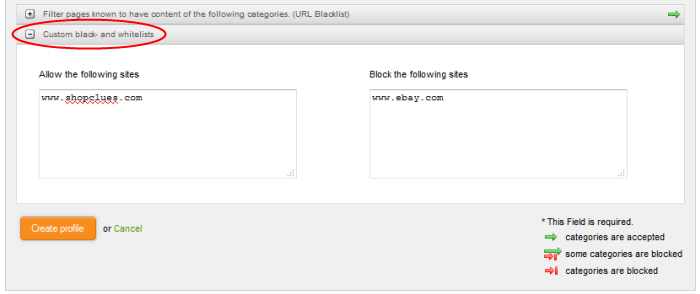
  • Enter the URLs or domains of the websites to be allowed in the 'Allow the following sites' text box.
  • Enter the URLs or domains of the websites to be denied in the 'Block the following sites' text box.

Note:

  • The URLs of the websites/domains should not contain the protocols (http:// or https://)
  • Wildcard characters are allowed while specifying domain(s) and sub domain(s)


  • Click 'Create' profile. A confirmation dialog will be displayed at the top
  • Click 'Apply' to save your profile.

The profile will now be added to the list and will be available in the 'URL Filter' drop-down under 'Web Protection' in the Add/Edit firewall rule interface for configuring the firewall policy.


Our Products
  • Free Antivirus
  • Free Internet Security
  • Website Malware Removal
  • Free Anti-Malware
  • Anti-Spam (Free Trial)
  • Windows Antivirus
  • Antivirus for Windows 7
  • Antivirus for Windows 8
  • Antivirus for Windows 10
  • Antivirus for MAC
  • Antivirus for Linux
  • Free Endpoint Security
  • Free ModSecurity
  • Free RMM
  • Free Website Malware Scanner
  • Free Device Manager for Android
  • Free Demo
  • Network Security
  • Endpoint Protection
  • Antivirus for Android
  • Comodo Antivirus
  • Wordpress Security
Cheap CDN
  • Bootstrap CDN
  • Semantic UI CDN
  • Jquery CDN
  • CDN Plans
  • CDN
  • Free CDN
Enterprise
  • Patch Management Software
  • Patch Manager
  • Service Desk
  • Website Down
  • Endpoint Protection Solutions
  • Website Security Check
  • Remote Monitoring and Management
  • Website Security
  • Device Manager
  • ITSM
  • CRM
  • MSP
  • Android Device Manager
  • MDR Services
  • Managed IT Support Services
  • Free EDR
Free SSL Certificate
Support Partners Terms and Conditions Privacy Policy

© Comodo Group, Inc. 2025. All rights reserved.