Add Internal Domains
- The resolvers will first check for local DNS requests from endpoints in imported sites
- If the request is for an internal domain, then the resolver handles it using local DNS servers. This is instead of sending the request to XSIG's public DNS servers, saving your bandwidth.
Manage internal domains in imported sites
- Click 'Configure' > 'Objects' > 'Internal Domains'

|
Internal Domains - Column Descriptions |
|
|---|---|
|
Column Header |
Description |
|
Company |
Applies to MSPs only. Name of the organization to which the internal domain belongs. |
|
Domain |
The domain name of the internal domain. |
|
Remark |
A short description of the internal domain. |
|
Actions |
Allows to edit or remove the internal domain. |
- Click 'Configure' > 'Objects' > 'Internal Domains'
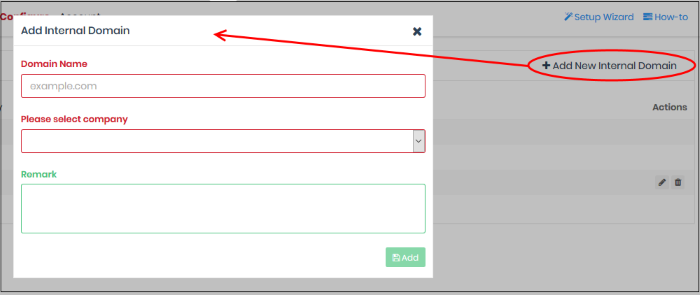
- Click 'Add New Internal Domain'

|
'Add Internal Domain' dialog – Table of Parameters |
|
|---|---|
|
Form Element |
Description |
|
Domain Name |
The registered domain name of the internal domain.
|
|
Please select company |
Applies to MSP customers only.
|
|
Remark |
A short description of the internal domain. |
- Enter the parameters and click 'Add'.
The internal domain is added to the list.
- Click 'Configure' > 'Objects' > 'Internal Domains'
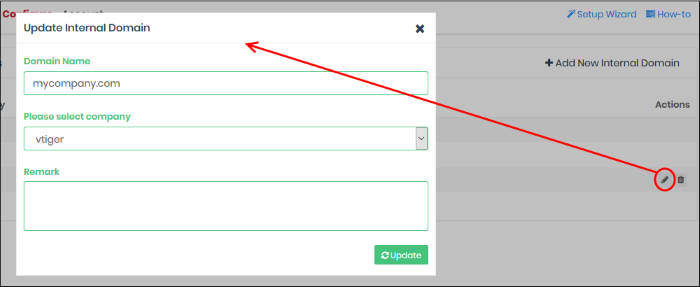
- Click the pencil icon beside the internal domain to be edited.
The Update Internal Domain dialog will appear.

- This is similar to 'Add Internal Domain' dialog
- You can edit the company and internal domain name. See the explanation above for more details
- Click 'Update' to save your changes.
- Click 'Configure' > 'Objects' > 'Internal Domains'
- Click the trash can icon beside the internal domain to be removed.

- Click 'OK' in the confirmation dialog to remove the internal domain from the list


