Add Internal Networks
- Click 'Configure' > 'Objects' > 'Internal Networks'
The local resolver lets you apply tailor-made security policies to individual endpoints and internal sub-nets.
- The internal networks interface lets you define individual IPs or ranges as objects. You can then apply security policies to these objects.
- Add the IP address of the endpoint and/or the internal IP address range.
- Create rules for the endpoints/internal networks.
- Create a policy which uses the rules. The addresses you added earlier can be selected from the 'Objects' drop-down as policy targets.
|
Note - A policy applied to a 'Site' will over-rule any policy applied to its internal network objects. Secure Internet Gateway will apply the site policy to the individual objects and ignore any individual policies for those objects. |
Manage Internal Networks
- Click 'Configure' > 'Objects' > Internal Networks'

|
Internal Networks - Column Descriptions |
|
|---|---|
|
Column Header |
Description |
|
Company |
MSPs only. Name of the organization to which the network site belongs. |
|
Site |
The network to which the endpoints or the sub-net belongs. |
|
Name |
The label of the endpoint or sub-net. |
|
IP |
The address of the endpoint or sub-net. |
|
Actions |
Edit or remove the endpoint/internal network. |
The interface lets you:
- Click 'Configure' > 'Objects' > 'Internal Networks'
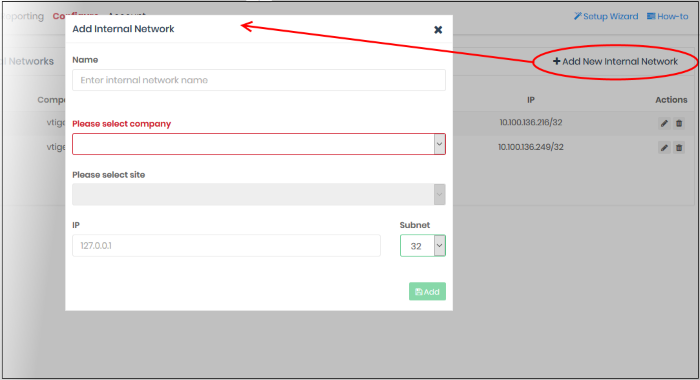
- Click 'Add New Internal Network'

|
'Add Internal Network' dialog - Table of Parameters |
|
|---|---|
|
Form Element |
Description |
|
Name |
Label of the internal network object. This name appears in the object drop-down under the network site when you create a policy. |
|
Please select company |
MSP customers only.
|
|
Please select site |
Choose the site to which the internal network belongs |
|
IP |
IP address of the internal network in CIDR notation.
|
- Click 'Add'
The internal network object is added to the list. It will be available in the 'Object' drop-down as a target when creating a new policy. See Apply Policies to Networks, Roaming / Mobile Devices for more details.
You can change the site/IP range of an internal network object at anytime.
- Click 'Configure' > 'Objects' > 'Internal Networks'.
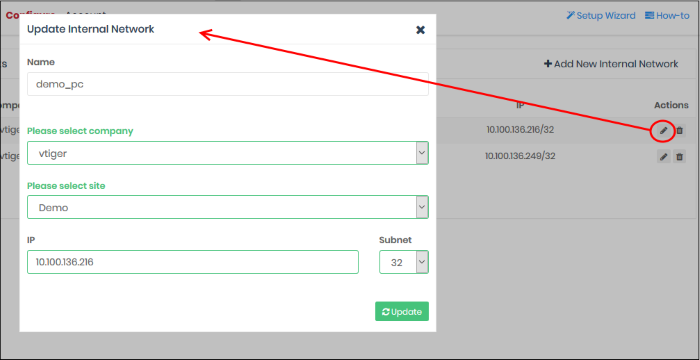
- Click the pencil icon beside the internal network object to edit:

The 'Update Internal Network' dialog opens.
- The dialog is similar to 'Add Internal Network' dialog
- You cannot edit the name of the internal network object
- You can edit the company, site and the IP range for the object. See above if you need help with this.
- Click 'Update' to save your changes
The internal
network object’s policy will be applied to the endpoints in
the new IP range.
Remove Internal Network Objects
You
can remove internal network objects if you no
longer want to apply a policy to them.
Once removed:
- If a policy exists for the parent site of the internal network, then this parent policy is applied to the endpoints in the internal network
- If no policy exists for the parent site, then the default security policy is applied to the network’s endpoints
- Click 'Configure' > 'Objects' > 'Internal Networks'
- Click the trash can icon beside the internal network object to be removed.

- Click 'OK' in the confirmation dialog to
remove the internal network object.


