


Ticket Filters
Click 'Admin Panel' > 'Manage' > 'Ticket Filters'
- Ticket filters are rules which implement specific actions on tickets if certain criteria are met.
- Actions include routing tickets to a specific department/admin/staff member, sending an auto-response, closing/rejecting a ticket, changing the ticket owner, and more.
- Once saved and made active, the filter is applied to all new tickets received by your organization.
- You can create multiple filters and prioritize them with the 'execution order' setting. Filters with a higher execution order take precedence in the event of a conflict.
Example filters you can create:
- Identify
tickets with device names starting with 'Desktop'. Change the users
on those tickets to a specific user. For example, to the network
admin.
- Assign tickets that were auto-created by Endpoint Manager to a particular staff member.
See the following for more help:
Open
the ticket filters interface
- Open the 'Admin Panel' (see the last link on the left)
- Click 'Manage' > 'Ticket Filters'
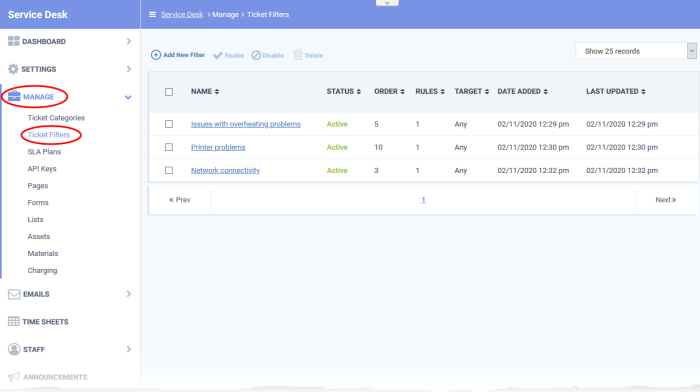
- Name - The label of the ticket filter
- Status - Whether the filter is enabled or disabled
- Order - The priority that the filter is executed
- Rules - The number of rules in the filter
- Target - The channel over which the ticket is received. You can select ‘Any’, or pick a specific channel like ‘Email’, ‘Web’ or ‘API’
- Date Added - Date and time the filter was created
- Last Updated - Date and time the filter was most recently edited
Click on a column header to sort the items in ascending/descending order.
The ticket filters interface lets you:
- Open the 'Admin Panel' (See the last link on the left)
- Click 'Manage' > 'Ticket Filters'
- Click 'Add New Filter'
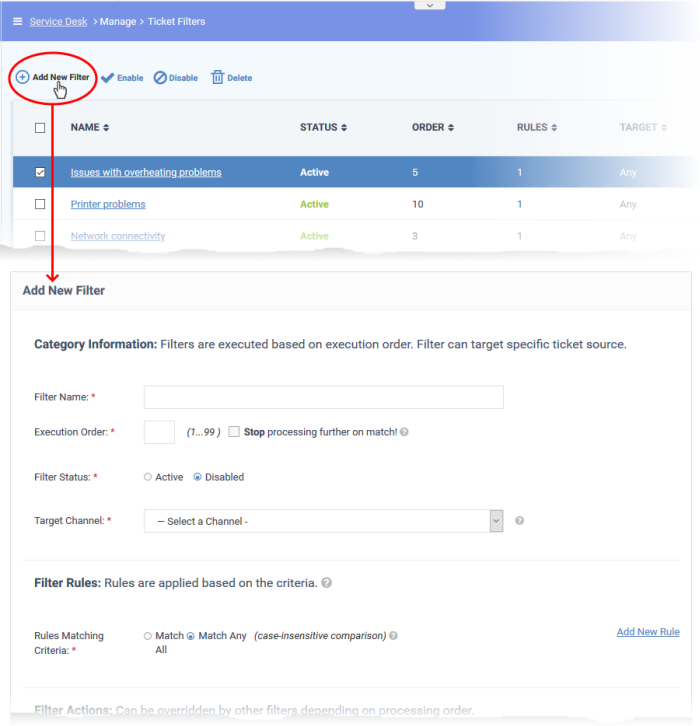
The new filter form contains the following sections:
- Filter Name: Enter a unique label for the filter. The name should identify the purpose of the filter.
- Execution Order: The priority of the filter. The lower the number, the higher the priority.
- Filters are prioritized according to their execution order. If a ticket meets the conditions of multiple filters, and these conditions conflict with each other, then the filter with the higher execution order is implemented.
- Stop processing further on match! - Service Desk will apply the actions in this filter when it finds a ticket which meets its conditions, then ignore any other filters which match the ticket.
For example, say you have two filters which state different actions for tickets received from ‘example@example.com’:
Filter A - IF user / email address EQUALS ‘example@example.com’, THEN assign to ‘Maintenance’ dept. Execution order = 1
Filter B - IF user / email address EQUALS ‘example@example.com’, THEN send ‘Canned response’. Execution order = 2
Actions are applied in this order to the tickets received from 'example@example.com':
1. The ticket is assigned to 'Maintenance' dept
2. A canned response is sent
If 'Stop processing further on match!' is enabled in filter A then the ticket is assigned to maintenance, but the canned response is not sent.
- Filter Status: Select whether you want the filter to be active or inactive by default. You can change the filter status at anytime using the 'Enable'/'Disable' buttons in the ticket filter screen. See Activate / deactivate filters for help with this.
- Target Channel: The method by which you received the ticket. For example, over email, via the service desk support website, over the phone, or auto-generated by Endpoint Manager. Service Desk will only apply the rule to tickets received over this channel.
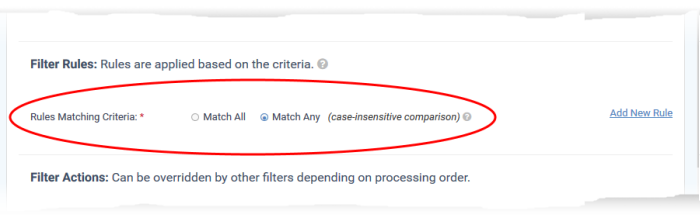
- Each rule has a search condition and a search criteria.
- You can add multiple rules to a filter, and choose to apply the filter if all rules are met, or if any one of the rules is met.
Match All - Applies the filter if every rule is met.
Match Any - Applies the filter if any single rule is met.
Add rules
- Click 'Add New Rule' on the left
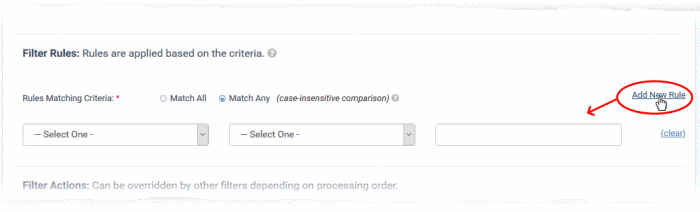
- Define a search rule in the following format:
[Search Parameter] [operator] [Search Criteria]
- First drop-down - Choose the search parameter. For example, you can search for tickets from specific email addresses or domains, or by their priority level or category.
- Second drop-down - Choose the operator (Equal, Not Equal, Starts With, etc)
- Third drop-down - Type the search term in the text field. What you type here depends on the search parameter you picked in the first drop-down. For example, it could be an email address, customer name, user, ticket category etc.
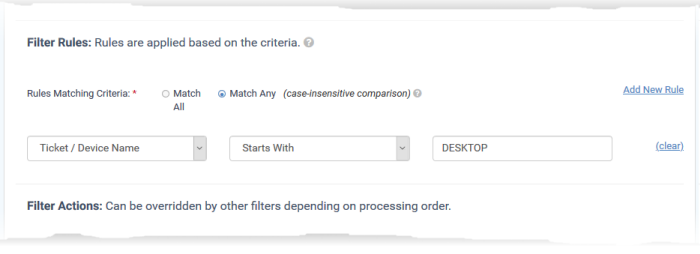
- For example, the rule in the following screenshot will catch all tickets which contain a 'Device Name' that starts with 'DESKTOP':
- Repeat the process to add more rules to the filter
Actions are the processes you want to implement when a ticket meets the conditions of the filter.
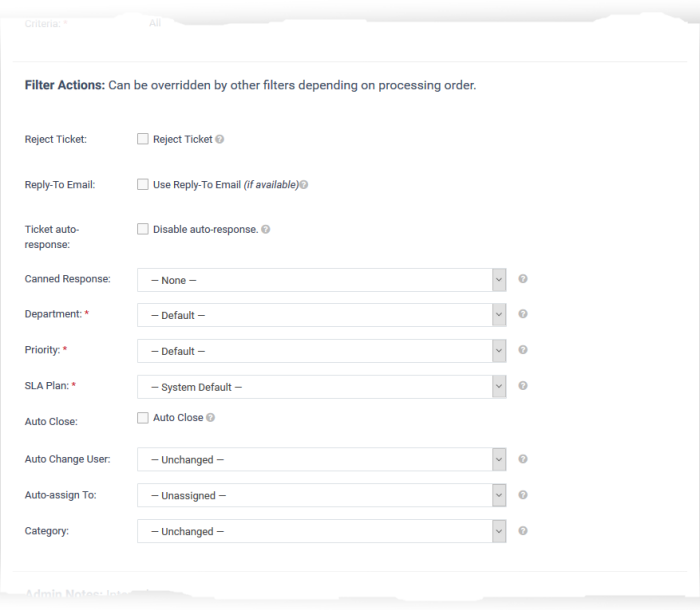
The available actions are:
- Reject Ticket: The ticket is not accepted and not added to Service Desk. Your support team will not work on it.
- Reply-To Email: An automatic response is sent to the email address from which the ticket was generated. This applies only if the ticket source is 'Email'.
- Ticket auto-response: If selected, auto-response mails are disabled. The setting here overrides the auto-response setting of the department to which the ticket is assigned.
- See Autoresponder Settings to read more on this.
- Canned Response: Automatically send a preset reply to the user.
- See Canned Responses to read more about this
- Department: Assign the ticket to a particular department.
- Priority: Assign a certain priority level to the ticket. The options are Low, Normal, High and Critical.
- See Appendix 2 - Ticket Priorities read more on this
- SLA Plan: Apply a preset service level agreement to the ticket.
- See Service Level Agreements (SLA) for help to view and manage SLAs
- Auto Close: Closes the ticket. The status of the ticket changes to 'Closed' in the 'Tickets' interface.
- Auto Change User: Set the ticket owner to a specific user. All further correspondence will be with the new user.
- Auto-assign To: Assign the ticket to a particular staff member or admin.
- Category: Place the ticket into a certain help topic.
- See Ticket Categories to read more on help topics.
- Add any comments you have about the filter.
Click the 'Add Filter' button at the bottom to save your new filter.
Activate / Deactivate a filter
You can enable or disable a filter at anytime from the 'Ticket Filters' interface
- Open the 'Admin Panel' (See the last link on the left)
- Click 'Manage' > 'Ticket Filters'
- Select the filters
- Use the 'Enable' or 'Disable' links at the top to switch the filter between 'Active' and 'Inactive' states
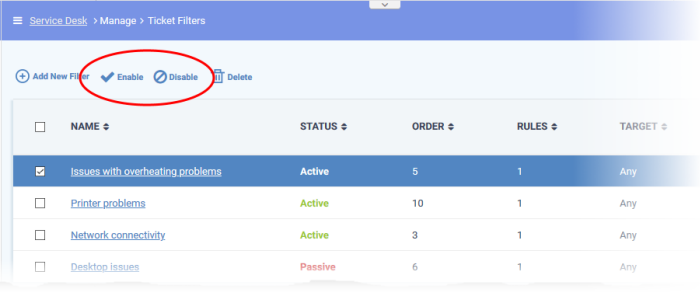
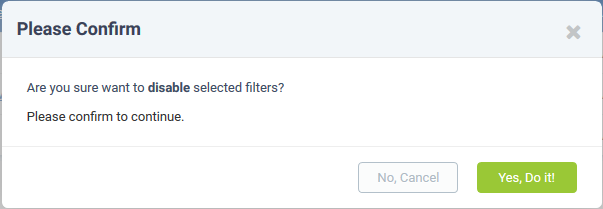
- Click 'Yes, Do it!' to confirm your selection
- Open the 'Admin Panel' (See the last link on the left)
- Click 'Manage' > 'Ticket Filters'
- Click on a ticket filter name in the list.
The 'Update Filter' screen lets you edit the filter configuration as required. The update procedure is same as explained above.
- Open the 'Admin Panel' (See the last link on the left)
- Click 'Manage' > 'Ticket Filters'
- Select the check box beside the ticket filters that you want to remove
- Click the 'Delete' link at the top
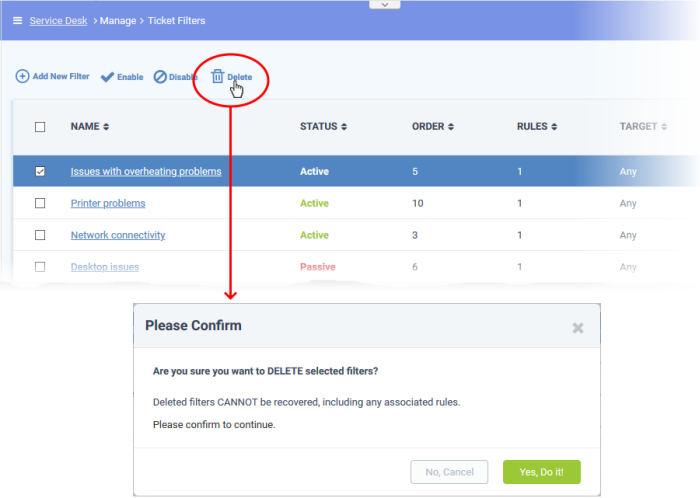
- Click 'Yes, Do it!' to confirm removal.