Ticket Report
Click 'Admin Panel' > 'Reports' > 'Tickets'
- The tickets report provides comprehensive information on all ticket activity for the selected period.
- Information includes ticket ID, the date and time of ticket creation, user's name and email address and the staff member assigned to the ticket.
- Reports can be exported to PDF and CSV formats.
|
Tip: You can also view Service Desk logs in the Comodo Dragon portal.
For more help with this, see the online help pagehttps://help.comodo.com/topic-457-1-981-14329-View-Audit-Logs.html. |
Create a tickets report
- Open the admin panel (See the last link on the left)
- Click 'Reports' > 'Tickets'

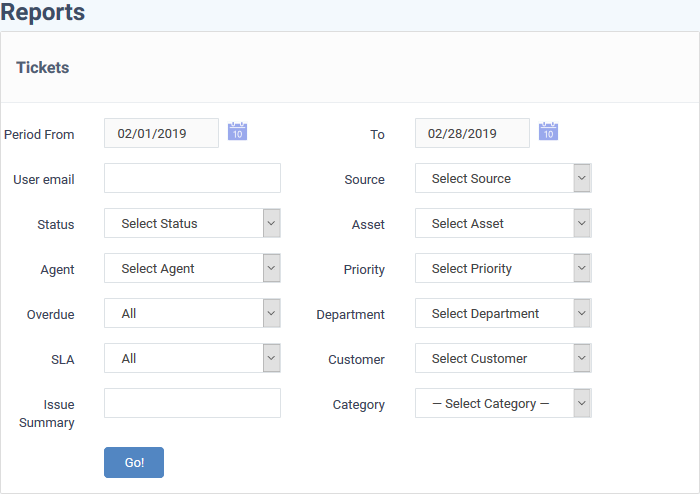
- Period: The default report period is from the first day of the current month to the current date. You can choose a different period by modifying the dates in the 'From' and 'To' fields.
- User email: Include tickets created by a specific user. Select the user's email address.
- Source: Filter the report by channel by which tickets are received.
- Status: Include only tickets with a selected state.
- Asset: Include tickets created for a specific item type.
- Agent: Include only tickets assigned to a specific staff/agent.
- Priority: Include only tickets of a certain criticality level.
- Overdue: Include only tickets that are marked overdue.
- Department: Include only tickets assigned to a certain department.
- SLA: Include only tickets assigned with a specific service level agreement plan.
- Customer: Include only tickets created by users belonging to a specific company.
- Issue Summary: Include only tickets containing a specific brief description of the issue and enter the issue summary in part or full.
- Category: Include only tickets that fall under a specific help topic.
- Click the 'Go!' button to generate the report. If no filters are selected then the report covers all ticket activities.

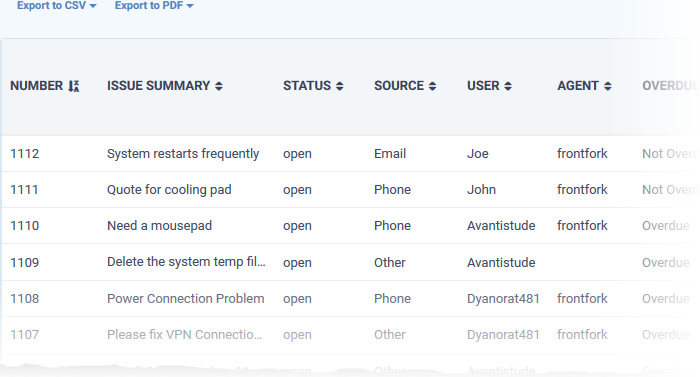
- Number: The identification number (ID) of the ticket.
- Issue Summary: A brief description of the issue.
- In many cases, the issue summary will have been specified by the user or staff member who created the ticket.
- The issue summary of tickets that were created by another CD module like EM will include the condition that generated the ticket.
- Status: Whether the ticket is open, paused or closed.
- Source: How the ticket was added. The possible values are phone, email, support portal and other.
- User: The name of the user with email ID, who created the ticket or on behalf of whom, the ticket was created by a staff member.
- Agent: The name of the staff member to whom the ticket is assigned.
- Overdue: Indicates whether the ticket is open beyond the stipulated closing time.
- Asset: The type of item that the ticket concerns. For example, 'Workstation', 'Server', 'Printer', 'Mobile'.
- Priority: Criticality of the ticket.
- Customer: The company to which the user belongs.
- Dept: The name of the department to which ticket was assigned.
- SLA: The service level agreement plan selected for the ticket.
- Created: The date and time the ticket was submitted.
- Closed: The date and time the ticket was closed.
- Billable Time: The time spent on resolving the issues(s) mentioned in the ticket by staff member, that is chargeable.
- Spent Time: Actual time spent by staff for resolving the ticket.
- Materials: Total cost of billable items and expenses which were used while resolving the ticket.
- Billable Time Cost: The charge calculated for the billable time, as per the service contract associated with the customer.
- Category: The help topic on which the user requested support.
- Click 'Export to PDF' or 'Export to CSV' to generate the report
You have the option to include custom fields, if any, for a ticket report.
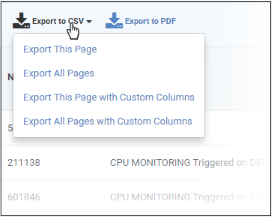
- Click 'Export to CSV'

- Export this page - The report file includes only the tickets in the current page
- Export all pages - The report file includes all tickets in the report
- Export this page with custom columns - The report file includes only tickets in the current page with custom fields, if any. See 'Forms' and 'Custom Lists' for info about adding custom fields
- Export all pages with custom columns - The report file includes all tickets in the report, with custom fields, if any. See 'Forms' and 'Custom Lists' for info about adding custom fields
Scheduled Reports
- Click
the icon
 beside 'Scheduled Reports' to configure automatic reports
and add recipients. See 'Scheduled Reports' for more details.


