


Create a New Policy
The 'Policies Management' section allows administrators to configure new polices and add secure applications to them as per organizational requirements. Though you can assign only one policy at a time to an endpoint group, you can add multiple components (secure applications) to a policy, each of which will be added to all endpoints in a group.
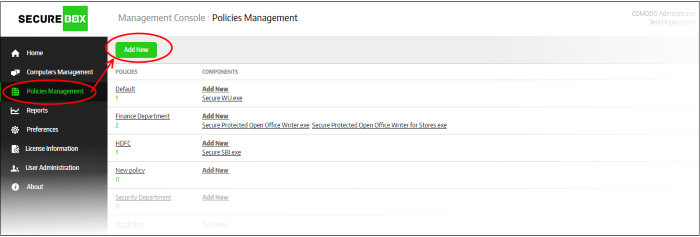
To create a new policy, click 'Polices Management' on the left and then the 'Add New' button.
The 'Policy Properties' screen will be displayed:
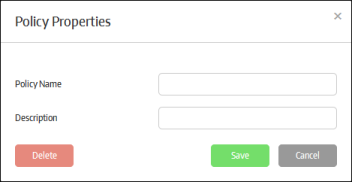
- Enter the name for the policy in the 'Policy Name' field
- Enter an appropriate description for the policy in the 'Description' field
- Click the 'Save' button
The policy will be added and listed in the screen.
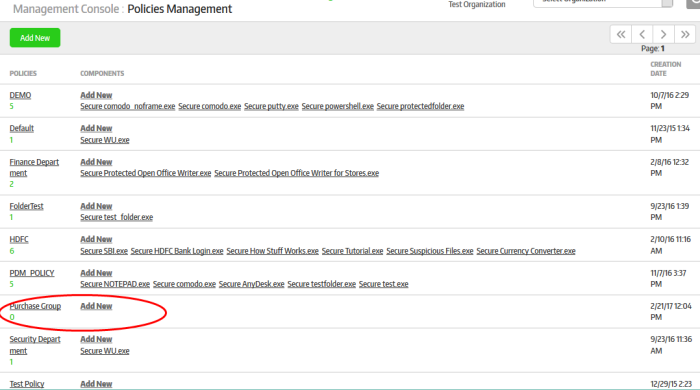
The next step is to and configure the secure application(s) for the policy. Click the 'Add New' link under the 'Components' column.
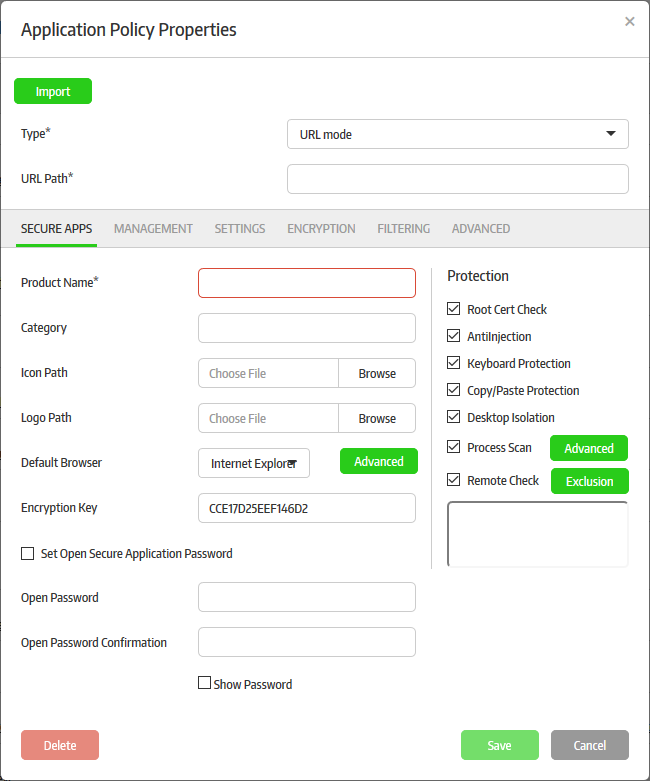
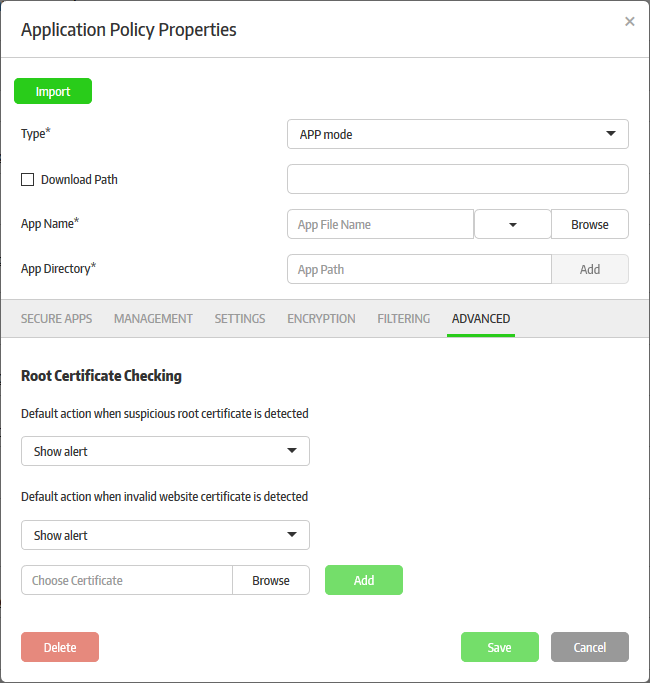
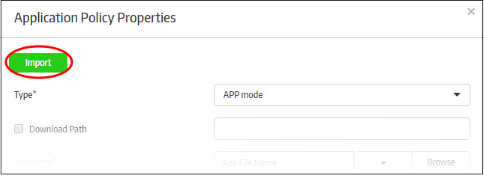
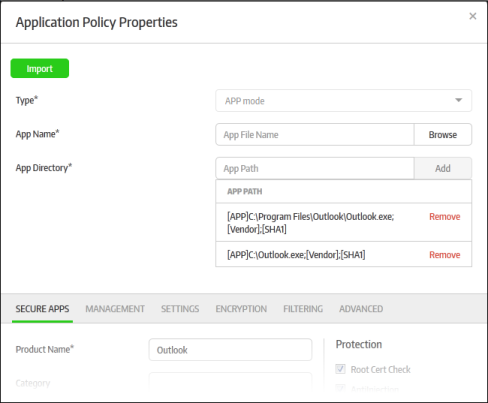
The 'Application Policy Properties' screen will be displayed:
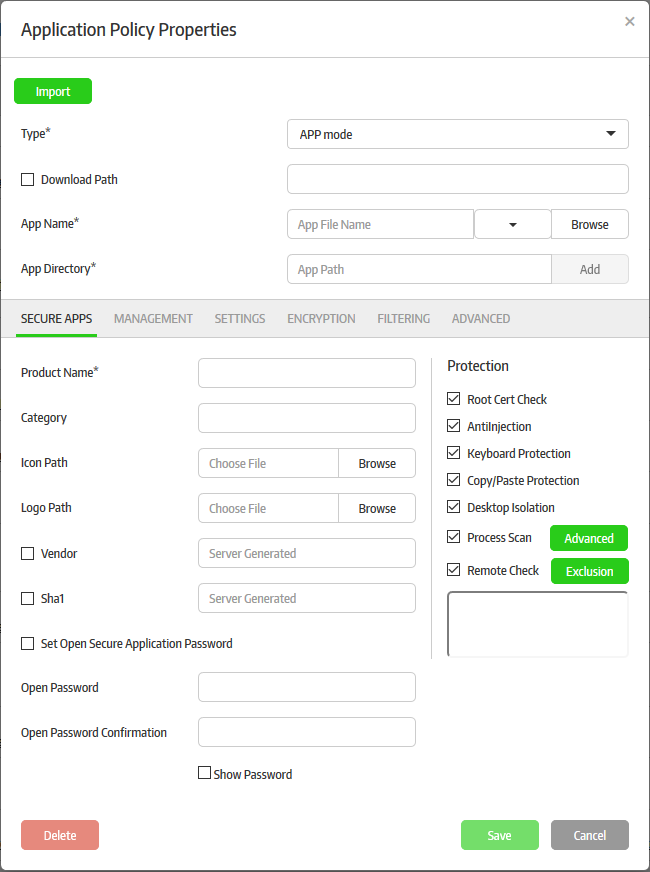
You have the option to use an existing policy as a base to create a new policy. Refer to the section 'To create a new policy using an existing policy as a base' for more details. The following steps explain how to create a new policy.
- Select the type of secure application that you want to add from the 'Type' drop-down
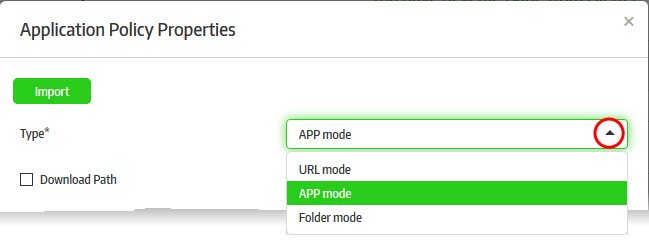
There are three types of secure applications:
- URL Mode – The specified URL will be run inside the secure box environment via the configured browser automatically when the secured application is launched. Refer to 'Configuring a Secure URL' for more details.
- APP Mode – The specified application on the Windows endpoints will be protected by Secure Box. The secured application can be configured to open only in the SB environment. Refer to 'Configuring a Secure APP' for more details.
- Folder Mode – A specified folder or an entire partition in the drive can be protected. The items opened inside the protected folder or drive will be run inside the secured environment. The secured item can be configured not to run outside of CSB. Refer to 'Configuring a Secure Folder' for more details.
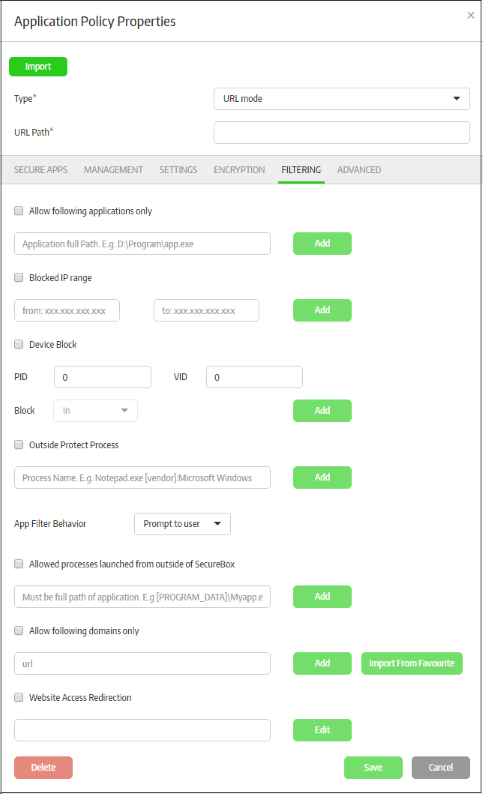
- Select 'URL mode' from the 'Type' drop-down
- Enter the URL that you want to secure in the 'URL Path' field
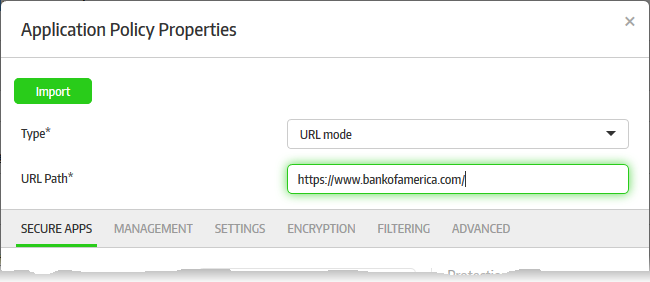
Each secure application allows for a more granular configuration through the sections below it. The parameters in the sections differ depending on the 'Type' of mode selected. Refer to 'Configuring Granular Secure Box Application Settings' for more details.
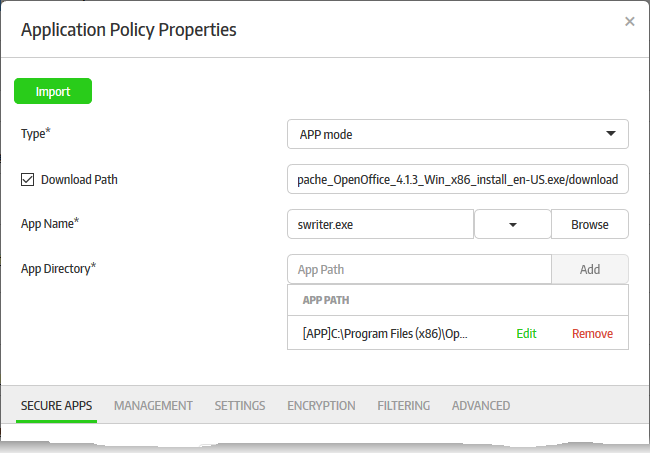
- Select 'APP mode' from the 'Type' drop-down
- Enter your app's name in the 'App Name' field (this should have .exe extension). Alternatively, click the 'Browse' button, navigate to the location of the application and click the 'Open' button. Please note that the 'Vendor' and 'SHA1' fields (should be selected) will be auto-populated in the 'Secure Apps' section if you select the 'Browse' method. If you want to define the 'Vendor' and 'Sha1' fields manually, then enter the app name. When the application is run, CSB will check if the admin defined vendor and SHA1 values match with its own. The app will be allowed to run only if there is a match. The drop-down in the field allows you to select Word, Excel or Powerpoint apps. If any of this selected, then there is no need to enter app name and app directory below, since they will be configured automatically.
- Enter the full path of the application that you want to secure in the 'App Directory' field. You can also enter search parameters here. For example, to search the folders for the app, enter 'search: C:/Programs/... ' without the quotes. The path of applications support system variables. For example, C:/Users/%username%/app/app.exe. Click 'Add'. Repeat the process to add more paths if the application might be installed on different locations on different endpoints.
- Download Path – If some of the endpoints do not have the configured app, then enable this option and enter the download path of the application. If the application is not installed on the endpoints it will be downloaded and installed during the secure application launch.
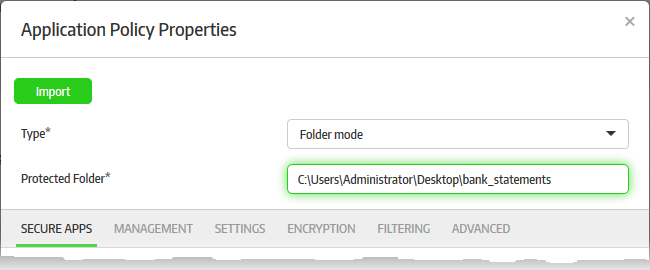
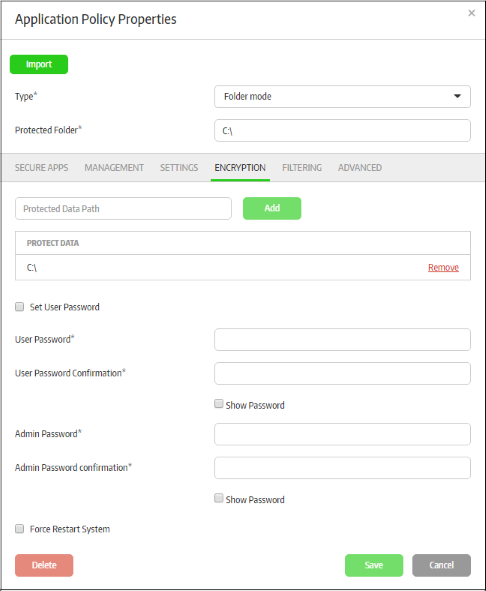
- Select 'Folder mode' from the 'Type' drop-down
- Enter the full path of the folder that you want to secure in the 'Protected Folder' field
The path of folders support system variables. For example, C:/Users/%username%/Desktop/folder_name
Each secure application allows for a more granular configuration through the sections below it. The parameters in the sections differ depending on the 'Type' of mode selected. Refer to 'Configuring Granular Secure Box Application Settings' for more details.
Configuring Granular Secure Box Application Settings
By default, the 'Secure Apps' tab will be selected. Click the links below to go straight to the required settings tab:
The 'Secure Apps' tab allows you to configure basic information and protection settings for the secure application.
|
Policies – 'Secure Apps' Tab – Table of Parameters |
|
|---|---|
|
Parameter |
Description |
|
Product Name |
Enter the name of the secure application. |
|
Category |
Enter an appropriate category name for the application. |
|
Icon Path |
The icon is used:
Supported format for the icon is .ico. Click the 'Browse' button, navigate to the location where the icon is stored and click 'Open'. |
|
Logo Path |
The logo is used:
Supported format for the log is .png. Click the 'Browse' button, navigate to the location where the logo is stored and click 'Open'. |
|
Default Browser |
This will be available only for 'URL mode'. Select the browser from the drop-down which will be used to open the secured URL. The options available are Internet Explorer (IE), Comodo Dragon, Portable IE8/9 and Comodo Ice Dragon browsers. If you choose Internet Explorer, you can configure advanced settings for IE-based secure applications. You can also add a pre-installed website certificate for the URL specified in the secure app, in order to compare it with the certificate obtained from the website. For more details, Refer to the explanation of Configuring Advanced Settings for IE Based Applications, under this table. |
|
Encryption Key |
This will be available only for 'URL mode'. This is used for validating an endpoint that is connected with CMC. The validation process includes sending encrypted values from the endpoint such as CMC generated machine ID, time stamp, Extra ID of the machine and so on. The values are encrypted using the encryption key and sent to the CMC via X token parameter in the http header. CMC decrypts the value and if found they are from a validated endpoint and coming from CSB, CMC allows it to connect to the configured URL. By default, an encryption key, which is 16 bytes in length, comes built-in with CMC. However it is advisable to change the encryption key in frequent intervals for safety. |
|
Vendor |
Applicable for 'App mode' only. If this is enabled and details filled, then only application produced by this vendor is allowed to run in the secure applications. If 'Browse' option is used to fill the 'App Name', then the vendor name, if available, will be auto-populated. You can also enter the details manually. CSB will check the vendor details when the app is run, and only when this matches with defined value, the application will be allowed to run. To get the vendor information of an executable file, check its properties -> Digital signature -> Details -> Singer information -> Name. |
| SHA1 | Applicable for 'App mode' only. If 'Browse' option is used to fill the 'App Name', then the SHA1 values, will be auto-populated. You can also enter the details manually. CSB will check the hash values when the app is run, and only when this matches with the defined value, the application will be allowed to run. |
|
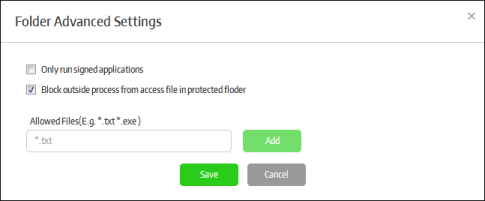
Folder Advanced |
Applicable for 'Folder mode' only. Click this to configure advanced settings for the protected folder.
|
|
Set Open Secure Application Password |
If selected, administrators can configure a password to open the secured item. |
|
Open Password |
Enter the password that should be used to open the secured item. |
|
Open Password Confirmation |
Enter the same password to confirm. |
|
Show Password |
If selected, the password will be displayed in the 'Open Password' field. |
|
Protection Settings |
|
|
Root Cert Check |
If enabled, the secured application will check for the root certificate. By default, CSB will compare with the Microsoft Trusted Certificate list. If required, the root certificate list can also be customized from the 'Management' tab. |
|
Anti-Injection |
If enabled, the secured application will be protected from malware injection. |
|
Keyboard Protection |
If enabled, the secured application will be protected against keyboard sniffing. |
|
Copy/Paste Protection |
If enabled, the copy/paste operation cannot be done between the secured item and Windows desktop application. |
|
Desktop Isolation |
If enabled, the normal Windows desktop will be isolated when the secured item is in operation. The user can switch between the desktop and the SB environment, by clicking the 'Switch to' button in the task bar. |
|
Process Scan |
If enabled, Comodo Secure Box will check all running processes with Comodo's File Look-Up Server (FLS) before the secure application starts. The FLS database contains the latest virus signatures. You have the option to automatically terminate any malicious processes which are discovered.
|
|
Remote Check |
If enabled, remote control applications will be detected and blocked for the secured item. You can exclude some remote applications by clicking the 'Exclusion' button.
|


- Click 'Save' for your settings to take effect
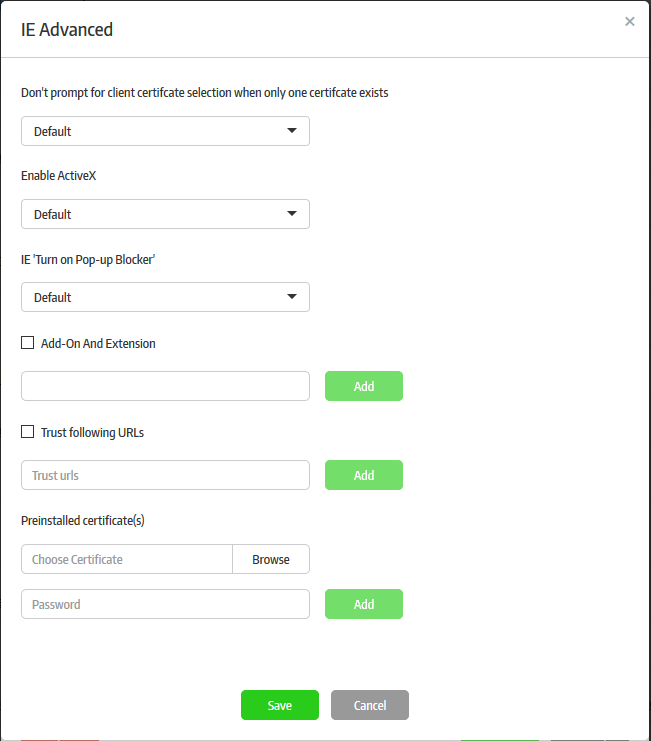
Administrators can configure additional security settings for URL Mode applications that are set to open in Internet Explorer (IE).
- Click the 'Advanced' button that appears beside the 'Default Browser' field after selecting 'Internet Explorer' from the drop-down
|
'Advanced IE Settings' - Table of Parameters |
|
|---|---|
|
Parameter |
Description |
|
Don't prompt for client certificate selection when only one certificate exists |
If the secure app requires client authentication to access a site, Internet Explorer will ordinarily ask the user to choose the client certificate they want to use - even if only one certificate exists. You can change this behavior to the following:
|
|
Enable ActiveX |
Allows you to enable or disable ActiveX controls on the website accessed through the secure app. The available options are:
|
|
IE 'Turn on Pop-up Blocker' |
Choose whether to allow or block pop-up windows displayed by the website. The available options are:
|
|
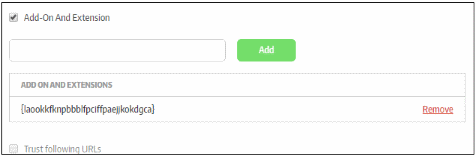
Add-on and Extension |
The GUID of an add-on can be found in its properties (IE > Manage add-ons > right click on the add-on > select 'more information'). GUID = CLASS ID. To selectively allow Add-ons and Extensions
|
|
Trust following URLs |
Add a list of trusted websites to the secure application. If the security level setting of IE ('Tools' > 'Internet Options' > 'Security' Tab) at an endpoint is set to 'High', IE will block all websites other than those in its trusted websites list. If you want some websites to be accessed by the IE based secure app, even if the IE is set to 'High' Security level at the endpoint, then add the URLs of the websites to 'Trusted URLs' field. To add trusted websites
|
|
Pre-installed certificates |
Allows you to install existing client certificates into the IE certificate store. This allows users to continue to authenticate themselves to websites when accessing via a Secure Box app. Some websites, for example banking websites and online shopping websites, require a client certificate to be installed on the user's browser for two-factor authentication. The client certificate is usually provided by the website operator. A user's client certificate can also be obtained by exporting it from their browser's certificate store and saving in .cer format. Administrators can add these certificates to the IE Advanced Settings component of the secure app configuration. Once the secure app is pushed to the endpoint, the certificate(s) will be installed, allowing the user to access the website from within the secure app. Once installed, the certificate also serves for authentication when the website is accessed outside the secure app. To add a pre-installed certificate
The certificate file will be added
|

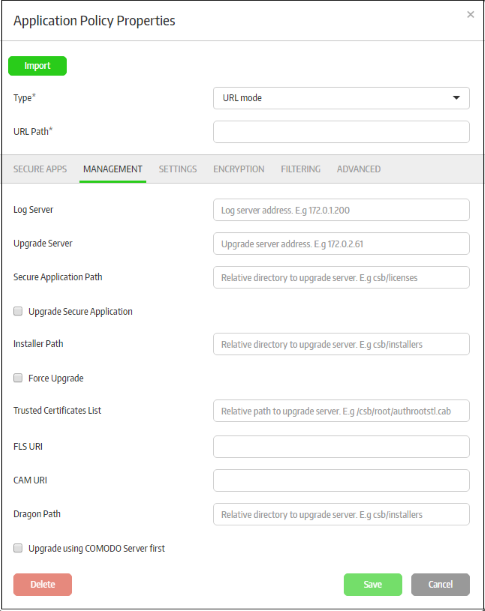
The administrators can upgrade CSB to latest versions using the Central Management Console, which is convenient and easy. However, if the organization has a strict network environment or if the CMC is down, the admins can configure the local server and upload the latest CSB versions here so that the endpoints can upgrade to latest versions from the local server.
-
Click the 'Management' tab.
|
Policies – 'Management' Tab – Table of Parameters |
|
|---|---|
|
Parameter |
Description |
|
Log Server |
Enter the IP of the log server address where the CSB logs will be stored. This will be auto-filled if the global log server setting is configured in the 'Preferences' section. Refer to the section 'Configuring the Management Console' for more details. |
|
Upgrade Server |
Enter the IP address of the local server in which the latest CSB versions must be uploaded by the admins. For example, 172.0.2.61. This will be auto-filled if the global upgrade server setting is configured in the 'Preferences' section. Refer to the section 'Configuring the Management Console' for more details. |
|
Secure Application Path |
Enter the path of the secure apps in the upgrade server, for example, csb/secureapps or csb/licenses. Secure applications will be updated from this path if CMC is not available or down. |
| Upgrade Secure Application | If this option is enabled and if there is a new version of secure application is available provided in the 'Secure Application Path' field, then the secure application will be updated when it is opened. If it is disabled, the secure app will not be updated. |
|
Installer Path |
Enter the path of the CSB installation files in the upgrade server, for example, csb/installers |
| Force Upgrade | If a new version of CSB available and the path is specified in the 'Installer Path', CSB will be updated automatically when any secure application is run. If disabled, users will get a prompt dialogue when running a secure app that a CSB update is available. |
|
Trusted Certificates List |
CSB verifies the root certificates using the Microsoft Root Certificate list. You can customize the root certificate list for verification. Enter the path of the root certificates stored in the upgrade server. For example, csb/root/authrootstl.cab |
|
FLS URI |
Enter the URL of the FLS. The FLS scan is performed in this redirected location, which mostly is pointed to Comodo's FLS servers. |
|
CAM URI |
Enter the URL of the CAM. The CAM license check scan is performed in this redirected location, which mostly is pointed to Comodo's CAM servers. |
|
Dragon Path |
Applicable for 'URL mode' only.The Dragon browser is customized for CSB. If a newer Dragon version is available, it can be updated by client. Enter the path of new versions of Dragon installation files in the upgrade server, for example, csb/dragon |
|
Upgrade using COMODO Server first |
If enabled, Comodo servers will be the first option for upgrading irrespective of the settings done above. |
- Click the 'Save' button for your changes to take effect.
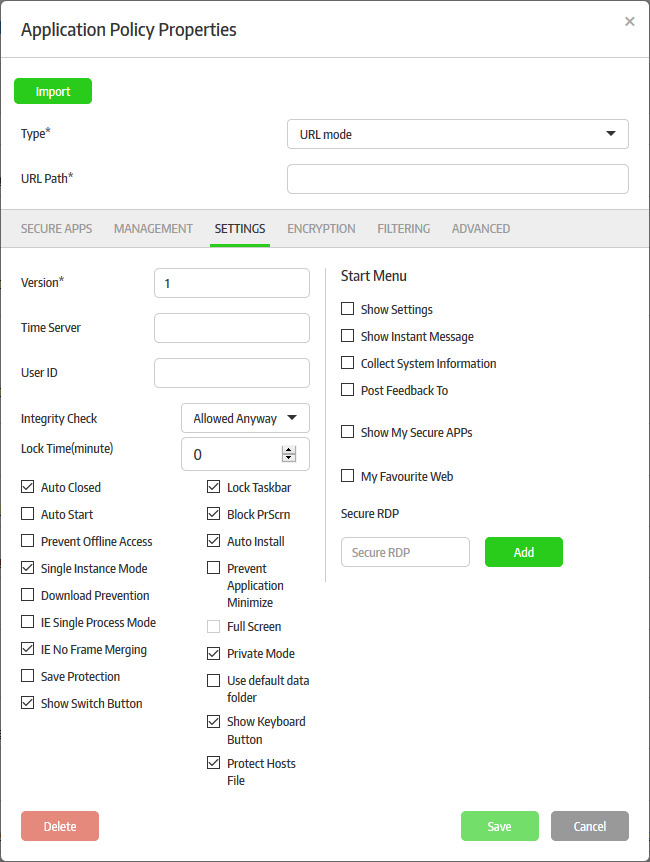
The 'Settings' tab allows administrators to configure basic settings for the secured item.
- Click the 'Settings' tab.
|
Policies – 'Settings' Tab – Table of Parameters |
|
|---|---|
|
Parameter |
Description |
|
Version |
Enter the version number for the secure application. This determines the whether the secure app is up-to-date or not. The secure app on the endpoints will the check the upgrade server for the latest version and update accordingly. This is applicable only when the upgrade server details are configured in the 'Management' tab. |
|
Time Server |
Enter the time server details for synchronizing the time among the systems, which is used for HTTP authentication time stamp. This will be auto-filled if the global time server setting is configured in the 'Preferences' section. Refer to the section 'Configuring the Management Console' for more details. |
|
User ID |
The 'Customer ID' that can be found in the 'About' page. This is applicable only when the upgrade server details are configured in the 'Management' tab. |
| Integrity Check | When a secure application is started, CSB will check the system environment for running the secure application safely. For example, CSB keyboard filter priority in the filter list. If the integrity check is failed, that CSB keyboard filter is not in the first priority, CSB will act per the option chosen. There are three options available:
|
| Lock Time (minute) | This field specifies the timeout in minutes to lock the Windows desktop if there is no user action. Enter '0' to disable this option. |
|
Auto Closed |
If enabled, the secure application will be closed automatically if the last window in it is closed. |
|
Always Open it in CSB |
Applicable for 'APP mod' only. If enabled, the secure application will always run in CSB only irrespective of whether the application is opened directly or a file that opens through the application. For example, if you create MS Word application as a secure app and deploy it, all the word files will open in Secure Box only whether opened via MS Word or double clicked on a word file. |
| Auto Start | If enabled, secure application will be launched during the Windows OS start. |
|
Prevent Offline Access |
If enabled, the secure application is not allowed to start if network connection is not available. |
|
Upgrade Secure Application |
If enabled, the secure application will upgrade automatically if a update is available. |
|
Scan in Background |
If enabled, the FLS scan runs in the background. |
|
Single Instance Mode |
If enabled, only one instance of the secured application will open. If opened again, the secure application will show the already opened application. |
|
Download Prevention |
Applicable for 'URL mode' only. If enabled, files cannot be downloaded from the Internet. |
|
IE Single Process Mode |
Applicable for 'URL mode' only. If enabled, IE runs at single process mode in CSB. |
|
IE No Frame Merging |
Applicable for 'URL mode' only. If enabled, IE can run both inside and outside the secure app at the same time. The user will be able to run IE outside the app separately, even if the browser is running inside the secure app. |
| Save Protection |
If enabled, users cannot save the content of the web pages to their local machines. Currently only IE is supported for this feature. |
| Show Switch Button | If enabled, the button to switch between secure application and desktop will be displayed. |
|
Lock Taskbar |
If enabled, the task bar is locked when the secure application is run. |
|
Block PrScrn |
If enabled, no print screen is allowed in CSB. |
|
Auto Install |
If enabled, when the secure application is run on a system without CSB, the CSB will be automatically downloaded and installed. |
| Close Running Application | Applicable for 'App mode'. If enabled, a warning will be displayed if you open an secure application that is already open before it was made secure. For example, some endpoints will have notepads already running and you create a secure application to run notepad.exe and deploy it. If the users try to open the secure application, a warning will be displayed to close the already running application. |
| Prevent Application Minimize |
If enabled, the secure application window cannot be be minimized. |
| Full Screen | Applicable for 'URL mode' only. If enabled, the secure application will open in full screen mode. |
| Close Running Application | Applicable for 'App mode'. If enabled, a warning will be displayed if you open an secure application that is already open before it was made secure. For example, some endpoints will have notepads already running and you create a secure application to run notepad.exe and deploy it. If the users try to open the secure application, a warning will be displayed to close the already running application. |
| Private Mode | Applicable for 'URL mode' only. If enabled, the secure application will open in private mode. |
| Use default data folder | Applicable for 'URL mode'. If enabled, Comodo Dragon and IE browsers can use profile data saved in their respective default data folders (running outside SecureBox). If this not enabled, these browsers will create their own profile data. Username and password saved outside of SB cannot be auto used in SB. |
| Show Keyboard Button | If enabled, the keyboard buttons will be displayed in secure application desktop. |
| Protect Host File | If this option is selected, the hosts file will not be used in secure applications. This means secure applications will be protected from host file poisoning attacks. |
|
App Filter Behavior |
The settings done here determine the action for the 'Allow following applications only' settings done in the 'Filtering' tab. There are three options available:
|
|
Start Menu Settings |
|
|
Show Settings |
If selected, the 'Show Settings' menu item will be available from the CSB start menu on the endpoints. On clicking it, the 'View Settings' dialog will be displayed providing details such as 'Protected Data, Allowed URLs, 'Allowed Applications', Terminated Process and About'. |
| Show Instant Message | If selected, the 'Send Instant Message' option will be available on the endpoint from the start menu for the secure application. The end-user can use this option to send instant messages to administrators. When an end-user sends a message, a notification will be displayed at the top of the management console, and the message icon beside the endpoint name will turn green in the 'Computer' > 'Computer Management' interface. By clicking the icon, the currently logged-in administrator can view the message. Refer to the Managing Endpoints section for more details. |
|
Collect System Information |
If selected, the 'Collect System Information' menu item will be available from the CSB start menu on the endpoints. On clicking it, CSB collects the basic system information for troubleshooting to help CSB support team. |
|
Post Feedback To |
If selected, the 'Post Feedback To' menu item will be available from the CSB start menu on the endpoints. On clicking it, CSB will send feed back information to a specified email address. By default, the information is sent to secureboxsupport@omodo.com. You can change the emai address in the field. |
|
Show My Secure APPs |
If selected, all the secure applications that have run before will be available from the CSB start menu as 'Recent Secure Applications' |
|
My Favourite Web |
Applicable for 'URL mode' only. If selected, the 'My Favorite Websites' menu item will be available from the CSB start menu on the endpoints.
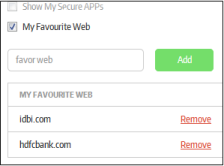
The added websites will be listed under 'My Favorite Websites' |
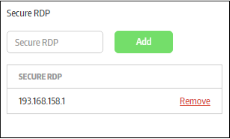
| Secure RDP | Computers that are using secure RDP application will allow RDP connections to it only via secure applications from other endpoints. You can add IPs of machines that are installed secure RDP application.
|
- Click the 'Save' button for your changes to take effect.
The 'Encryption' tab allows administrators to configure the data folders that will be be protected with 'Transparent Data Encryption'. Files created by secure applications and stored in the configured folder will also be encrypted and can be accessed by the secure applications with read/write permissions. Non secure applications that access the encrypted folders have only read permissions. One secure app can secure multiple folders and one folder can be secured by multiple secure apps as well. Make sure to specify predefined generic names, for example, appdata and userhome, to work with all Windows accounts.
- Click the 'Encryption' tab.
|
Policies – 'Encryption' Tab – Table of Parameters |
|
|---|---|
|
Parameter |
Description |
|
Protected Data Path |
Enter the full path of the folder or drive that should be encrypted and click the 'Add' button. Repeat the process to add more folders. To remove a folder from the list, click the 'Remove' link beside it. |
|
Set User Password |
If selected, you can configure the user and admin password to open the encrypted folders |
|
User Password |
Enter the password for the user to open the folder |
|
User Password Confirmation |
Confirm the user password |
|
Show Password |
If selected, you can see the password details while entering |
|
Admin Password |
Enter the password for the administrator to open the folder |
|
Admin Password Confirmation |
Confirm the admin password |
|
Show Password |
If selected, you can see the password details while entering |
It is possible to open other programs, visit other URLs and so from the secured environment. The 'Filtering' tab allows administrators to define filtering checks when creating a secured application, such as configuring to allow only certain applications, URLs to open in the secured environment. You can also configure to allow or not allow USB devices from accessing the secured application.
- Click the 'Filtering' tab.
|
Policies – 'Filtering' Tab – Table of Parameters |
|
|---|---|
|
Parameter |
Description |
|
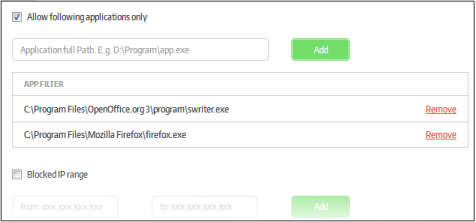
Allow following applications only |
If selected, only the added applications will be allowed to open in the secured environment for the secure application. Depending on the setting configured in 'App Filter Behavior', the opening of other applications will be blocked, allowed or displayed a warning to the user.
|
|
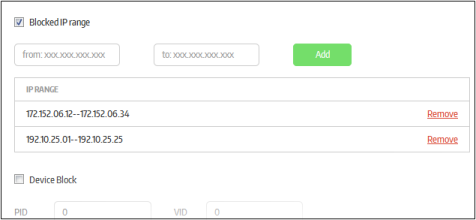
Blocked IP Range |
If selected, the secure application prevents access to the sites with IP in the defined range.
|
|
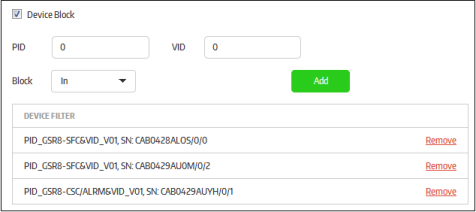
Device Block |
If selected, the secure application can be defined to block or allow devices based on their product ID (PID) and vendor ID (VID) numbers.
Please note that in order to make the blocked out device to work again in the host system, the configuration in the secure application should be changed or the CSB should be uninstalled. |
|
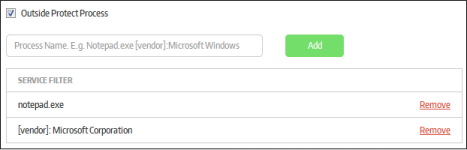
Outside Protect Process |
In addition to the protection for processes invoked by the secure application, you can configure protection for processes for applications running outside the secure application. This can be configured to protect a specific application or applications produced by a vendor. If an executable file name is entered, the specified program will be protected by CSB even when it’s run outside of secure application. If a vendor name is entered, all the programs that are produced by this vendor will be protected even when they run outside of secure application.
|
| App Filter Behavior | The settings done here determine the action for the 'Allow following applications only' settings done above. There are three options available:
|
| Allowed process launched from outside of Secure Box | Secure applications prevent outside process to start another process into secure application. For example, Windows Explorer may start another application(assume notepad.exe) into secure application. If it's not configured here, secure application will block this. To add applications that can be started outside SB, enter the full path of the application and click 'Add'. 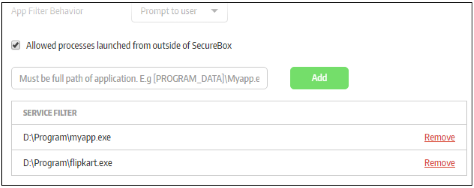
|
|
Allow following domains only |
Available for 'URL mode' only. The user can open multiple sites from the configured browser. You can configure the websites that can be opened from the secured application. Select the 'Allow following domains only' check box
|
|
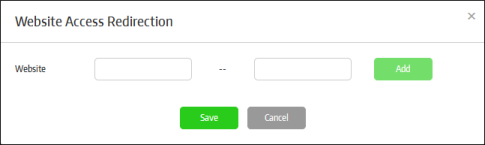
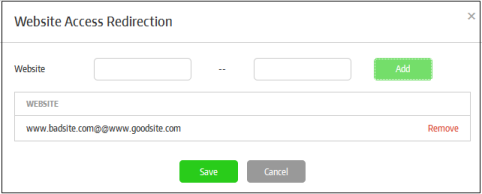
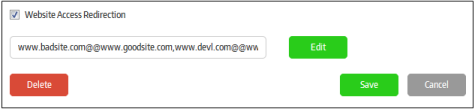
Website Access Redirection |
Available for 'URL mode' only. You can configure to redirect websites that are opened in the secure URL app browser to other websites.
The redirect details will be listed in the screen.
|

- Click the 'Save' button for your changes to take effect.
The 'Advanced' tab allows administrators to configure advanced settings for IE based secure applications as well as define actions to be taken for 'Root Cert Check' feature. Root certificate of all SSL connection in the protected application will be verified using a trusted root certificate list added to the management console. You can also add website certificates here in order to compare it with the certificate in the secure application. This is similar to certificate pinning that associates a host with their expected certificate or public key.
Please note that root certificate check and certificate checks are different. Root certificate check is for checking if the root certificate is in the trusted list and by default it checks the Microsoft Trust Certificate list. You can also configure to check against a customized root certificate list from the 'Management' tab > Trusted Certificates List. The certificate check is used to compare the website information in the added certificate with the secure application website's certificate and ascertain if they are the same or not.
-
Click the 'Advanced' tab.
|
Policies – 'Advanced' Tab – Table of Parameters |
|
|---|---|
|
Parameter |
Description |
|
Root Certificate Checking |
|
|
Default action when suspicious root certificate is detected |
The setting done here determines the action for the 'Root Cert Check' feature in SECURE APPS tab > Protection. The options available are:
|
|
Default action when invalid website certificate is detected |
Allows you to configure the action for an invalid website certificate detection after comparing with website certificates added in the next field 'Choose Certificate'. The options are:
|
| Add Website Certificates | The 'Choose Certificate' field allows you to add website certificates in order to compare and check with the secure application website's certificate.
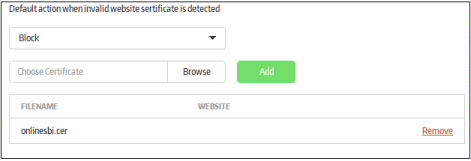
|
- Click the 'Save' button for your changes to take effect.
To create a new policy using an existing policy as a base
CMC allows administrators to create a new policy using the configuration of an existing secure app from a policy. This feature will be useful to roll out the policy with or without modifications to other endpoints groups per the organization's requirement.
To import the settings of an existing policy, click the 'Add New' link or on the name of a secure app under 'Components' and click the 'Import' button at the top.
The 'Import Exist Secure App' dialog will be displayed.
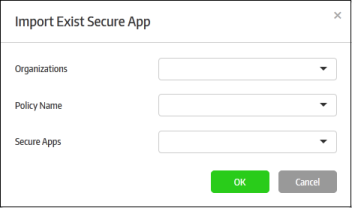
- Organizations – Lists the organizations available for the account. Select the organization from which you want to import a policy. Please note this feature will be available for administrators with super admin privileges only.
- Policy Name – Lists all the policies available in the selected organization. Select the policy from the drop-down.
- Secure Apps – Lists all the secured items that are configured for the selected policy. Select the secured item from the drop-down that you want to import.
- Click 'OK'.
The secured item will be imported with all its settings including the product name. You can save it with the same settings or modify them according to the requirement. This is similar to the process explained for creating a new policy. Click here to know more about how to configure the settings in the imported policy.