Comodo Help
Find the desired product help
Comodo Dome Firewall

Comodo Dome Firewall

Dome Firewall Central Manager Admin Guide

English

Print Help Download Help
Manage URL And Content Filtering Profiles
  • Introduction To Dome Firewall Central Manager
    • Sign-up For Firewall Central Manager
    • Setup Dome Firewall Central Manager
    • Integrate Central Manager With Comodo One / Comodo Dragon / ITarian
    • Login To The Admin Console
    • Change Password
    • Add Organizations
    • Enroll Dome Firewall Devices
  • The Main Interface
  • The Dashboard
    • View Details Of A Firewall Device
    • Quick Actions On A Firewall Device
      • Backup/Restore A Firewall Device
      • Configure SSH Access For A Firewall Device
      • Network Configuration
    • Access Admin Console Of A Firewall Device
  • Manage System Status And General Configuration
    • Update Firmware Version
    • View And Upgrade Central Manager License
    • View Management Tasks
  • Customer Management
    • Manage Organizations
    • Activate Firewall Licenses
  • Approve Firewall Device Enrollment
  • Add Interfaces
  • Firewall Management
    • Configure Firewall Policy Rules
    • Manage Firewall Address Objects
    • Manage Firewall Object Groups
    • Configure Destination Network Address Translation Rules
    • Configure Source Network Address Translation Rules
    • Configure System Access Rules
  • Configure Virtual Private Network Settings
    • Configure IPSec/L2TP Users
    • IPSec Configuration
    • Configure L2TP Server
  • Manage Advanced Threat Protection Profiles
  • Manage URL And Content Filtering Profiles
  • Intrusion Prevention
    • Configure The Intrusion Prevention System
    • Manage IPS Rulesets
    • Manage Application Identification Rulesets
  • About Comodo Security Solutions

Manage URL and Content Filtering Profiles


  • Click 'URL Filter' in the left-hand menu to open the filter configuration screen
  • The web filter allows you to control which websites your end-users can access.
  • You need to create a URL/content filter profile to implement this feature. The profile can then be added to a firewall rule

There are two elements of a URL profile:

  • A website category filter.
  • A whitelist / blacklist of specific websites.

Once created, URL profiles can be activated in the 'Web Protection' section of a firewall rule. See Web Protection Settings for help with this.

    • Profiles created for an organization are available to all devices in that organization.
    • Profiles created for an individual device are only be available to that device.

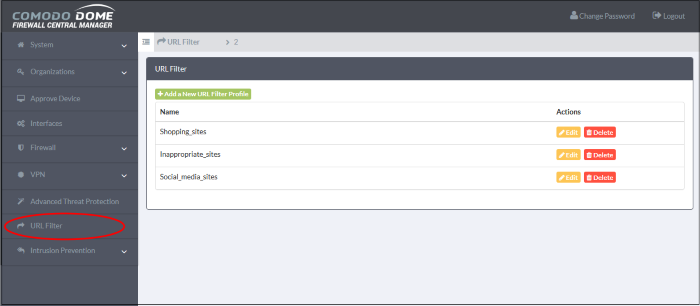
    Open the URL filter interface

    • Click 'URL Filter' on the left


    URL Filter - Column Descriptions

    Column

    Description

    Name

    Profile label.

    Actions

    Edit

    Opens the profile editor so you can modify the profile. The editor interface is similar to the interface for adding a profile. See Create a URL Filter Profile for more details.

    Delete

    Removes the profile.


    Create a URL Filter Profile


    URL filter profiles are constructed from the following two items:

    • Content categories - Web pages with content which falls into a chosen category will be automatically blocked
    • URL Whitelist/Blacklist - Users can access whitelisted addresses. Blacklisted addresses will be blocked. These lists are often used to create exceptions for sites blocked (or allowed) by content categories.


    To create a URL filtering profile

    • Click 'URL Filter' on the left
    • Select an organization/device from the drop-down in the title bar
    • Click the 'Add a New URL Filter Profile' button at the top-left of the interface.


    Complete the following details in the form:

    • Name - Friendly label to identify the purpose of the profile.
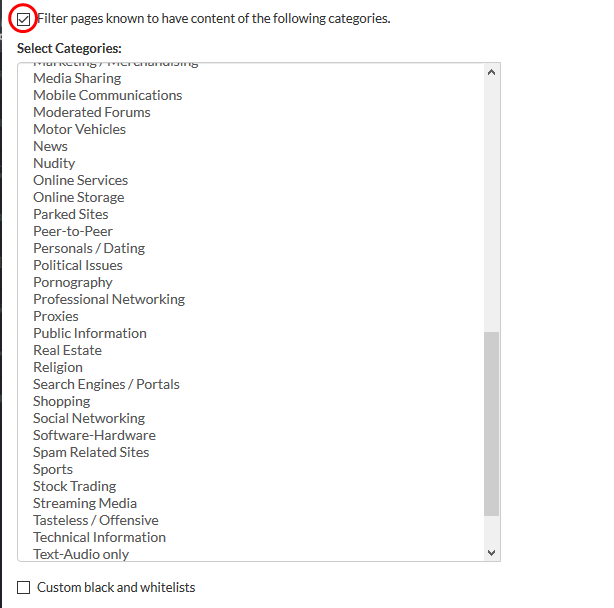
    • 'Filter pages known to have...' - Choose website categories that you want to block:


    Tip: Press and hold the 'Ctrl' key to select mutiple items.


    • 'Custom black and whitelists' - Specify URLs you want to allow or block. Black and whitelists are usually created to provide exceptions to the categories you have allowed/blocked.


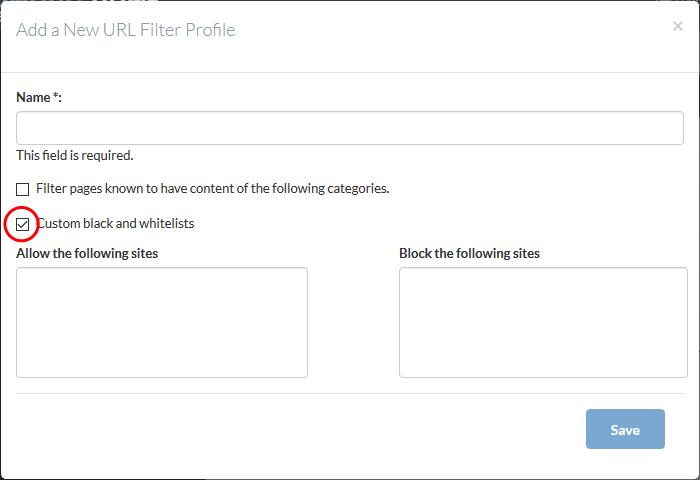
    • 'Allow the following sites' – Whitelisted websites. Users are allowed to access the sites you type here.
    • 'Block the following sites' – Blacklisted websites. Users are not allowed to access sites you type here.

    Note:

    • Type URLs in the format www.example.com (without http:// or https://)
    • Wildcard characters are allowed. For example, *.example.com will block all sub-domains of example.com
    • Click 'Save'.

    The profile is now available in the 'URL Filter' drop-down when creating/editing a firewall rule.

    • Repeat the process to add more filter profiles.
    Our Products
    • Free Antivirus
    • Free Internet Security
    • Website Malware Removal
    • Free Anti-Malware
    • Anti-Spam (Free Trial)
    • Windows Antivirus
    • Antivirus for Windows 7
    • Antivirus for Windows 8
    • Antivirus for Windows 10
    • Antivirus for MAC
    • Antivirus for Linux
    • Free Endpoint Security
    • Free ModSecurity
    • Free RMM
    • Free Website Malware Scanner
    • Free Device Manager for Android
    • Free Demo
    • Network Security
    • Endpoint Protection
    • Antivirus for Android
    • Comodo Antivirus
    • Wordpress Security
    Cheap CDN
    • Bootstrap CDN
    • Semantic UI CDN
    • Jquery CDN
    • CDN Plans
    • CDN
    • Free CDN
    Enterprise
    • Patch Management Software
    • Patch Manager
    • Service Desk
    • Website Down
    • Endpoint Protection Solutions
    • Website Security Check
    • Remote Monitoring and Management
    • Website Security
    • Device Manager
    • ITSM
    • CRM
    • MSP
    • Android Device Manager
    • MDR Services
    • Managed IT Support Services
    • Free EDR
    Free SSL Certificate
    Support Partners Terms and Conditions Privacy Policy

    © Comodo Group, Inc. 2025. All rights reserved.