Comodo Help
Find the desired product help
Comodo Dome Firewall

Comodo Dome Firewall

Dome Firewall Central Manager Admin Guide

English

Print Help Download Help
Introduction To Dome Firewall Central Manager > Enroll Dome Firewall Devices
  • Introduction To Dome Firewall Central Manager
    • Sign-up For Firewall Central Manager
    • Setup Dome Firewall Central Manager
    • Integrate Central Manager With Comodo One / Comodo Dragon / ITarian
    • Login To The Admin Console
    • Change Password
    • Add Organizations
    • Enroll Dome Firewall Devices
  • The Main Interface
  • The Dashboard
    • View Details Of A Firewall Device
    • Quick Actions On A Firewall Device
      • Backup/Restore A Firewall Device
      • Configure SSH Access For A Firewall Device
      • Network Configuration
    • Access Admin Console Of A Firewall Device
  • Manage System Status And General Configuration
    • Update Firmware Version
    • View And Upgrade Central Manager License
    • View Management Tasks
  • Customer Management
    • Manage Organizations
    • Activate Firewall Licenses
  • Approve Firewall Device Enrollment
  • Add Interfaces
  • Firewall Management
    • Configure Firewall Policy Rules
    • Manage Firewall Address Objects
    • Manage Firewall Object Groups
    • Configure Destination Network Address Translation Rules
    • Configure Source Network Address Translation Rules
    • Configure System Access Rules
  • Configure Virtual Private Network Settings
    • Configure IPSec/L2TP Users
    • IPSec Configuration
    • Configure L2TP Server
  • Manage Advanced Threat Protection Profiles
  • Manage URL And Content Filtering Profiles
  • Intrusion Prevention
    • Configure The Intrusion Prevention System
    • Manage IPS Rulesets
    • Manage Application Identification Rulesets
  • About Comodo Security Solutions

Enroll Dome Firewall Devices


  • Dome Firewall devices have a built-in client which communicates with the central manager. This allows the device to receive commands from the manager and apply them to the firewall.
  • Dome Firewall virtual appliances behind Network Address Translation (NAT) can also be enrolled to the central manager. The manager will communicate with the appliance through the NAT IP address.
    • Note – Existing configurations (policies, objects etc) will not be imported with the FW device. We recommend you remove these from the device before importing, then configure them again in central manager.


      There are two steps to enroll firewall devices to central manager:

      • Connect the device to the Dome Firewall Central Manager
      • Approve the device and assign it to an organization

      See the following for more details:


      Step1: Connect the Dome Firewall interface to Dome firewall Central Manager


      To connect a Dome Firewall Virtual Appliance to the central manager:

      • Login to the firewall device at https://[ip address of the Dome firewall device]:10443
      The 'Comodo Dome Firewall' interface will open.


      After logging in,

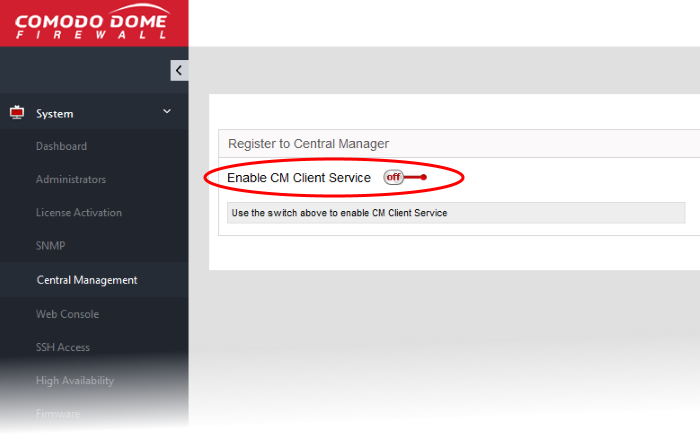
      • Click 'System' > 'Central Management'
      • Switch on the 'Enable CM Client Service' option


      • Enter the parameters required to connect the firewall to Dome central manager
      • Server IP - Enter the IP address of the DFW Central Manager interface
      • Organization Name - Enter the name of the organization to which you want the device to belong. You can create organizations by logging into the central manager and clicking 'Organizations' > 'Organizations' > 'Add Organization'.
      • Description (Remark)* - Enter any comments you wish to leave about the device
      • Click 'Connect'


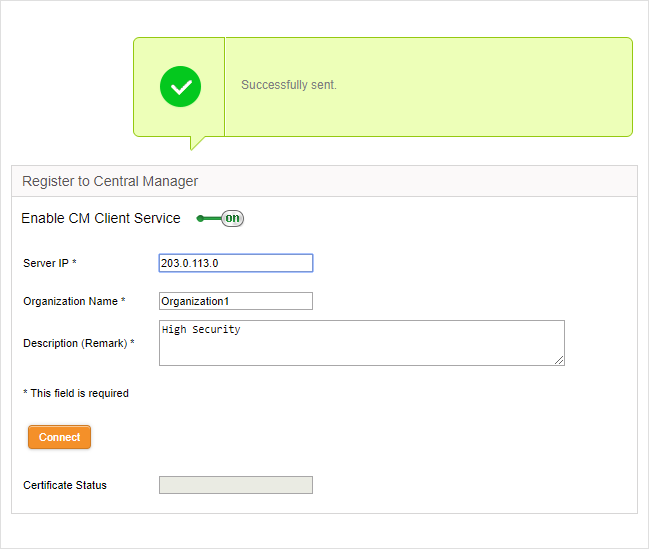
      The device will be successfully connected to Dome Firewall Central Manager.


      Next, the administrator needs to approve the device in order to complete the import process.


      Step 2 : Approve the Dome Firewall Device


      To approve a device:

      • Make sure you have connected the device as explained in step 1 above.
      • Login to the DFW Central Manager console.

      After logging in,

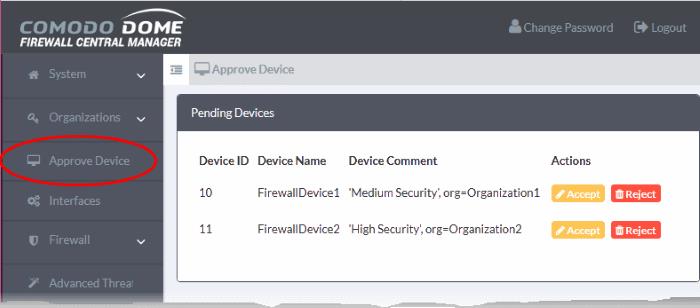
      • Click 'Approve Device' on the left.
      • The 'Pending Device' interface shows all devices awaiting approval.
      • Click 'Accept' next to the device you wish to approve. This will open the 'Accept Device' dialog.
      • You have the option to change the device organization if required.
      • Click 'Save' to approve the device and assign it to an organization.
      • Repeat the process to approve and import more devices.


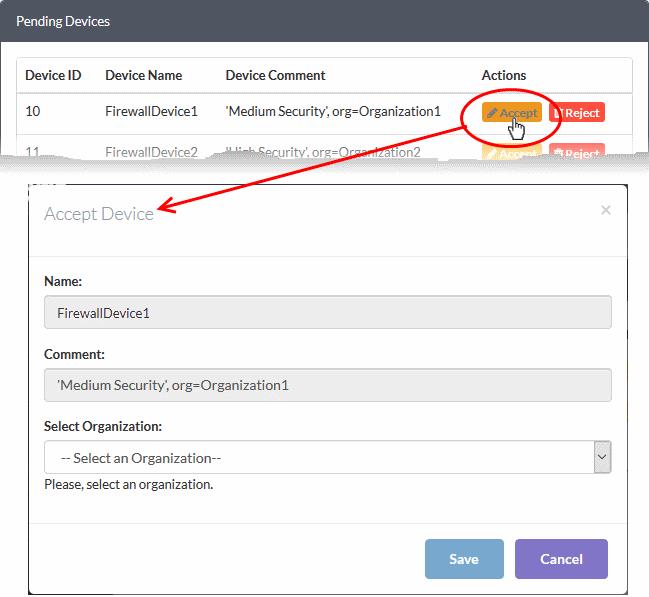
      • Name - The device label. The name is pre-populated and cannot be edited. Please note that you can change the name of a device from the dashboard after device enrollment. 
      • Comment - Brief description and organization details entered when enrolling the device. This field is pre-populated and not editable
      • Select Organization - Choose the organization to which the device should be assigned. See 'Add Organizations' if you have not yet added an organization.

      Our Products
      • Free Antivirus
      • Free Internet Security
      • Website Malware Removal
      • Free Anti-Malware
      • Anti-Spam (Free Trial)
      • Windows Antivirus
      • Antivirus for Windows 7
      • Antivirus for Windows 8
      • Antivirus for Windows 10
      • Antivirus for MAC
      • Antivirus for Linux
      • Free Endpoint Security
      • Free ModSecurity
      • Free RMM
      • Free Website Malware Scanner
      • Free Device Manager for Android
      • Free Demo
      • Network Security
      • Endpoint Protection
      • Antivirus for Android
      • Comodo Antivirus
      • Wordpress Security
      Cheap CDN
      • Bootstrap CDN
      • Semantic UI CDN
      • Jquery CDN
      • CDN Plans
      • CDN
      • Free CDN
      Enterprise
      • Patch Management Software
      • Patch Manager
      • Service Desk
      • Website Down
      • Endpoint Protection Solutions
      • Website Security Check
      • Remote Monitoring and Management
      • Website Security
      • Device Manager
      • ITSM
      • CRM
      • MSP
      • Android Device Manager
      • MDR Services
      • Managed IT Support Services
      • Free EDR
      Free SSL Certificate
      Support Partners Terms and Conditions Privacy Policy

      © Comodo Group, Inc. 2025. All rights reserved.