


IPSec Configuration
- Click 'VPN' on the left then 'IPSec'
The IPSec area lets you configure tunnels between different networks and sites for managed organizations.
- Dome Firewall supports two types of VPN protocols:
- 'Net-to-Net' VPN connections (aka 'Site-to-Site VPN') - Connect network to network via IPSec VPN.
- L2TP Host to Net VPN – Connect external devices with L2TP clients to internal networks through an IPsec VPN.
- Note – Existing IPsec connections are not imported when you add a device. We recommend you remove them from the device before importing, then configure them again in central manager.
- Once configured, the IPSec connection type is available as a firewall object. This can be used in the source and destination address fields of a FW rule.
Configure IPSec settings and add tunnels
- Select a firewall device or organization from the gray bar above the table
- Click 'VPN' on the left then select 'IPSec'
Use this interface to create,
configure and monitor IPsec connections, and to configure
authentication preferences. You can implement authentication between
IPsec connected devices by pre-shared key.
The interface contains two areas:
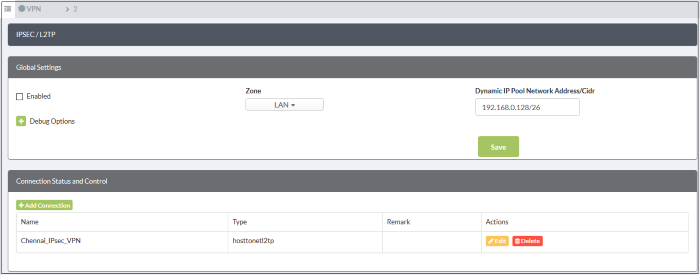
The 'Global Settings' area allows you to:
- Enable or disable the IPsec VPN service
- Configure which internal network zones can be accessed over IPsec
- Specify the dynamic IP address pool that should be used when assigning addresses to external clients.
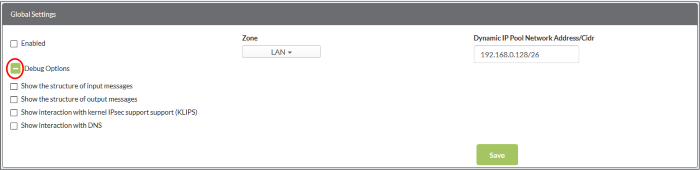
The 'Debug Options' area allows you to choose how much information is included in IPsec events in debugging logs.
- Enabled – Activate or deactivate the IPsec VPN service
- Zone - Choose the internal network to which external clients/networks will connect over the VPN.
- Dynamic IP pool network address/cidr – The range of addresses from which IPs are drawn and dynamically assigned to external clients.
- Debug options - The level of detail that should be logged about an IPsec event such as a connection failure. The log file is stored at /var/log/messages on the virtual appliance. Click the '+' button to view further options.
- Click 'Save' for your settings to take effect.
- Select a firewall device or organization from the gray bar above the table
- Click 'VPN' on the left then select 'IPSec'
- The 'Connection Status and Control' area of the page lets you view, edit and add IPsec tunnels.

- Name - Label to identify the connection.
- Type - The type of tunnel - site-to-site or host-to-net.
- Remark - A short description of the tunnel.
- Actions – Edit or delete a VPN connection. Editing a connection is similar to adding a new connection explained below.
Add a New Tunnel Configuration
- Select a firewall device or organization from the gray bar above the table
- Click 'VPN' on the left then select 'IPSec'
- Click 'Add Connection' in the 'Connection Status and Control' area
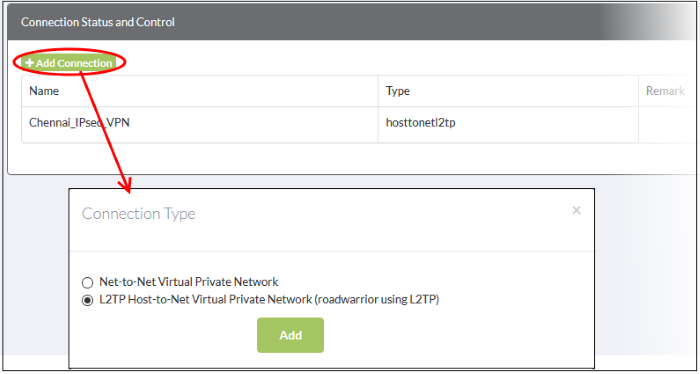
- Choose the connection type and click 'Add'
- You next have to configure the connection
- The interface is the same for both types of connection, except that 'Net to Net' connections have an additional parameter - 'Remote subnet'.
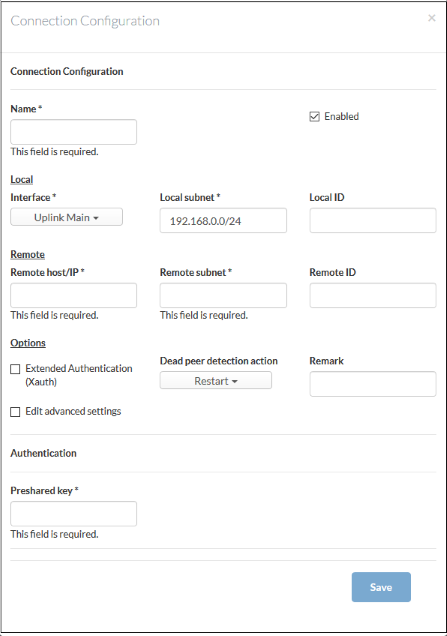
Connection Configuration
- Name - Create a label to identify the tunnel
- Enabled - The tunnel will be activated after you click 'Save'. Do not select this if you just want to configure the connection and enable it later.
Local
- Interface - The uplink interface on the DFW virtual appliance through which the external client should connect to the local network.
- Local Subnet - This field is auto-populated with the local sub-net of the LAN.If you want to specify a different subnet, enter the address in CIDR format.
- Local ID - Enter an identification string for the local network.
Remote
- Remote host/IP - Enter the IP address or hostname of the external host or network
- Remote subnet - The option is available only if you are creating 'Net to Net' connection type. Specify the sub network of the external network that can connect through the tunnel
- Remote ID - Enter an identification string for the local network.
Options
- Extended Authentication (Xauth) - Select if you want to enable additional, certificate based authentication for the remote client. You must install the client certificate on to the external client if you select this option.
- Dead peer detection action -Choose the action the firewall should take if the peer disconnects. The options available are:
- Clear - Disconnect
- Hold - Wait for the peer to reconnect
- Restart - Reboot the peer
- Remark - Enter a short description of the connection
- Edit advanced settings - Advanced parameters can be edited only after saving the tunnel configuration. Seeediting advanced parameters of IPsec tunnel configuration for more details.
Authentication
- Use a pre-shared key - Select this option if you wish to apply PSK type authentication for the remote client. Enter the password to be used for authentication by the remote client.
- Click 'Save' for your configuration to take effect.
The connection will be added to the Connection status and control area.