Configure your Preferences
'My Preferences' helps you to
configure and update your personal information.
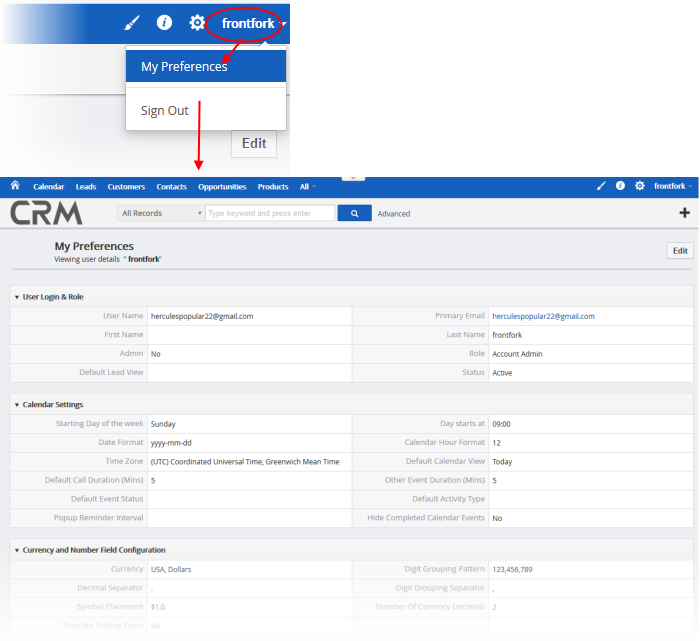
- Click the arrow under the user login name to access 'My Preferences'
- Select 'My Preferences'.
The user's details menu appears:

- Click 'Edit' button at top-right to configure your preferences.
The 'My preferences' interface
contains eight areas:
From this you can modify Primary Email, Name, and Default Lead View. Also, this section will help administrators to assign roles to individual users and view status.

- User Name - Specify the user name
- First Name - Specify the first name of the user
- Last Name - Specify last name of the user
- Primary Email - Specify primary email of the user
- Role - Assign roles to individual users. Only displayed for admin users
- Default Lead View – Specify the lead view: today, last 2 days or last week
You can configure your calendar according to your preferences. You can set up Reminder Interval, Default calendar View, Time Zone and many more.

- Starting Day of the week - Set-up your start day of week. For Instance, If your working day starts on Monday, you can select Monday
- Date Format - Select desired date format
- Day Starts at - Customize your working hour on calendar view
- Time Zone - Select desired time zone
- Calendar Hour Format - Select either 12 hour or 24 hour time format
- Default Call Duration - Automatically update End Date and Time for calls.
- Other Event Duration - Automatically update End Date and Time for all events other than calls.
- Default Calendar View - Comodo supports different views in Calendar module. Select preferred view from the drop-down to make it default view
- Default Event Status – Setup your default event status: Planned, Held, Not Held
- Default Activity Type - Setup your default activity types: Call, Meetings, Mobile Call
- Popup Reminder Interval - Setup time interval for event reminder pop-up to appear again after it is closed
- Hide Completed Calendar Events – If checkboxed, the completed calendar event will not be shown in the calendar
Currency and Number Field Configuration
Allows to configure currency format, digit and decimal separator, symbol placement etc. You can configure currency as per the requirement. It is useful for managing modules like Invoices, Quotes, Sales and Purchase Orders.

- Currency - Select desired currency for the drop-down. However, the values will be saved according to base current rates. Default = USA, Dollars. See CRM settings to add more currency.
- Digit Grouping Pattern - Select digit group separator that is often used when displaying large numbers, to make them easier to read.
- Decimal Separator - Select a decimal point from drop-down to use between the integer and the fractional parts of a decimal.
- Symbol Placement - Select a value from drop-down to have currency symbol before or behind the currency value.
- Digit Grouping Separator - Select a decimal point from drop-down ito display large numbers, to make them easier to read.
- Number of Currency Decimals -Select the number of decimals you would like to have after a currency value.
- Truncate Trailing Zeros – If checkboxed, values will be truncated in all decimal fields, currency fields and percentage fields. Note: The currency field will have two decimal places by default and Truncate trailing zeros will not affect that default value.
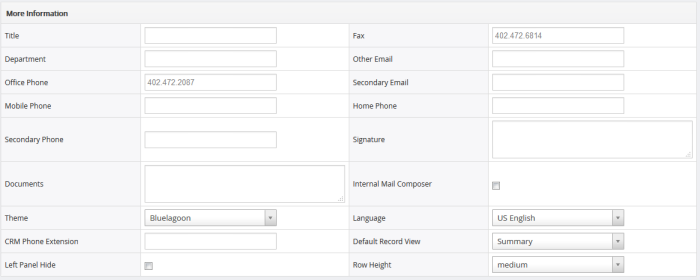
Allows you to manage your personal information like number, email, signature etc.

- Title - Specify designation of the user
- Fax - Specify fax number of the user
- Department - Specify the department of the user
- Other Email - Specify the other email of the user
- Office Phone - Specify office phone number of the user
- Secondary Email - Specify secondary email id of the user
- Mobile Phone - Specify mobile phone number of the user
- Home Phone - Specify the home phone number of the user
- Reports to - Select the user(Subordinate) to whom the user reports to
- Secondary Phone - Specify the secondary phone number of the user
- Signature - Specify the signature in the text area. Your signature will be automatically embedded along with email body.
- Documents - Attach related documents of users
- Internal Mail Composer – If checkboxed, enables you to view CRM's built-in email composing window when you click on email id of records in Customer Relationship Management (CRM)
- Theme - Select desired theme from drop-down
- Language - Select desired language from the drop-down
- CRM Phone Extension – Specify a CRM phone extension of the user
- Left Panel Hide – If checkboxed, it hides the Left Panel Menu
- Default Record View - Choose between viewing Summary view or Detail view when you click to view a record.
- Row Height – Specify the row height between wide, medium, narrow
Allows you to update your address details like city, state, country, etc.

- Street Address - Specify a street address of the user
- Country - Specify the user's country name
- City - Specify a name of the city where the user lives
- Postal Code - Specify a postal code of the user's address
- State - Specify a name of the state where the user lives
Allows you to upload a user's photograph.
- Click 'Browse' to navigate a user's photograph

- Click
the 'Delete' button to remove form preferences.
Displays
the access key for a user to starts a client session with server.
Helps
you categorize and search records to easy find.
- Click 'Save'.


