Comodo Help
Find the desired product help
Xcitium Platform

Xcitium Platform

Service Desk - Admin Guide

English

Print Help Download Help
Service Desk Admin Panel > Manage Staff > Staff Members
  • Introduction To Service Desk Module
    • Quick Start
    • Login To The Service Desk Module
  • Service Desk Admin Panel
    • Admin Panel Dashboard
      • View The Dashboard And Export Reports
      • View Alerts & Notifications
    • Service Desk Configuration
      • Company Profile And Support Portal Settings
      • Service Desk System Settings
      • Ticket Settings And Options
      • User Registration Settings
      • Email Settings And Options
      • Access Control Settings
      • Knowledge Base Settings And Options
      • Autoresponder Settings
      • Configure Alerts And Notices
      • Configure Two Factor Authentication
    • Manage Service Desk Components
      • Ticket Categories
      • Ticket Filters
      • Service Level Agreements (SLA)
      • API Keys
      • Client Portal Pages
        • Configure Your Support Center Page
      • Forms
      • Custom Lists
      • View And Manage Asset Types
      • Manage Materials And Expense Items
      • Manage Charging Plans
    • Email Management
      • Setup Your Support Email Addresses
      • Block User Email Addresses
      • Email Templates
      • Test Outgoing Email Settings
    • Manage Time Sheets
    • Manage Staff
      • Staff Members
      • Staff Roles
      • Departments
      • Time Sheet Templates
      • Material Approval
    • Manage Announcements
    • Generate Reports
      • Time Log Reports
      • Ticket Report
      • Asset Reports
      • Service Types Reports
      • Department Ticket Reports
      • Agent Reports
      • Users Reports
      • Resource Appointment Reports
      • Scheduled Reports
    • Finance
      • Generate Cost Reports
      • Manage Contracts
  • Service Desk Staff Panel
    • Staff Panel Dashboard
      • View The Dashboard And Export Reports
      • View Staff Members
      • My Profile
    • Manage Users And Customers
      • Manage Users
      • Manage Customers
    • Manage Tickets
      • Ticket Details
    • Manage Knowledgebase
      • FAQs
      • Manage FAQ Categories
      • Canned Responses
    • Manage Projects
    • Manage Staff Time Sheets
    • Manage Calendars
  • Appendix 1 - Field Types In Custom Forms And Custom Lists
  • Appendix 2 - Ticket Priorities
  • Appendix 3 - How Charging Works In Service Desk
  • About Comodo Security Solutions

Staff Members


    Click 'Admin Panel' > 'Staff' > 'Staff Members'
    • The staff members area lets you view and manage staff (a.k.a. 'Agents'), update their details, assign them to departments, change their roles/permissions, and more.

    Notes:

    • You can only add new staff members through the Comodo Dragon interface.
    • Open Comodo Dragon > Click ‘Management’ > ‘Staff’.
    • See this page in the Comodo Dragon guide for help to create staff.
    • New staff are assigned to the 'System Default' department. Click 'Admin Panel' > 'Settings' > 'System' to view or change the default department. See Service Desk System Settings if you need more help.
    • You can create new departments and assign staff to them as required.
    • Service Desk imports staff with the same role they have in Dragon. The role determines their permissions with the Service Desk interface. You can also create custom roles for staff.

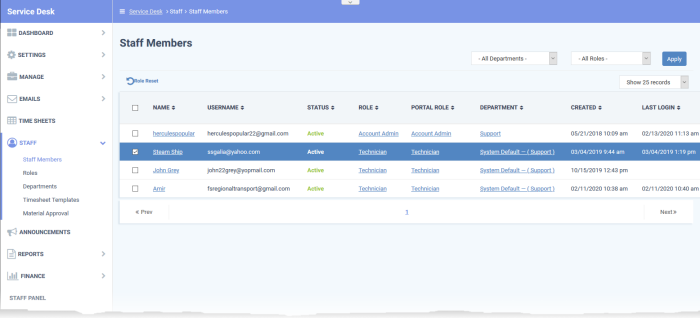
    Manage staff members

    • Open the 'Admin panel' (see the last link on the left)
    • Click 'Staff' > 'Staff Members'


      • Name: The full name of the staff member.

      Click the name to open the 'Update Staff' screen. The screen lets you view and edit staff details and change their role and department. See Update details, role and department of a staff for more information.

      • User Name: The name the staff member uses to login to Service Desk.
      • Status: Active - Can login and access Service Desk. Locked – Cannot login to Service Desk.
      • Role: The role determines the Service Desk permissions of the staff member. You can change a staff member’s role in the 'Update Staff' dialog.
      • See Update staff for more.
      • See Staff Roles to read more about roles.
      • Portal Role: The role assigned to the staff member in the Сomodo Dragon Portal. There are three default roles in CD that are not editable - ‘Account Admin’, ‘Admin’, and ‘Technician’.

      You can create a custom role by cloning a default role then editing its permissions. If a staff member has a custom role then the portal role column shows the default role from which it was created.

        • See https://help.comodo.com/topic-457-1-981-14337-Manage-Roles.html to read more about portal roles.
          • Department: The Service Desk department to which the staff member belongs. Click the staff member’s name to change the department. See Update details, role and department of a staff if you need more help.

          • Created: The date at which the staff member was added to Comodo Dragon.

          • Last Login: The date and time the staff member most recently logged into Service Desk.

          See the following for more help:

          • Update staff details, role and department
          • Reset the role assigned to staff

          Update staff details, role and department


          You can view and edit the staff member's phone number, department and role. You can also edit the signature appended to outgoing mails from the staff member.

          • Open the admin panel (see the last link on the left)
          • Click 'Staff' > 'Staff Members'
          • Click the name of the staff member.


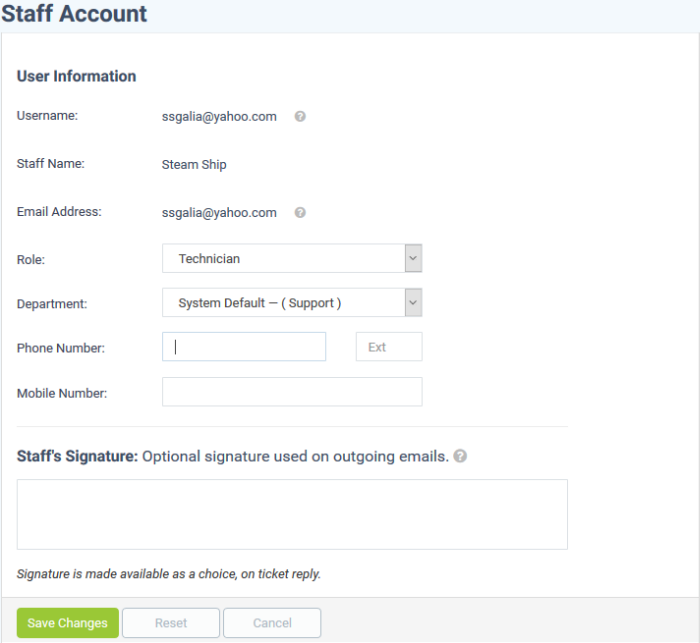
          User Name - The name the staff member uses to log into  Comodo Dragon and Service Desk.


          Staff Name - The full name of the staff member.


          Email Address - The email address of the staff member.

          Note: You cannot edit the username or email address from here. Account admins can edit the staff name in the Comodo Dragon interface at ‘Management’ > ‘Staff’.

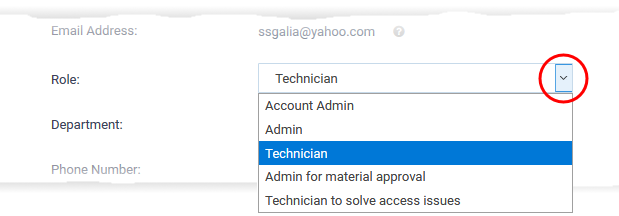
          Role - The role determines the staff member’s privileges in Service Desk. There are two ways you can approach roles:

          1) Use the Сomodo Dragon roles - Login to CD > click ‘Management’ > ‘Roles’.

          All roles created in CD are automatically mirrored in Service Desk. You can clone a default CD role and modify it’s permissions to create a custom role. CD roles are also cascaded to other modules such as Endpoint Manager and CRM.

          2) Create roles in Service Desk - Open Service Desk > click ‘Admin Panel’ > ‘Staff’ > ‘Roles’

          Roles you create in Service Desk are exclusive to the application. They are not mirrored in other CD modules like Endpoint Manager or CRM.

          Staff imported from Comodo Dragon inherit the role they have in the portal. You can change this role in the Service Desk interface at any time.

          • See Staff Roles if you want to read more about adding and managing roles.

          Select a role for the staff member from the drop-down:


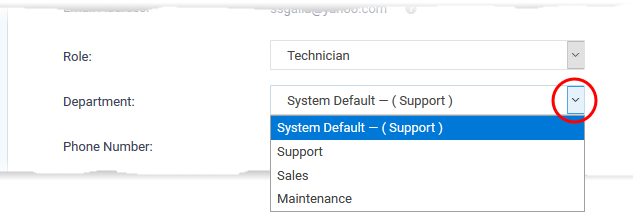
          Department - The internal department to which the staff member belongs. New staff are auto-assigned to the Service Desk ‘Default’ department. You can view and change the default department at ‘Admin Panel’ > Settings’ > ‘System’. See Service Desk System Settings for more guidance on setting default department.


          Service Desk ships with three basic departments:

          • Support
          • Sales
          • Maintenance

          Click 'Admin Panel' > 'Staff' > 'Departments' to create new departments. See Departments for more guidance on managing departments.


          Select a department you want to assign to the staff member from the drop-down:


          Phone Number: Enter the contact number and extension for the staff member.


          Mobile Number: Enter the cell phone number of the staff member.


          Staff Signature: This text is appended to all outgoing mails from staff to customers. It can include, for example, company contact details, disclaimers or ‘About us’ information.


          Click 'Save Changes' to update the staff member’s details.


          Reset the role assigned to a staff


          Resetting a staff member’s role reverts it to their original Сomodo Dragon role.

          • Open the admin panel (see the last link on the left)
          • Click 'Staff' > 'Staff Members'
          • Select the target staff
          • Click 'Role Reset' at the top left


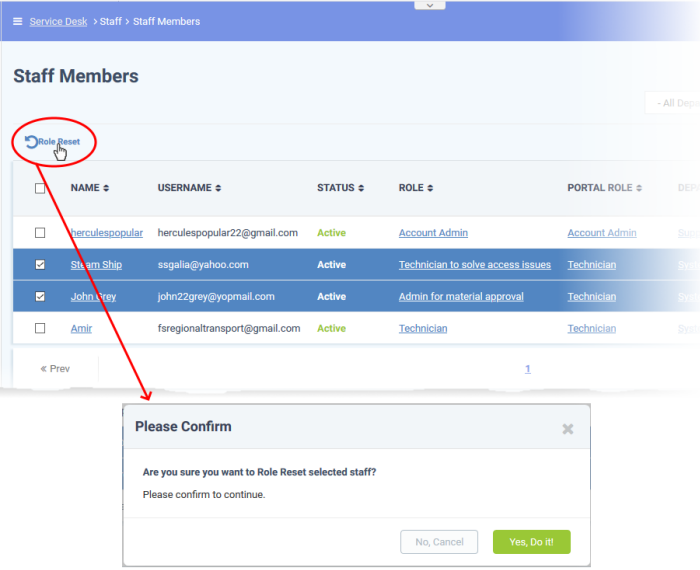
          • Click 'Yes, Do it!' in the confirmation dialog.
          Our Products
          • Free Antivirus
          • Free Internet Security
          • Website Malware Removal
          • Free Anti-Malware
          • Anti-Spam (Free Trial)
          • Windows Antivirus
          • Antivirus for Windows 7
          • Antivirus for Windows 8
          • Antivirus for Windows 10
          • Antivirus for MAC
          • Antivirus for Linux
          • Free Endpoint Security
          • Free ModSecurity
          • Free RMM
          • Free Website Malware Scanner
          • Free Device Manager for Android
          • Free Demo
          • Network Security
          • Endpoint Protection
          • Antivirus for Android
          • Comodo Antivirus
          • Wordpress Security
          Cheap CDN
          • Bootstrap CDN
          • Semantic UI CDN
          • Jquery CDN
          • CDN Plans
          • CDN
          • Free CDN
          Enterprise
          • Patch Management Software
          • Patch Manager
          • Service Desk
          • Website Down
          • Endpoint Protection Solutions
          • Website Security Check
          • Remote Monitoring and Management
          • Website Security
          • Device Manager
          • ITSM
          • CRM
          • MSP
          • Android Device Manager
          • MDR Services
          • Managed IT Support Services
          • Free EDR
          Free SSL Certificate
          Support Partners Terms and Conditions Privacy Policy

          © Comodo Group, Inc. 2025. All rights reserved.